What Are the 3 Primary Ways to Migrate Client Data to QuickBooks Online?
Optimizing financial data management is crucial for efficient client servicing, and QuickBooks Online is a robust cloud-based accounting software that offers remarkable benefits. Whether using QuickBooks Desktop or another software solution, migrating your client’s data to QuickBooks Online can unlock the advantages of online accounting. But the question remains: how can this migration be accomplished? This comprehensive guide will explore three primary methods to migrate client data to QuickBooks Online: manual data entry, utilizing IIF files, or leveraging a conversion service or external application like SaasAnt Transactions. Each method will be examined for its advantages and disadvantages, empowering you to select the optimal approach tailored to your client’s needs and preferences.
3 Primary Methods for Migrating Client Data to QuickBooks Online
Migrating client data to QuickBooks Online involves various methods, each with advantages and considerations. Let’s delve into the three primary approaches designed to facilitate this transition efficiently and effectively.
1. Manual Data Entry in QuickBooks Online
Manual data entry is a foundational yet meticulous approach for transferring client data to QuickBooks Online. This method involves systematically inputting each piece of data directly into the software, ensuring precision and accuracy.
Steps Involved in Manual Data Entry
Account Creation
The initial step entails the creation of a dedicated QuickBooks Online account tailored to meet the client’s unique requirements. It involves setting up the necessary account details, configurations, and security preferences specific to the business.
Profile Configuration
A detailed input of the company’s profile, preferences, and essential information is crucial. It includes the company’s name, address, tax information, industry specifics, and other pertinent details required for accurate record-keeping.
Data Entry
Manually inputting various components is vital for an accurate transition. This phase involves adding customers, vendors, products, services, and the complete range of financial transactions into the QuickBooks Online system. Each entry necessitates precise details for comprehensive financial tracking and reporting.
Data Verification
The final phase involves a comprehensive check and reconciliation of all entered data. Rigorous scrutiny is applied to ensure the accuracy and completeness of the migrated information. This verification process is crucial to guarantee that all the information transferred aligns accurately with the original data set.
The time-consuming nature of manually transferring extensive data could be a potential drawback, requiring significant resources and effort. Other potential issues include manual data entry errors that could affect the accuracy of the migrated books.
Employing manual data entry is beneficial if the transaction volume is less for data migration to QuickBooks Online. However, it is essential to consider the scale and volume of data to migrate, as this method may be time-intensive for businesses dealing with significant amounts of information.
2. Leveraging IIF Files for Efficient Data Migration
Utilizing IIF (Intuit Interchange Format) files is a valuable means to facilitate data transfer between various software applications. This method acts as a bridge, enabling the seamless movement of information from the source software to QuickBooks Online.
Steps for IIF File Usage
Data Export to IIF Format
The process begins with extracting client data from the source software into the IIF file format. This format ensures a compatible structure that QuickBooks Online can recognize and process.
Open the source software that contains the client data you want to export. The source software can be QuickBooks Desktop or any other software that supports IIF files.
Navigate to ‘File,’ then select ‘Export.’
Select ‘Lists to IIF File,’ then select the list you want to export.
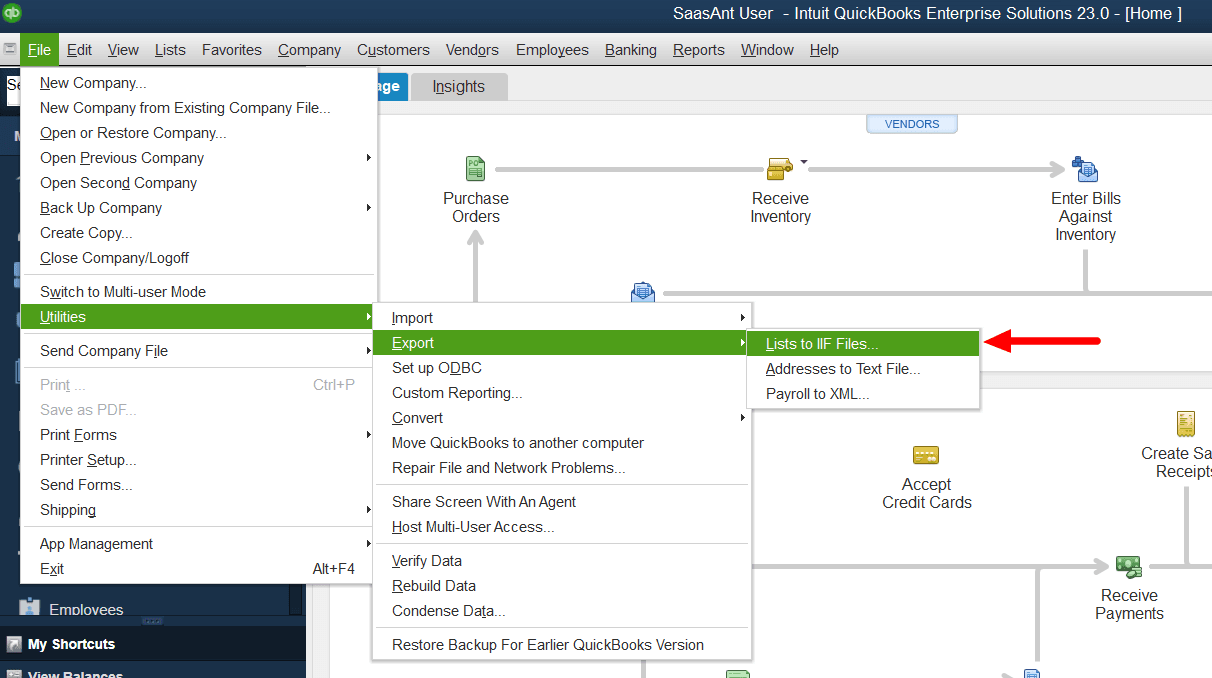

The list includes customers, vendors, products, services, accounts, etc.
Select ‘OK,’ then enter a name for your IIF file.
Select a location to save your IIF file in the’ Where’ dropdown, then click ‘Save.’
You have now exported your client data to an IIF file.
Data Import into QuickBooks Online
After preparing the IIF file, the subsequent step involves uploading this file into QuickBooks Online. Mapping the data fields within the QuickBooks interface is crucial to ensure the imported data aligns accurately with the desired fields and categories within the software.
Navigate to the ‘Gear’ icon > ‘Tools’ > ‘Import Data.’
Select the ‘Transactions’ option from the data types you can import.
Choose the IIF file option from the file formats you can upload.
Browse your computer and select the IIF file you want to import.
Click on the Upload button and wait for the file to be processed.
Review the data fields and match them with the corresponding fields in QuickBooks Online.
You can use the dropdown menus to select the proper fields or create new ones if required.
Click the ‘Next’ button and review the data summary to import.
You can also edit or delete any transactions if you want.
Click on the ‘Import’ button and wait for the data to import.
Check the status of the import and view the results.
You can also download a report of the import details.
Data Verification
A critical phase involves a thorough examination of the imported data. This verification process is essential to ensure the accuracy and completeness of the transferred data. Rigorous scrutiny should be applied to validate that the data has been correctly transposed and is consistent with the original dataset.
Leveraging IIF files for data migration presents a more organized and systematic means to transfer data into QuickBooks Online. However, the method might need to be improved in handling intricate data structures and require specific technical skills for successful execution.
IIF files may not support some features and data types available in QuickBooks Online, such as attachments, custom fields, classes, locations, etc.
IIF files may not be compatible with some versions or editions of QuickBooks Online, such as QuickBooks Online Advanced or QuickBooks Online Accountant. It means some features or data may not be available or supported in the target system.
IIF files may be unable to handle large amounts of data or complex data structures, such as multi-currency, inventory, or payroll.
IIF files may be unable to migrate historical data or transactions older than a specific period. This means some data may not be accessible or reportable in the target system.
3. Utilizing Bulk Data Applications Like SaasAnt Transactions
Applications like SaasAnt Transactions offer an alternative that streamlines the migration process. SaasAnt Transactions provides a user-friendly and efficient method specifically designed for QuickBooks Online.
Benefits of Using SaasAnt Transactions
Effortless Data Migration: Enables seamless and efficient data transfer from various accounting software to QuickBooks Online.
Enhanced Efficiency: Reduces manual efforts, minimizing errors during the migration process.
Data Accuracy and Completeness: Ensures the integrity and completeness of data, avoiding discrepancies.
Support for Complex Data: Handles intricate data structures that other methods may not support.
User-Friendly Interface: Offers a straightforward and intuitive interface, making the migration process smooth and accessible.
SaasAnt Transactions provides a robust solution that simplifies migrating client data, offering comprehensive support and ease throughout the process.
Steps for Importing Client Data Using SaasAnt Transactions
Step 1: Prepare Your Data in an Excel File
Before migrating your data, you’ll need to export it from QuickBooks Desktop to an Excel file. You can do this easily with SaasAnt Transactions:
Start by downloading and installing ‘SaasAnt Transactions.’
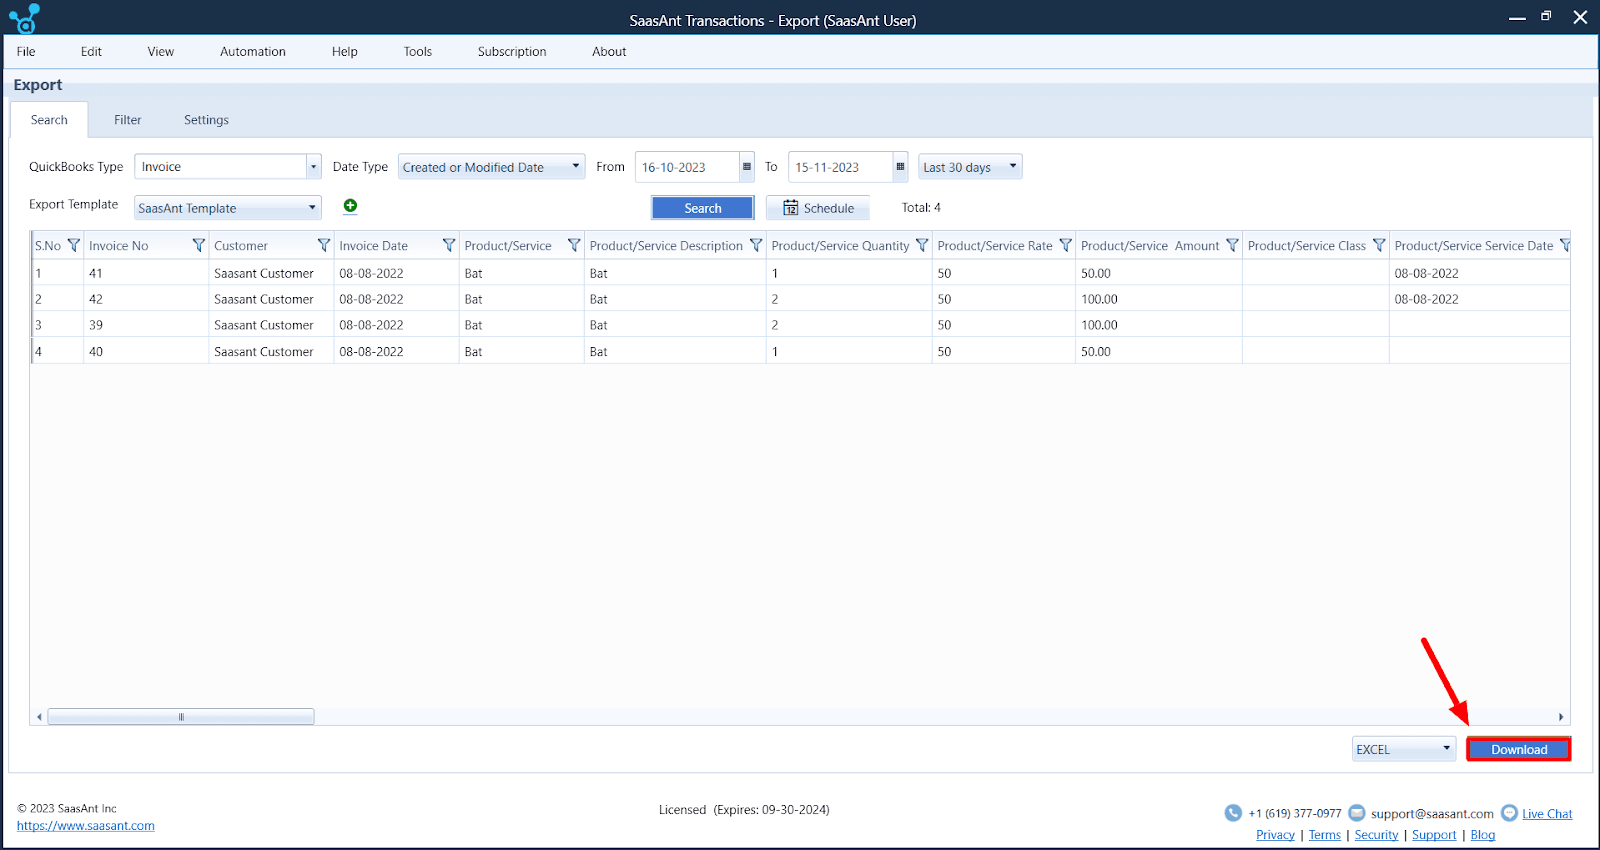
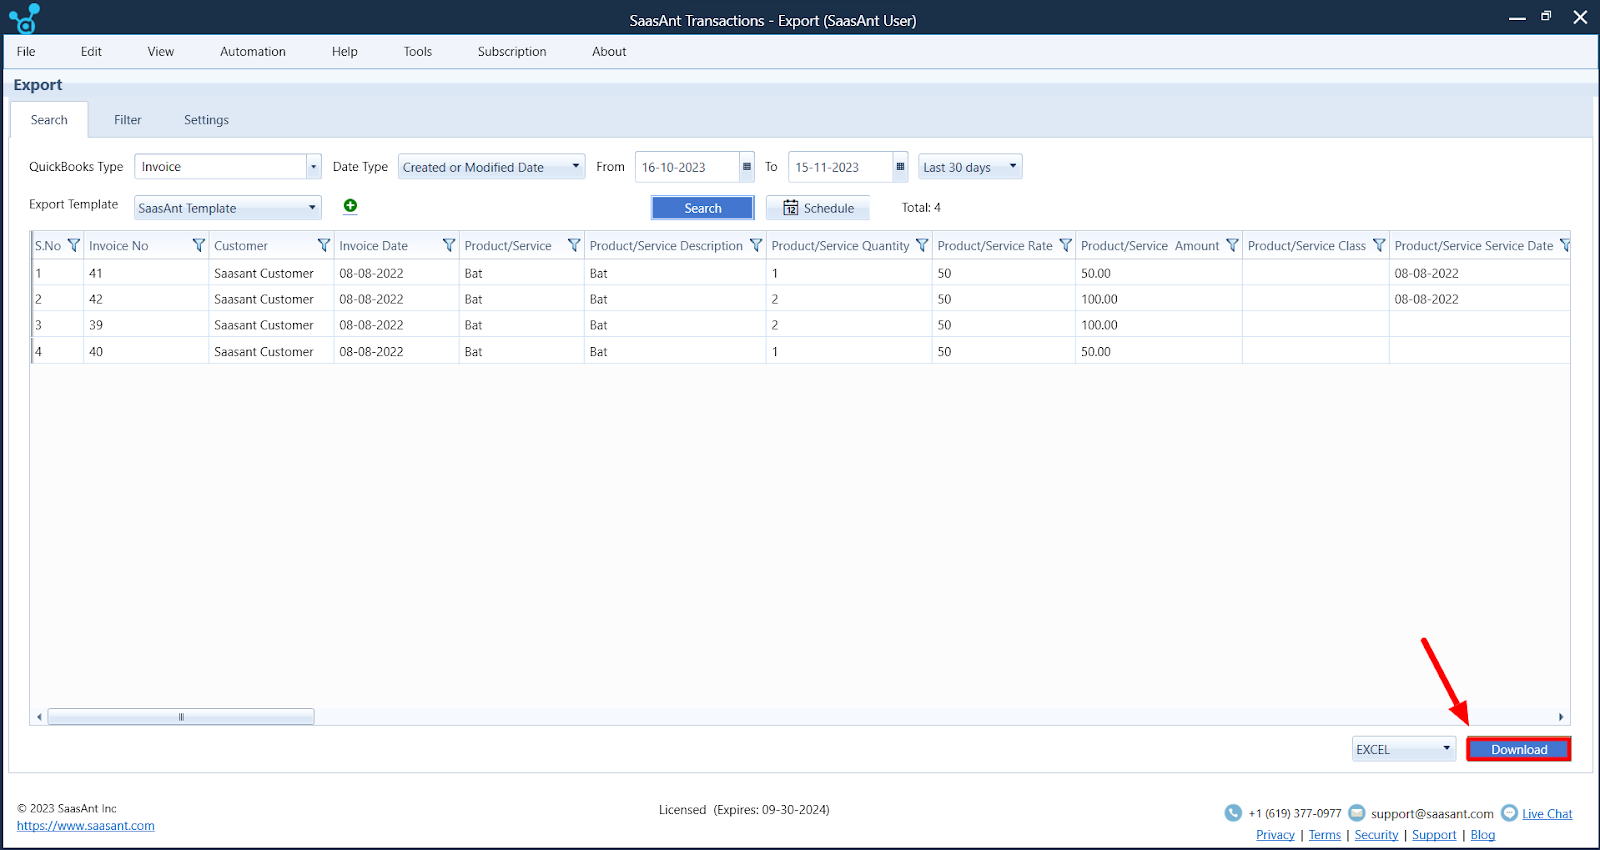
Launch the SaasAnt Transactions application and click on ‘File,’ then select ‘Connect to QuickBooks.’
Choose the ‘Export’ option to initiate the export process.
Specify the QuickBooks type, export template (QuickBooks or SaasAnt), date range, and format (Excel or CSV) for the transactions you want to export.


Once your Excel file is ready, review it to ensure compatibility with QuickBooks Online.
Check data content and prioritize to be transferred.
Step 2: Use SaasAnt Transactions’ Templates and Validate Your Data
Now, use SaasAnt Transactions’ templates to map your data for QuickBooks Online:
Download the appropriate SaasAnt Transactions template for your data type (e.g., Journal Entries, Invoices, Bills, Chart of Accounts).
Copy your validated data into the template, ensuring each piece of information is in the correct column.
Review the template, fill in all fields correctly, and match the SaasAnt Transactions template.
Post review, ensure the accuracy and structure of your Excel data
Look for common errors such as duplicates, incorrect figures, or misplaced transactions.
Verify that your data conforms to QuickBooks Online requirements, including column headers, data types, and date formats.
Step 3: Set Up Your QuickBooks Online Account
In this final step, create or access your QuickBooks Online account and configure it as needed:
If you don’t have a QuickBooks Online account, sign up for one by choosing the subscription level suitable for your business.
Customize your QuickBooks Online settings, including the chart of accounts, tax rates, and user permissions, to align with your business requirements.
Step 4: Import Your Data Using SaasAnt Transactions
Now, it’s time to import your data into QuickBooks Online:
Navigate to the Apps tab in QuickBooks Online and search for ‘SaasAnt Transactions.’
Click ‘Get App Now’ to connect SaasAnt with your QuickBooks Online account.
Click ‘Import’ to start the import process.
Select the import template, transaction type, and file format.
Browse and select your data file, then click ‘Next.’
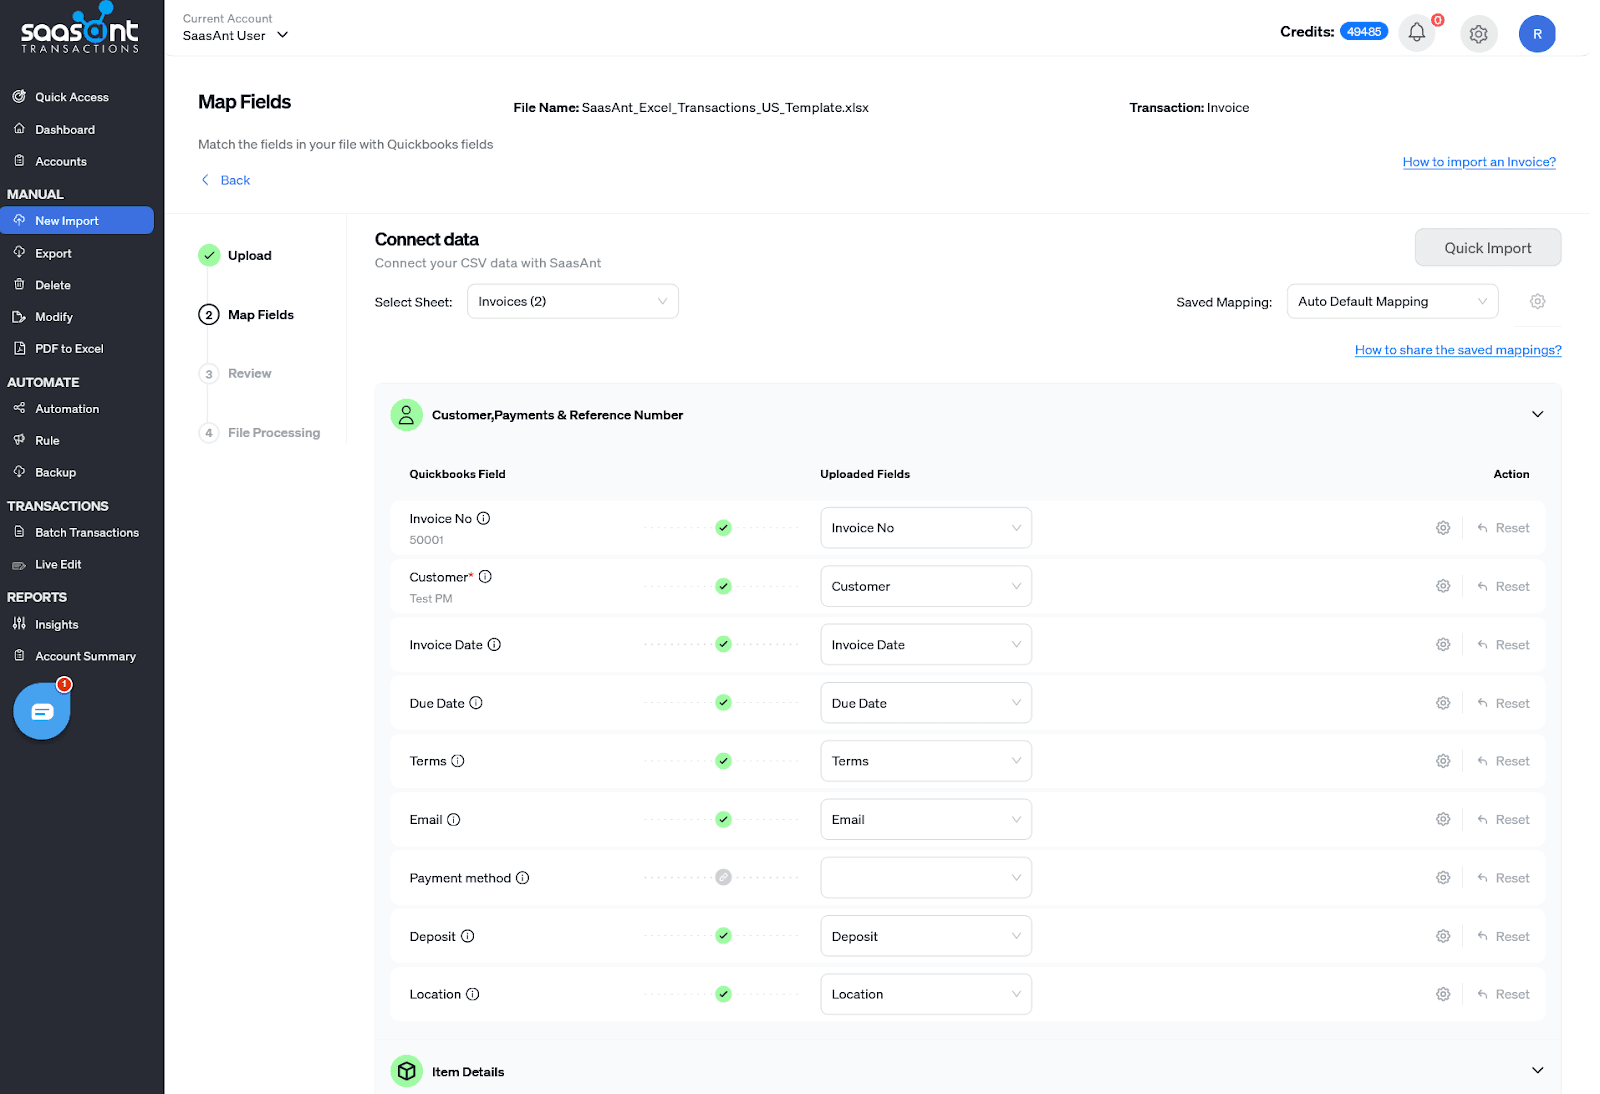
Map the fields in your data file to match the fields in QuickBooks Online, and click ‘Next.’
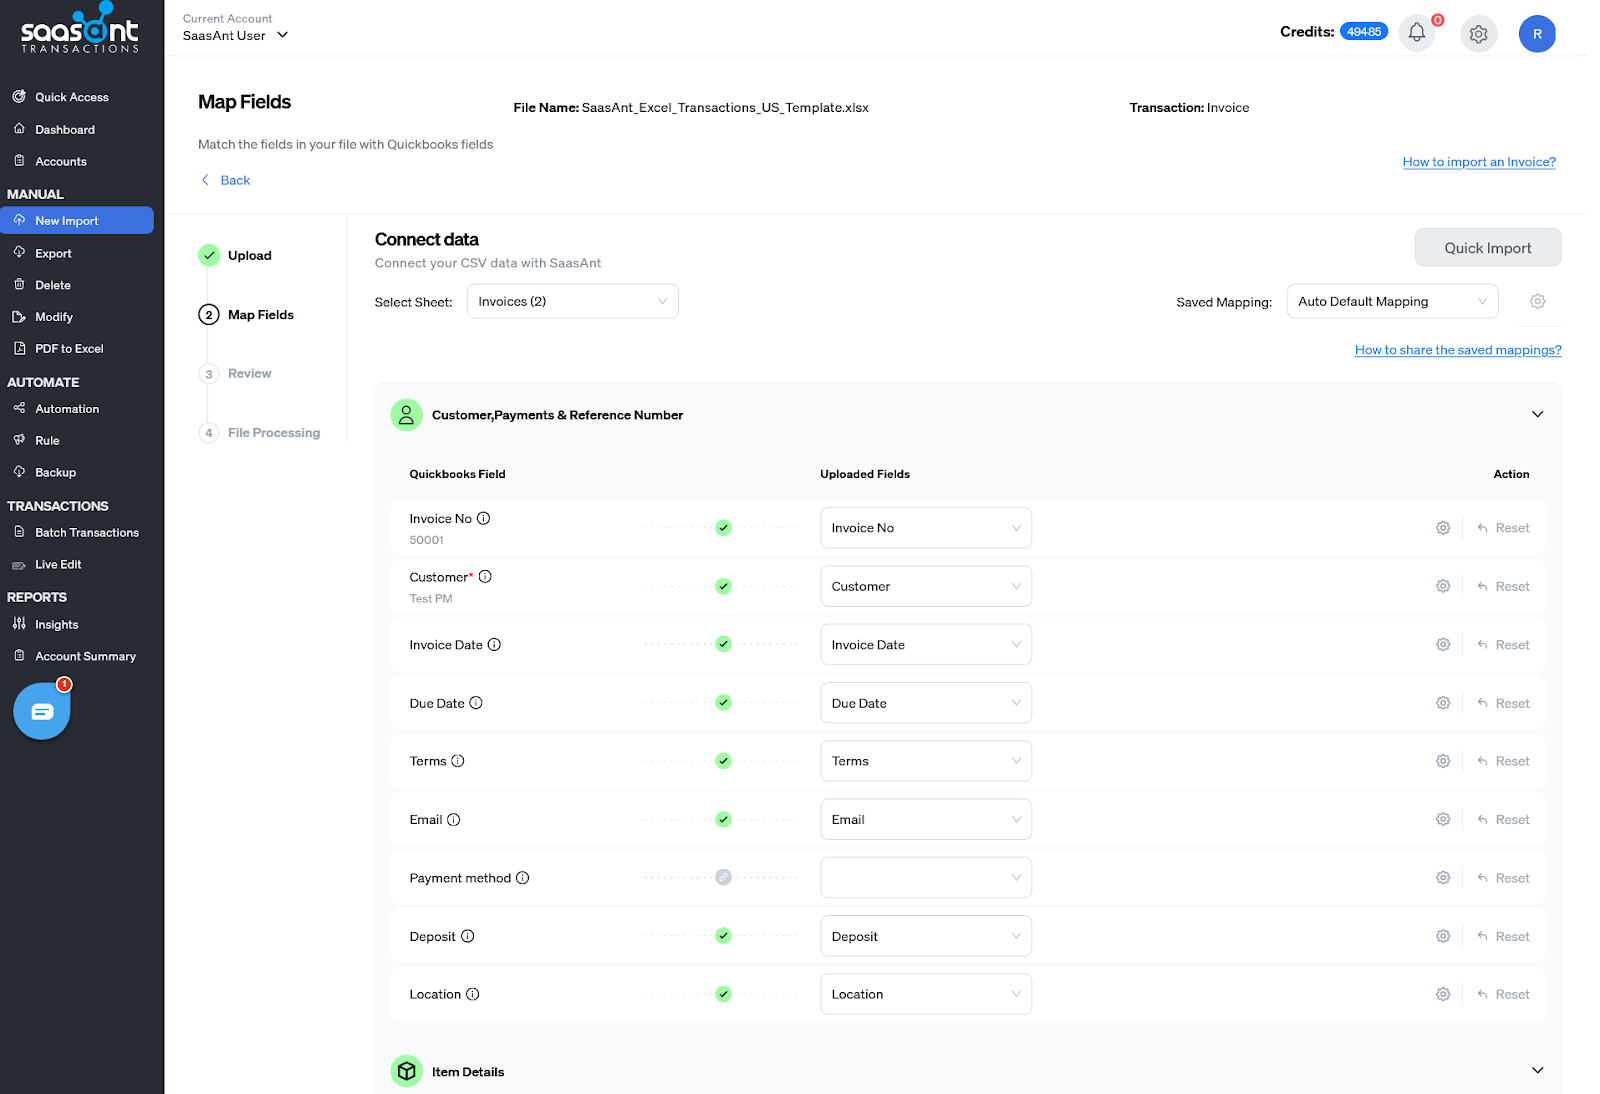
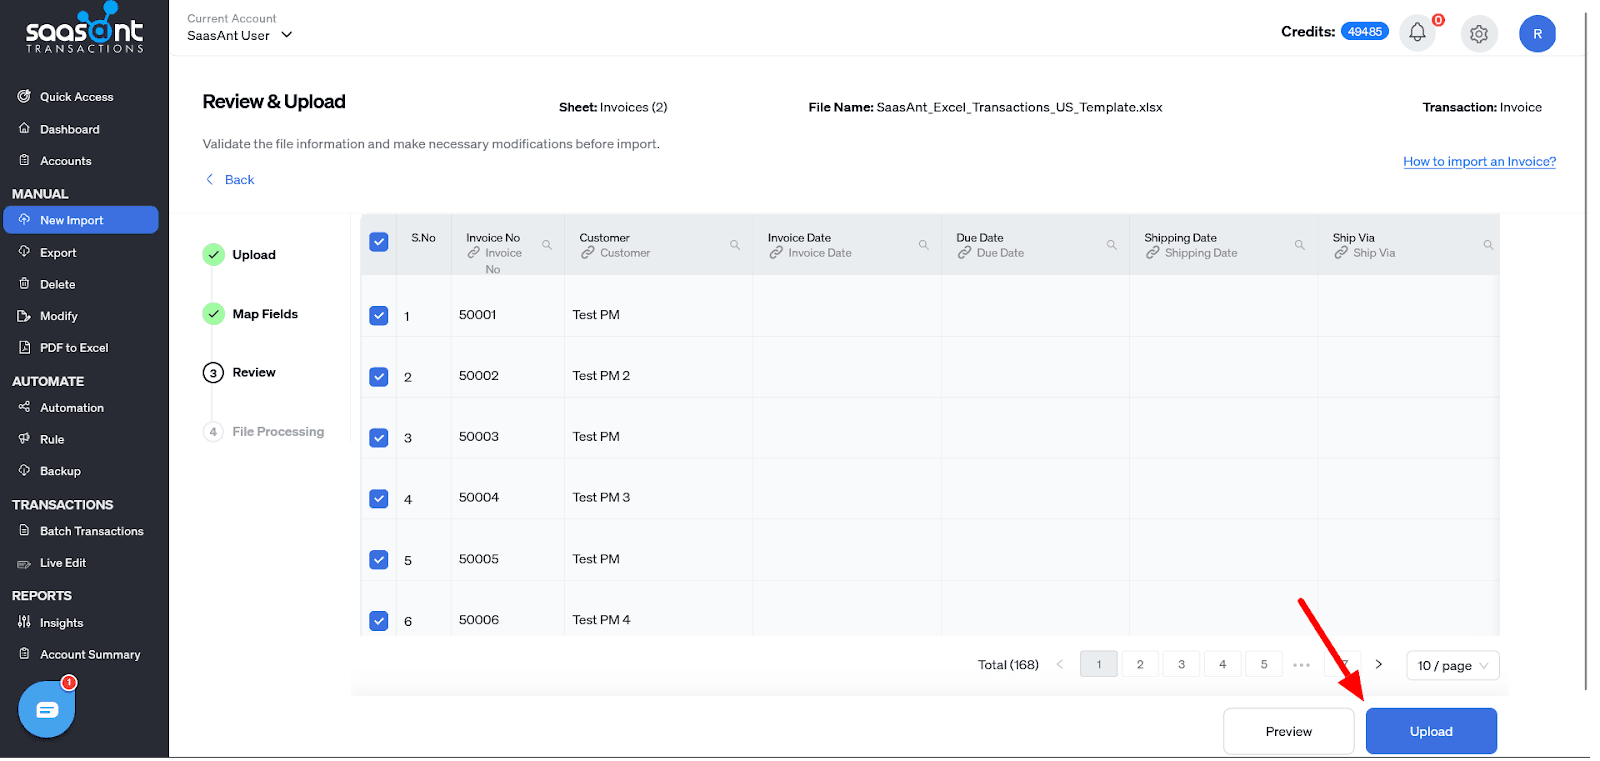
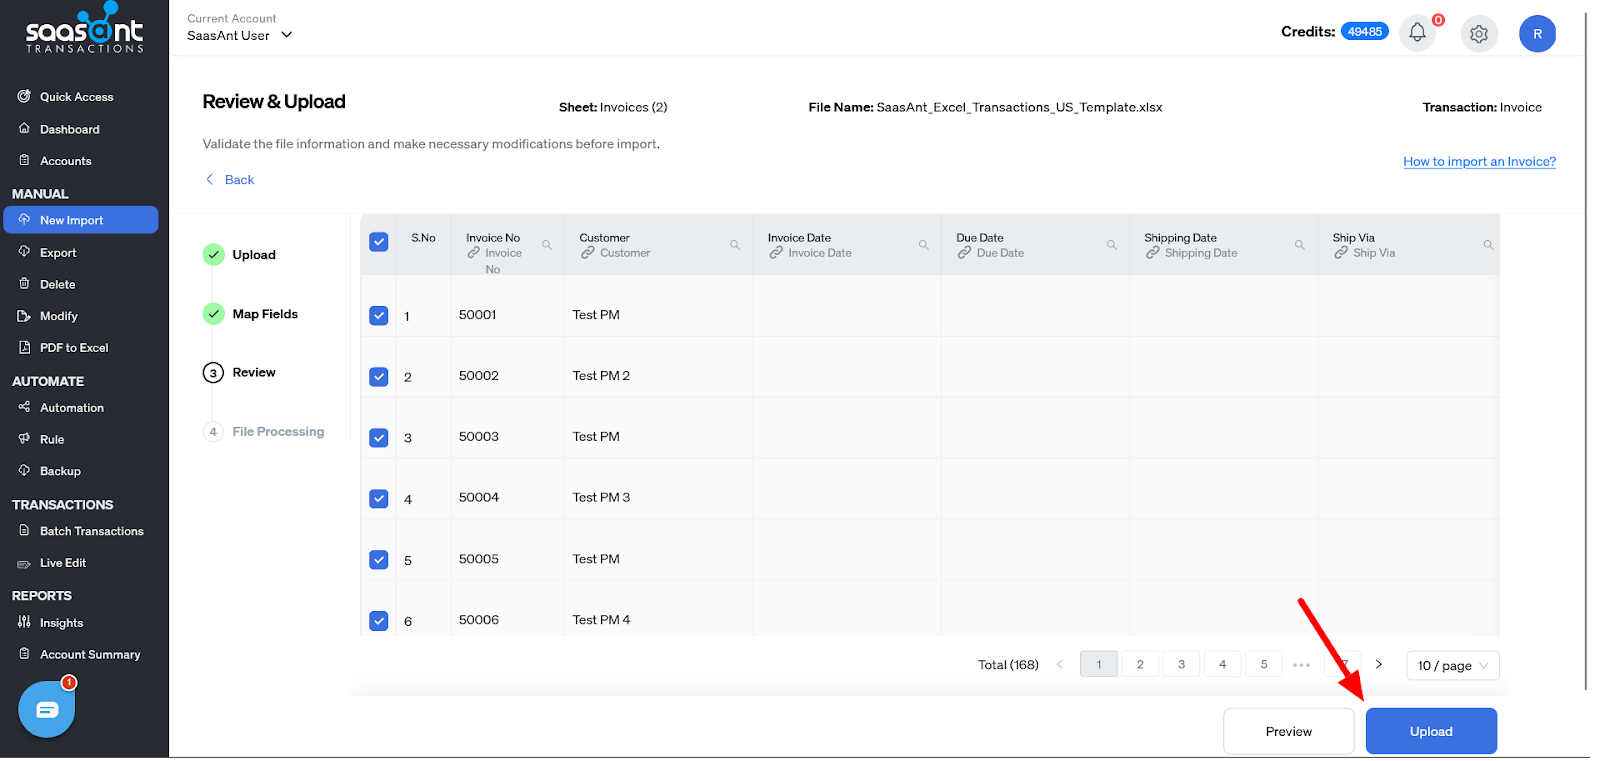
Review the import summary, and when ready, click ‘Upload.’
Step 5: Check Your Import
Verify that your import is successful and there are no errors. If any error occurs, SaasAnt Transactions Online will help you fix it by giving hints on the error and how to fix it.
Wrap Up
In conclusion, migrating client data to QuickBooks Online is crucial to efficient and modernized financial management. This comprehensive guide has explored three primary methods for achieving this migration.
For businesses of all sizes, especially those dealing with extensive data, SaasAnt Transactions presents the most efficient and reliable method. Its ease of use and compatibility with various data types make it the optimal choice for a smooth transition to QuickBooks Online. To optimize the migration process and ensure data accuracy, consider using SaasAnt Transactions as your preferred method for migrating client data to QuickBooks Online. It streamlines the process, reduces errors, and empowers businesses to harness the benefits of cloud-based accounting easily.
FAQs
Q1: What Is an IIF File, and How Can It Migrate Data to QuickBooks Online?
An IIF file contains a list of data in a tab-delimited format. It can migrate data to QuickBooks Online by importing the file into the software and mapping the fields to the corresponding lists or transactions. This method allows for a faster and more accessible data transfer than manual data entry.
Q2: How do you export data from QuickBooks Desktop to IIF Format?
To export data from QuickBooks Desktop or other software to IIF format, you need to follow these steps:
Open the QuickBooks Desktop that contains the data you want to export.
Navigate to ‘File,’ select ‘Utilities,’ then click ‘Export.’
Select ‘Lists to IIF File,’ then select the list you want to export. The list includes customers, vendors, products, services, accounts, etc.
Select ‘OK,’ then enter a name for your IIF file.
Select a location to save your IIF file in the’ Where’ dropdown, then click ‘Save.’
Q3: What Steps Are Involved in Manual Data Entry in QuickBooks Online?
Set up a customized QuickBooks Online account with your business details and preferences.
Enter your company’s profile, information, and settings for accurate record-keeping and reporting.
Add your customers, vendors, products, services, and financial transactions manually into the QuickBooks Online system.
Check and reconcile all the migrated data to ensure its accuracy and completeness.
Q4: What Is Saasant Transactions, and How Can It Help with Data Migration to QuickBooks Online?
SaasAnt Transactions is a user-friendly application that enables you to migrate data from various accounting software to QuickBooks Online. It allows you to import, export, delete, and validate your data quickly and efficiently, ensuring data accuracy and completeness.
Q5: How do you export data from QuickBooks Desktop to Excel using Saasant Transactions?
To export data from QuickBooks Desktop to Excel using SaasAnt Transactions, you need to follow these steps:
Start by downloading and installing ‘SaasAnt Transactions.’
Launch the SaasAnt Transactions application and click on ‘File,’ then select ‘Connect to QuickBooks.’
Choose the ‘Export’ option to initiate the export process.
Specify the QuickBooks type, export template (QuickBooks or SaasAnt), date range, and format (Excel or CSV) for the transactions you want to export.
Once your Excel file is ready, review it to ensure compatibility with QuickBooks Online.
Q6: How Do I Validate and Structure My Data for QuickBooks Online Compatibility?
To validate and structure your data for QuickBooks Online compatibility, you need to follow these steps:
Look for common errors such as duplicates, incorrect figures, or misplaced transactions.
Verify that your data conforms to QuickBooks Online requirements, including column headers, data types, and date formats.
Q7: How to Use Saasant Transaction Templates to Map Your Data for QuickBooks Online?
To use SaasAnt Transaction templates to map your data for QuickBooks Online, you need to follow these steps:
Download the appropriate SaasAnt Transaction template for your data type (e.g., Journal Entries, Invoices, Bills, Chart of Accounts).
Copy your validated data into the template, ensuring each piece of information is in the correct column.
Review the template, fill in all fields correctly, and match the SaasAnt template.
Q8: How do you import data into QuickBooks Online using SaasAnt Transactions?
To import your data into QuickBooks Online using SaasAnt Transactions, you need to follow these steps:
Launch SaasAnt Transactions, click ‘File,’ and select ‘Connect to QuickBooks.’
Choose ‘QuickBooks Online’ as the QuickBooks type and log in to your account.
Click ‘Import’ to start the import process.
Select the import template (QuickBooks or SaasAnt), transaction type, and file format.
Browse and select your data file, then click ‘Next.’
Map the fields in your data file to match the fields in QuickBooks Online, and click ‘Next.’
Review the import summary, and when ready, click ‘Import.’
Q9: Without Intuit’s Technical Support, What Resources or Third-Party Services Are Available to Assist with This Migration?
Suppose you need assistance migrating your data to QuickBooks Online without Intuit’s technical support. In that case, you can use SaasAnt Transactions as a third-party service to help you with the process. SaasAnt Transactions is an application that can help you batch import, export, and delete transactions and lists in QuickBooks Online. It supports various formats such as CSV, XLS, and XLSX, and various transaction types and lists such as invoices, expenses, bills, payments, customers, vendors, products, etc.
Tags
Read also
Migrating Data from Xero to QuickBooks Online
Migrating from QuickBooks Desktop to QuickBooks Online
A Step-by-Step Guide to Migrating from QuickBooks Desktop to Online
Streamlining Your FreshBooks to QuickBooks Migration with SaasAnt Transactions