How to Track Mileage in QuickBooks Online
For many small business owners and independent contractors, mileage tracking often becomes a repetitive, time-consuming, and error-prone task. Yet maintaining accurate mileage records is essential—not only for claiming the standard Internal Revenue Service (IRS) mileage deduction, but also for staying organized, compliant, and in control of overall business finances.
This is where QuickBooks Online (QBO) proves especially valuable. Designed with small businesses in mind, QuickBooks Online offers a streamlined and intuitive approach to mileage tracking, reducing manual effort while improving accuracy and record-keeping consistency.
Contents
How to Track Mileage in QuickBooks Online
Manually Tracking Trips in QuickBooks
FAQs
QuickBooks Mileage Tracking
Effortless Recording
QuickBooks Online simplifies mileage capture by offering both automated and manual tracking options. Through the mobile app, users can enable automatic mileage tracking, which leverages location services to log trips in real time. For greater control, trips can also be entered manually with key details such as date, distance, starting and ending locations, and business purpose—ensuring every journey is properly documented.
Multi-Vehicle Management
For businesses that rely on more than one vehicle, QuickBooks Online supports tracking mileage across multiple vehicles with ease. Each vehicle can be managed individually, and a primary vehicle can be designated to speed up data entry and reduce repetitive steps in daily use.
Simplified Classification
Accurate classification is critical for compliance and reporting. QuickBooks Online allows users to clearly categorize trips as business or personal, helping maintain clean records and ensuring mileage claims are supported by clear, defensible documentation when needed.
Beyond the Basics: Unlocking the Full Potential of QuickBooks Online Mileage Tracking
While accurate mileage capture is foundational, QuickBooks Online extends beyond basic tracking to support more informed financial and operational decision-making.
Data-Driven Insights
Mileage data in QuickBooks Online is not just stored—it is actionable. Built-in reporting enables users to analyze travel patterns, identify inefficiencies, and understand how business travel impacts overall expenses. These insights can guide smarter route planning, cost optimization, and long-term operational improvements.
Tax Season Simplified
Manually managing mileage can complicate tax preparation. QuickBooks Online reduces this burden by organizing and surfacing mileage data in a tax-ready format, helping ensure relevant deductions are accurately reflected. This minimizes last-minute scrambling and supports smoother collaboration with tax professionals.
Peace of Mind for the Future
With mileage data securely recorded and easily accessible, QuickBooks Online provides confidence and continuity. Whether responding to an audit inquiry or reviewing historical expenses, having well-maintained records eliminates unnecessary stress and allows business owners to stay focused on growth rather than documentation.
How to Track Mileage in QuickBooks Online
Keeping track of your business mileage can be tedious, but QuickBooks Online (QBO) simplifies the process with its user-friendly mobile app. Here's a step-by-step guide on how to track your mileage using the QBO app on your Android device:
Step 1: Download and Launch the App
Head to the ‘Google Play Store’ on your Android device and search for ‘QuickBooks Online.’
Once downloaded, launch the app and log in to your QuickBooks Online account.
Step 2: Accessing the Mileage Feature:
Locate the menu icon (☰) in the top left corner of the app's main screen.
Tap on the menu icon to reveal a list of options.
Select ‘Mileage’ from the list to access the mileage tracking section.
Step 3: Enabling Automatic Tracking (Optional):
QuickBooks Online offers the convenience of automatic mileage tracking.
If you'd like to use this feature, tap on ‘Auto-track your miles.’
When prompted, grant the app location permission to track your trips automatically.
Step 4: Reviewing Unreviewed Trips
Under the ‘Unreviewed’ tab within the ‘Mileage’ section, you'll find a list of trips automatically recorded by the app.
Step 5: Classifying Your Trips
Swipe left on a trip to categorize it as ‘Business.’ This indicates the trip was for work-related purposes.
Swipe right on a trip to categorize it as ‘Personal.’ This signifies the trip was for non-business use.
Step 6: Adding Details (Optional)
While automatic tracking captures the basics, you can add further details for each trip.
Tap on a specific trip to access additional options.
Tap the three dots (...) in the top right corner and select ‘Edit trip.’
This lets you add details like the purpose of the trip and the vehicle used.
Step 7: Saving Your Changes:
Once you've reviewed and potentially added details to your trip, it's time to save your changes.
Tap the checkmark icon in the top right corner to finalize your entry.
Additional Tips
You can manually add trips by tapping the ‘+’ icon within the ‘Mileage’ section.
QuickBooks Online allows you to set up and manage different vehicles used for business purposes.
Access the settings within the ‘Mileage’ section to manage your vehicles.
Regularly review your mileage data and ensure your trips are accurately categorized for optimal record-keeping.
By following these steps and exploring the additional features, you can leverage the power of QuickBooks Online’s mileage tracking functionality on your Android device to simplify your record-keeping and gain valuable insights into your business travel.
Streamlined Mileage Tracking with QuickBooks Online: A Guide for iOS Users
Keeping track of your business mileage on the go can be a breeze with the user-friendly QuickBooks Online (QBO) mobile app for iOS devices. Here's a step-by-step guide to help you effortlessly track your miles:
Step 1: Download and Launch the App:
Open the App Store on your iOS device and search for ‘QuickBooks Online.’
Once downloaded, launch the app and log in to your QuickBooks Online account.
Step 2: Accessing the Mileage Feature
Locate the gear icon (⚙️) situated in the bottom right corner of the app's main screen.
Tap on the gear icon to access the settings menu.
Within the settings menu, navigate to the ‘Mileage’ section.
Step 3: Enabling Automatic Tracking (Optional):
QuickBooks Online offers the convenience of automatic mileage tracking.
If you prefer this method, tap on ‘Auto-track your miles.’
Follow the on-screen prompts to grant the app location permissions, allowing it to record your trips automatically.
Step 4: Reviewing Recent Trips
Under the ‘Mileage’ section, you'll find a list of recent trips recorded by the app.
Step 5: Classifying Your Trips
Tap on a specific trip to view its details.
A pop-up menu will appear with options to categorize the trip as ‘Business’ or ‘Personal.’
Select the appropriate category based on the purpose of your trip.
Step 6: Adding Details (Optional)
While automatic tracking captures the basics, you can add further information for each trip.
Tap again on the trip you'd like to edit.
Select ‘Edit’ to access additional options.
This lets you add details like the purpose of the trip and the vehicle used.
Step 7: Saving Your Changes
Once you've reviewed and added any additional details, it's time to finalize your entry.
Tap the ‘Save’ button in the top right corner to confirm your changes.
Additional Tips:
You can manually add trips by tapping the ‘+’ icon within the ‘Mileage’ section.
QuickBooks Online allows you to set up and manage different vehicles used for business purposes.
Access the settings within the ‘Mileage’ section to manage your vehicles.
Regularly review your mileage data and ensure your trips are accurately categorized for optimal record-keeping.
Manually Tracking Trips in QuickBooks
Before you start, you’ll want to create a record for the vehicle you’ll use. Click Mileage in the navigation toolbar. Hover over the green Add trip button in the middle right of the screen, then click ViewVehicles. Then click Add Vehicle and complete the fields on the screen that opens. Click Save. Back on the main screen, click directly on Add Trip. The New trip panel will slide out from the right.
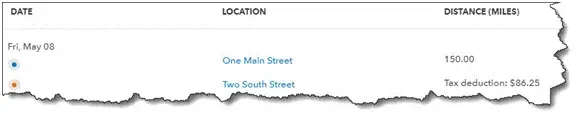
Enter the Date, then the number of miles driven (Distance). You can enter the Starting and Ending points for your records if you'd like. Click either the Business or Personal icon and enter a Description. Select the correct Vehicle if you use multiple, and click Save. Your trip will now appear on the main screen with your tax deduction already calculated, as pictured below. Click the More button at the end of the row (not shown here) to Edit and duplicate your trips.
Once you’ve created a record for a trip in QuickBooks Online, it will be added to the list on the main Mileage screen.
Automatically track mileage in QuickBooks Online
There’s another way to track your trips, which doesn’t involve writing down your odometer readings or mileage. The QuickBooks Online mobile app will automatically track your miles as you drive.
To set this up, open the app and click on the three horizontal lines in the lower right to open the app’s navigation shortcuts. Then click the Mileage icon. Auto-tracking is off by default, so click OFF to open the Mileage settings screen. Click the Auto-tracking button to change it from grayed-out to green. In the small window that opens, click Settings to go to the QuickBooks section of your phone’s Settings screen and make these changes:
Location must be Always On.
Motion & Fitness must be On.
Background App Refresh must be On.
Cellular Data must be On.
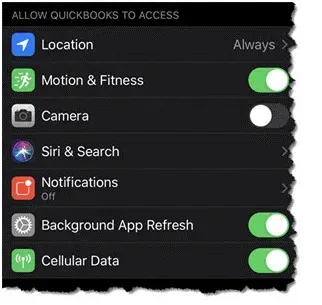
Before automatically tracking your mileage in QuickBooks Online, you’ll need to change some settings (the image above was taken on an iPhone; Android phones have similar settings).
After you've changed your settings, close this screen and return to the QuickBooks Online app’s main Mileage screen. Auto-tracking should be ON. Click the + (plus) sign in the lower right, then Create trip. The app will automatically detect your starting and stopping locations using your phone’s GPS. When you’ve arrived at your destination, open the Mileage app again.
Swipe left on the trip’s record to categorize it as business and right to mark it as personal. If it’s a business trip, enter its purpose and click Save. You’ll now need to turn off auto-tracking and reverse the changes you made to your phone’s settings (unless you usually leave any of them on).
A Quick Tip for QuickBooks Online
Do you ever open QuickBooks Online in a new tab because you need to check something in another part of the site but don’t want to shut down your current screen? If you’re accessing QuickBooks Online through Google Chrome, it’s easy. Right-click anywhere in the navigation toolbar that contains links (not the blank space below) and select Open link in the new tab. A new tab will open to a QuickBooks mileage tracking online page. You can do whatever you need in the second tab without disturbing your original page.
Stay in Touch while tracking mileage on QuickBooks Online. Don’t hesitate to contact us at support@saasant.com so that we can help with your use of QuickBooks Online and/or your overall accounting.
FAQs
What is mileage tracking, and why is it essential for businesses?
Mileage tracking involves recording the distance traveled for business purposes. Businesses must claim the standard IRS mileage deduction and maintain accurate records for tax purposes and financial management.
How can QuickBooks Online help me track my mileage?
QuickBooks Online offers a user-friendly mobile app and web interface for effortlessly recording and managing your business mileage. You can manually enter trip details or leverage the app's automatic tracking feature.
What are the benefits of using QuickBooks Online for mileage tracking?
QuickBooks Online simplifies mileage tracking by offering automatic recording, multi-vehicle management, trip classification, and data-driven insights. It also helps streamline tax filing by pre-populating mileage information into relevant forms.
How do I track mileage using the QuickBooks Online mobile app?
To track mileage using the QuickBooks Online mobile app:
Download the app.
Log in to your account.
Access the 'Mileage' section.
You can enable automatic tracking or manually add trips by entering the date, distance, and other details.
Can I categorize my trips as business or personal on the mobile app?
Yes, the app allows you to swipe left or right on a trip to classify it as business or personal.
How do I add details on the mobile app, like trip purpose and vehicle used?
To add various details:
Tap on a specific trip to view its details and edit options.
You can then add the trip purpose, select the vehicle used, and save your changes.
How do I manually add trips in QuickBooks Online?
To manually add trips in QuickBooks Online:
Navigate to the 'Mileage' section.
Click 'Add trip,' and enter the date, distance, starting and ending points (optional), trip purpose, and vehicle used.
Can I add multiple vehicles for mileage tracking?
Yes, QuickBooks Online allows you to set up and manage different vehicles used for business purposes. You can access the settings within the 'Mileage' section to manage your vehicles.