The Ultimate Guide to Migrating Between QuickBooks Desktop and Online
In this article, we’ll delve into the workflow for migrating data between QuickBooks Desktop and Online through SaasAnt Transactions and the easy migration of all the transactions.
Contents
Migration from QuickBooks Desktop to Online
Migrations from QuickBooks Desktop to Online are done using the steps below. Following are the Step by Step transitions to migrate from QuickBooks Desktop to QuickBooks Online.
Step 1: Export Data
Collect data: To export transactions from QuickBooks Desktop to QuickBooks Online, start by collecting your Excel sheet and exporting it from QuickBooks Desktop. It can be done directly from QuickBooks Desktop through
(QuickBooks Desktop -> Transactions you want(e.g., Customers) -> Customer Centre -> Excel -> Export Transactions or Export Customer List). If it sounds complicated, here are SaasAnt Transactions to export from QuickBooks Desktop.
How to Export Transactions through SaasAnt Transactions?
To seamlessly export QuickBooks Desktop Transactions through SaasAnt Transactions, follow the steps below:
● Download and install SaasAnt Transactions from the official SaasAnt website.
Launch SaasAnt Transactions, click ‘File’ and select ‘Connect to QuickBooks.’
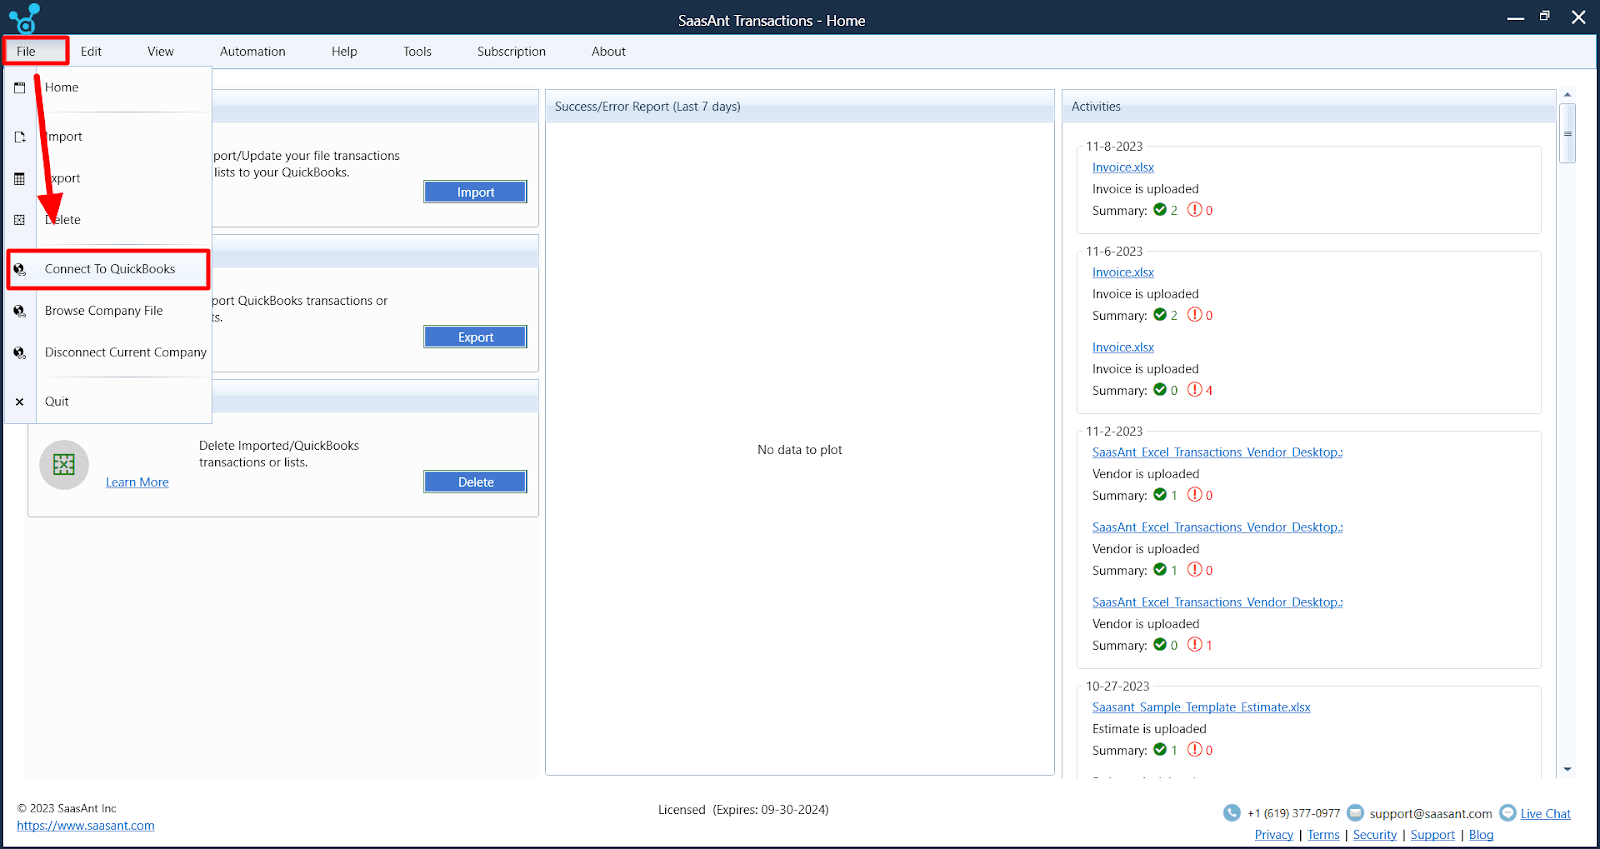
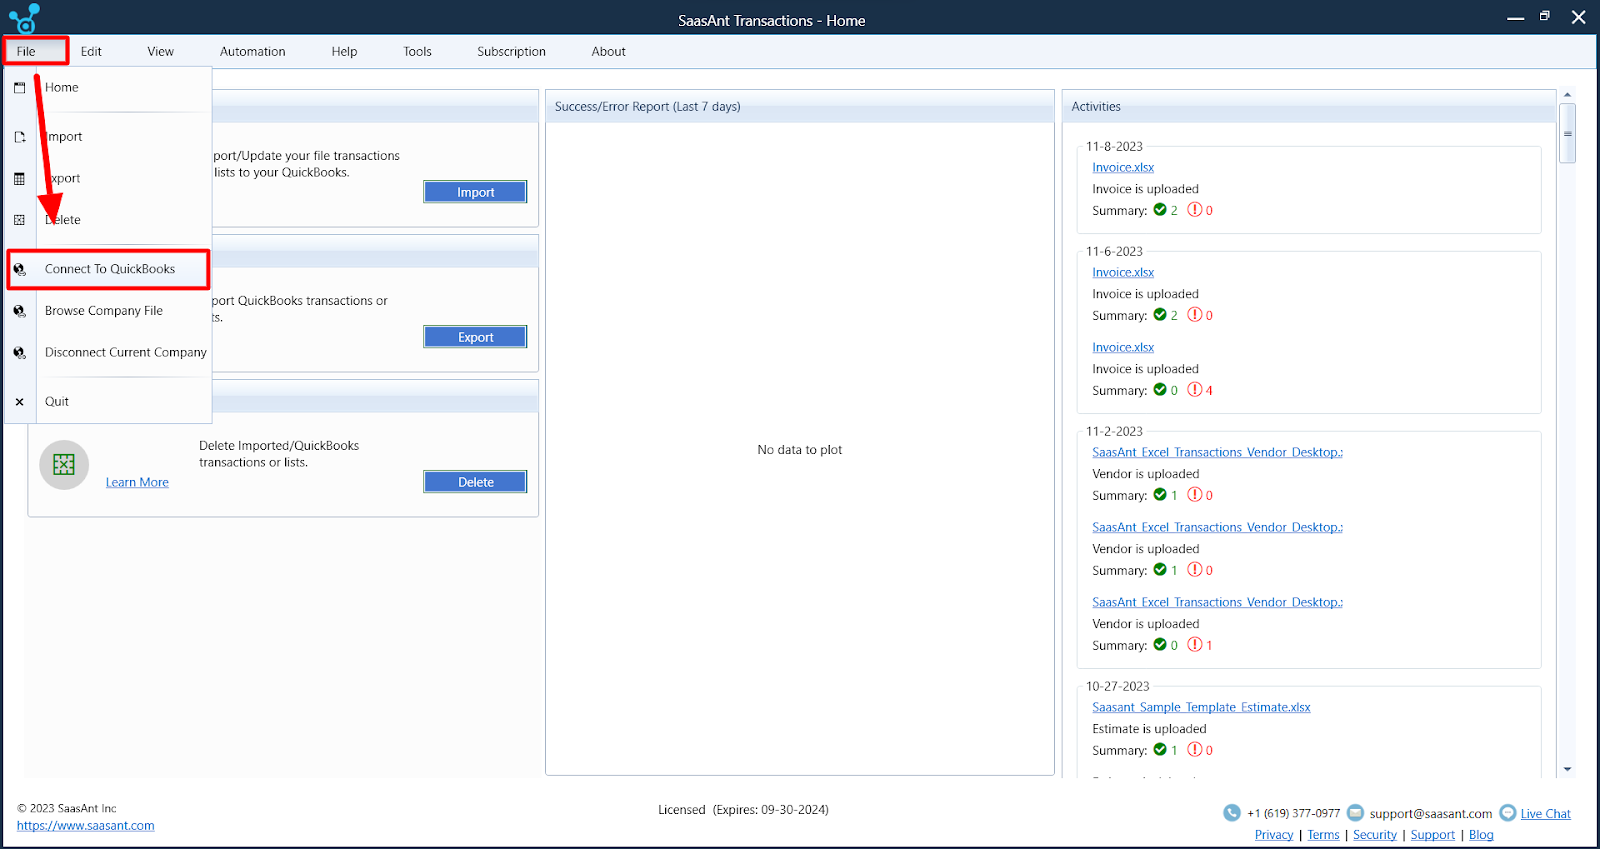
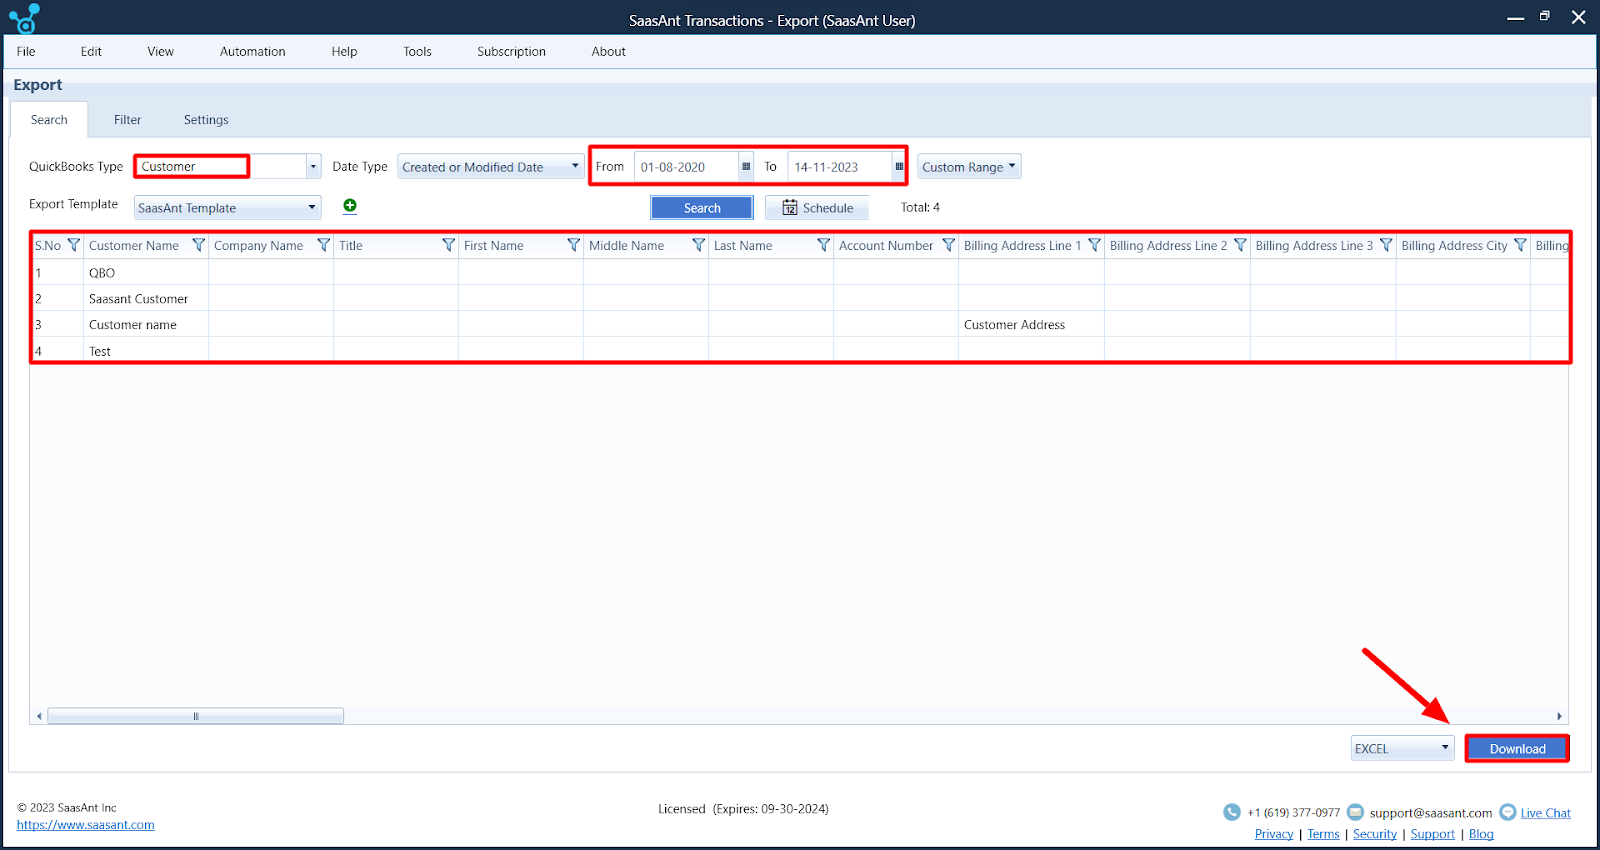
Click the ‘Export’ option to initiate the export of transactions.
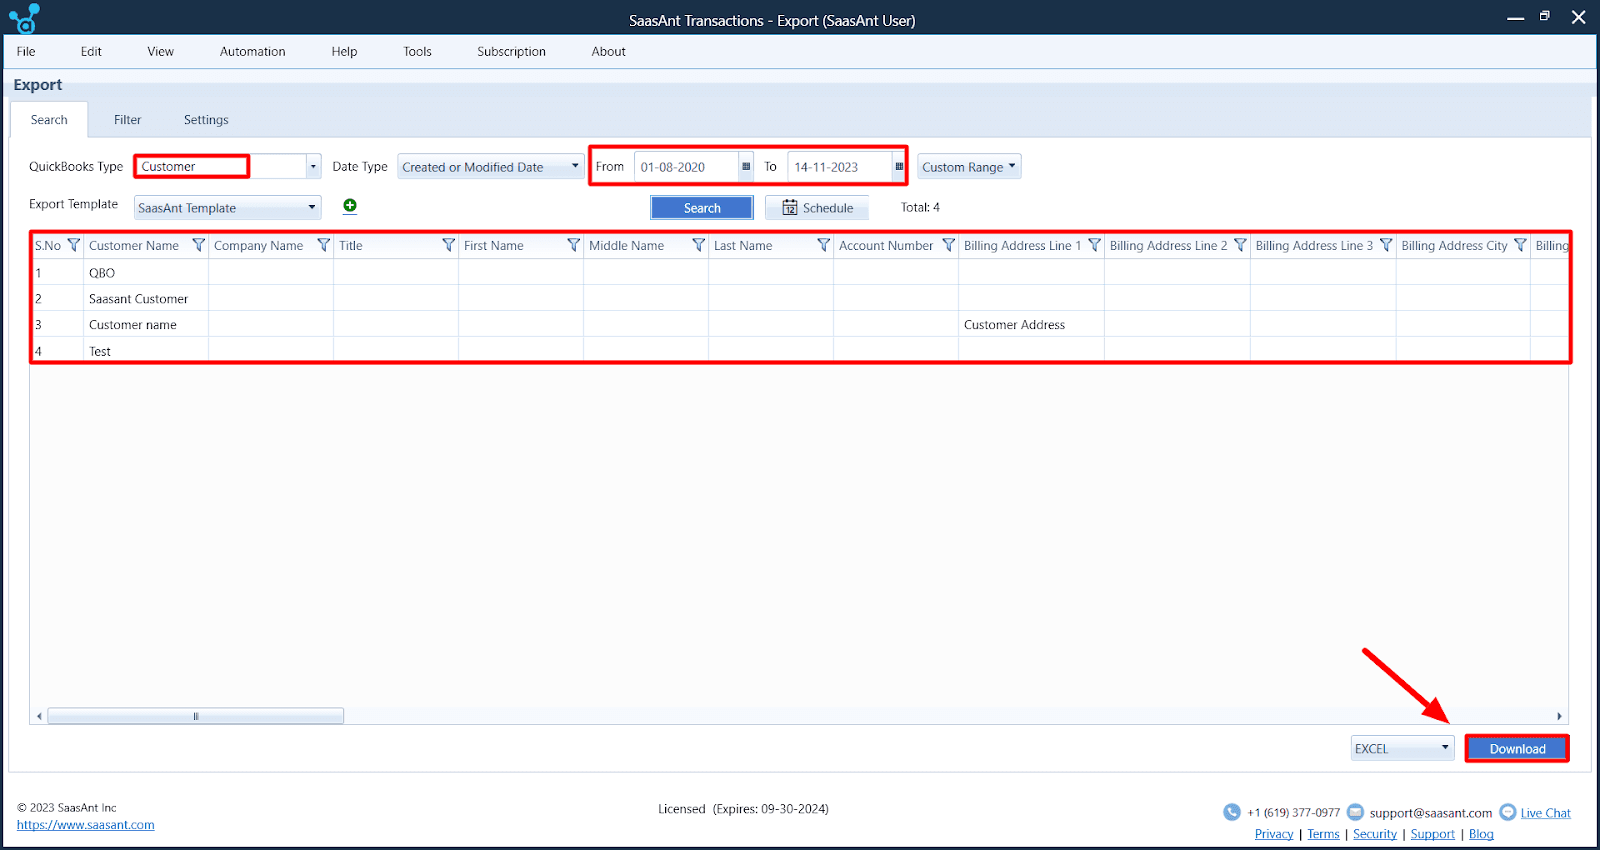
Fill in the QuickBooks Type, Export Template(whether in QuickBooks Template or SaasAnt Template), Date Type, From, and To Date to export the specific Transaction you want.
Download the transactions in whichever format you want for migration, like Excel or CSV.
Step 2: Excel Preparation & Data Checks
After exportation, prepare the Excel sheet downloaded from QuickBooks Desktop according to your business needs and make changes according to your transactions. Also, verify the below.
Format Verification: Ensure that your Transaction files are in SaasAnt supporting format such as CSV, Excel, txt, or IIF files for import. Convert your files accordingly, as you can import them into QuickBooks Online through SaasAnt Transactions Online.
Cleanse your Data: Ensure your Excel sheet is clean and has no discrepancies like duplicate entries, missed transactions, or incorrect amounts.
Maintain Structure: Verify Excel column headers should match with the QuickBooks Online fields, and with this, also check data types and formats.
Step 3: Use of SaasAnt Transactions Template
SaasAnt’s Template: You are allowed to use your customized template for Excel sheets and import it into QuickBooks Online, but if you mismatch any columns in the mapping screen, there will be some data issues, so try with SaasAnt’s Template to migrate the transactions corresponding to the type of data your migrating.
Once you have exported transactions from QuickBooks Desktop, like Invoices, Bills, Journal Entries, Payments, Bill Payments, and Charts of Accounts, try to fill in the SaasAnt Transactions Template.
Template Usage: Fill all the exported transactions into the SaasAnt template and fit every data in the correct column to support the data mapping automatically.
Step 4: Setting up QuickBooks Online
Create QuickBooks Online account: If you already have your QuickBooks, it is advisable to set up a new QuickBooks Online account because when you import into the already present account, the transactions will be confused, and many mistakes will occur. So, create a new account by choosing the subscription level that fits your business needs for migration from QuickBooks Desktop.
Configure Settings: Configure the settings in QuickBooks Online, such as the chart of accounts, tax rates, and user permissions, to reflect your business according to your preferences. (QuickBooks Online -> Gear Icon -> Accounts and Settings)
Step 5: Migration to QuickBooks Online
Usage of SaasAnt’s Template: Prepare your data in the proper format using SaasAnt’s template. Use SaasAnt Transactions Online to bring this data into QuickBooks Online smoothly.
How to Import Transactions through SaasAnt Transactions?
You must create a new QuickBooks Online account before you import transactions from Quickbooks Desktop to Online, as importing into an existing account might cause issues with existing transactions. Follow the steps below to import transactions from Quickbooks Desktop to QuickBooks Online.
Begin by logging into your QuickBooks Online account.
Head to the ‘Apps’ section and locate ‘SaasAnt Transactions.’
Establish a connection between SaasAnt Transactions and your QuickBooks Online account.
Initiate the import process by clicking on ‘New Import.’
Upload your transaction files, which can be in various formats like Excel, CSV, or IIF.
Ensure the fields in your file align with the corresponding QuickBooks fields during the mapping process.
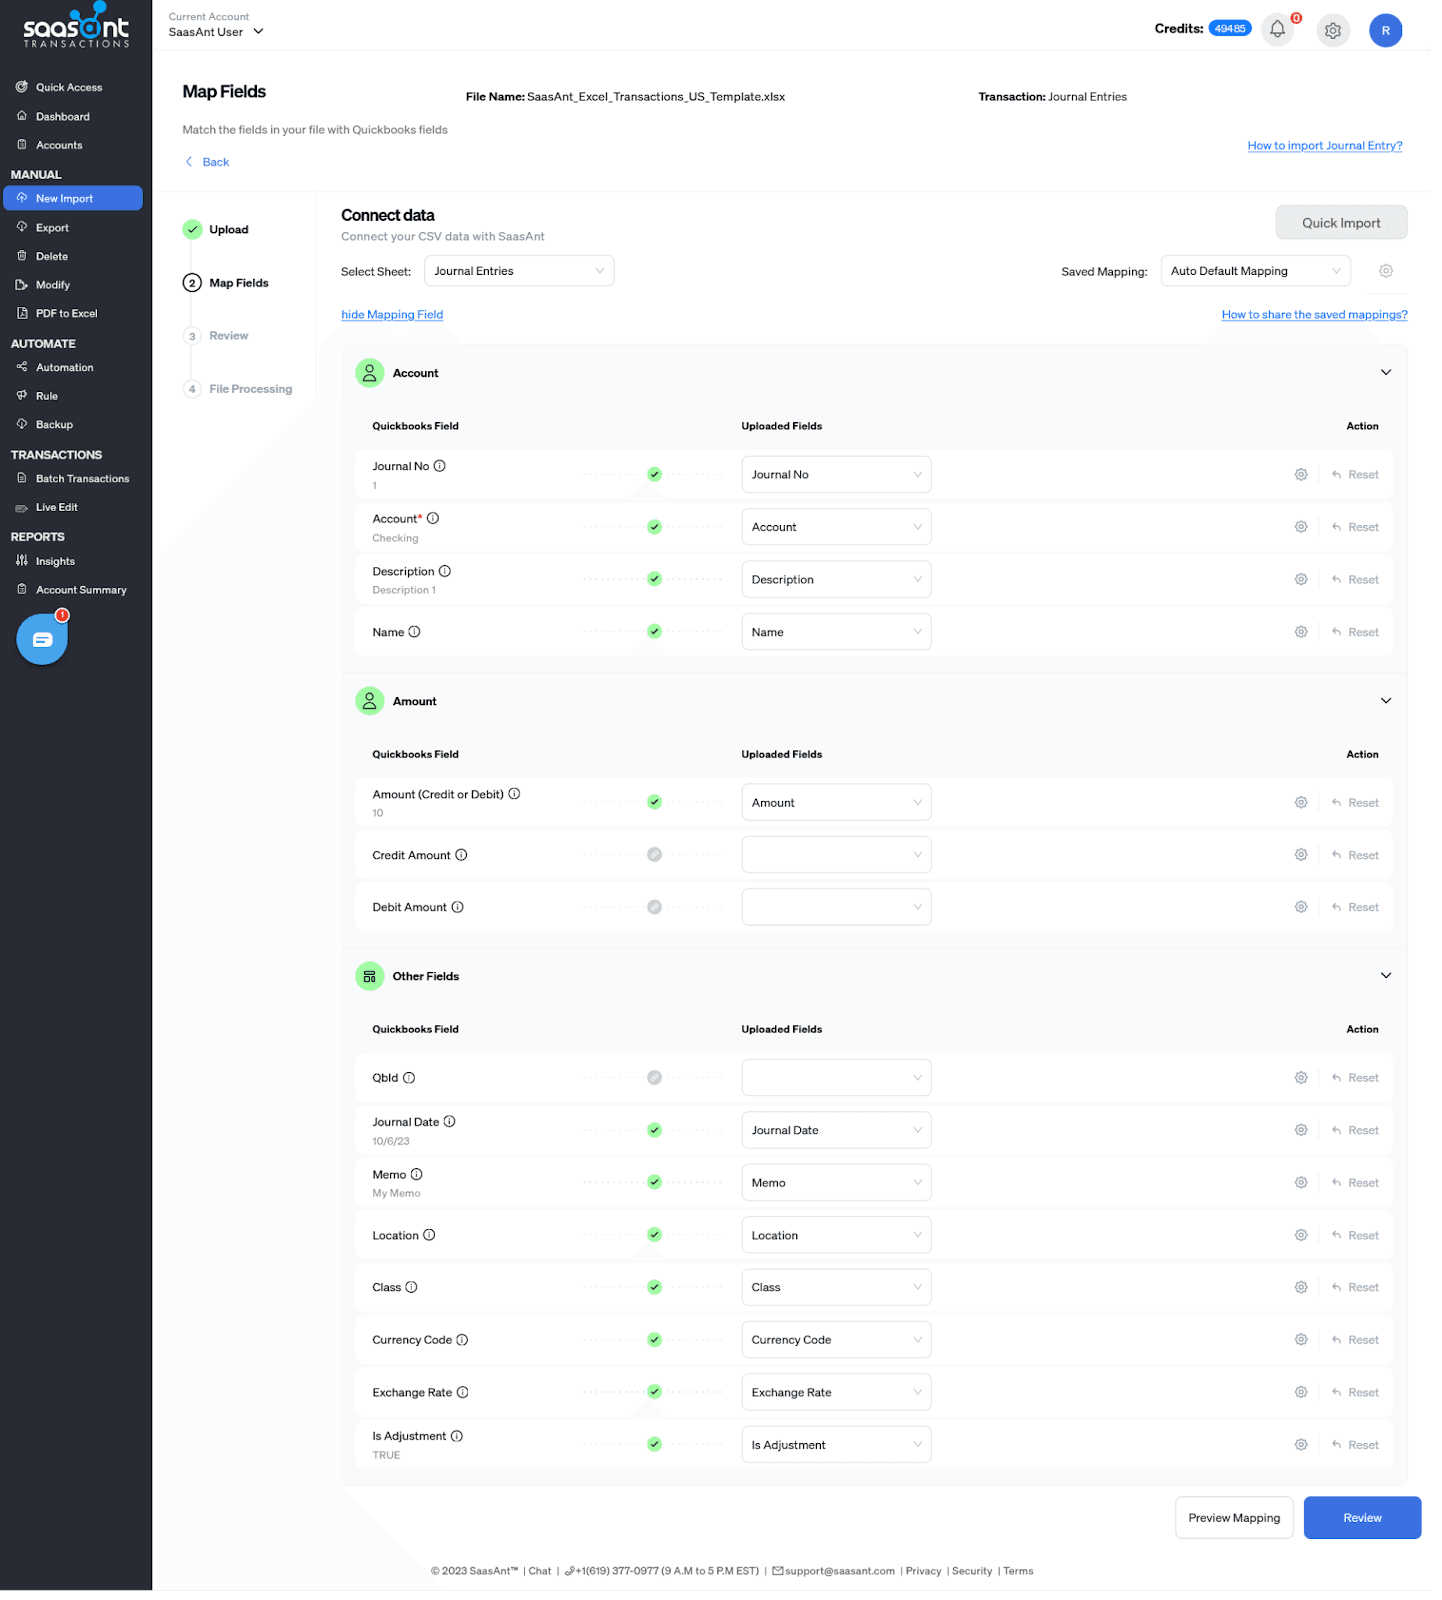
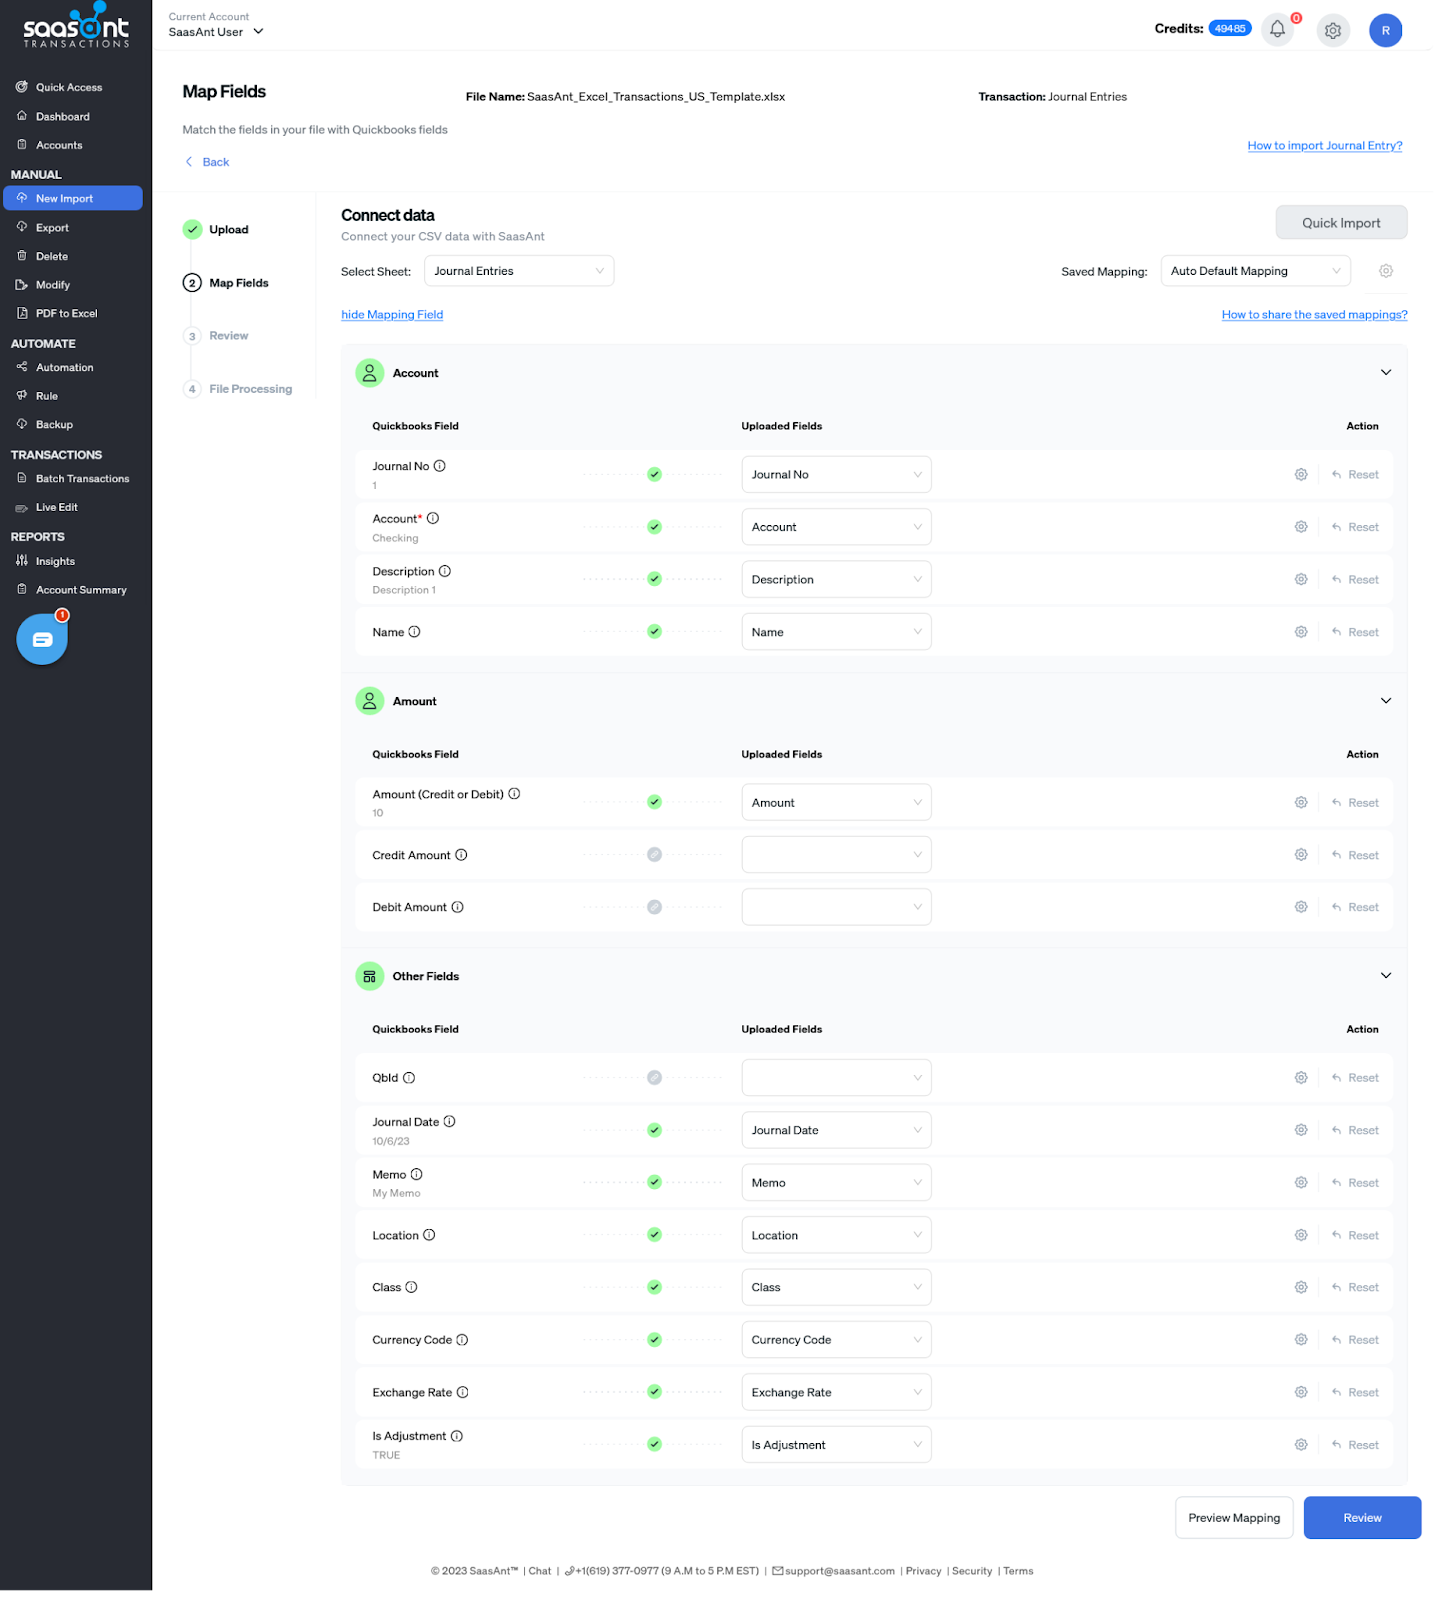
Review the mapping setup and start the import.
After importing, validate the data in QuickBooks Online to ensure accuracy.
Follow this article on how to Import Invoices into QuickBooks Online: Step-by-Step Guide to get a complete guide on importing on Quickbooks Online.
During the importation process, if any error occurs, SaasAnt Transactions will support fixing them and give you a hint on how to resolve and fix the issue.
Migration from QuickBooks Online to Desktop
Transferring all the data from QuickBooks Online to the Desktop can be processed with several steps. Let’s discuss the step-by-step process of migration from QuickBooks Online to Desktop.
Step 1: Exporting Transactions
Gather Data: To transfer transactions from QuickBooks Online to QuickBooks Online, gather all the necessary information. It is done by adequately gathering or collecting data in an Excel sheet and exporting it from QuickBooks Online.
In QuickBooks Online, you can export reports and lists but not the transactions, so you cannot make changes or edit any incorrect transactions. In this case, you can use SaasAnt Transactions Online to connect and export all or any specific transactions you would like to export and import in QuickBooks Online.
Connect SaasAnt Transactions Online with QuickBooks Online -> Open SaasAnt -> Export -> Choose the Transaction Type(e.g., Invoices, Bills) -> Date Type, Date Range -> Search for your transaction to export; you can use Advance Options to use more features in specific transactions according to your need).
SaasAnt provides an additional feature to schedule your export or backup from QuickBooks Online through SaasAnt Transactions Online.
SaasAnt Online -> Backup -> Select schedule (Fill in all the required details) ->Backup Location and schedule backup according to your time requirements.
How to Export Transactions through SaasAnt Transactions?
If you’re hoping to export data between QuickBooks Online, here are the straightforward steps to help you export the data.
Login to your ‘QuickBooks Online account.’
Go to ‘Apps’ and Find ‘SaasAnt Transactions.’
Link QuickBooks Online with SaasAnt Transactions.
Choose ‘Export’ in SaasAnt Transactions Online to start the export process.
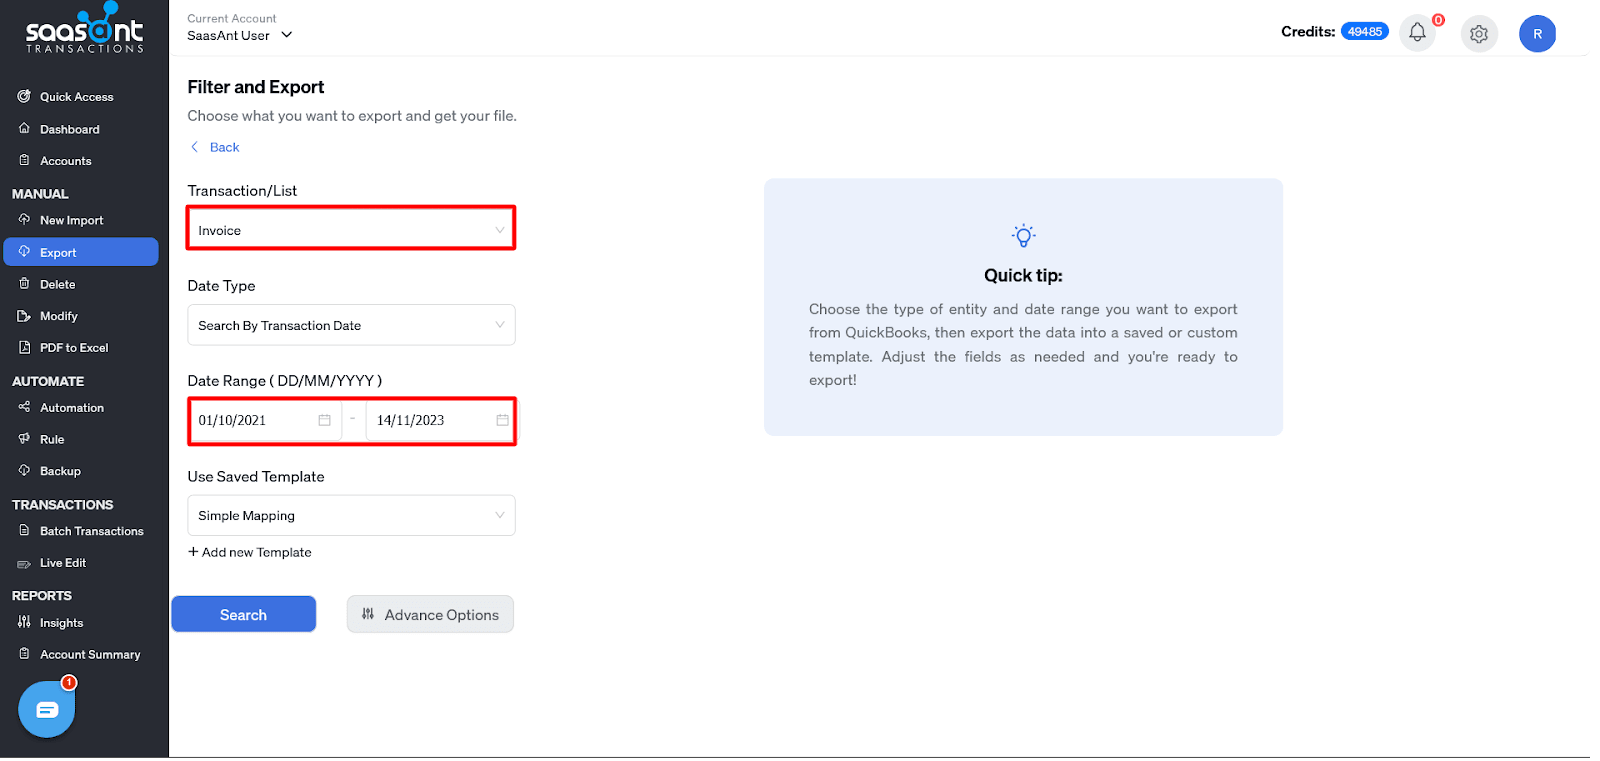
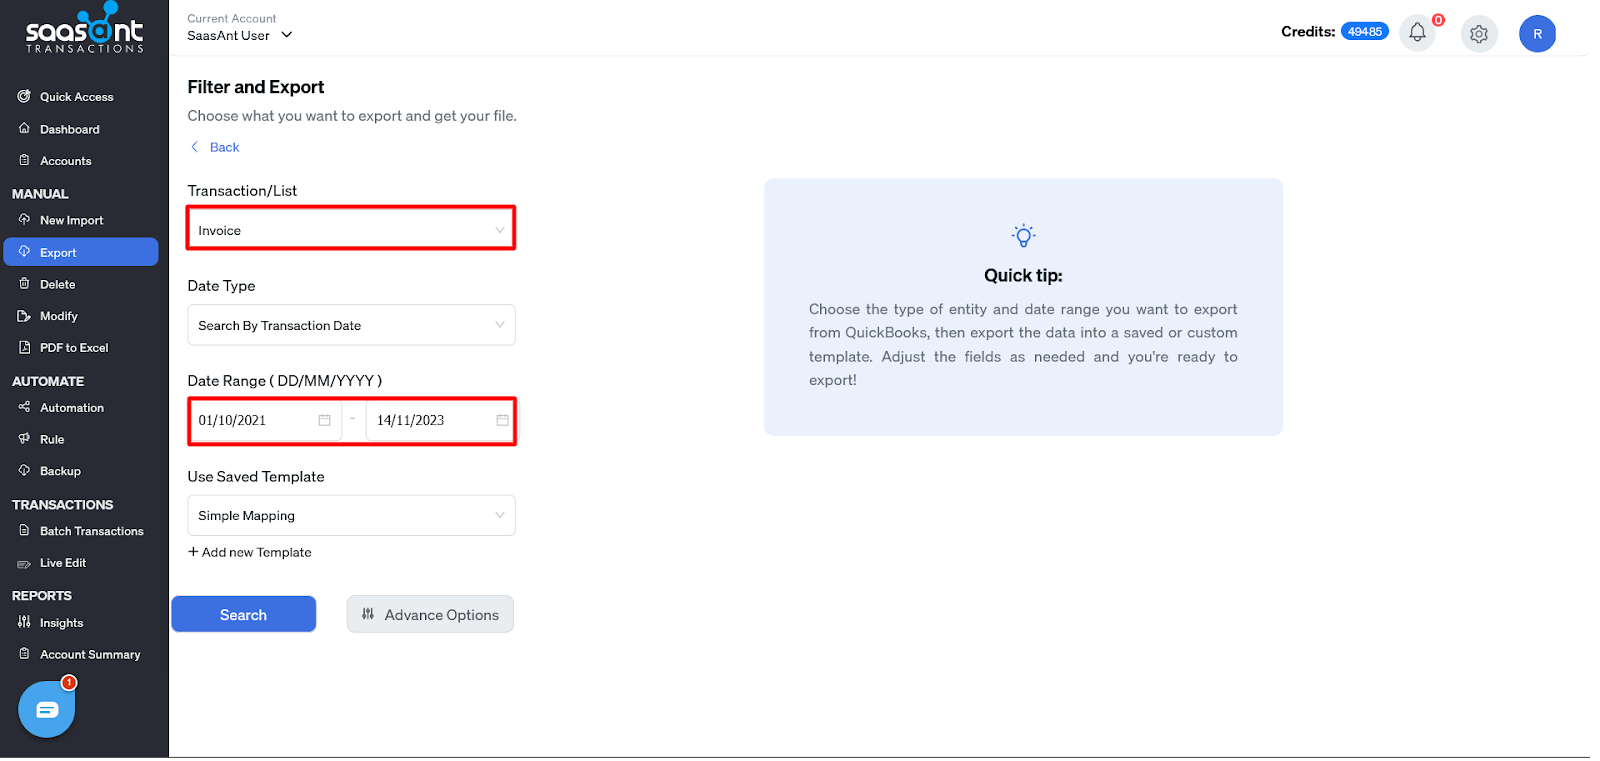
Click ‘Let’s Export’ and reach the ‘Filter and Export’ page.
Choose & select your ‘Transaction’ type, ‘Date Range,’ and the necessary information to export and get your file.
After ‘Search,’ select the records you want to export and ‘Download’ the selected records in either. CSV or. XLSX format.
Step 2: Prepare and Validate Data
Following the export process from Quickbooks Online, work on the Excel sheet to customize and make changes according to your business needs and requirements. Check the points below for proper data validation preparation in an Excel sheet.
Checking the Format: Ensure that your transaction files are in a format compatible with SaasAnt Transactions, such as CSV or Excel. It will simplify importing them into QuickBooks Desktop using SaasAnt Transactions Desktop.
Data Cleanup: Pay close attention to the Excel sheet to eliminate discrepancies, such as missing transactions or incorrect figures, and correct them before the importation process.
Structure Maintenance: Make sure your Excel sheet matches the headers used in QuickBooks Desktop. It involves verifying column headers, data types, and formats to ensure a smooth transition.
Step 3: Utilize SaasAnt’s Template
Utilize Pre-Designed Template: Consider using SaasAnt’s pre-designed Excel template for an import into QuickBooks Desktop. You can use custom templates, but inaccuracies in column mapping may lead to transactional errors. SaasAnt’s template ensures correct alignment with the data type transferred.
Accurate Data Migration: After extracting transactions such as Invoices, Bills, Journal Entries, Payments, Bill Payments, and Charts of Accounts from QuickBooks Online, populate the SaasAnt Transactions Template. Carefully check for discrepancies in credit and debit balances in Journal Entries and duplications or misplacements in the entries.
Template Integration: Enter all exported transaction data into the SaasAnt template, ensuring each piece of information aligns with the appropriate column. This process facilitates accurate data mapping and integration with QuickBooks Desktop.
Step 4: Setup QuickBooks Desktop
Establish a new QuickBooks Desktop account: If you’re a current QuickBooks user, initiating a new QuickBooks Desktop account specifically for the migration process is recommended. It prevents data confusion and errors when merging with an existing account. Choose a subscription plan from QuickBooks Online that aligns with your migration needs.
Customize QuickBooks Desktop Settings: Customize essential settings in your new QuickBooks Desktop account. It includes setting up your chart of accounts, adjusting tax rates, and defining user access levels.
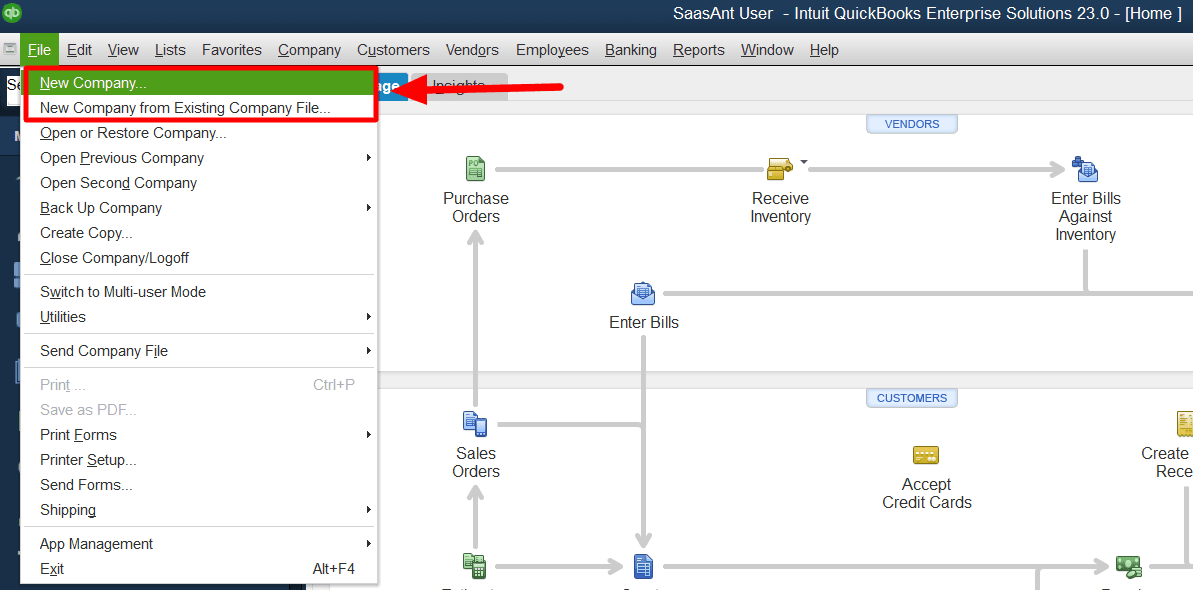
Navigate to QuickBooks Desktop, click on the ‘File’ menu, and proceed to ‘New Company’ to create a new company and import transactions into it without merging with the existing company and making confused transactions and reports. If you choose ‘New company from Existing File,’ a new company file will be created by copying the preferences and essential lists like the chart of accounts from an existing company.

Step 5: Import Data
How to Import Transactions through SaasAnt Transactions?
For migrating data from QuickBooks Desktop to QuickBooks Online using SaasAnt Transactions, follow these steps and establish a new QuickBooks Desktop account to avoid complications and errors associated with existing accounts.
Download & install SaasAnt Transactions from the official SaasAnt website.
Launch SaasAnt Transactions, click ‘File’ and select ‘Connect to QuickBooks.’
Click ‘Import’ and choose your transaction type as ‘QuickBooks Transaction Type.’
Upload your file(supports various file formats, including Excel, CSV, TXT, and IIF)
Map critical QuickBooks fields according to your transaction type files.
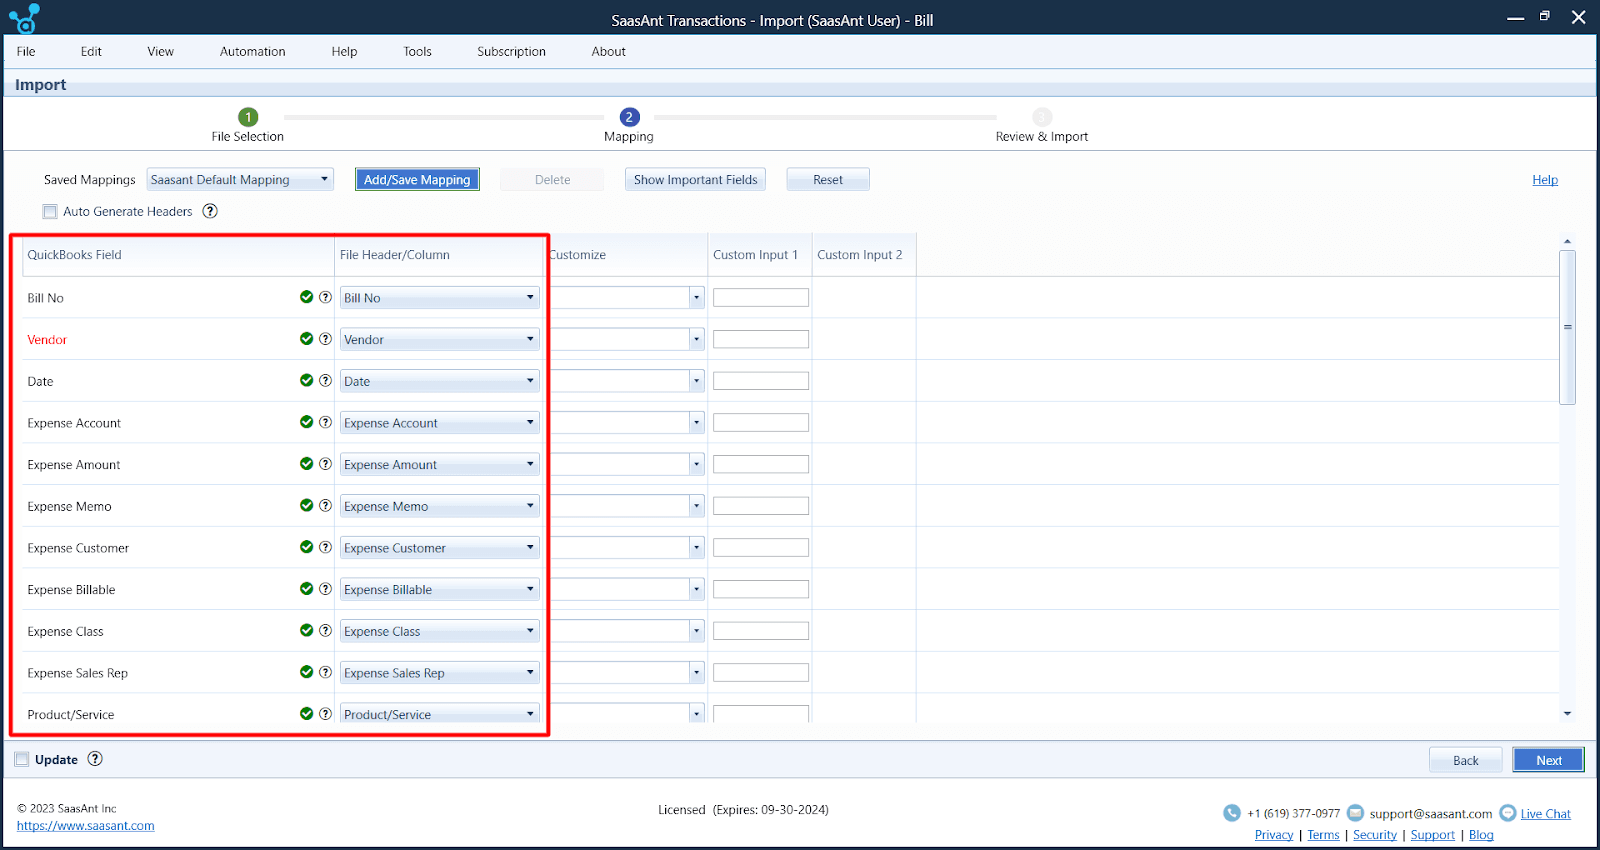

Review the mapping and initiate the import.
Validate the imported data in QuickBooks Desktop to ensure accuracy.
Conclusion
In conclusion, the transition from QuickBooks Desktop to Online and QuickBooks Online to Desktop is a process that demands careful planning and attention to detail. SaasAnt Transactions makes it easier and seamless by addressing common challenges such as mismatched transactions, data discrepancies, and duplicate entries using its template for accurate mapping and importing successfully. Establishing a new QuickBooks Online or a QuickBooks Desktop account is advisable to avoid data confusion. Finally, conducting a review post-migration ensures the integrity and accuracy of records can create a successful migration.
FAQ(Frequently Asked Questions)
Q1. Can I migrate from QuickBooks Professional Services Enterprise Edition Desktop to QuickBooks Online?
Yes, you can migrate from QuickBooks Enterprise to Online. However, large file sizes and concerns about QuickBooks Online backups becoming corrupt are valid issues. You can use the SaasAnt Transactions application to migrate from QuickBooks Desktop to Online, even for large-size files.
Q2. Can I revert to QuickBooks Desktop after using QuickBooks Online?
Yes, you can switch back to QuickBooks Desktop from the Online version. The process involves exporting your data from QuickBooks Online and importing it into your desktop version, which is done flawlessly with SaasAnt Transactions.
Q3. When trying to migrate data, I’m encountering an error that my QuickBooks Online account is over 60 days old. How can I resolve this?
To resolve the issue of your QuickBooks Online account being over 60 days old during data migration, consider using SaasAnt Transactions. It allows you to export and import your financial data into an existing QuickBooks Online account, regardless of its time, thus overcoming the 60-day limitation and ensuring a successful data migration.
Q4. Can I convert QuickBooks Desktop Enterprise to QuickBooks Online?
Yes, conversion from QuickBooks Desktop Enterprise to Online is possible. However, the process might be more complex than migrating from Pro or Premier versions. It’s advisable to use applications like SaasAnt Transactions and follow the guidelines on the official website.
Q5. What should I do if not all data migrates from Desktop to Online and QuickBooks support cannot resolve the issue?
In this case, if you are using SaasAnt Transactions to migrate the data from Quickbooks Desktop to Online, there won’t be any missed data, or no data will left without migrating. If you encounter an issue, reconcile your data with your transaction records. So, trying to use SaasAnt Transactions when you migrate is advisable.
Q6. What steps involve migrating data from QuickBooks Online to the Desktop version?
Migrating data from QuickBooks Online to Desktop involves the following steps:
1. Export Transactions from QuickBooks Online: Use SaasAnt Transactions Online to export necessary transactions like invoices and bills and download them in a compatible format such as CSV or Excel.
2. Setup QuickBooks Desktop: Create a new QuickBooks Desktop company file for the migration to avoid merging issues with existing data.
3. Import Data into QuickBooks Desktop: Use SaasAnt Transactions to import the prepared data into QuickBooks Desktop. Map the data fields correctly in SaasAnt and validate the imported data in QuickBooks Desktop for accuracy.
Q7. Could there be any data loss or feature limitations when moving data from QuickBooks Online to Desktop?
When migrating data from QuickBooks Online to Desktop, there’s a possibility for data loss or feature limitations due to different platforms. QuickBooks Online offers features like automatic bank feeds, multi-user access, and real-time data updates that may not be fully compatible with the Desktop version.
During the migration, some data types, for instance, attachments in transactions, audit logs, and custom reports for the Online, may not be replicated precisely on the Desktop. It creates a thorough review and possible manual adjustments post-migration to ensure data integrity between the two versions.