Recurring Transactions in QuickBooks Online - Detailed Guide
Managing recurring transactions in QuickBooks Online helps streamline routine accounting tasks, reduce manual effort, and minimize data entry errors. Recurring invoices are especially valuable for subscription billing, retainers, and ongoing services where transactions follow a predictable schedule.
This guide explains how to set up, automate, edit, pause, and stop recurring invoices in QuickBooks Online. It also addresses common limitations and highlights how tools such as SaasAnt Transactions can extend QuickBooks’ capabilities for bulk operations and automation.
Simplifying Your Transaction Management
To further ease your workload in QuickBooks Online, use SaasAnt Transactions for bulk importing of transactions and use advanced filters for bulk deleting, editing, and exporting transactions. These features allow you to make changes to multiple entries at once, saving you time and ensuring accuracy. Additionally, automating imports through email, FTP/SFTP, and Zapier can eliminate the need for manual data entry, keeping your records current with minimal effort. By utilizing these features, you can focus less on administrative tasks and more on growing your business while enjoying the peace of mind that comes from knowing your accounting processes are well-managed.
Setting Up Recurring Invoices: Step-by-Step Guide
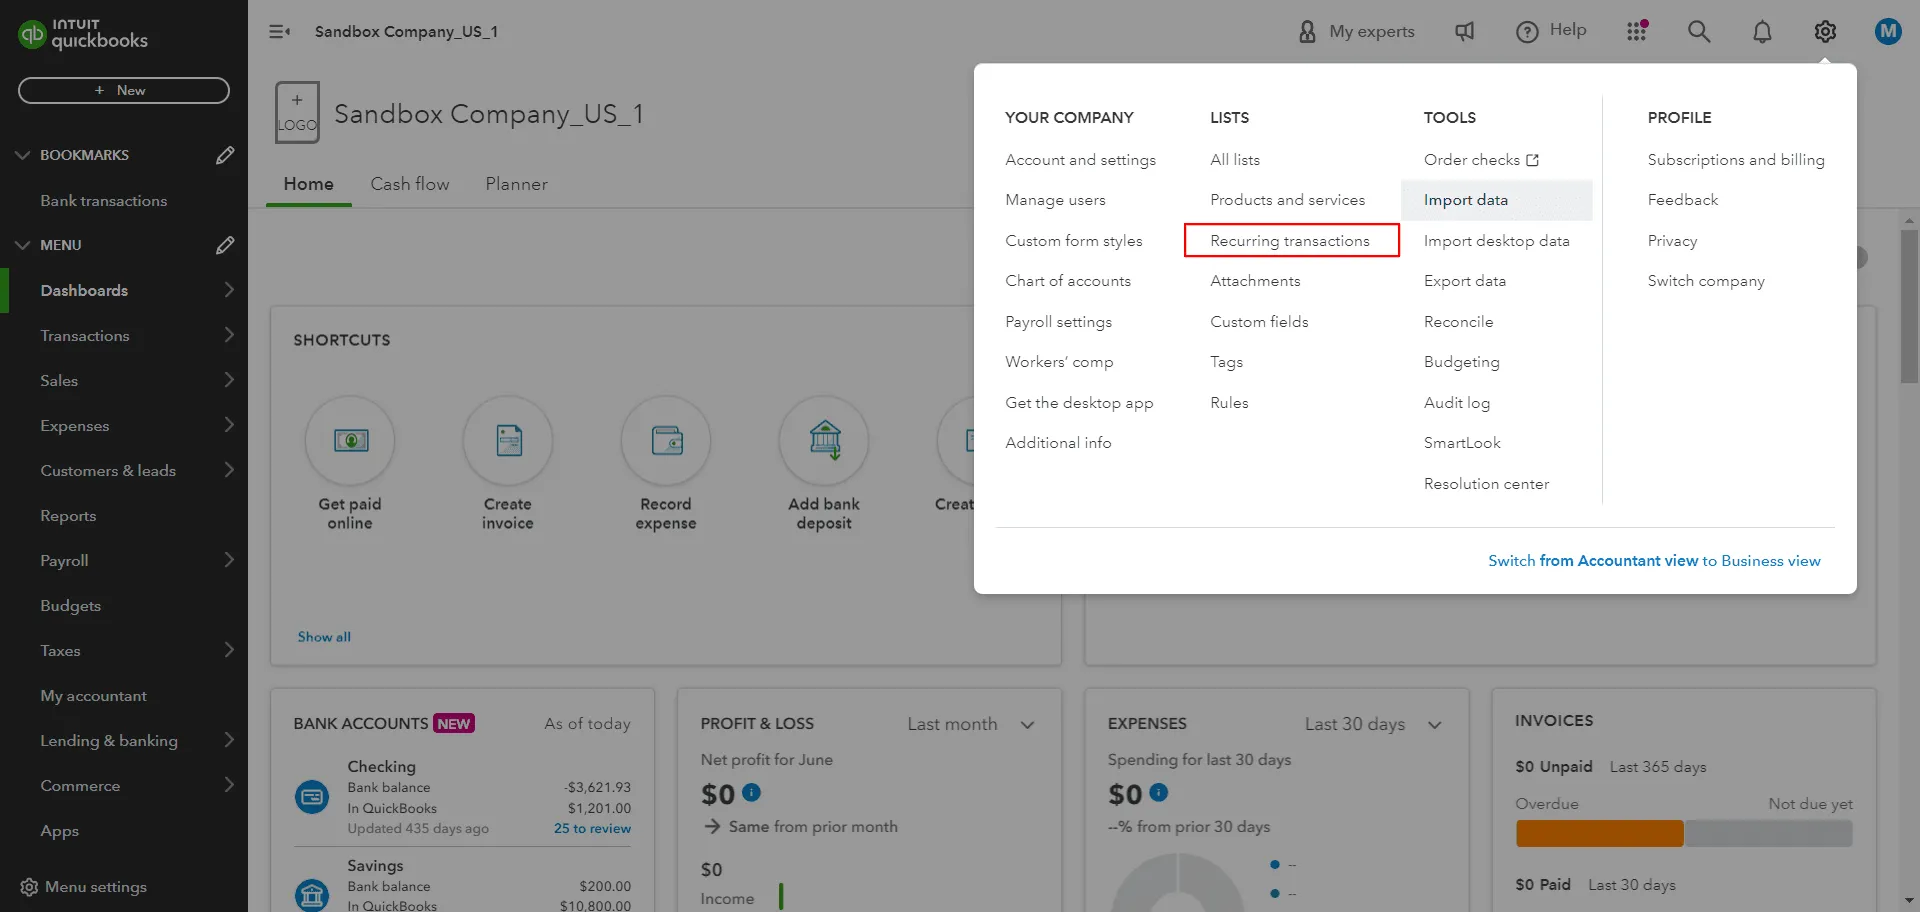
Go to Settings ⚙️:
Navigate to the Settings menu, represented by the gear icon in the upper right corner.
Select Recurring Transactions:
Under the Lists column, select "Recurring Transactions."
Click New:
Click on the "New" button to start creating a new template.
Choose Invoice:
Select "Invoice" as the transaction type and click "OK."
Enter a Template Name:
Provide a name for your template to make it easier to identify.
Pick a Type:
Choose from Scheduled, Reminder, or Unscheduled.
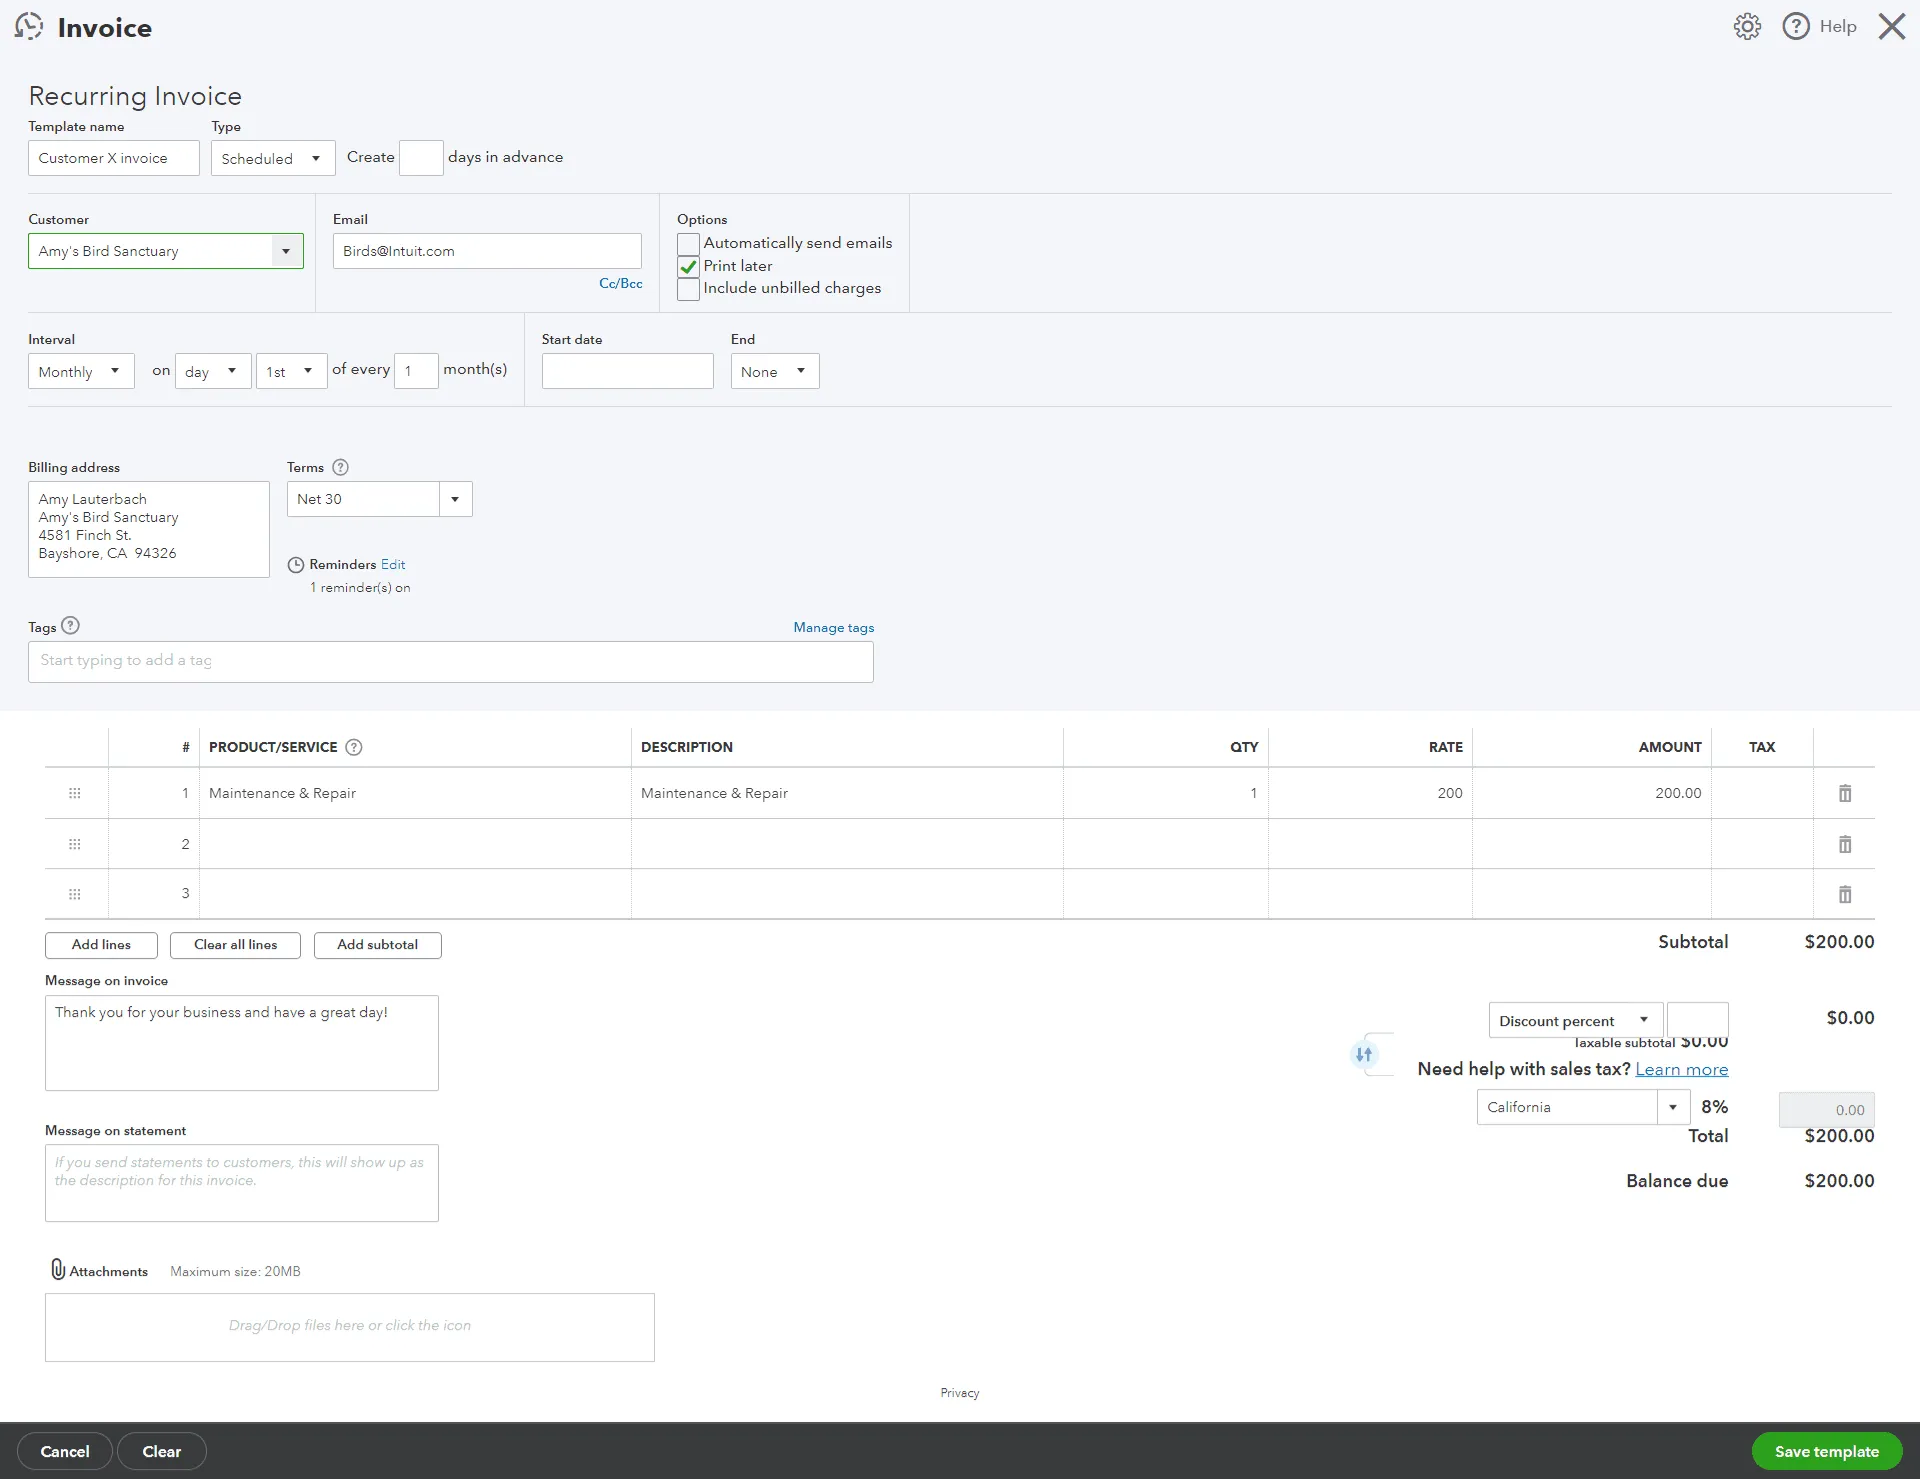
Fill Out Invoice Details:
Complete the necessary fields for the invoice.
Save Template:
Save the template to finalize the setup.
Example
For instance, if you run a subscription-based service, you can create a recurring invoice template to bill your customers monthly. Set the type to "Scheduled," and QuickBooks will automatically generate and send the invoice every month.
Automating Invoices
Automation is a key feature of QuickBooks Online's recurring transactions. By selecting "Scheduled" as the type, you can ensure that invoices are automatically sent out at regular intervals, such as weekly, monthly, or annually.
Manual entry of recurring invoices can be time-consuming and error-prone. Automating this process eliminates the need for manual intervention, reducing the risk of mistakes and saving valuable time.
What is a Recurring Invoice?
A recurring invoice is a transaction template that automates billing. It sends invoices to customers at regular intervals without manual intervention, ensuring timely and consistent billing.
Example
Consider a scenario where you provide a maintenance service. By setting up a recurring invoice template, you can automatically bill your clients every quarter for maintenance services.
Importing Recurring Transactions
QuickBooks Online doesn't natively support importing recurring transactions. However, you can use an application like SaasAnt Transactions to import them from Excel files. This feature is handy for businesses that need to transfer a large number of recurring transactions into QuickBooks.
Creating and Editing Recurring Invoice Templates
Creating a Template
To create a new template, follow the steps outlined in the "Setting Up Recurring Invoices" section. Ensure that you choose the appropriate type and fill in all necessary details.
Editing a Template
Navigate to Settings ⚙️:
Go to the Settings menu.
Choose Recurring Transactions:
Select "Recurring Transactions."
Select Edit:
In the Action column, click "Edit" from the dropdown menu for the transaction you want to modify.
Example
If you need to update the billing amount for a recurring service, edit the template and adjust the amount. This ensures that future invoices reflect the correct billing amount.
How to Stop Recurring Invoices in QuickBooks Online
Sometimes, recurring invoices may no longer be needed. Stopping them prevents unnecessary billing and helps maintain accurate records.
To stop recurring invoices in QuickBooks Online:
Click the Gear icon (⚙️) > Recurring Transactions.
Find the specific recurring invoice template in the list.
In the Action column for that template, choose:
Pause: To temporarily stop it.
Skip next date: To skip just the next scheduled invoice.
Delete: To permanently remove the template (confirm the deletion).
Viewing Recurring Invoices
To view your recurring invoices, navigate to Settings ⚙️ > Recurring Transactions. Here, you can see all your recurring templates and their statuses. You can also run a report or check the customer's page to see the status.
Example
Running a report on recurring transactions provides an overview of all automated billing activities, helping you keep track of your invoicing processes.
Managing recurring transactions in QuickBooks Online can significantly streamline your accounting processes. From setting up and automating invoices to editing and stopping recurring templates, QuickBooks provides a comprehensive set of tools.
FAQs
1. Can I import recurring transactions directly into QuickBooks Online?
No, QuickBooks Online does not natively support importing recurring transactions. However, you can use an application like SaasAnt Transactions to import them.
2. How do I stop a recurring invoice in QuickBooks Online?
To stop a recurring invoice, navigate to Settings ⚙️ > Recurring Transactions and delete the template or change its type to "Unscheduled" or "Reminder."
3. What types of transactions can be made recurring in QuickBooks Online?
You can create recurring templates for all transactions except bill payments, customer payments, and time activities.
4. Can I automate credit card payments with QuickBooks Online?
Yes, you can automate credit card payments with a recurring sales receipt.
5. How do I view my recurring invoices?
To view recurring invoices, go to Settings ⚙️ > Recurring Transactions or run a report on recurring transactions.
Enhance your QuickBooks Online experience with tools like Saasant Transactions, which can help you import invoices efficiently. Embrace automation and streamline your accounting processes today!
Read also
Workflow Automation for Bookkeeping and Accounting Professionals
Import Invoices into QuickBooks Online: Step-by-Step Guide
Import Journal Entries into QuickBooks Online: Step by Step Guide
How to Edit Invoices in QuickBooks Online