QuickBooks Desktop to QuickBooks Online Migration: Your Ultimate Guide
Introduction: Navigating Your QuickBooks Desktop to QuickBooks Online Migration
Migrating your financial data from QuickBooks Desktop to QuickBooks Online represents a pivotal advancement for any business seeking enhanced operational flexibility, real-time accessibility, and the sophisticated features of modern cloud accounting. This definitive guide offers an exhaustive, step-by-step walkthrough, specifically leveraging SaasAnt Transactions for a seamless, accurate, and error-minimized transition. By engaging with this guide, you will gain a profound understanding of how to successfully transfer your invaluable financial records, safeguarding data integrity and laying a robust foundation for an optimized cloud accounting future.
What you will learn in this guide:
The mechanics of QuickBooks data migration and why specialized tools are essential.
A detailed walkthrough of installing and connecting SaasAnt Transactions Desktop.
Precise steps for exporting your financial data from QuickBooks Desktop.
A comprehensive pre-migration checklist to prepare your QuickBooks Online account.
The critical sequence for importing various data types into QuickBooks Online using SaasAnt.
Solutions to common migration errors and frequently asked questions.
How to optimize your migration for accuracy and compliance.
Contents
Introduction: Navigating Your QuickBooks Desktop to QuickBooks Online Migration
Understanding QuickBooks Desktop To QuickBooks Online Data Migration: Why Cloud Accounting Matters
The SaasAnt QuickBooks Desktop to Online Migration Workflow: A Step-by-Step Execution Plan
Pre-Migration Checklist: Ensuring a Seamless and Error-Free Transition
The Migration Process Order: A Critical Sequence for Data Upload Success
Uploading Your Data to QuickBooks Online Using SaasAnt: Practical Steps
Common Errors and Effective Solutions During QuickBooks Migration
Conclusion: Your Pathway to a Successful QuickBooks Online Migration
Understanding QuickBooks Desktop To QuickBooks Online Data Migration: Why Cloud Accounting Matters
Data migration encompasses the systematic transfer of your existing financial records, including historical transactions and essential lists, from your on-premise QuickBooks Desktop application to the cloud-based QuickBooks Online platform. This transition is fundamental for businesses seeking to modernize their accounting processes, gain remote access to their financial records, and fully leverage QuickBooks Online's robust reporting capabilities and extensive integration ecosystem.
While QuickBooks offers an internal migration tool, it often presents limitations, particularly for large datasets or complex transactional requirements. This is precisely where purpose-built solutions like SaasAnt Transactions become indispensable.
How SaasAnt Transactions Facilitates QuickBooks Migration
SaasAnt Transactions is engineered to provide an accurate and efficient data transfer experience between QuickBooks Desktop and QuickBooks Online. It functions as a robust intermediary, ensuring your critical financial data is moved reliably and without compromise.
Here is a clear breakdown of its operational mechanics:
Export from QuickBooks Desktop: The SaasAnt Transactions Desktop application enables the export of your QuickBooks Desktop data into a meticulously structured CSV (Comma Separated Values) file format. This comprehensive export includes:
Essential List Data: Such as customers, vendors, products or services, and your complete chart of accounts.
Comprehensive Transaction Records: Including invoices, payments, bills, and detailed journal entries.
Benefit: This structured export prepares your data for a clean import, mitigating common formatting issues.
Import to QuickBooks Online: After data preparation, SaasAnt Transactions Online enables direct upload into your QuickBooks Online account. This stage offers:
Precision and Accuracy: Through exact field mapping, ensuring data populates the correct fields within QuickBooks Online.
Custom Field Mapping: The flexibility to map your unique custom fields, allowing for a tailored migration that preserves your specific business data.
Bulk Import Control: An ideal feature for managing large volumes of data and migrating multi-year financial records with efficiency.
Benefit: SaasAnt's import capabilities significantly reduce manual data entry and potential errors inherent in complex migrations.
Important Note: To access the full spectrum of migration functionality offered by SaasAnt, active subscriptions are required for both the QuickBooks Desktop (for data export) and QuickBooks Online (for data import) versions of SaasAnt Transactions. This ensures seamless integration and support throughout your migration journey.
Why Is SaasAnt the Preferred Tool for QuickBooks Desktop to Online Migration?
SaasAnt Transactions offers significant strategic advantages for achieving a smooth and successful migration:
Feature | Description |
Bulk Data Export & Import with Advanced Mapping | Efficiently handle extensive datasets with granular control over individual data fields — essential for large businesses. |
Supports All Critical Lists & Transaction Types | Ensures that all essential financial records, from customer/vendor lists to complex journal entries, are transferable. |
Reduces Migration Errors with Built-in Validations | Minimizes data discrepancies and integrity issues through automated validations, saving time and preventing costly mistakes. |
Ideal for Complex Migrations & Multi-Year Records | Capable of managing intricate, historical data transfers — ideal for businesses with long financial histories. |
Enhanced Data Security | SaasAnt ensures end-to-end data security during the export and import process, offering complete peace of mind. |
Dedicated Support | Expert technical support is available to assist with any issues that may arise during the migration or data handling process. |
The SaasAnt QuickBooks Desktop to Online Migration Workflow: A Step-by-Step Execution Plan
The migration process facilitated by SaasAnt is meticulously structured for clarity, control, and user confidence. Let's systematically walk through each critical stage to ensure a comprehensive understanding.
Phase 1: Exporting Your Financial Data from QuickBooks Desktop
This initial phase involves the crucial setup and operation of the SaasAnt Transactions Desktop application to extract your QuickBooks data accurately.
1. Installing SaasAnt Transactions Desktop Application
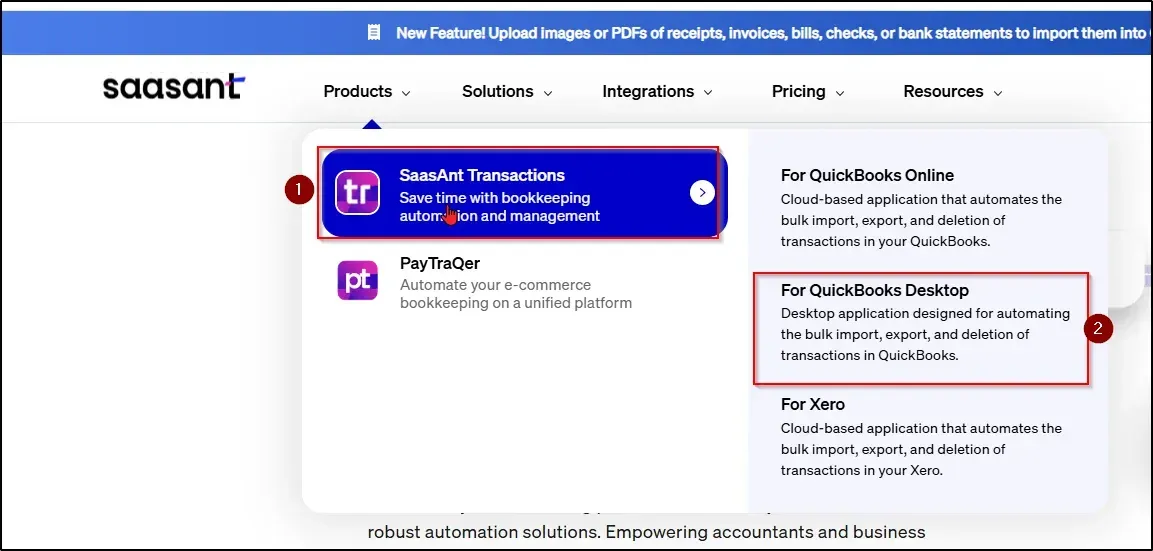
Access the Official SaasAnt Website: Navigate to the 'Products' section and specifically select "SaasAnt Transactions" followed by "For QuickBooks Desktop."
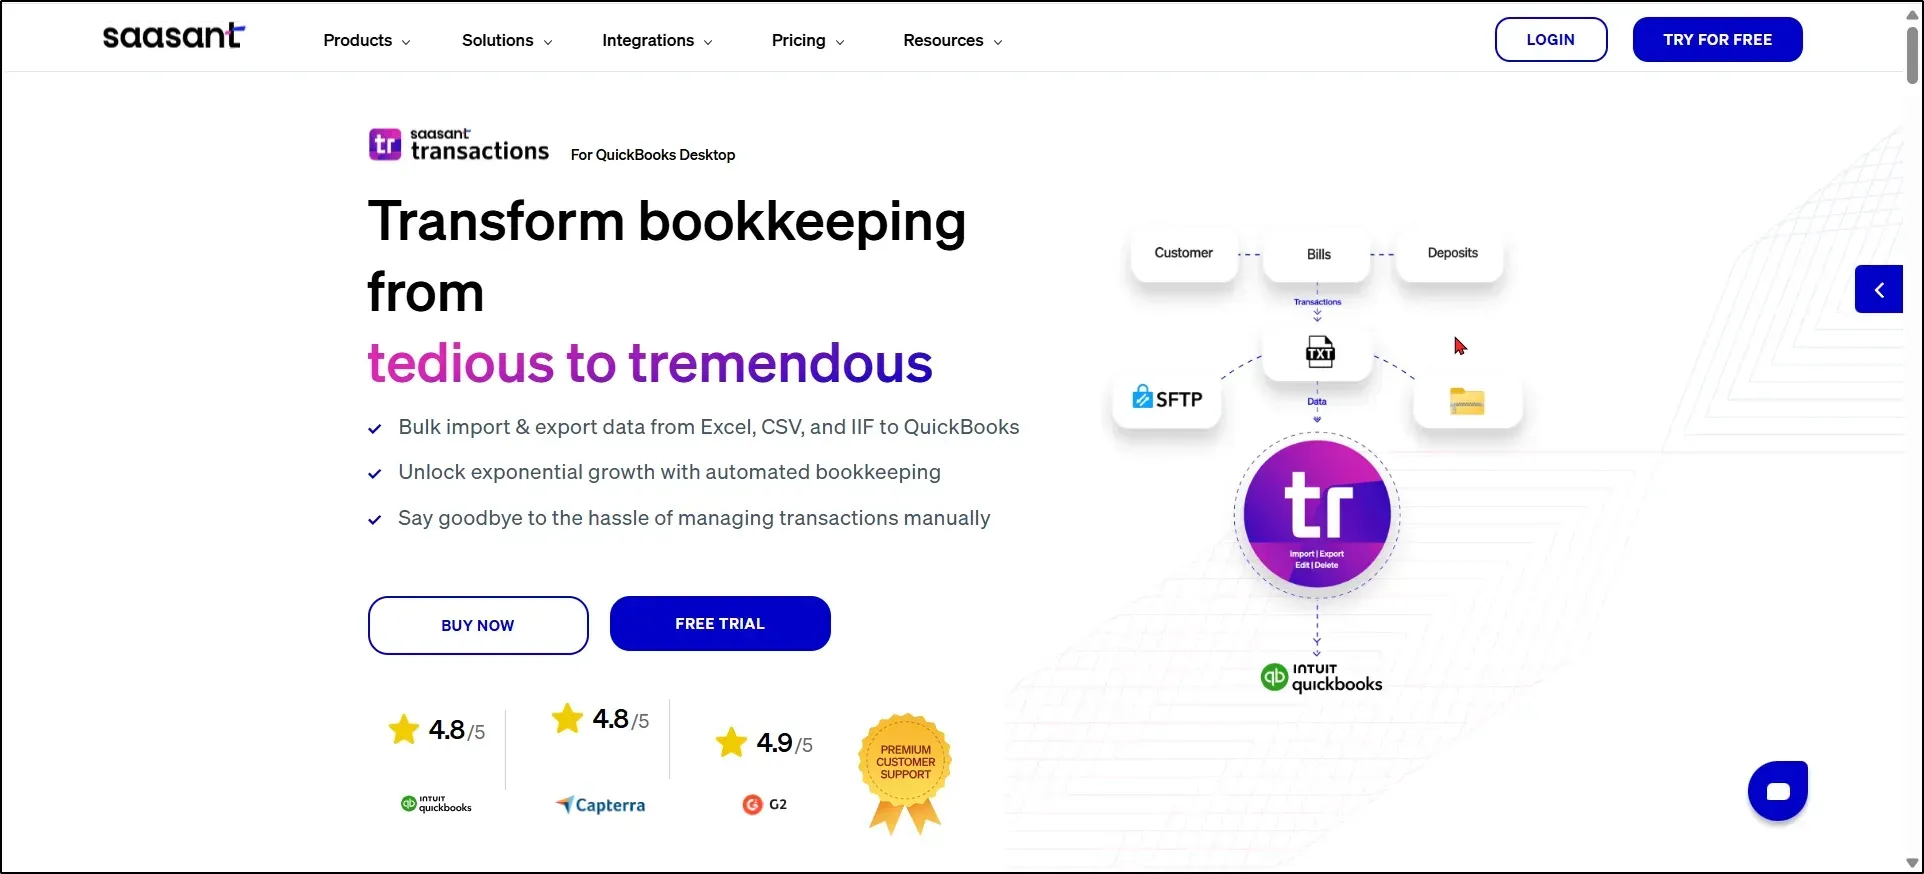
Download the Application: Locate and click on the "Free Trial" option to download the installer file for the application.
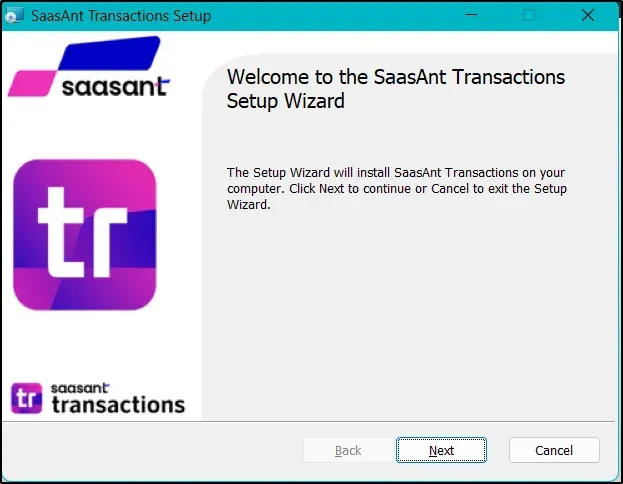
Execute the Installer: Open the recently downloaded file and follow the on-screen installation prompts carefully. Click 'Next' to commence the installation process.
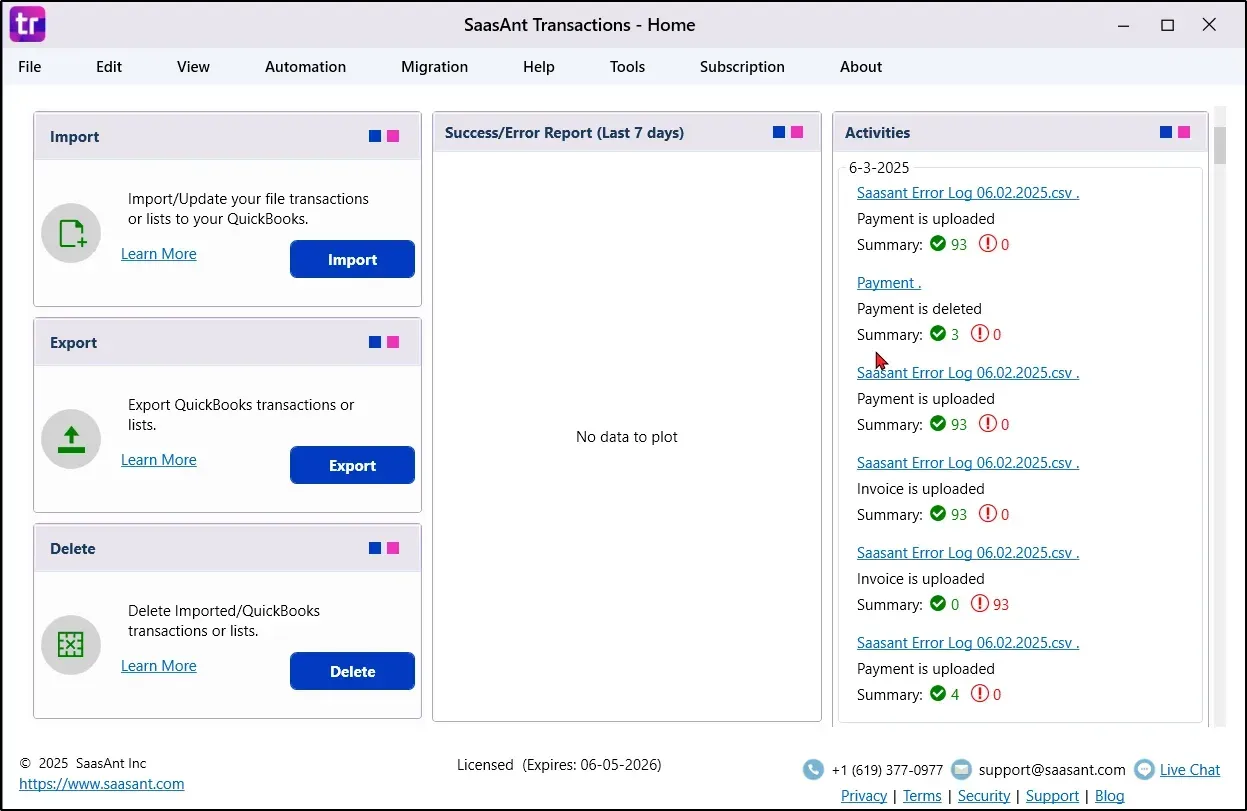
Launch SaasAnt: Upon successful installation, the SaasAnt Home Page will automatically appear, primed for connection with your QuickBooks Desktop instance.
2. Establishing Connection Between QuickBooks Desktop Company File and SaasAnt
Simultaneous Application Opening: Ensure that both your QuickBooks Desktop company file and the SaasAnt Transactions Desktop application are open and running concurrently.
Initiate Connection: Within the SaasAnt application, navigate to 'File' and then select 'Connect to QuickBooks'.
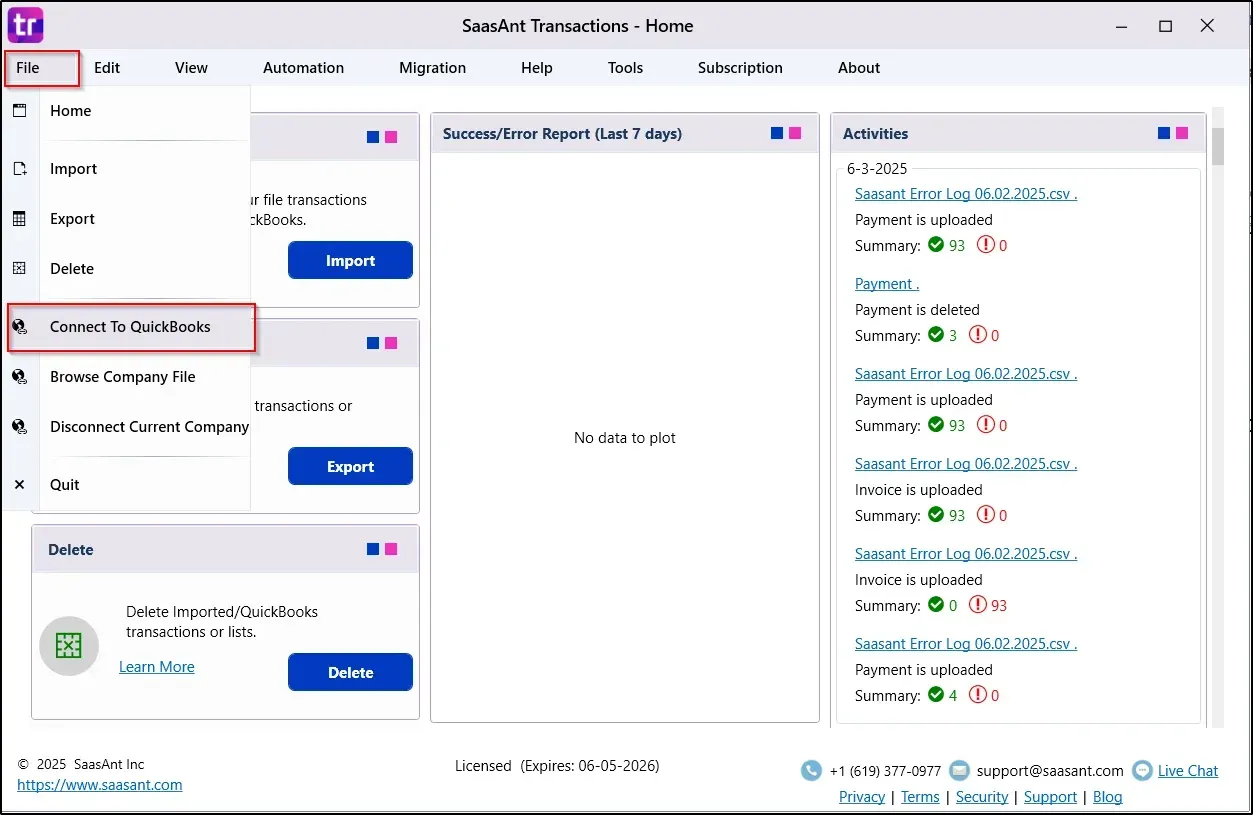
Certificate Authentication: A pop-up window will prompt you to authenticate the digital certificate. This is a vital security step to complete the secure connection.
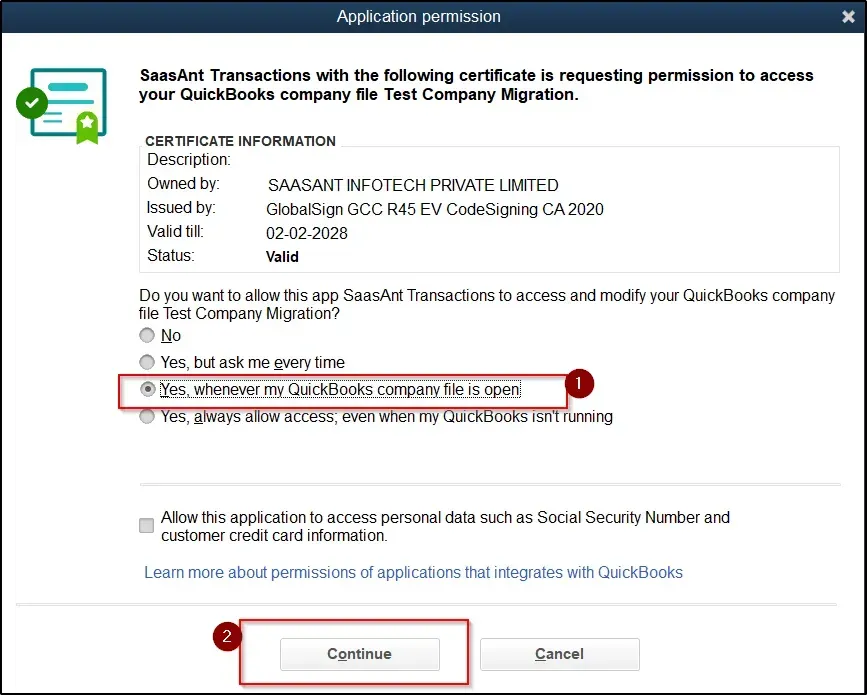
Connection Verification: Once the authentication process is complete, your QuickBooks company name will be prominently displayed at the top of the SaasAnt application interface, confirming a secure and successful connection.
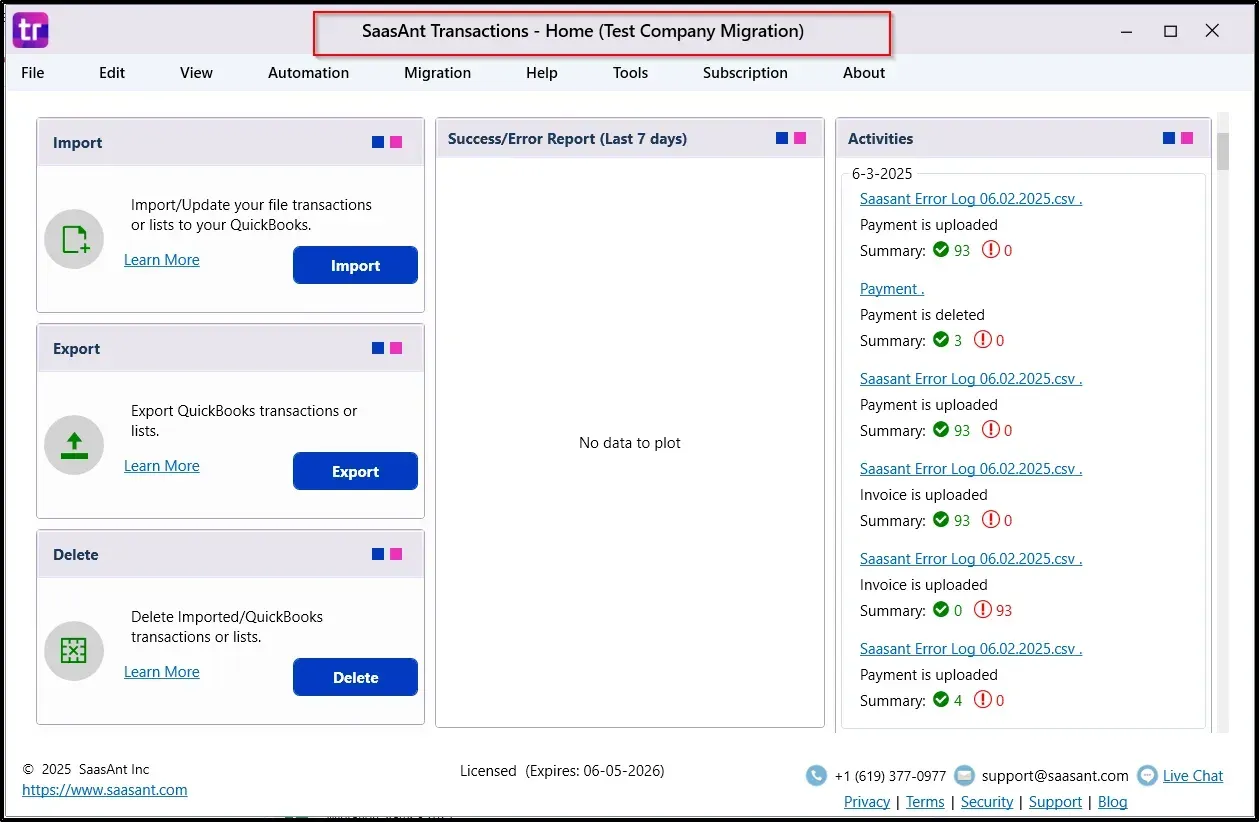
Result: Your QuickBooks Desktop File is now successfully connected with the SaasAnt Desktop Application, ready for data export.
3. Acquiring Your SaasAnt Desktop Subscription
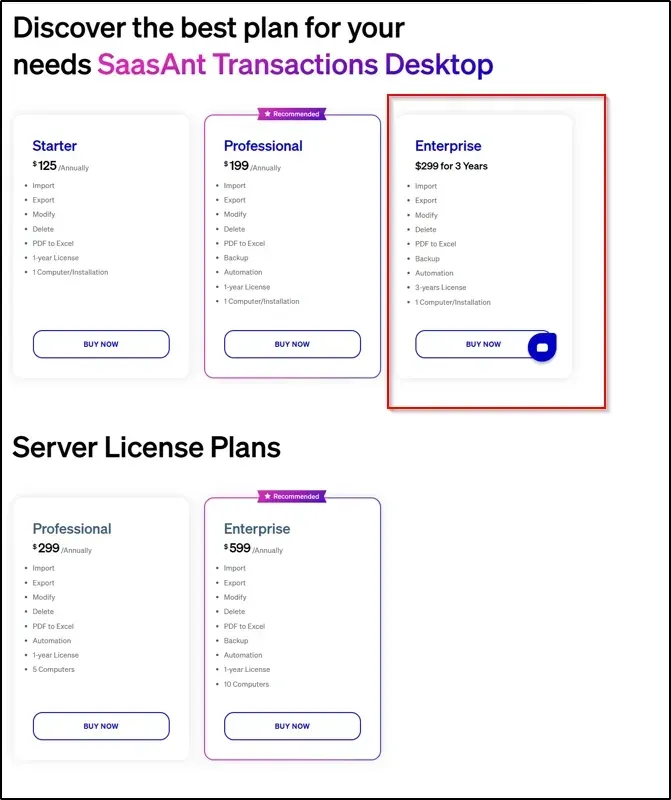
While the application initially operates in trial mode, full access to migration capabilities necessitates a valid license.
License Requirement: The comprehensive migration feature is typically available under a specific premium plan (e.g., the $299 plan) in the SaasAnt Pricing Page. Consult SaasAnt's current pricing details for precise plan information.
Purchase Avenues: Licenses can be procured directly from the official SaasAnt website or conveniently through the application interface itself.
License Activation Process:
Open the SaasAnt Transactions Desktop Application.
Navigate to the 'Subscription' menu and then select 'Register'.
Input your purchased license key into the designated field.
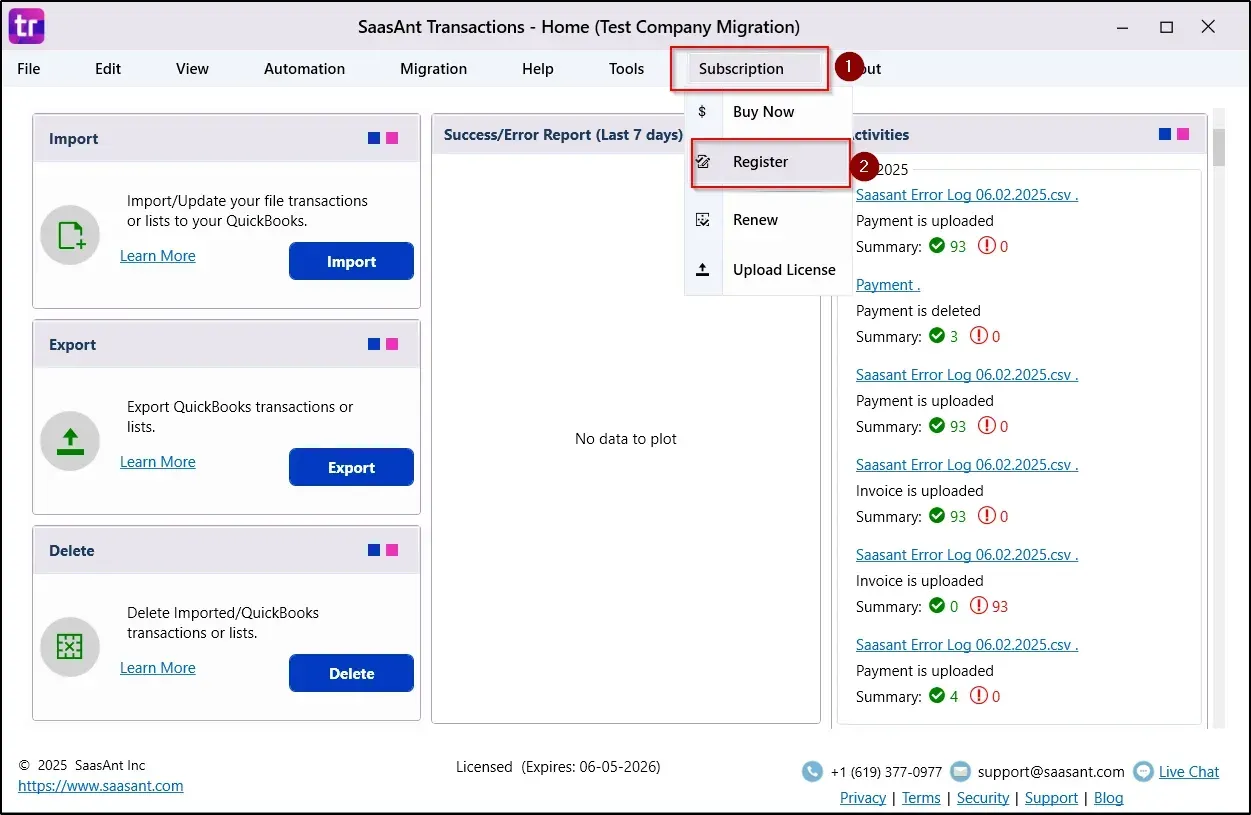
Activation Confirmation: A "Registration Successful" message will confirm that your application is fully activated and prepared for all operational uses, including migration.
4. Executing Data Export for Lists and Transactions from SaasAnt Desktop
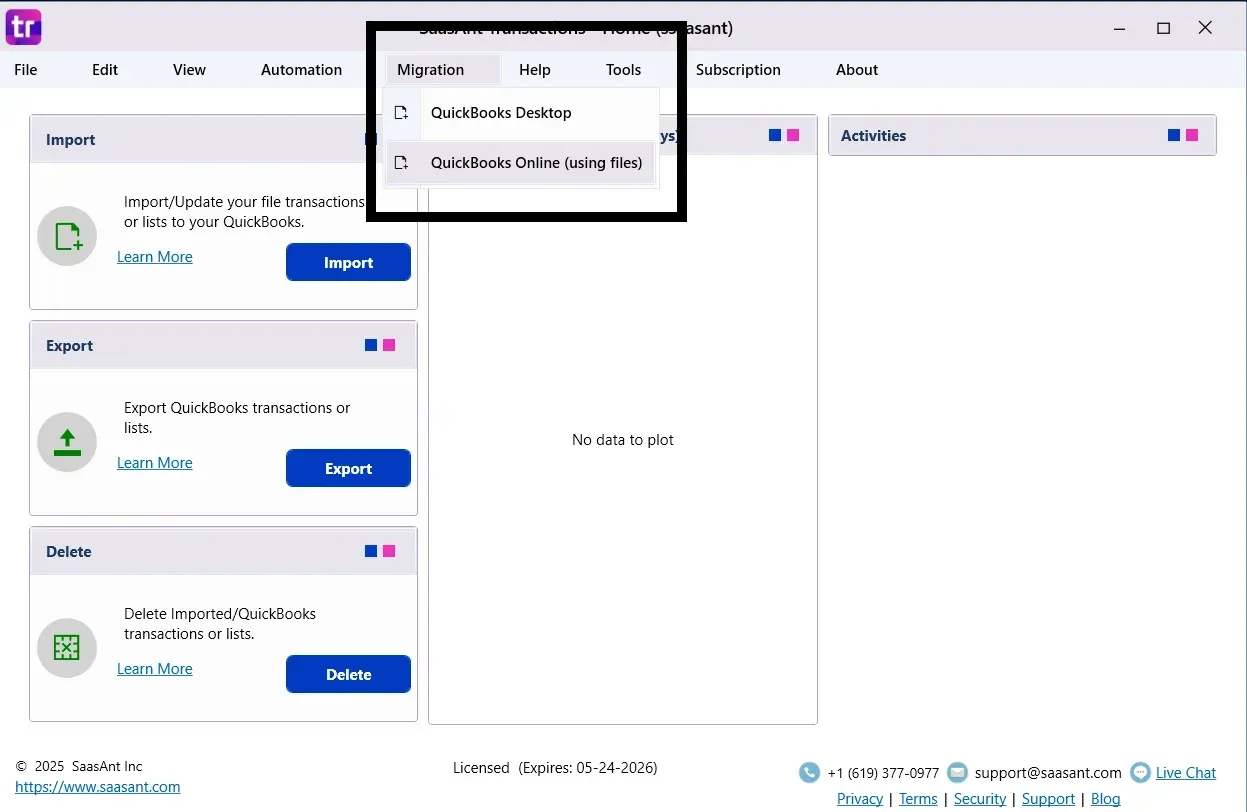
Initiate Migration Flow: Click the 'Migration' tab located at the top of the SaasAnt interface and choose 'QuickBooks Online (Using Files)' from the subsequent dropdown menu. This action will launch the specialized SaasAnt Migration application.
Commence New Migration: Within the SaasAnt Migration application, click on the 'Start New Migration' button.

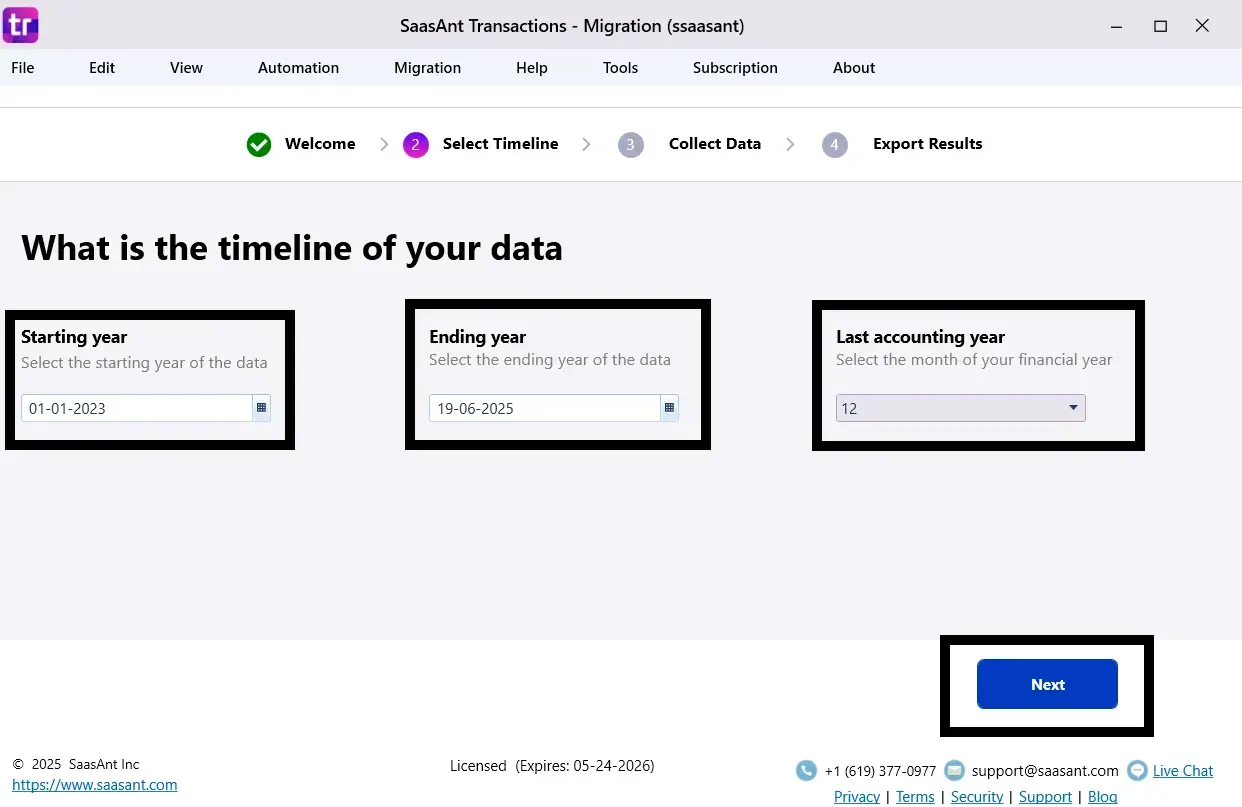
Define Accounting Period: Specify the exact Migration Start and End Dates, alongside the relevant accounting period, then click 'Next' to proceed.
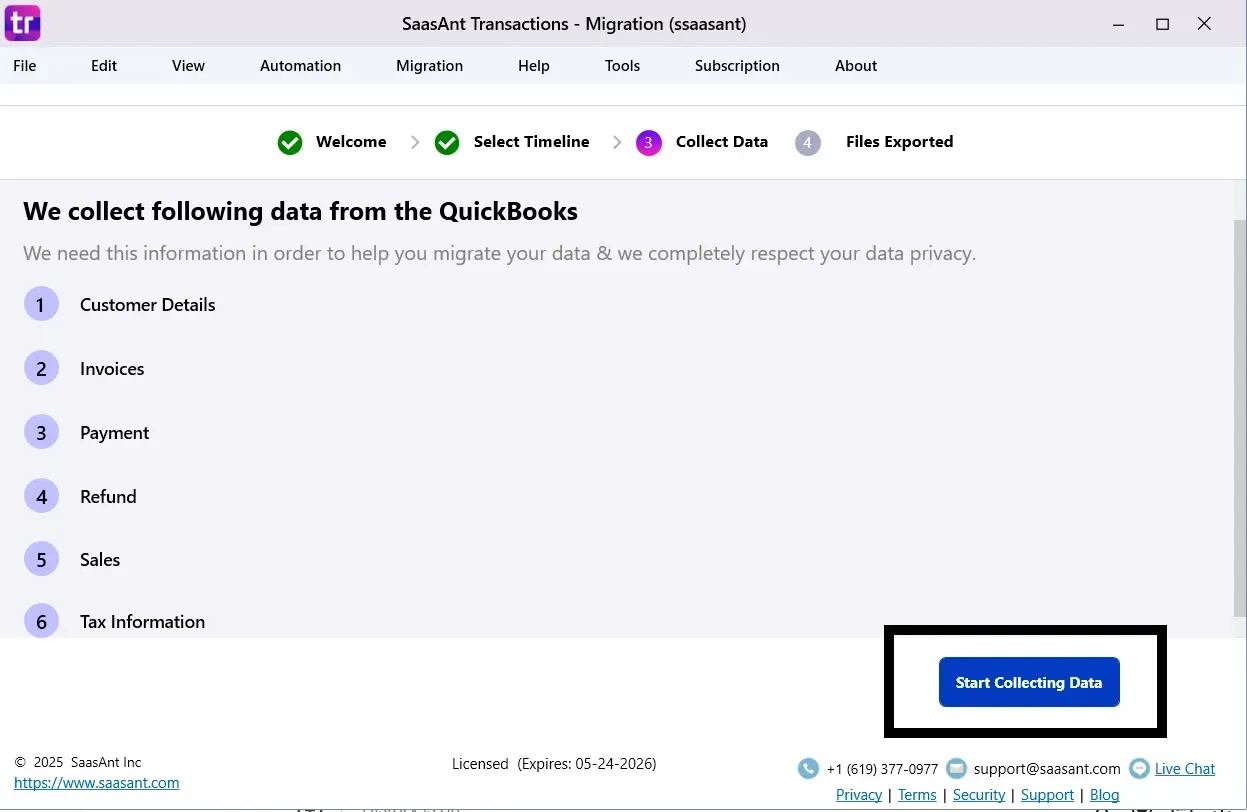
Data Collection Initiation: A comprehensive list of transactions slated for extraction will be displayed. Click 'Start Collecting Data' to begin the export process.
Review Exported Data: Once the data collection is complete, click 'View Migrated Data' to automatically open the designated folder containing your meticulously exported CSV files.
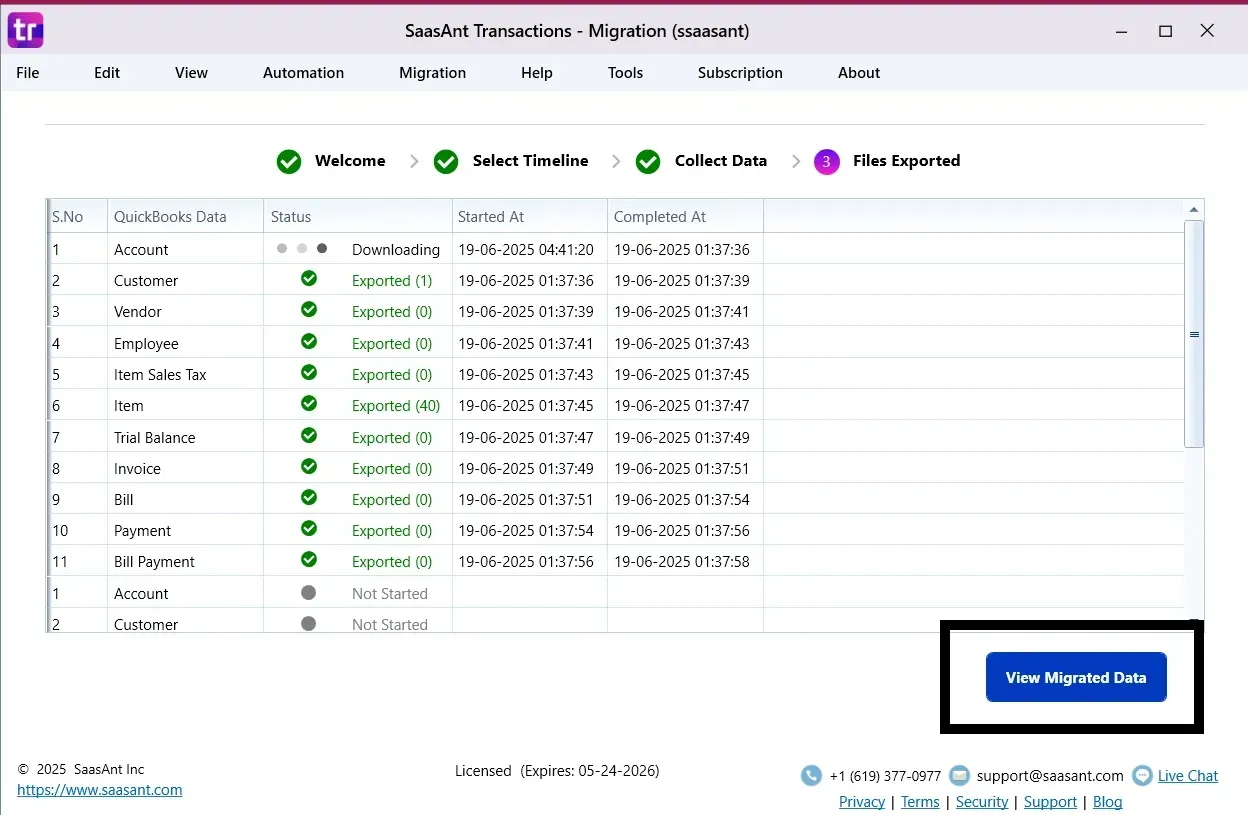
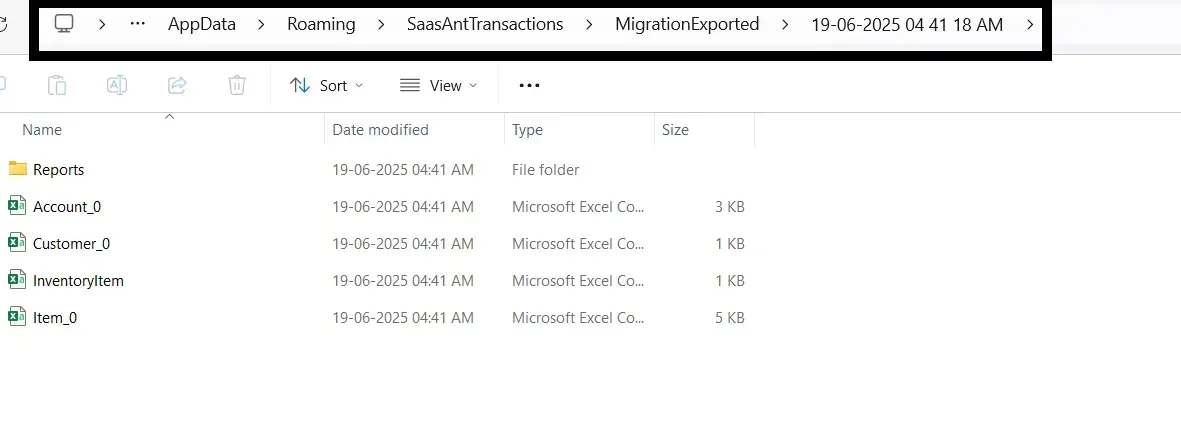
Result: Your essential financial data has now been successfully exported from QuickBooks Desktop into readily usable CSV files, perfectly structured for the next crucial phase: importing into QuickBooks Online.
 Check this video on how to connect SaasAnt Desktop to your QuickBooks Desktop
Phase 2: Importing Your Exported Data to QuickBooks Online
With your data successfully exported from QuickBooks Desktop, the subsequent pivotal step involves transferring it into your QuickBooks Online account utilizing the SaasAnt Transactions Online application.
1. Initiating Usage of SaasAnt Transactions Online
Crucial Prerequisite: To securely connect any third-party application to QuickBooks Online, you must possess admin access permissions to your QuickBooks company account. This ensures authorization and data security.
2. Connecting QuickBooks Online with the SaasAnt Application
Access QuickBooks Online Apps Section: Log in to your QuickBooks Online account. From the left-hand navigation menu, proceed to the 'Apps' section and click on 'Find Apps. '
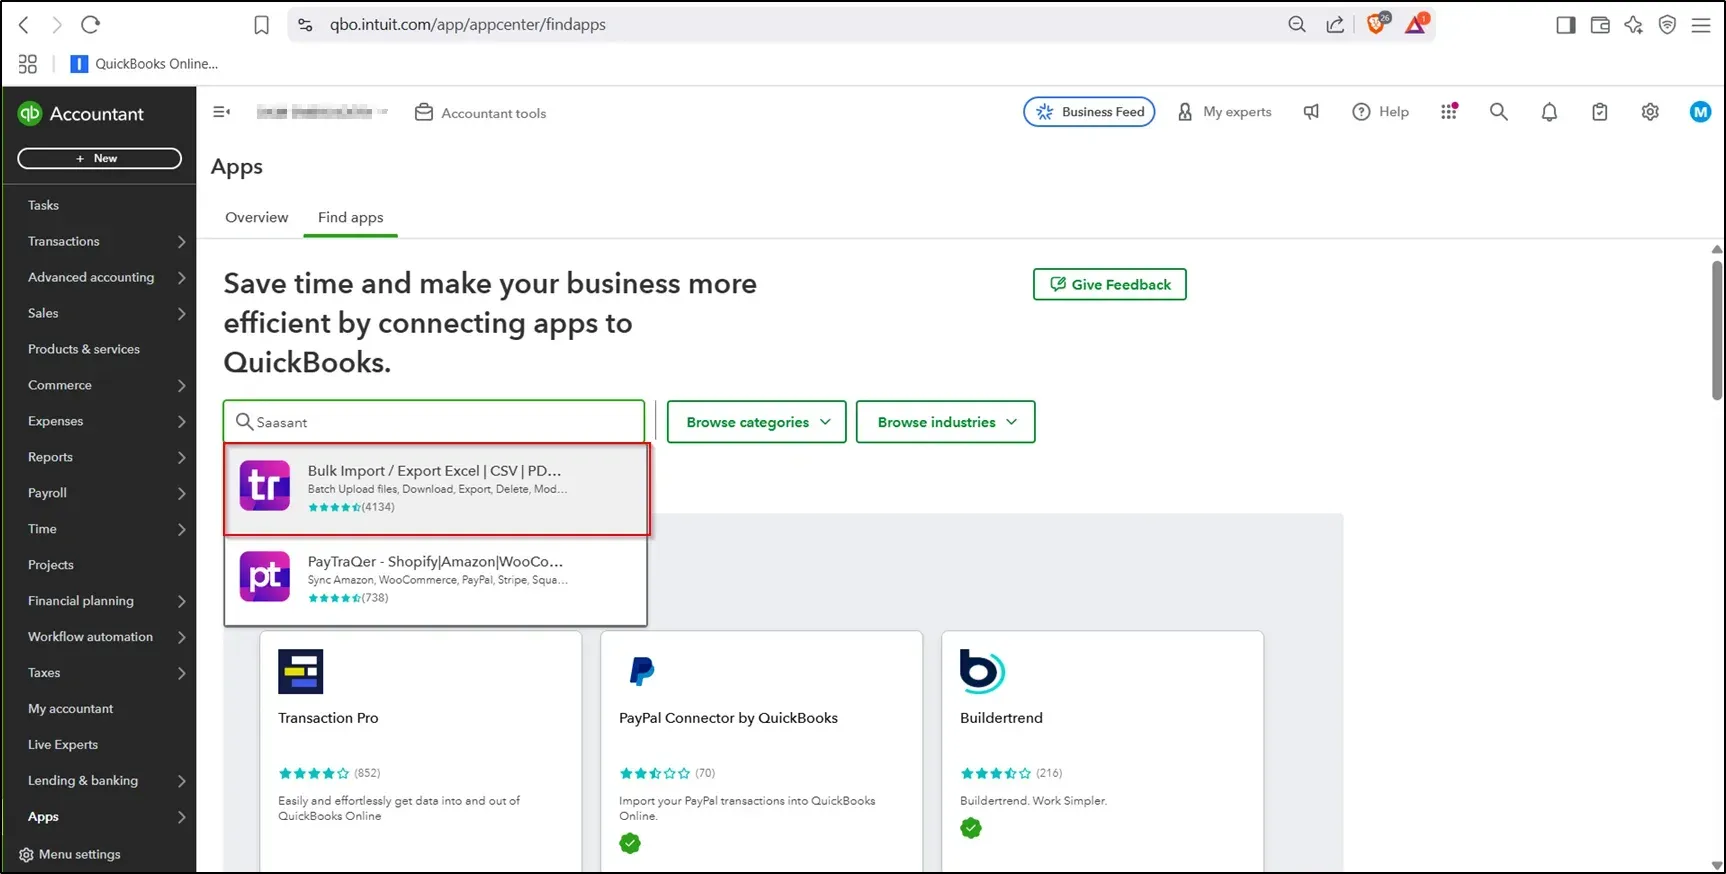
Search for SaasAnt Application: Within the 'Find Apps' section, utilize the search bar to find "SaasAnt Transaction" and select the most relevant result presented.
Establish App Connection: On the dedicated SaasAnt app page, click on the 'Get App Now' button to commence the connection process.
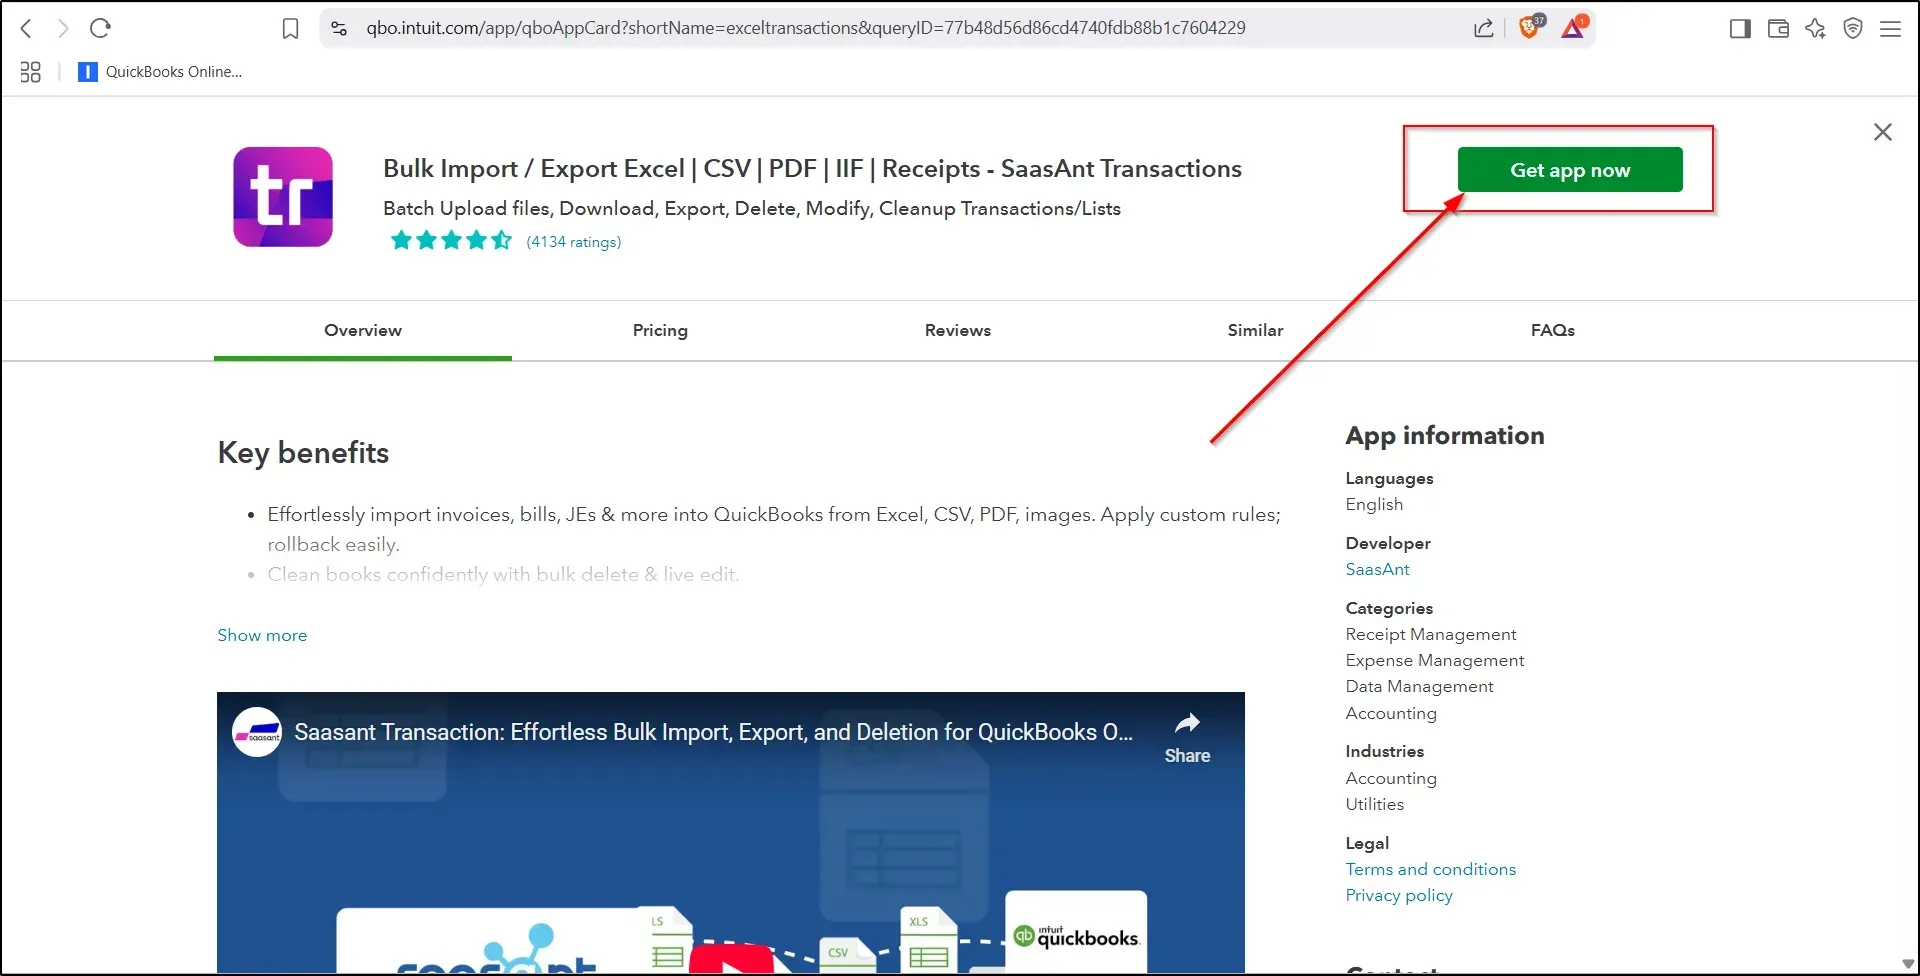
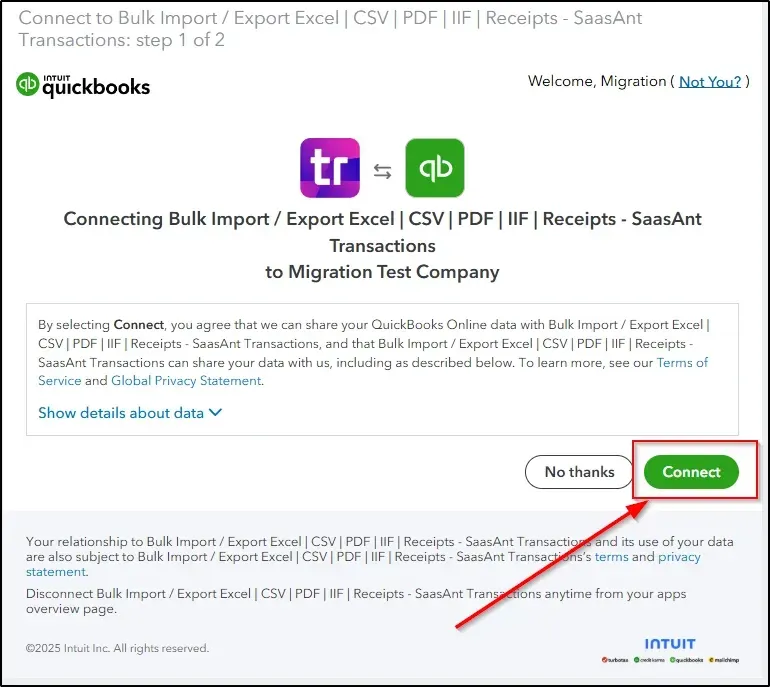
Authorize Connection: Click 'Connect' and explicitly authorize the application's access to your QuickBooks Online data. Upon successful authorization, you will be seamlessly redirected to the SaasAnt Transactions Online home page, confirming the established connection.
Trial Activation: For users connecting to the application for the first time, a complimentary 30-day trial period will be automatically activated.
3. Subscribing to SaasAnt Transactions Online for Full Access
To continue with comprehensive data transfer capabilities beyond the limitations of the trial version, a subscription is necessary.
Review Subscription Plans: Consult the official SaasAnt pricing details to select a subscription plan that precisely aligns with your anticipated data transfer volume and specific business requirements.
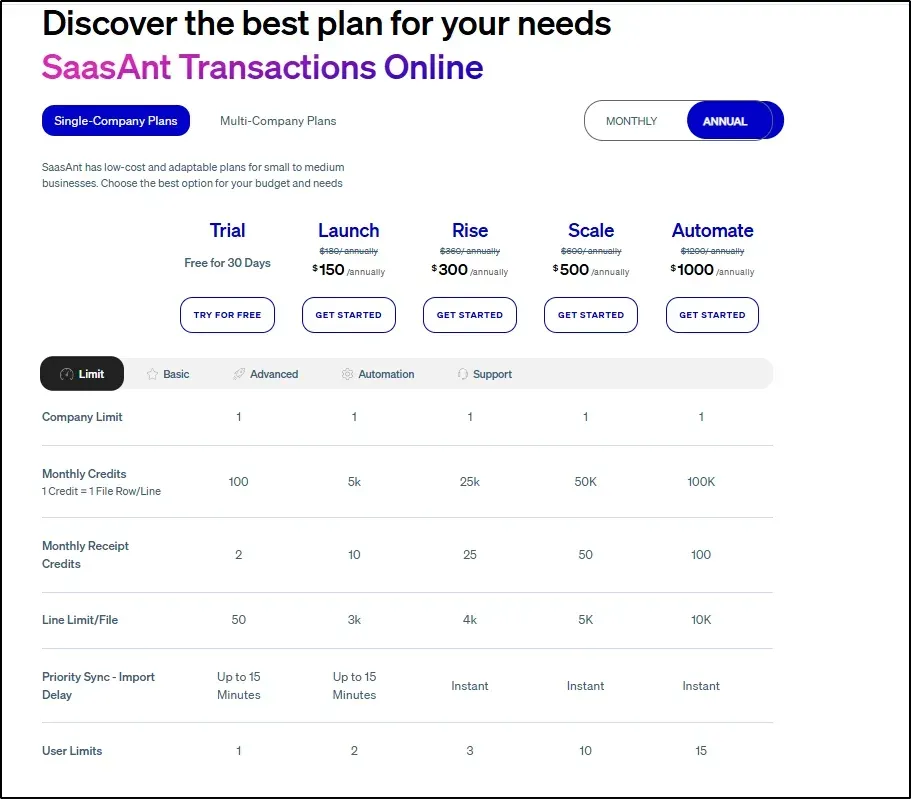
Initiate Subscription: Open the SaasAnt Online application, navigate to the gear icon (settings), and then click on 'Plans'.
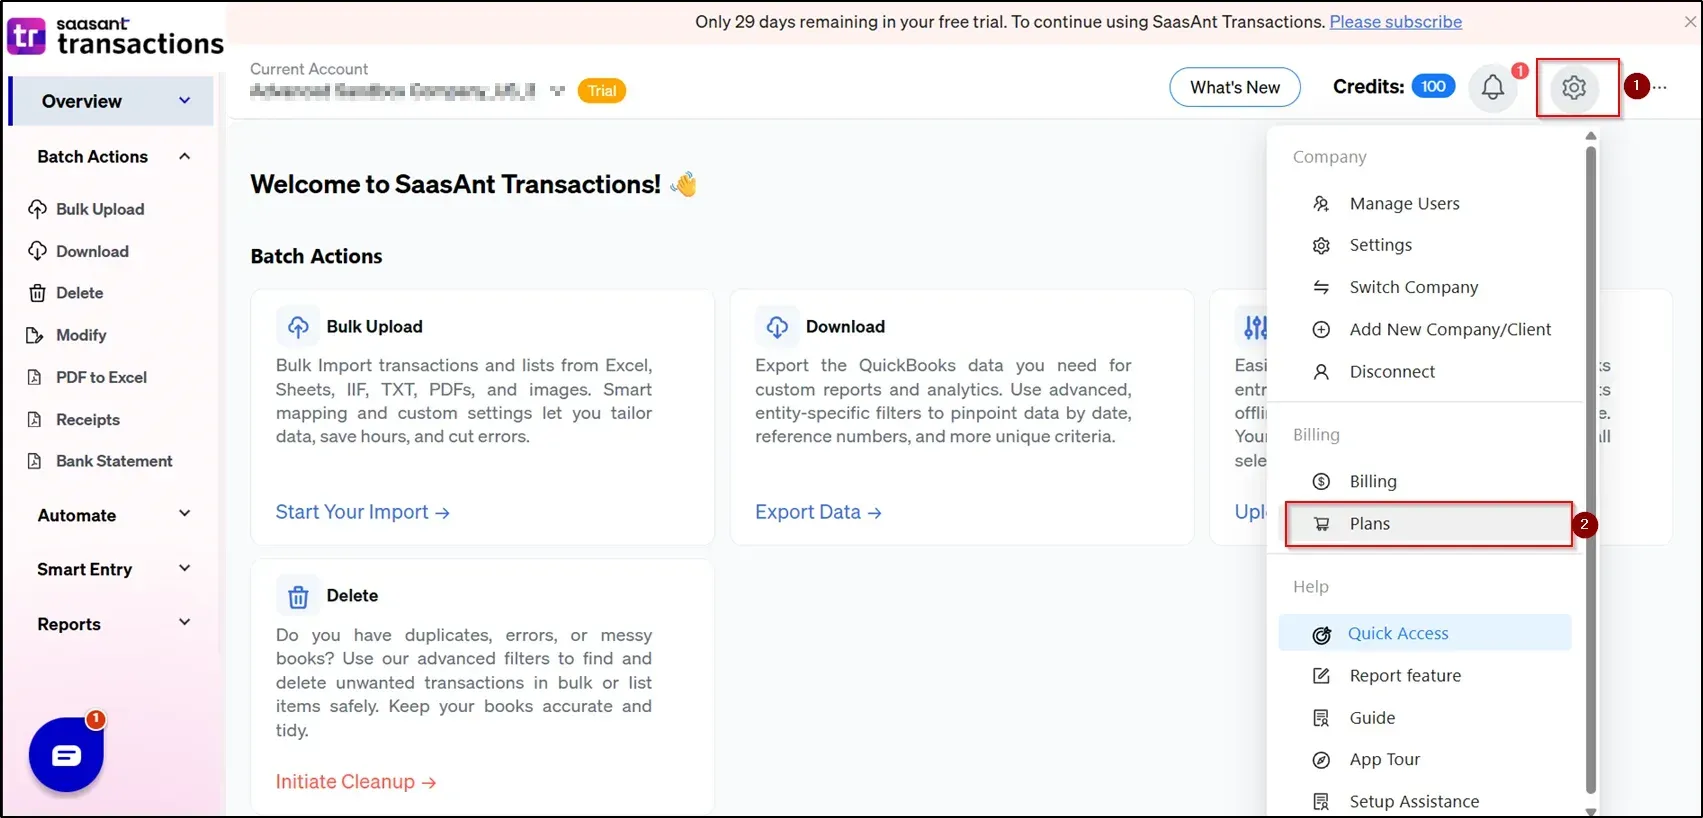
Complete Payment: Click 'Select Plan' to be securely redirected to the payment gateway (e.g., Stripe) where you can enter your card details and finalize the purchase. Upon successful payment, your account will be fully activated and ready to continue the migration process.
Pre-Migration Checklist: Ensuring a Seamless and Error-Free Transition
Before importing your exported data, it is essential to prepare your QuickBooks Online account thoroughly. This proactive step is crucial for preventing potential errors, ensuring the integrity of your transferred data, and facilitating a smooth overall migration experience.
Currency Alignment: Verify that both your QuickBooks Desktop and QuickBooks Online accounts are configured to the same home currency. Discrepancies in this area can lead to significant financial errors.
Clean Slate Principle: Ideally, your target QuickBooks Online account should be empty of any existing transactions or lists before migration. This practice prevents potential data conflicts, duplicates, and complex reconciliation issues.
Sales Tax Setup Validation: If your QuickBooks Desktop utilizes custom sales tax configurations, you must manually replicate and create these same sales tax items within QuickBooks Online before initiating the data import.
How to Create Sales Tax in QuickBooks Online:
Log in to your QuickBooks Online account, navigate to the 'Tax' section, and click on 'Sales Tax' (for US versions).
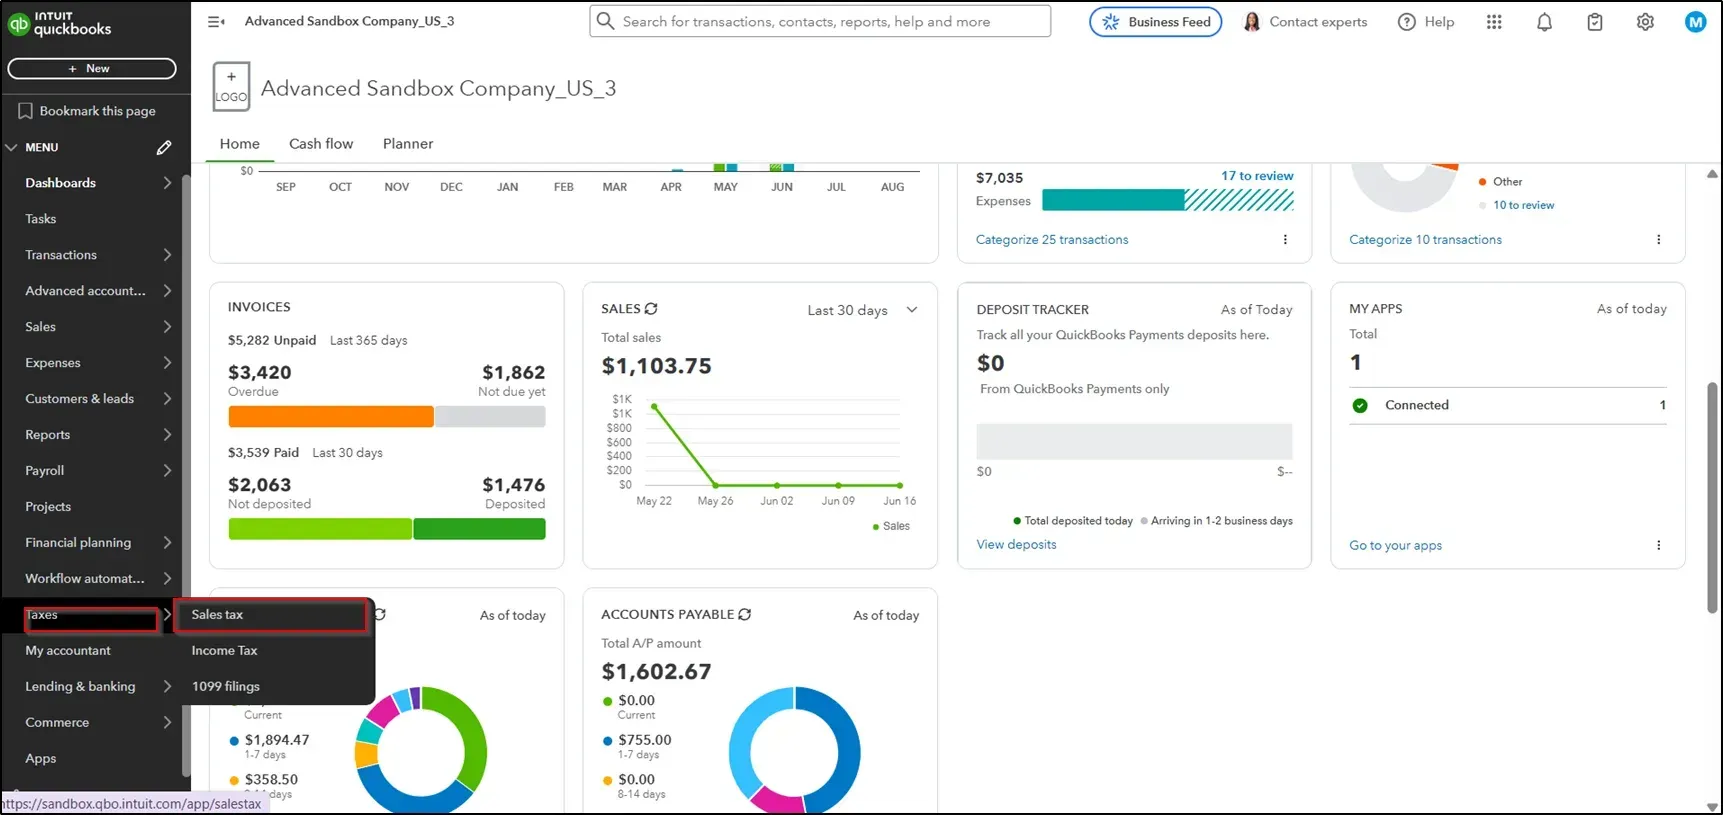
Click on 'Tax Settings' → 'Add Agency' → 'Custom Rates. '
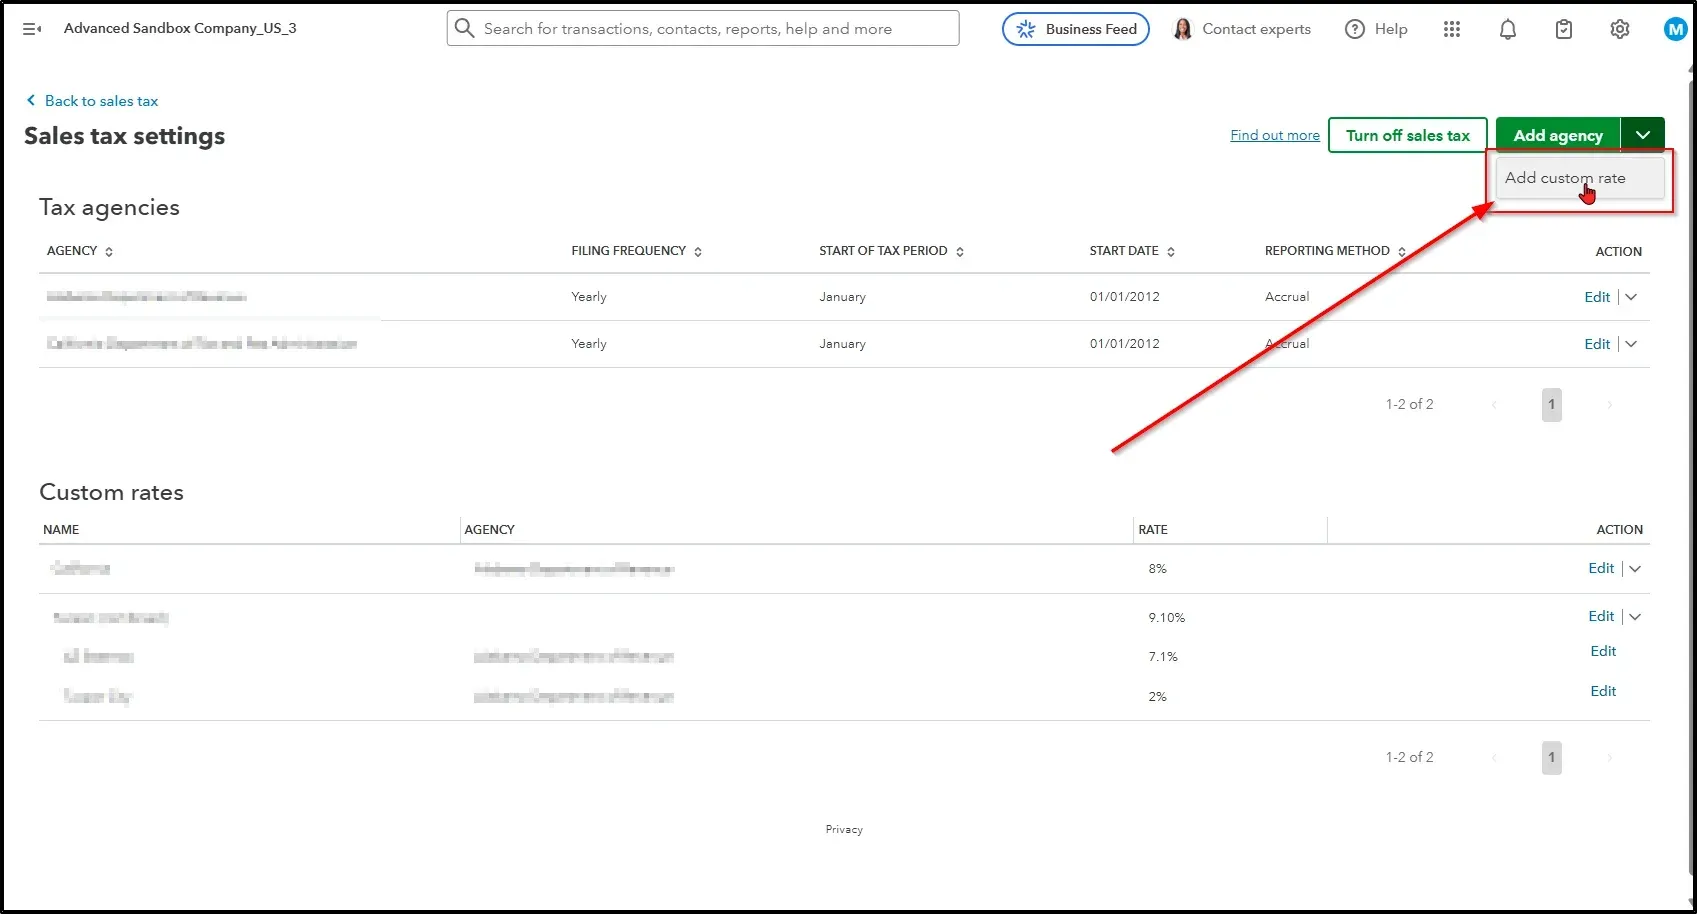
Critical Match: Ensure the sales tax name created in QuickBooks Online precisely matches its corresponding name in QuickBooks Desktop. Mismatched names will cause import failures.
Multi-Currency Settings (If Applicable): For businesses whose QuickBooks Desktop file utilizes multiple currencies:
You must enable multi-currency in QuickBooks Online. Navigate to Settings > Account and Settings > Advanced > Currency.
Closed Books Date Configuration: Set the "Close the books" date in your QuickBooks Online account to one day before your defined migration start date.
Example: If your migration is scheduled to commence on January 1, 2023, set the close date to December 31, 2022.
Access this setting via Settings > Account and Settings > Advanced > Accounting > Close the books.
Duplicate Journal Entry Warnings Activation: To prevent the accidental creation of duplicate journal entries in QuickBooks Online, activate the warning setting.
Go to Settings > Account and Settings > Advanced > Automation and enable “Warn me if a duplicate journal number is used.” This proactive measure adds an extra layer of data integrity.
The Migration Process Order: A Critical Sequence for Data Upload Success
To guarantee absolute data integrity, proper linking between financial records, and accurate reporting within QuickBooks Online, you must upload your exported data in the following exact sequence using SaasAnt Transactions Online:
Customer Records: Foundation for all sales-related transactions.
Vendor Records: Essential for all purchase and expense-related transactions.
Employee Records: If migrating payroll-related data (though payroll itself often requires separate setup).
Chart of Accounts: The backbone of your financial reporting structure.
Product/Service Items: Necessary for invoices, bills, and other transaction lines.
Trial Balance: To establish correct opening balances.
Invoices: Accounts Receivable transactions.
Bills: Accounts Payable transactions.
Receive Payments: Applying payments against invoices.
Bill Payments: Applying payments against bills.
All Other Transactions (Journal Entries): Any remaining transaction types not covered above will typically be recorded as Journal Entries during this process.
Before you initiate any data transfer from your exported Excel/CSV files to QuickBooks Online, confirm that you have diligently completed every item outlined in the Pre-Migration Checklist.
Uploading Your Data to QuickBooks Online Using SaasAnt: Practical Steps
The process for uploading each distinct data type via SaasAnt Transactions Online follows a consistent and user-friendly methodology. We will illustrate these general steps comprehensively, and you can apply them systematically to each entity in the pre-defined critical order.
General Data Upload Steps (Illustrated with Customer Upload Example)
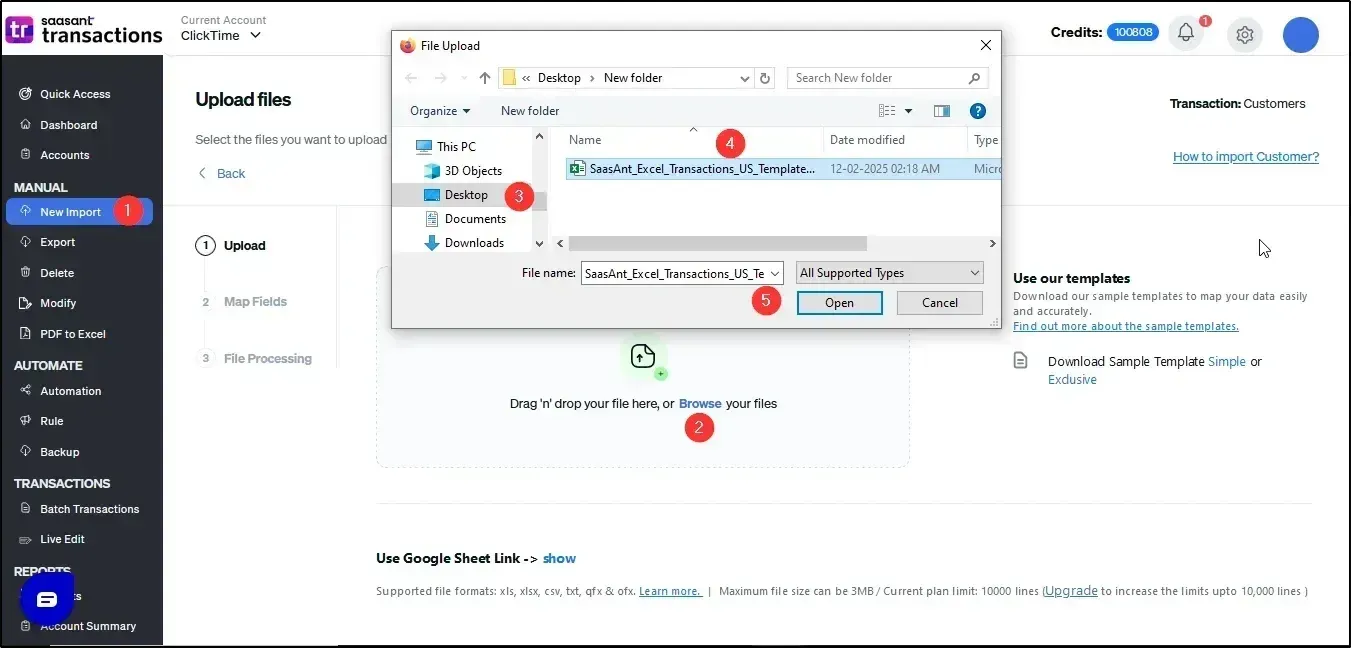
Select QuickBooks Entity: Within the SaasAnt Transactions Online interface, click on the Bulk Upload option and then precisely select the QuickBooks entity you intend to upload from the available list (e.g., "Customers").
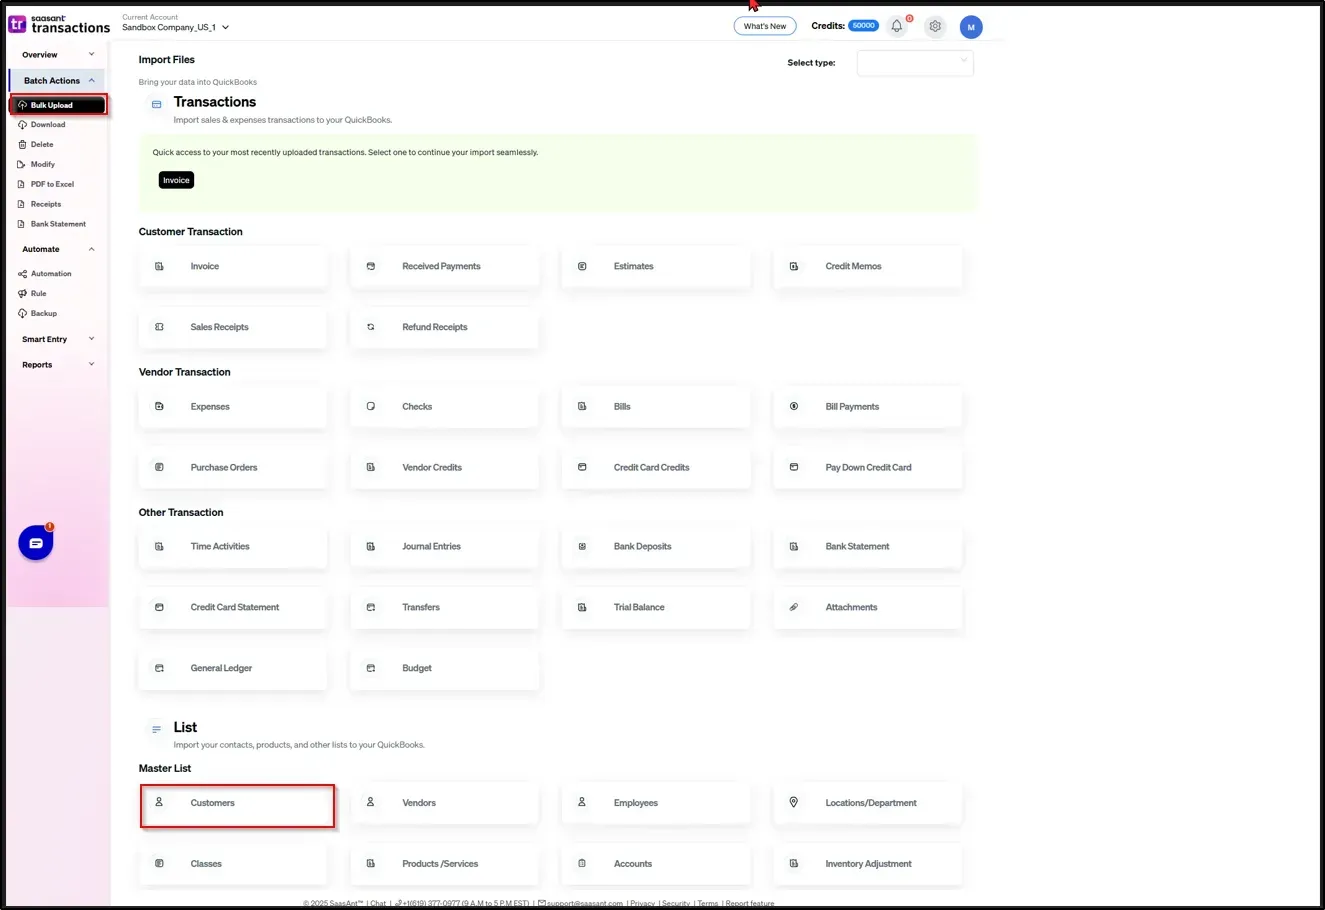
Choose Your Exported File: Navigate to and select the specific CSV file you previously exported from QuickBooks Desktop that contains the data corresponding to the chosen entity.
Accurate Field Mapping: On the dedicated Mapping screen, meticulously align the QuickBooks fields (destination) with the corresponding column headers in your uploaded CSV file (source). This step is paramount for accurate data placement. Once all fields are correctly mapped, click Save and Continue to proceed.
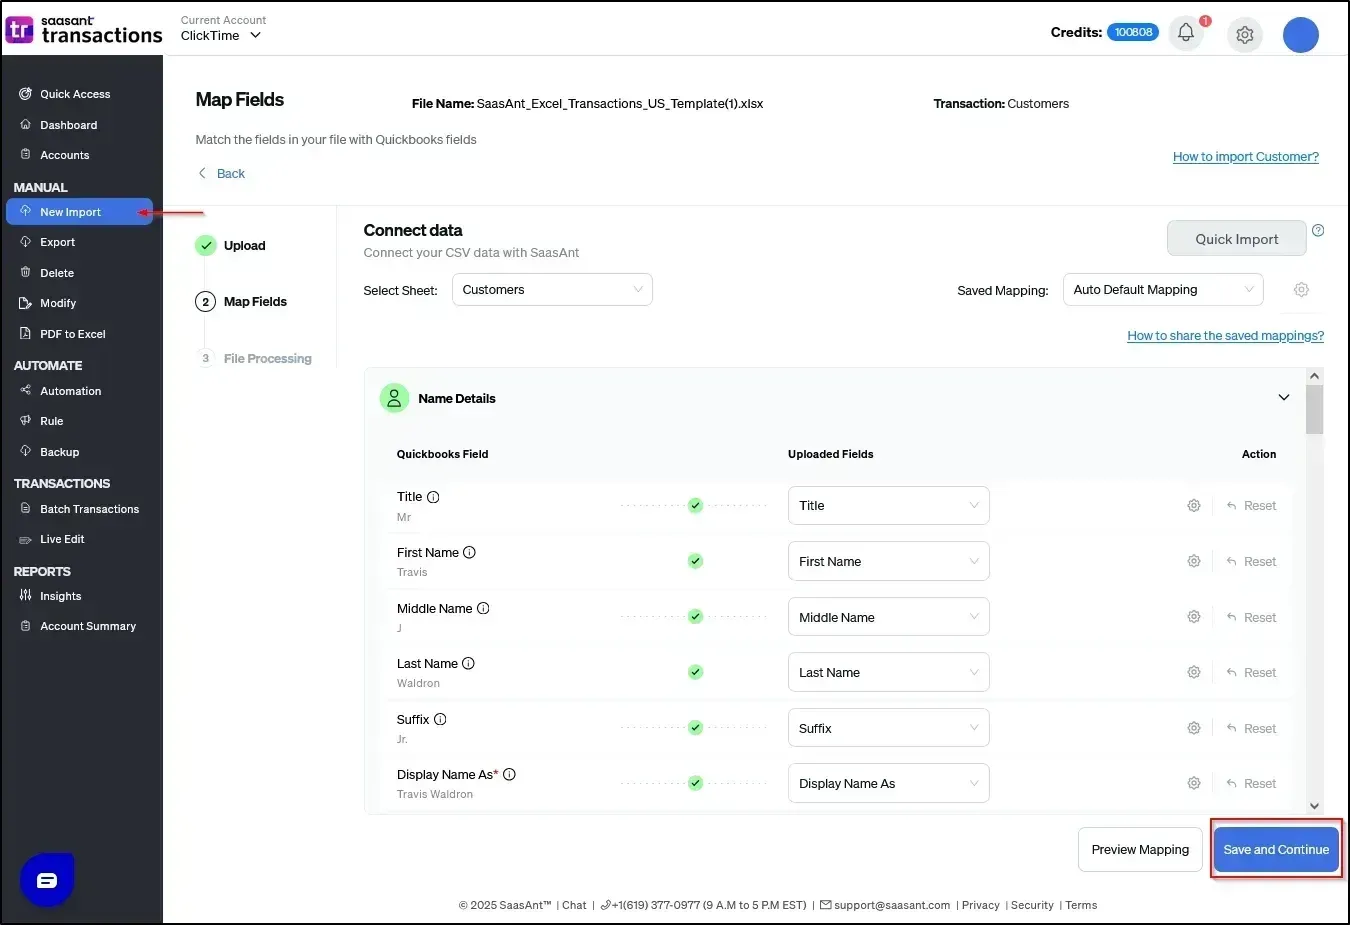
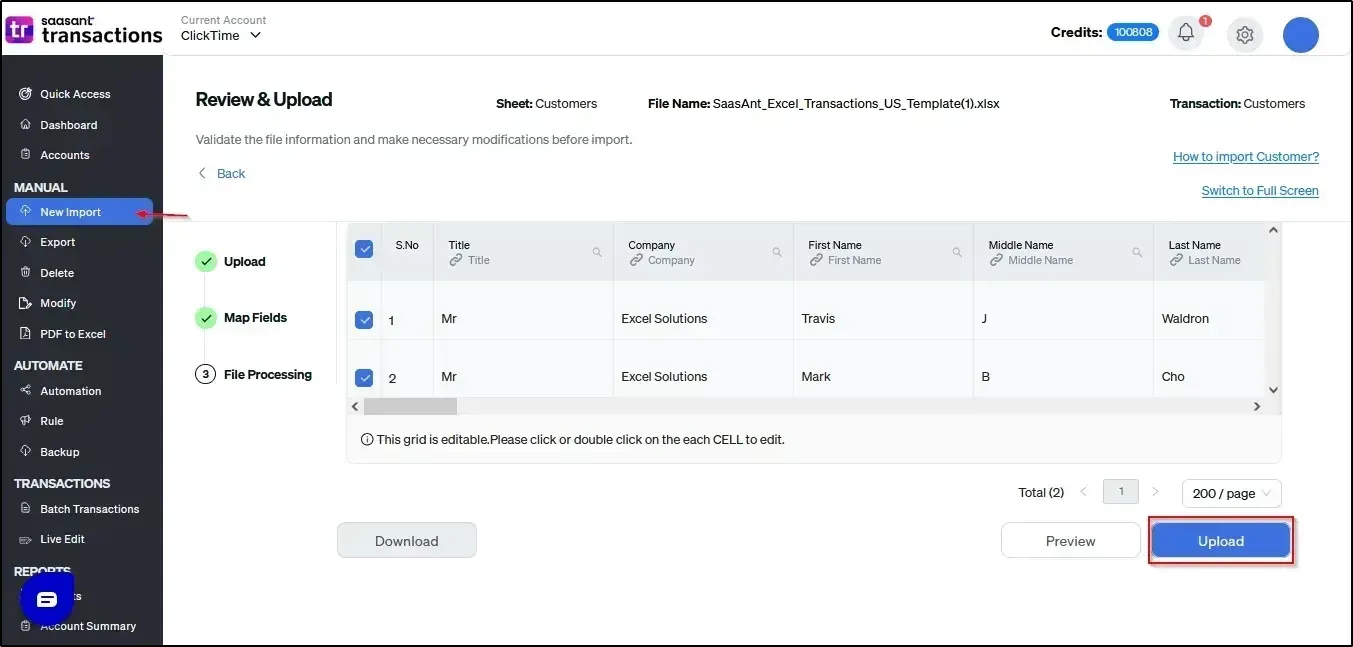
Review and Validate Data: Access the Review screen. Here, click on Preview to generate a visual representation of how your data will appear once imported into QuickBooks Online. Review this preview carefully to ensure everything is accurate. Once you are satisfied with the preview, click 'Upload' to initiate the import.
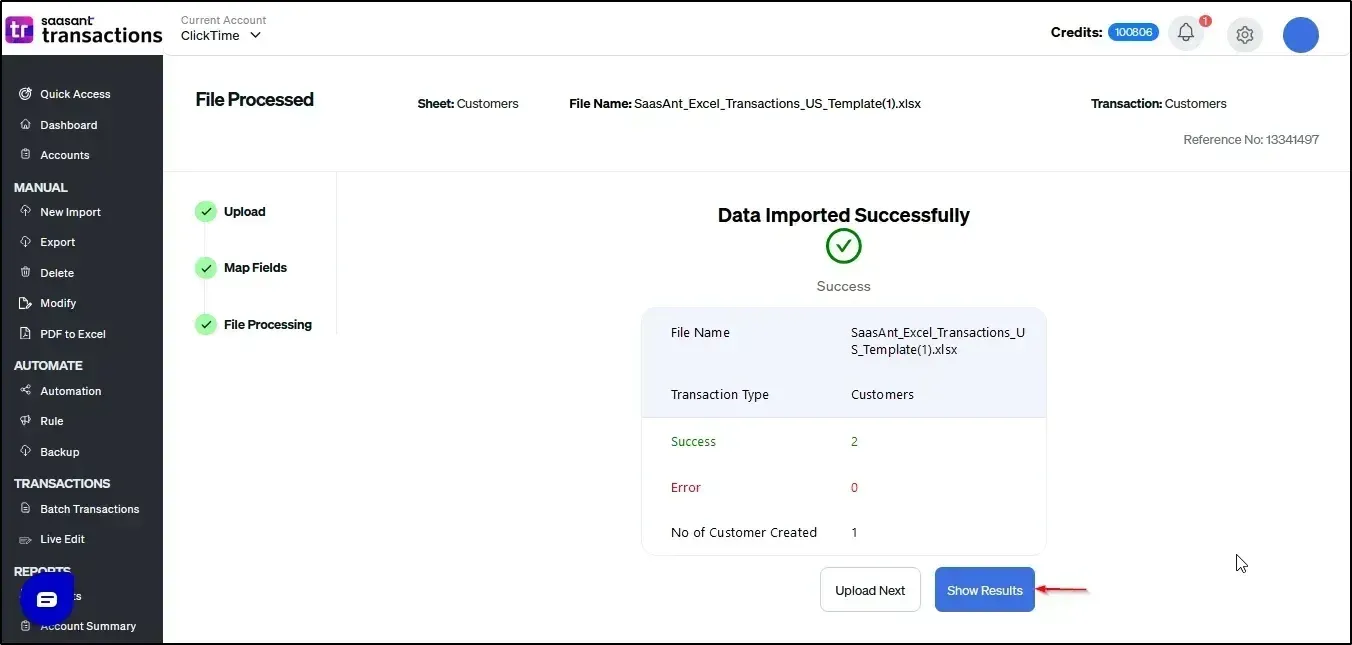
Confirmation of Import: A clear success message will confirm that your data has been successfully imported into your QuickBooks Online account.
Repeatability: This precise five-step process should be diligently followed for the migration of Customers, Vendors, Employees, Chart of Accounts, Products/Services, Invoices, Bills, Journal Entries, Receive Payments, Bill Payments, and the Trial Balance. Always remember to select the correct entity in Step 1 for each respective upload.
Learn how to import data into your QuickBooks Online with SaasAnt Transactions Online
Common Errors and Effective Solutions During QuickBooks Migration
Even with the aid of a robust migration tool like SaasAnt, encountering errors during the migration process is a possibility. Understanding the most frequent issues and their proven solutions will empower you to troubleshoot effectively and maintain momentum.
Specific Limitations During QuickBooks Migration
It is crucial to acknowledge that specific transaction and data types are generally not directly supported for automated migration from QuickBooks Desktop to QuickBooks Online using third-party tools such as SaasAnt. These often require manual re-entry, alternative setup, or strategic workarounds:
Inventory Adjustments
Build Assembly
Price Levels
Item Sites
Statement Charges
Item Receipts with Bills
Credit Card Charges (individual transactions)
Attachments
Inventory Transfers
Vehicle Mileage
Inventory Assemblies
Fixed Assets (detailed asset records, though balances can be migrated)
Item Groups (often converted to categories or need manual setup)
Other Names
Sales Tax Groups
Locations (can often be recreated manually in QBO)
Item Payments
Troubleshooting Customer and Vendor List Import Errors
Error: "The name supplied already exists."
Solution: Ensure all customer and vendor names in your CSV are unique. If a name already exists in QuickBooks Online (e.g., from a previous manual entry), this error can often be safely ignored if it refers to the same entity.
Error: "Email Address does not conform to RFC 822 syntax."
Solution: Correct the email address format (e.g., change "testemail@aol,com" to "testemail@aol.com") in your CSV. If the email is not critical, consider removing the email field for that specific entry.
Resolving Chart of Accounts Import Errors
Error: "Another account is already using number [X]."
Solution: Assign a unique account number to the new account.
Error: "The name supplied already exists."
Solution: Avoid duplicate account names. Ensure each account has a distinct name.
Error: "Incorrect Date Format or Invalid enumeration."
Solution: Verify that the account type (e.g., Bank, Expense, Income) and detail type (e.g., Checking, Supplies) in your file precisely match the supported values in QuickBooks Online.
Error: "Account used for reconciliation discrepancies cannot be a sub-account."
Solution: Use the appropriate parent account instead of attempting to create the reconciliation discrepancy account as a sub-account.
Error: "Subaccounts must have the same account type as their parent."
Solution: Ensure that the account type of a sub-account (e.g., "Expense") is identical to its parent account's type (e.g., "Expense").
Error: "Only one Opening Balance Equity account allowed."
Solution: If you have multiple accounts named "Opening Balance Equity," change the excess accounts to “Owner's Equity” or another suitable equity account type.
Addressing Products/Services Import Errors
Important Notes:
QuickBooks Desktop "parent items" are often converted into "Categories" within QuickBooks Online.
Ensure that all associated Income, Expense, and Inventory accounts for your products/services are pre-created in QuickBooks Online before importing the items.
Error: "The name supplied already exists."
Solution: Use unique item names for all products and services.
Error: "Missing ExpenseAccountRef or IncomeAccountRef"
Solution: For each product/service item, you must provide both a valid income account and an expense account in your data file.
Error: Category conflicts
Solution: If an item name in your file conflicts with an existing category name in QuickBooks Online, either rename the item in your file or modify the existing category within QBO to resolve the conflict.
Error: Inventory product account requirements
Solution: For inventory items, the Income account specified must have "Income" as its Account Type and "Sales of Product Income" as its Detail Type in QuickBooks Online.
Error: Missing inventory COGS account
Solution: You must provide an Expense Account for Cost of Goods Sold (COGS) with "Cost of Sales" as its Account Type and "Supplies and materials - COS" as its Detail Type.
Error: "No matching category" error
Solution: Verify that all categories referenced in your product/service data file already exist in QuickBooks Online; create any missing categories as needed.
Troubleshooting Invoice Transaction Import Errors
Important Note: QuickBooks Online automatically defaults to using the primary Accounts Receivable account for all invoices. Unlike Desktop, you cannot select different AR accounts on a per-invoice basis.
Error: Duplicate document numbers
Solution: Ensure unique invoice numbers are used in your data file. Alternatively, within SaasAnt settings (Gear Icon → Settings → Transactions), enable "Process transactions with Duplicate Reference Numbers" by toggling it On.
Error: "No matching Product/Service found."
Solution: Verify that the product or service names listed in your invoice file exactly match those already created and present in QuickBooks Online.
Error: GST/HST rate errors
Solution: Ensure that the exact tax codes and rates used in your exported data are present and correctly configured within QuickBooks Online.
Error: "Transaction amount must be 0 or greater."
Solution: Verify that all invoice totals are either zero or a positive value.
Error: "No Customer information found."
Solution: Ensure that the customer names in your invoice file exactly match the customer names that have already been successfully imported into QuickBooks Online.
Addressing Bill Transaction Import Errors
Error: Duplicate document numbers
Solution: Apply the same solution as for invoice duplicate document numbers.
Error: "No matching Product/Service found"
Solution: Verify product names in your bill file exactly match those in QuickBooks Online.
Error: "No Account or Product/Service available for this line"
Solution: Ensure there are no blank lines or missing account/product information within your bill data file. Every line item needs a corresponding account or product/service.
Error: "Line Amount for Expense Account is mandatory"
Solution: Provide an amount for every line item, using 0 if no value is applicable for that specific line.
Error: "Transaction amount must be 0 or greater"
Solution: Ensure all bill totals are either zero or a positive value.
Error: "No Account information found"
Solution: Verify that all expense accounts referenced in your bills exist in QuickBooks Online's Chart of Accounts with exact name matches.
Error: "No Vendor information found"
Solution: Ensure that vendor names in your bill file exactly match those of vendors that have already been successfully imported into QuickBooks Online.
Troubleshooting Receive Payments Import Errors
Error: "No matching Invoice found"
Solution: The system requires a precise match across three key elements when applying payments: the invoice number, the customer name, and the payment amount. All three must exactly match between your payment file and the corresponding existing invoice in QuickBooks Online.
Resolving Bill Payments Import Errors
Error: "No matching Bill found"
Solution: Verify that the bill number referenced in your bill payment file exists as an unpaid bill in QuickBooks Online.
Addressing Journal Entries Import Errors
Important Requirements for Journal Entries:
Balance: The total debits and credits for each journal entry must balance to zero.
AR/AP Links: Include customer names for all Accounts Receivable (AR) entries. Include vendor names for all Accounts Payable (AP) entries.
Dual Rows: Each complete journal entry requires both a debit row and a credit row.
Error: "No Account information found"
Solution: Ensure all accounts referenced in your journal entries exist in QuickBooks Online's Chart of Accounts with exact name matches.
Error: Currency mismatch errors
Solution: For multi-currency entries, ensure that the account currency specified in the journal entry matches the associated customer or vendor currency.
Error: "Only one foreign currency per transaction"
Solution: Limit journal entries to your home currency plus a maximum of one foreign currency per individual transaction.
Conclusion: Your Pathway to a Successful QuickBooks Online Migration
By diligently adhering to this comprehensive, step-by-step guide, your migration from QuickBooks Desktop to QuickBooks Online using SaasAnt Transactions will be executed with precision, accuracy, and full compliance. The critical emphasis on pre-migration preparation, sequential data upload, and proactive error resolution ensures a streamlined process. Always prioritize meticulously validating your data both before and immediately after migration to ensure consistency, maintain financial integrity, and effectively prevent future discrepancies.
The transition to QuickBooks Online represents a significant opportunity to enhance your financial management efficiency, offering unparalleled flexibility and accessibility. With thoughtful planning and the strategic deployment of powerful tools like SaasAnt Transactions, your journey to cloud accounting success will be both smooth and rewarding.
Read Also
Migrating from QuickBooks Desktop to QuickBooks Online
What Are the 3 Primary Ways to Migrate Client Data to QuickBooks Online?
Understanding QuickBooks Migration: From Desktop to Online
Troubleshooting Common Issues During QuickBooks Migration