Managing Journal Entries in QuickBooks
Navigating the complex accounting and financial management landscape requires a careful touch and impeccable organization. That’s where journal entries step into the spotlight. This article will explore managing journal entries in QuickBooks, the trusty go-to software for countless businesses. These entries act as the heart and soul of your financial records, and getting the hang of their management is a game-changer for precise financial reporting and more thoughtful decision-making.
And here’s where SaasAnt Transactions comes into the picture, helping streamline and optimize your journal entry management process. Let’s explore its vital role in simplifying this essential aspect of accounting.
Contents
Why Manage Journal Entries?
Why Manage Journal Entries?
Journal entries act as the foundational data in accounting, meticulously recording every financial transaction within your business. These entries cover a broad spectrum, from income and expenses to assets and liabilities, and they constitute the essential building blocks of your financial statements. As a result, proficiently handling journal entries is of utmost importance to maintain the precision and integrity of your financial data.
Overview of Journal Entries in QuickBooks
Understanding Journal Entries
Let’s break down the concept of journal entries. In the accounting universe, they’re like the meticulously detailed records of your financial adventures. Think of them as your GPS for tracking the cash flow in and out of your business, clearly showing your economic well-being. The best part? QuickBooks takes the complexity out of creating and managing these entries, making it a breeze, even if you’re not a financial expert. It’s like having a helpful friend by your side to simplify the whole process.
Types and Usage in QuickBooks
QuickBooks offers a range of journal entry types, encompassing standard, reversing, and recurring entries. These diverse types each have their specific role, enhancing the flexibility in documenting transactions and grasping the when and how of applying these different entry types. It is pivotal for ensuring precise financial reporting in the accounting sphere.
Creating and Managing Journal Entries
Step-by-Step Guide
Let’s dive into the practical aspect of journal entry management. This section will provide a step-by-step guide to creating journal entries in QuickBooks:
In QuickBooks Online
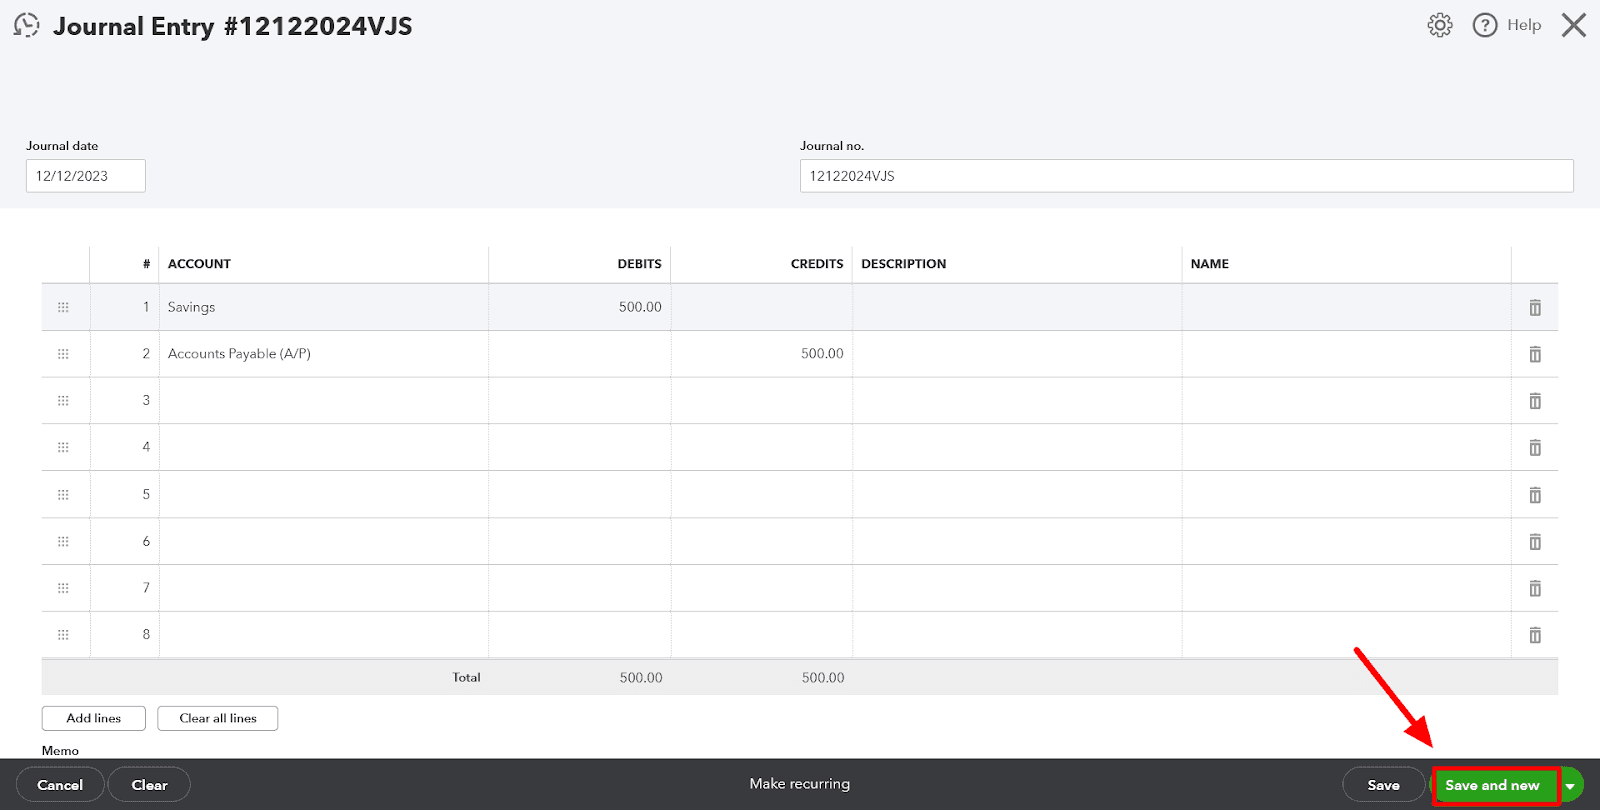
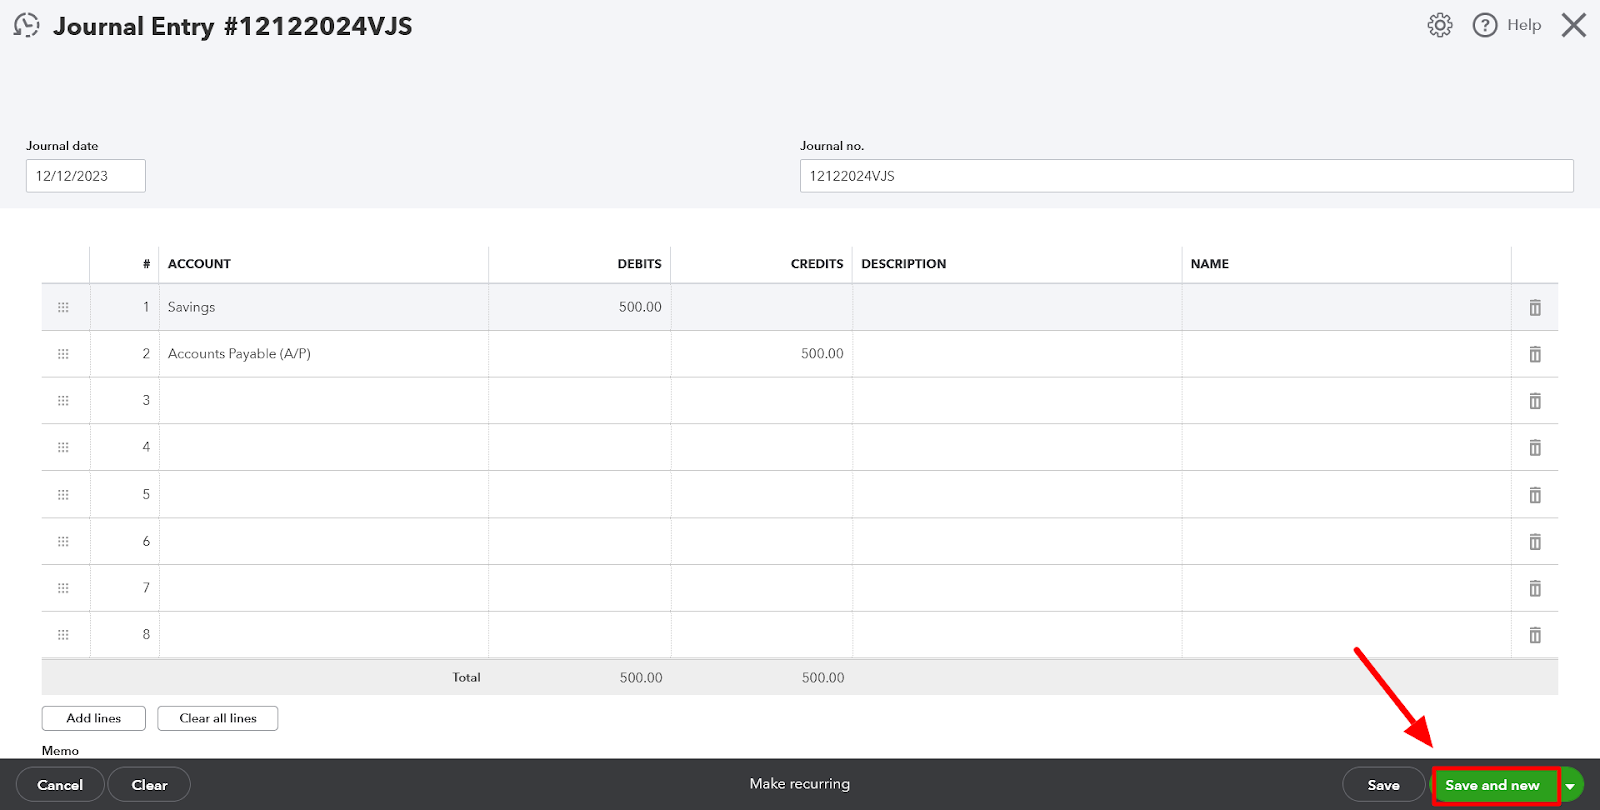
Click on ‘+New’ and then select ‘Journal entry.’
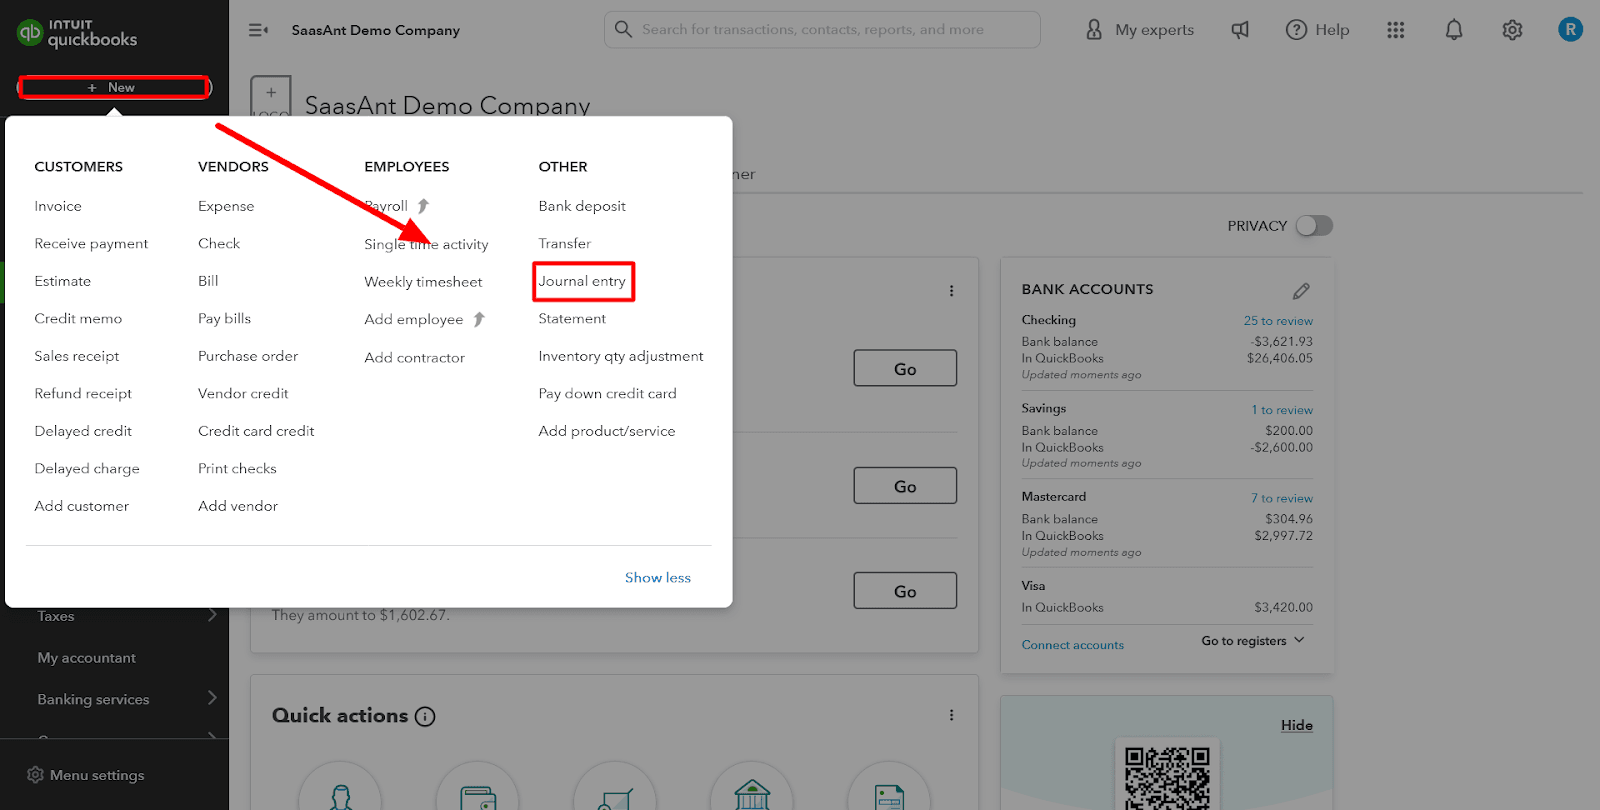
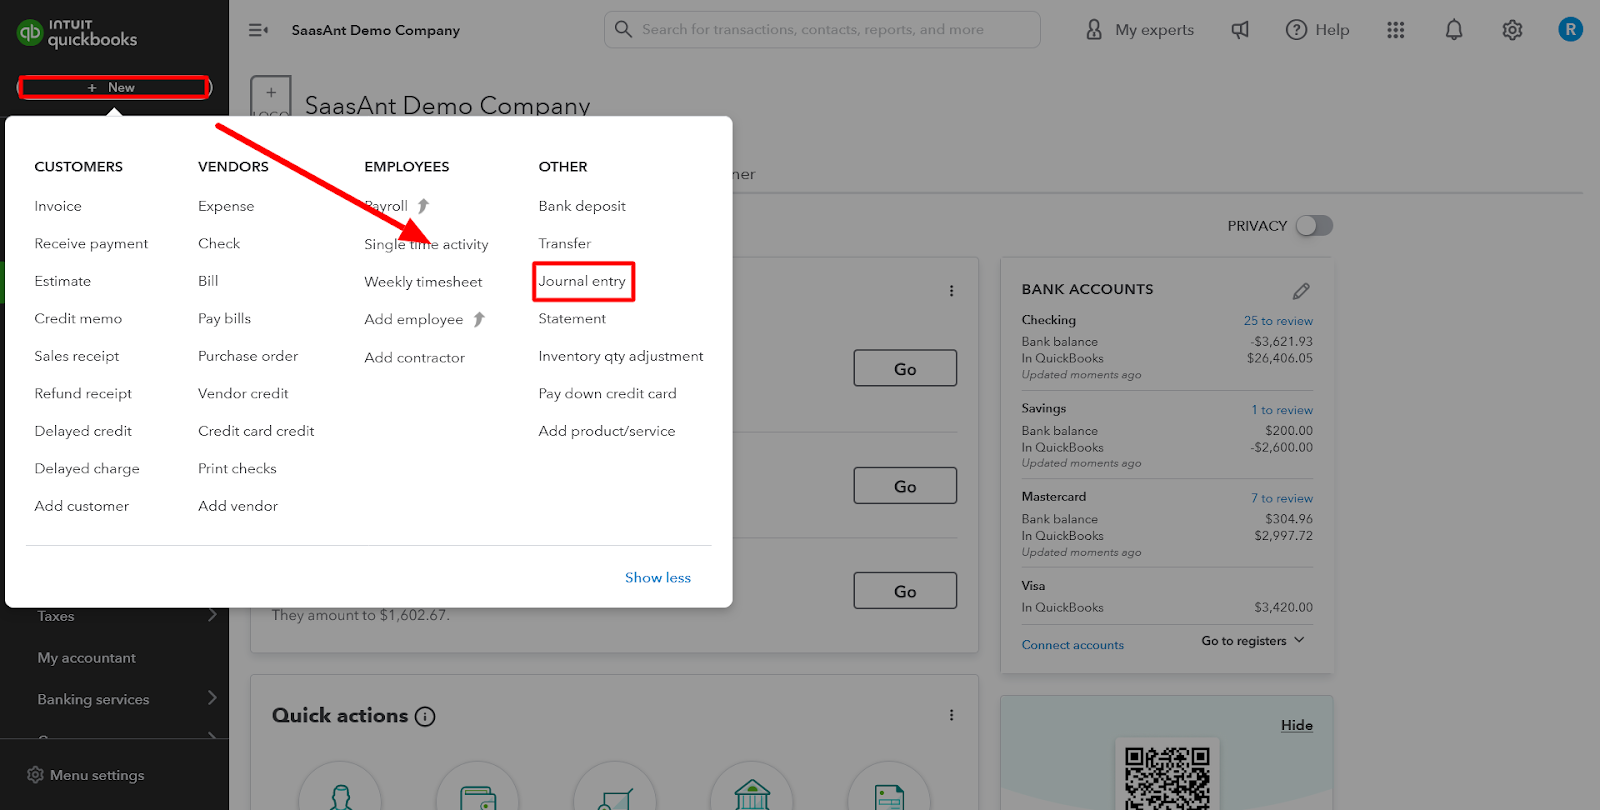
Choose an account from the ‘Account’ field in the first line.
If you need to debit or credit the account, input the amount in the appropriate column.
On the following line, select the other account involved in the transaction. If you recorded a debit or credit in the first line, enter the same amount in the opposite column.
Double-check the amounts; you should have the exact figure in the ‘Credit’ column on one line and the ‘Debit’ column on the other. It ensures that the accounts are in balance.
Add relevant information in the ‘Memo’ section to provide context for the journal entry.
Finally, click ‘Save and new’ or ‘Save and close.’
In QuickBooks Desktop
Begin by logging into your QuickBooks Desktop account.
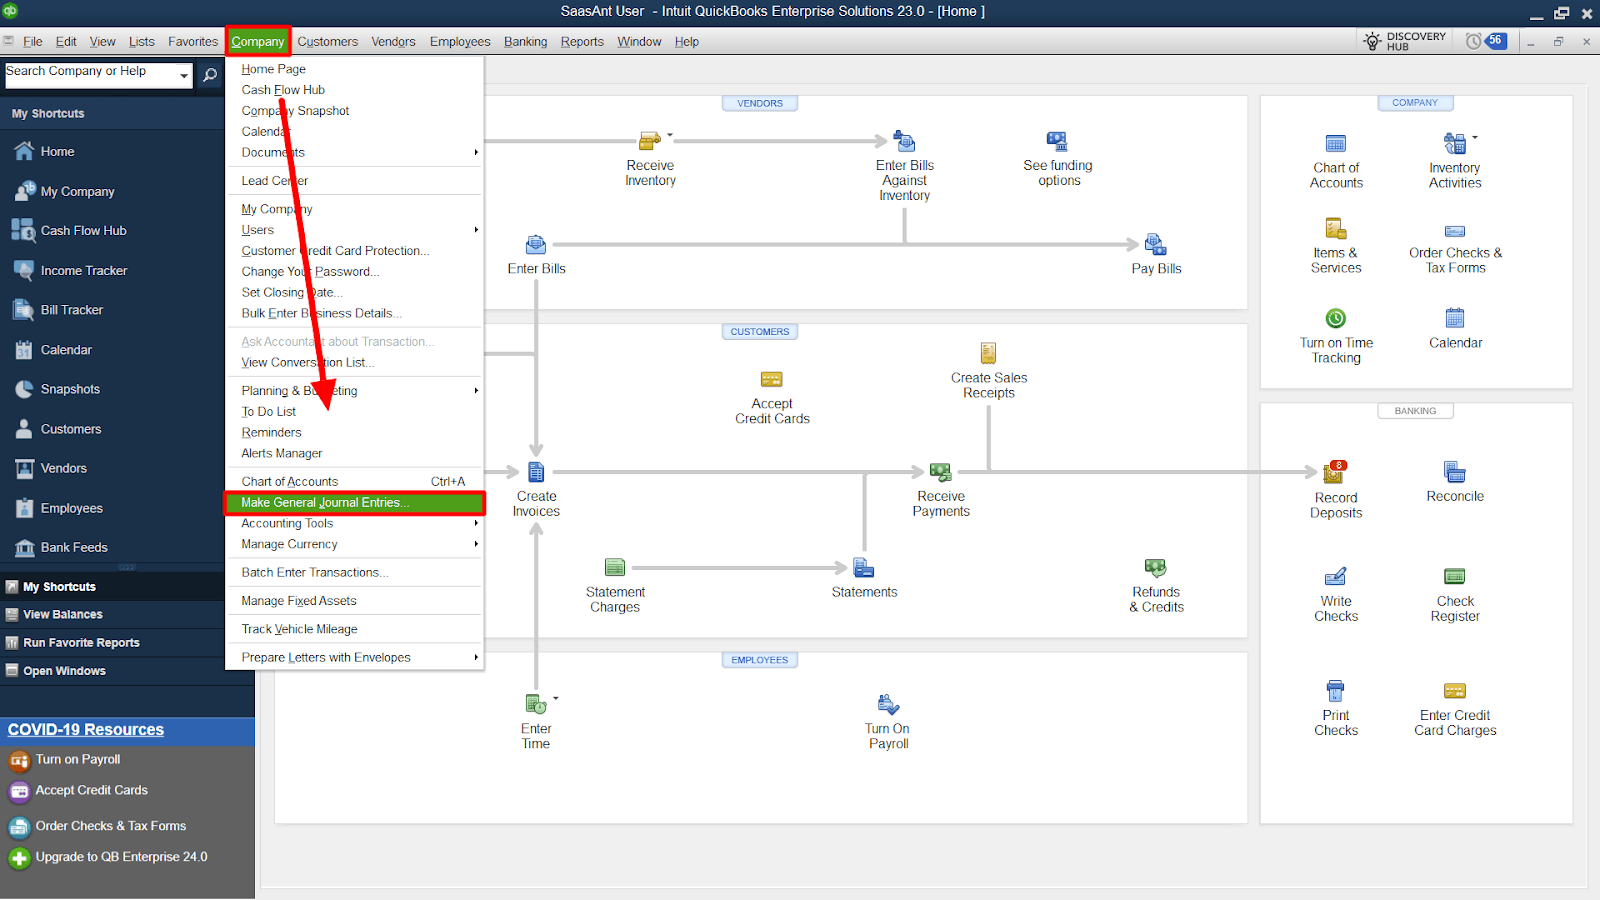
Locate and click on the ‘Company’ tab in the status bar at the top of your QuickBooks Desktop interface.
Select the ‘ Make General Journal Entries ‘ option from the dropdown menu under the ‘Company’ tab.

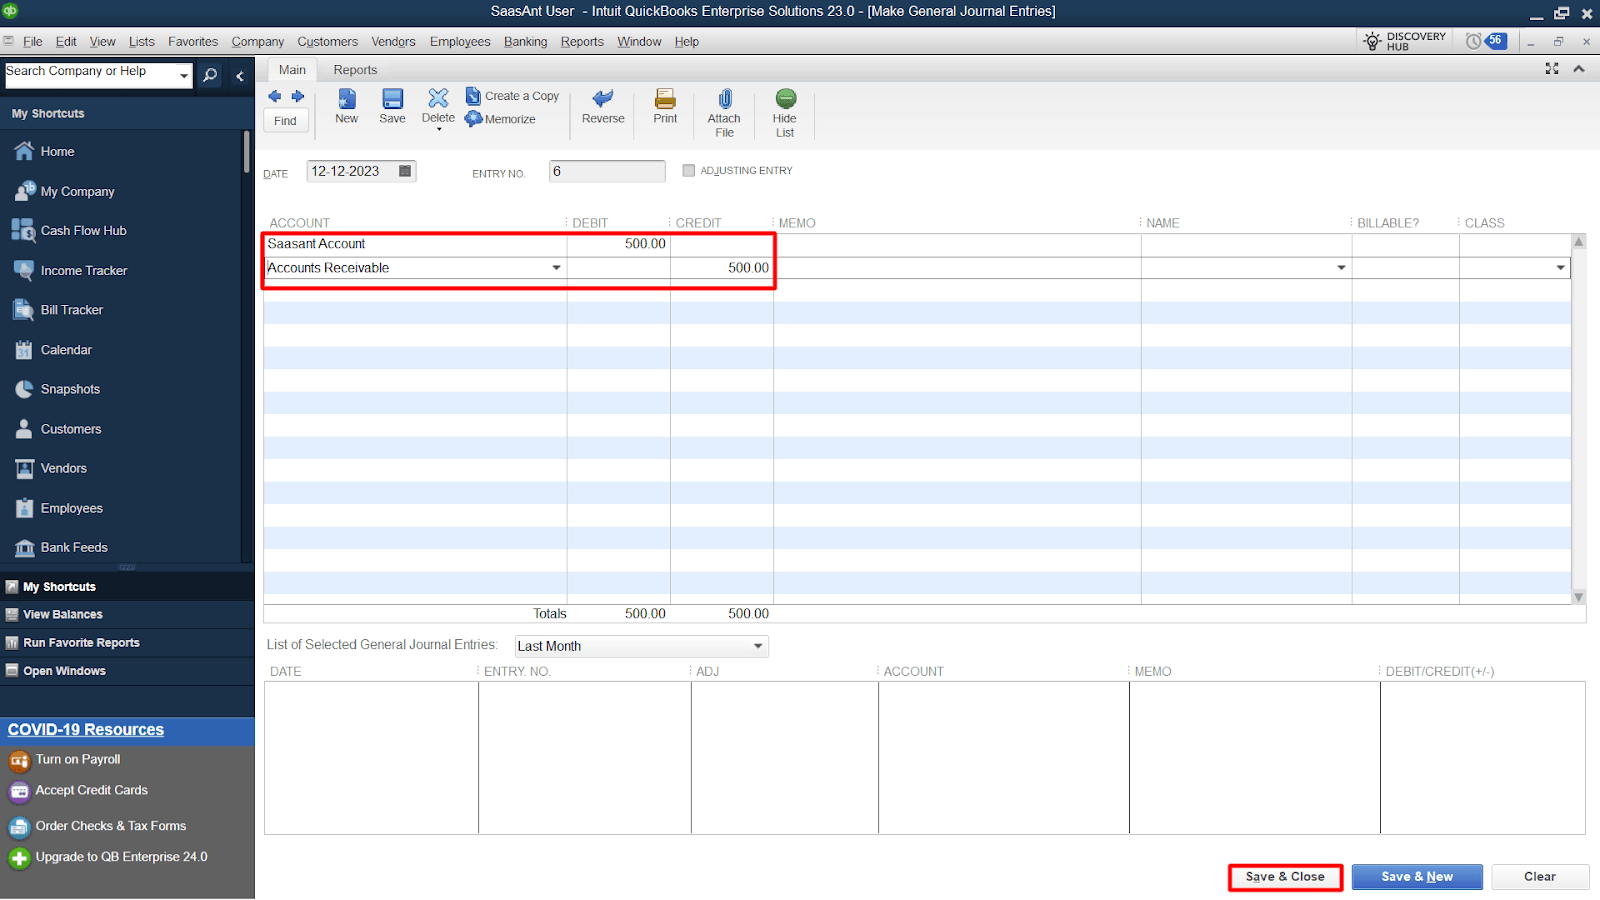
You’ll find fields within the ‘Make General Journal Entries’ to complete. These include the ‘Account Name,’ ‘Debit,’ and ‘Credit’ fields. Ensure you enter the correct information for each of these fields.
Once you’ve entered all the necessary data for your journal entry, you have two options:
If you need to record another journal entry, click ‘Save and New.’
If you’re finished and don’t need to add more entries now, click ‘Save and Close.’

Organizational Tips
Organizing and managing your journal entries is crucial to maintaining a streamlined accounting process. Let’s explore the tips and strategies to keep your entries neat and accessible, making financial analysis and reporting a breeze.
Consistent Categorization: Use a standardized chart of accounts with clear, consistent account names and codes. It helps categorize expenses and revenues uniformly, making locating specific entries during analysis easier.
Date and Description: Include a date and a descriptive reference in your journal entries. It makes it simpler to track transactions and understand the context of each entry, especially when reviewing historical records.
Regular Reconciliation: Perform bank and account reconciliations regularly. It ensures that your records match the financial statements, minimizing errors and discrepancies.
Automation: To enhance the efficiency of managing journal entries, adopting automation methods that minimize manual data input and improve precision is essential. A valuable asset in achieving this goal is SaasAnt Transactions, an application specifically crafted to streamline handling bulk transactions.
Audit Trail: Maintain an audit trail within your software to track any changes made to journal entries. It is essential for maintaining accountability and transparency.
Deleting Journal Entries
Mistakes happen; when they do, knowing how to correct them is essential. This section will guide you through deleting journal entries in QuickBooks.
Step-by-Step Guide to Deleting Journal Entries using SaasAnt Transactions Online
To get started with SaasAnt Transactions, you’ll need to set up the tool. Connect it to your QuickBooks Online account and configure your export settings.
Step 1: Registration and QuickBooks Integration
Sign up for SaasAnt Transactions for QuickBooks Online to establish automatic connectivity with your QuickBooks company.
Step 2: Access SaasAnt Transactions and Get Oriented
Open SaasAnt Transactions, featuring a user-friendly interface tailored for QuickBooks Desktop and Online users.
Step 3: Managing Multiple Companies (Exclusive to SaasAnt Online)
Add a new company by selecting ‘Add Company’ at the top. Connect to Intuit, and then use the ‘Switch Company’ option to choose the desired company for data export.
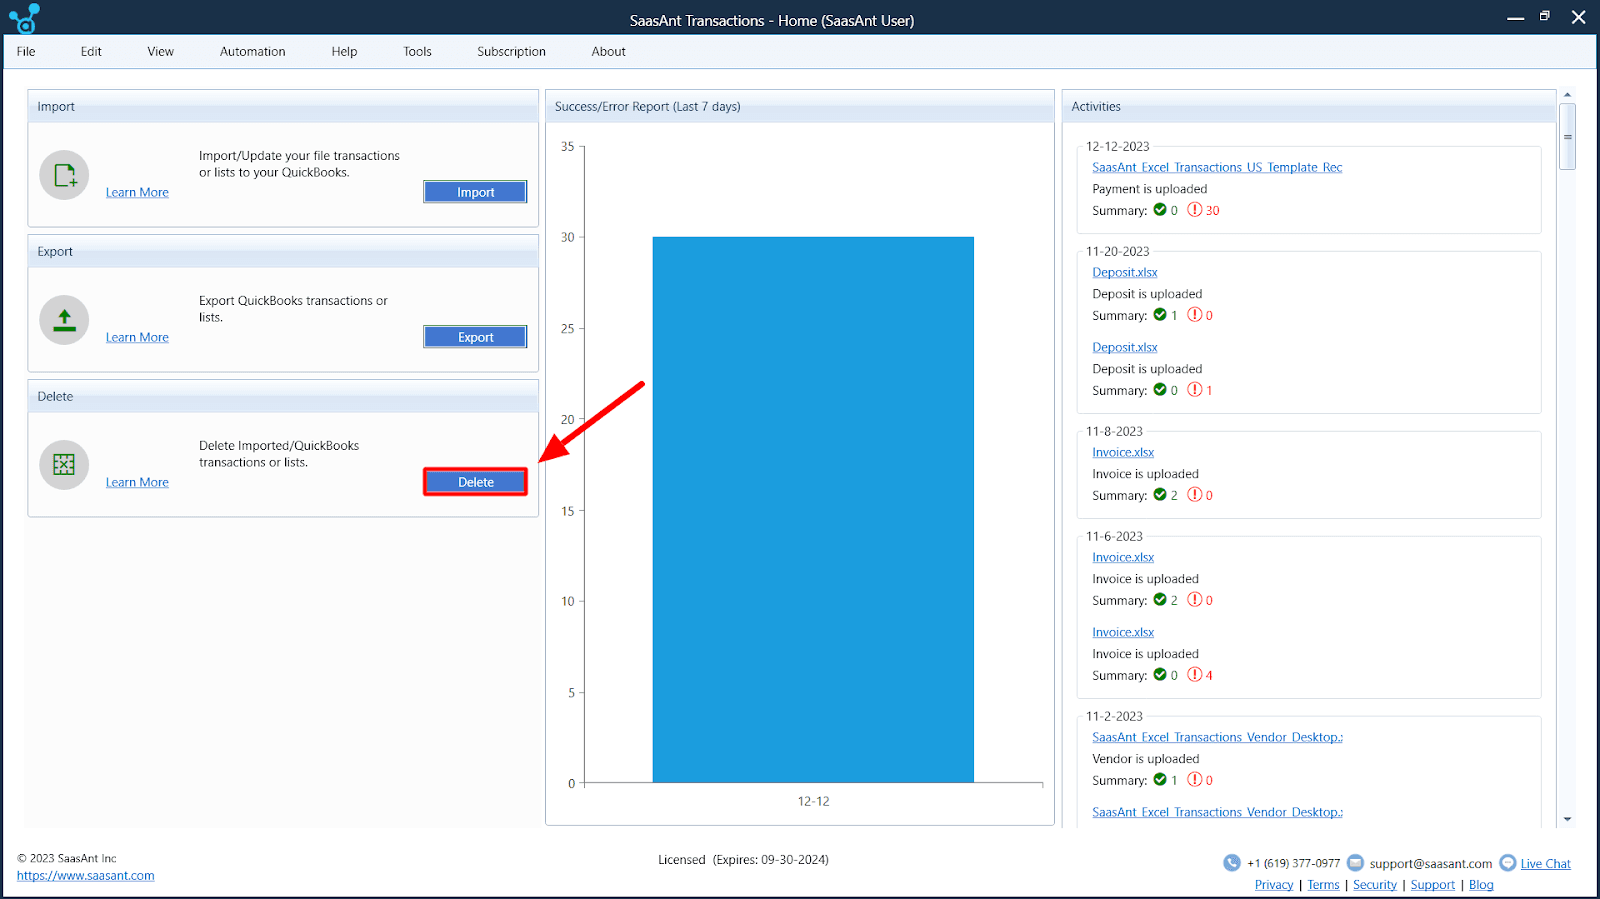
Step 4: Utilize the ‘Delete’ Feature
Access the ‘Delete’ feature on the main dashboard under the ‘Manual’ section. Alternatively, find ‘Delete’ under the ‘Quick Access’ section on the home screen.
Step 5: Choose Your Data Type
Select the QuickBooks transaction type you wish to delete from the ‘Transaction/List’ dropdown menu. Opt for ‘Journal Entries’ from the dropdown.
Step 6: Define Date Parameters
Within the ‘Date Type’ menu, pick between ‘Search By Created Date,’ ‘Search By Transaction Date,’ or ‘Search By Last Updated Date,’ according to your specific needs.
Step 7: Specify the Date Range
Specify the start and end dates for deleting journal entries within a specific date range.
Step 8: Locate Journal Entries by Number
You can also locate journal entries using the journal number by providing it in the ‘Journal No’ field.
Note: Always backup your records before deletion.
Step 9: Initiate the Deletion Process
Click the ‘Search’ button to retrieve data from QuickBooks.
Step 10: Confirm and Execute the Deletion
Once your records are displayed, select the journal entries you want to delete by checking the checkbox in the first column. After selecting, click the ‘Delete’ button in the top right corner. A confirmation pop-up will appear; clicking ‘OK’ will delete the chosen records. You can also download the deleted records in Excel or CSV format by clicking ‘Download’ at the bottom of the table.
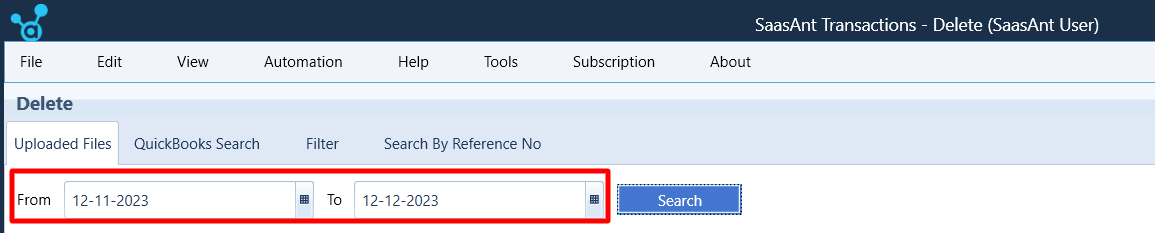
Step-by-Step Guide to Deleting Journal Entries using SaasAnt Transactions Desktop
Step 1: Access QuickBooks Desktop and Connect SaasAnt Transactions Desktop
Log in to your QuickBooks Desktop account and ensure that SaasAnt Transactions Desktop is appropriately connected.
Step 2: Navigate to the ‘Delete’ Feature
On the main dashboard, locate and access the ‘Delete’ feature.
Step 3: Manage Uploaded Files
To delete uploaded files, click on the ‘Uploaded Files’ button. Click the adjacent ‘QuickBooks Search’ button to remove files in QuickBooks.

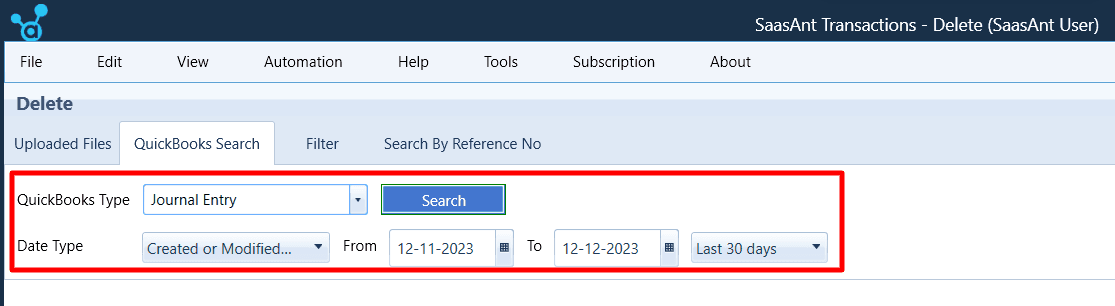
Step 4: Select QuickBooks Data Type
From the ‘Transaction/List’ dropdown menu, choose the type of QuickBooks data you want to delete. In this case, opt for ‘Journal Entries’ from the list.
Step 5: Choose Date Type
Select ‘Created or Modified Date’ and ‘Transaction Date’ within the’ Date Type’ menu, depending on your requirements.
Step 6: Specify Date Range (Optional)
If you have specific date criteria, you can specify a start and end date to delete journal entries within a particular date range. Alternatively, you can search historical records by selecting options like ‘Last 7 days,’ ‘Last 30 days,’ ‘Last 6 Months,’ or ‘Last 1 Year’ from the dropdown.
Step 7: Retrieve Data
Click the ‘Search’ button to retrieve data from QuickBooks.
Step 8: Select Journal Entries for Deletion
Once your records are displayed, choose the journal entries you wish to delete by checking the checkbox in the first column. Select multiple entries as needed.
Step 9: Delete Selected Entries
After making your selections, click the ‘Delete’ button. A confirmation pop-up will appear.
Step 10: Confirm Deletion
Click ‘OK’ in the confirmation pop-up to delete the chosen journal entries. Be sure about your selections, as this action is irreversible.
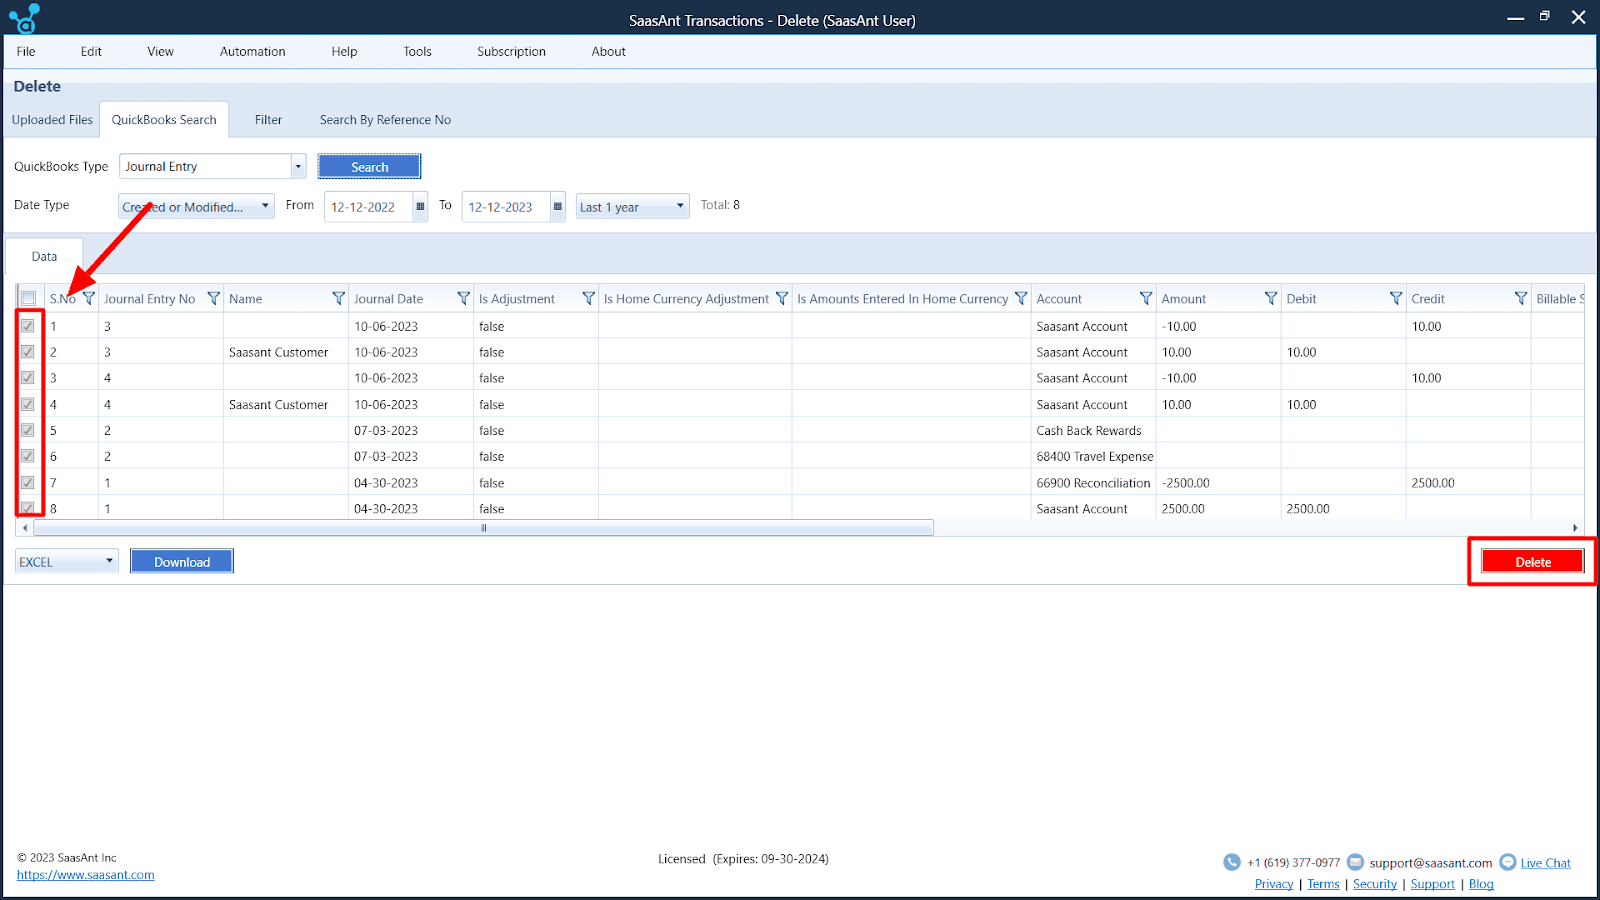

Step 11: Download Deleted Records
You can also download the deleted records in Excel or CSV format by clicking the ‘Download’ option at the bottom of the table.
Managing Multiple Journal Entries
Managing financial records in QuickBooks is essential for maintaining accurate financial statements. However, there may come a time when you need to delete multiple journal entries:
Data Entry Errors: Mistakes can happen during data entry, such as duplicate entries or errors in amounts. Fix these errors by deleting and re-entering journal entries.
Data Cleanup: As your business evolves, you might need to clean up your financial records by removing redundant or outdated entries.
Data Migration: During data migration to QuickBooks, you may want to delete test entries or data that’s no longer relevant.
Technical Complications and Solutions
When dealing with multiple journal entries, several technical complications may arise:
Time-Consuming Manual Deletion
Deleting multiple entries one by one can be time-consuming and prone to errors. SaasAnt Transactions offers a streamlined process to select and delete multiple journal entries in one go, saving time and reducing the risk of mistakes.
Data Retrieval Challenges
Locating specific entries can be challenging, especially when dealing with a large volume of data. SaasAnt Transactions simplifies data retrieval by allowing you to filter and search for access based on various criteria, such as date, type, or amount.
Risk of Data Loss
Accidentally deleting the wrong entries can result in data loss and financial discrepancies. SaasAnt Transactions includes confirmation prompts to minimize the risk of accidental deletions, ensuring that you only remove the entries you intend to delete.
How SaasAnt Transactions Can Help?
SaasAnt Transactions is a reliable and robust application that enhances your QuickBooks experience. Here’s how it can assist in managing and deleting multiple journal entries:
Efficient Deletion: SaasAnt Transactions simplifies selecting and deleting multiple journal entries simultaneously, reducing the time and effort required for manual deletion.
Enhanced Search and Filter: The tool provides advanced search and filtering options, allowing you to locate specific entries quickly, even among a large dataset.
Data Backup: SaasAnt Transactions ensures that your data is backed up before deletion, offering peace of mind and a safety net in case of accidental deletions.
Improved Accuracy: By streamlining the deletion process and reducing manual data handling, SaasAnt Transactions helps maintain the accuracy of your financial records.
Implications of Deleting Journal Entries
The process of deleting journal entries in your accounting software, like QuickBooks, is a challenging one. It can have far-reaching implications for your financial reports and overall accounting data. Understanding the consequences of deleting journal entries is vital to maintaining the accuracy and integrity of your financial records.
The Impact on Financial Reports
When you delete journal entries, several significant implications affect your financial reports:
Altered Financial Statements
Deleted journal entries directly impact your financial statements, such as the balance sheet and income statement. Deleting entries may change your financial position and profitability. Ensuring that your financial statements accurately reflect your company’s financial health is crucial.
Historical Data Loss
Deleting journal entries erases historical financial data. Historical data is valuable for trend analysis, audits, and decision-making. Think carefully before removing records that could benefit understanding your company’s economic history.
Audit and Compliance Implications
Deleting entries can disrupt audit trails. Maintaining a transparent audit trail is vital for compliance and internal controls. Deletions should be well-documented and justified to meet regulatory requirements.
Data Consistency
Deletion can lead to data consistency. Ensure that other associated transactions and records are updated to maintain data consistency. Changes should be carefully tracked and reconciled.
Error Correction
You may delete journal entries to fix errors. Instead of deletion, consider creating correcting entries to maintain a clear audit trail while rectifying mistakes. This approach ensures transparency and accuracy.
Reconciliation Challenges
Deleted entries can disrupt account reconciliation. Plan for the impact on account reconciliation and ensure the reconciliation process is adjusted to accommodate the changes.
Best Practices in Journal Entry Management
Journal entries are the backbone of your accounting system, reflecting all financial transactions. Let’s explore best practices that can help you manage your journal entries effectively, from conducting regular audits to ensuring proper documentation. These practices will not only streamline your accounting processes but also provide confidence in the integrity of your financial data.
Regular Audits of Journal Entries
Practice: Conduct Routine Audits of Journal Entries
Why?
Regular audits help identify errors, omissions, and discrepancies in your journal entries.
Ensures that financial records accurately represent your business’s financial position and performance.
How?
Set a schedule for periodic audits, such as monthly or quarterly—review journal entries for accuracy and compliance with accounting standards. Investigate and rectify any discrepancies or errors found during the audit.
Clear and Consistent Documentation
Practice: Maintain Clear and Consistent Documentation
Why?
Documentation provides a transparent audit trail for all journal entries. It is vital to understand the context and purpose of each entry.
How?
Clearly label journal entries with descriptions that explain the nature of the transaction. Include supporting documents or references to validate the entry. Create a standardized documentation process for all entries.
Segregation of Duties
Practice: Implement Segregation of Duties
Why?
It reduces the risk of fraudulent or erroneous entries and enhances internal controls and accountability.
How?
Assign different roles for creating, approving, and reviewing journal entries. Ensure that no single individual has complete control over the journal entry process. Define and communicate roles and responsibilities clearly within your accounting team.
Reconciliation and Review
Practice: Regular Reconciliation and Review
Why?
Reconciliation ensures that all journal entries align with bank statements and other financial records. Periodic reviews help catch and correct any discrepancies.
How?
Reconcile accounts monthly to identify and resolve discrepancies promptly. Review journal entries against source documents and supporting evidence. Document and retain reconciliation records for future reference.
Digital Record-Keeping
Practice: Utilize Digital Record-Keeping
Why?
Digital records are more straightforward to search, access, and manage, reducing the risk of document loss or damage.
How?
Use accounting software to create, store, and manage digital copies of journal entries.
Implement a secure and organized file structure for easy retrieval.
Wrap Up
Through these journal entries, businesses can maintain the precision and integrity of their financial data, enabling precise financial reporting and informed decision-making. QuickBooks is a valuable application for simplifying the creation and management of journal entries. It is a helpful companion for individuals needing to be more financial experts, providing user-friendly solutions for the often complex accounting world.
However, beyond the capabilities of QuickBooks, SaasAnt Transactions emerges as a pivotal asset in journal entry management. It streamlines and optimizes the process, making it more efficient and precise. This software simplifies the creation and management of entries and offers advanced features for filtering, searching, and deleting journal entries. The benefits of SaasAnt Transactions extend to safeguarding data integrity, streamlining error corrections, and ensuring compliance with audit and regulatory standards.
The combination of QuickBooks and SaasAnt Transactions and a commitment to best practices empowers businesses to navigate the complex accounting landscape with precision and confidence, enabling them to make well-informed financial decisions and maintain the integrity of their financial records.
FAQs
Q1: What Is the Role of Journal Entries in Accounting and Financial Management?
Journal entries serve as the foundational data in accounting by meticulously recording all financial transactions, including income, expenses, assets, and liabilities. They are essential for creating accurate financial statements and maintaining financial data precision and integrity.
Q2: How Can SaasAnt Transactions Help Streamline Journal Entry Management in QuickBooks?
SaasAnt Transactions is an application that simplifies journal entry management by offering efficient deletion, advanced search and filter features, data backup, and improved accuracy. It enhances the overall journal entry process.
Q3: What Are the Implications of Deleting Journal Entries in QuickBooks, and Why Is It Important to Consider These Consequences?
Deleting journal entries can impact financial statements, historical data, compliance, data consistency, and reconciliation. It’s crucial to understand these implications to maintain the accuracy and integrity of financial records.
Q4: How Can Businesses Benefit from Combining Quickbooks and SaasAnt Transactions for Journal Entry Management?
The combination of QuickBooks and SaasAnt Transactions empowers businesses to navigate accounting complexities efficiently, make informed financial decisions, and ensure the integrity of their financial records by streamlining the creation, management, and deletion of journal entries.
Q5: What Technical Complications Can Arise When Dealing with Multiple Journal Entries, and How Does SaasAnt Transactions Address Them?
Technical complications may include time-consuming manual deletion, data retrieval challenges, and the risk of data loss. SaasAnt Transactions streamlines the process, offers advanced search and filter options, provides data backup, and minimizes the risk of accidental deletions, addressing these challenges.
Recommended reading: