Managing Deposits in QuickBooks Online

This article will take you through managing deposits and the circumstances of deleting a deposit in QuickBooks Online with the prowess automation software SaasAnt Transactions.
Contents
Quick Instructions for Deleting a Deposit in QuickBooks Online
Quick Instructions for Recording a Deposit in QuickBooks Online
Step-by-step guide on how to delete a deposit in QuickBooks
Step-by-step Guide on How to Import Deposits in QuickBooks Online Using SaasAnt Transactions
Understanding Deposits in QuickBooks
Steps and tips for effectively managing deposits
Potential pitfalls when deleting deposits
Best practices for managing deposits
Troubleshooting deposit management issues
Conclusion
FAQs
Quick Instructions for Deleting a Deposit in QuickBooks Online
If you’re looking to delete deposits in Quickbooks Online, follow these procedures for straightforward steps to delete
Sign in to your QuickBooks Online account.
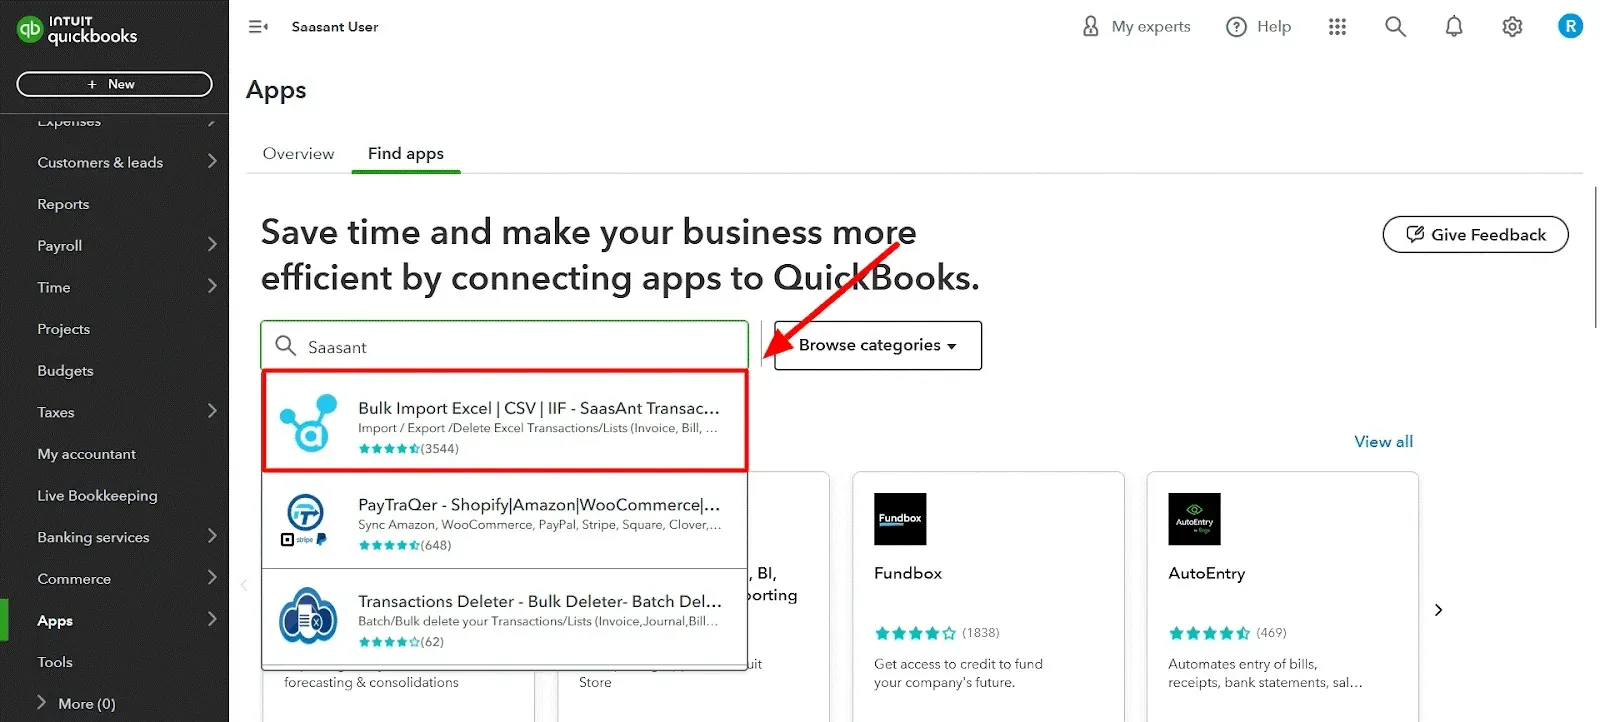
Navigate to the ‘Apps’ section and search ‘SaasAnt Transactions.’
Connect ‘QuickBooks Online’ with ‘SaasAnt Transactions.’
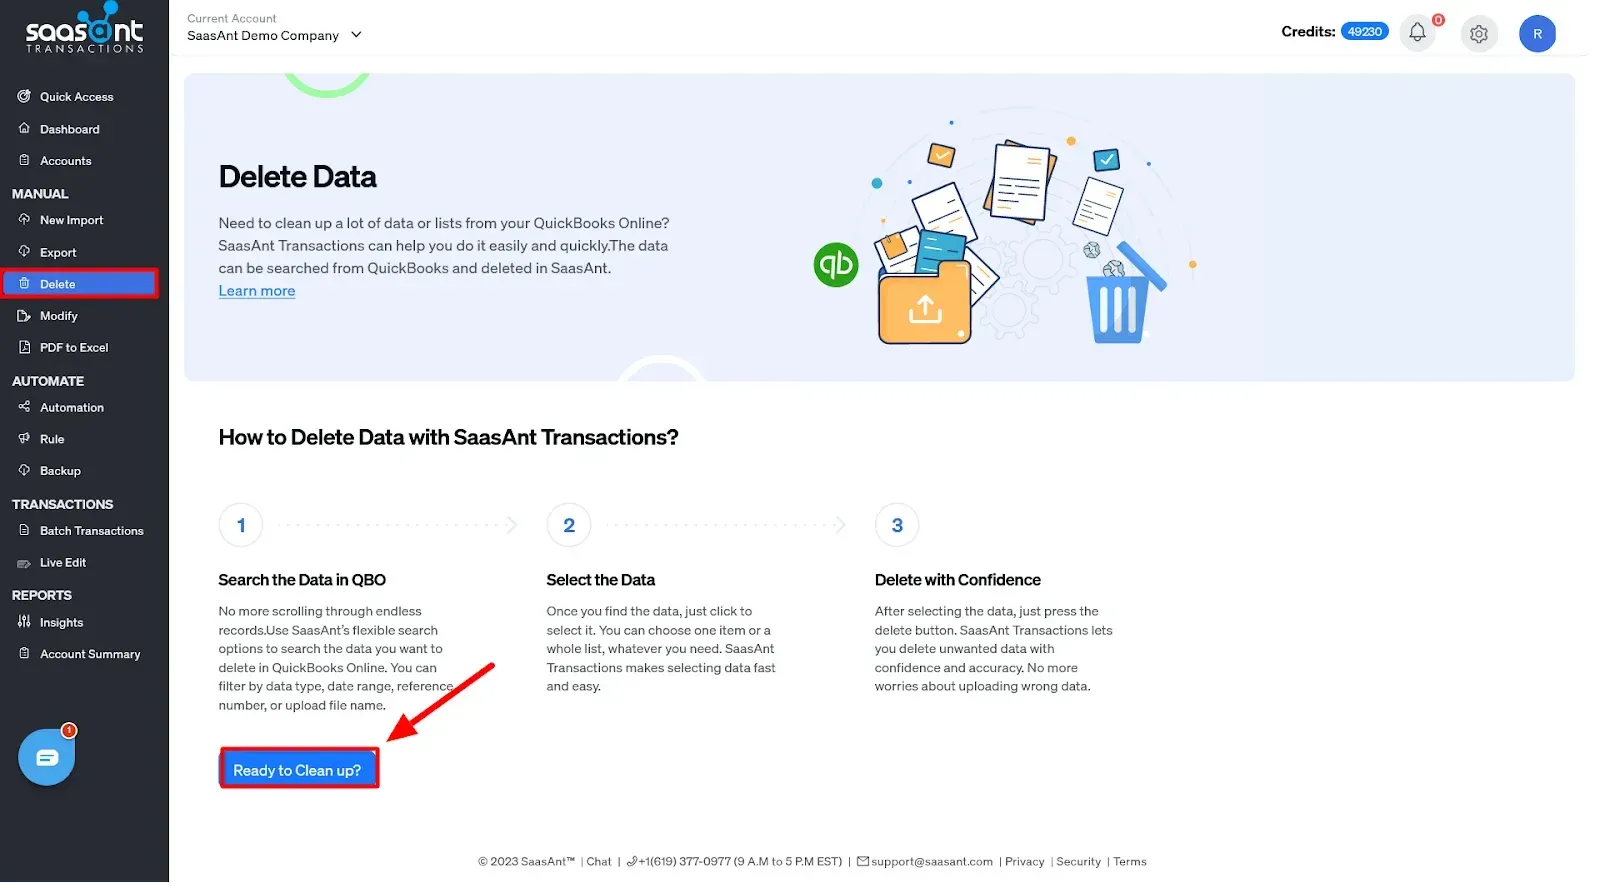
Within ‘SaasAnt Transactions Online,’ select the ‘Delete’ option.
Navigate to the ‘Delete Data’ page. Click ‘Ready to Clean up?’
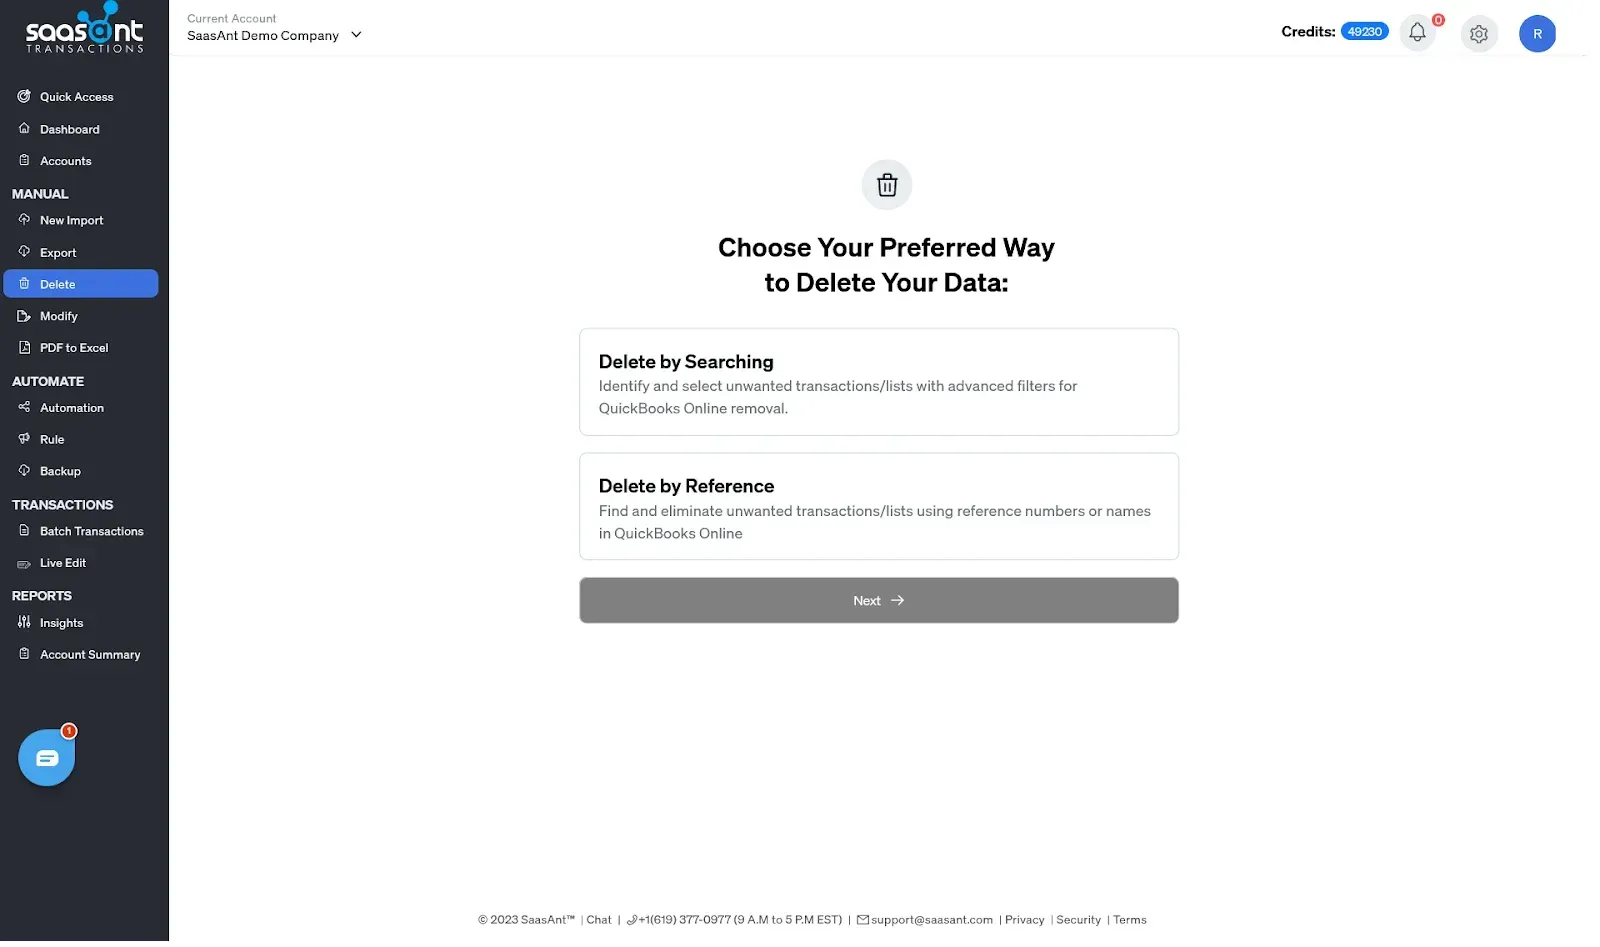
Select your preferred way to delete your data – Either by ‘Delete by searching’ or ‘Delete by Reference.’
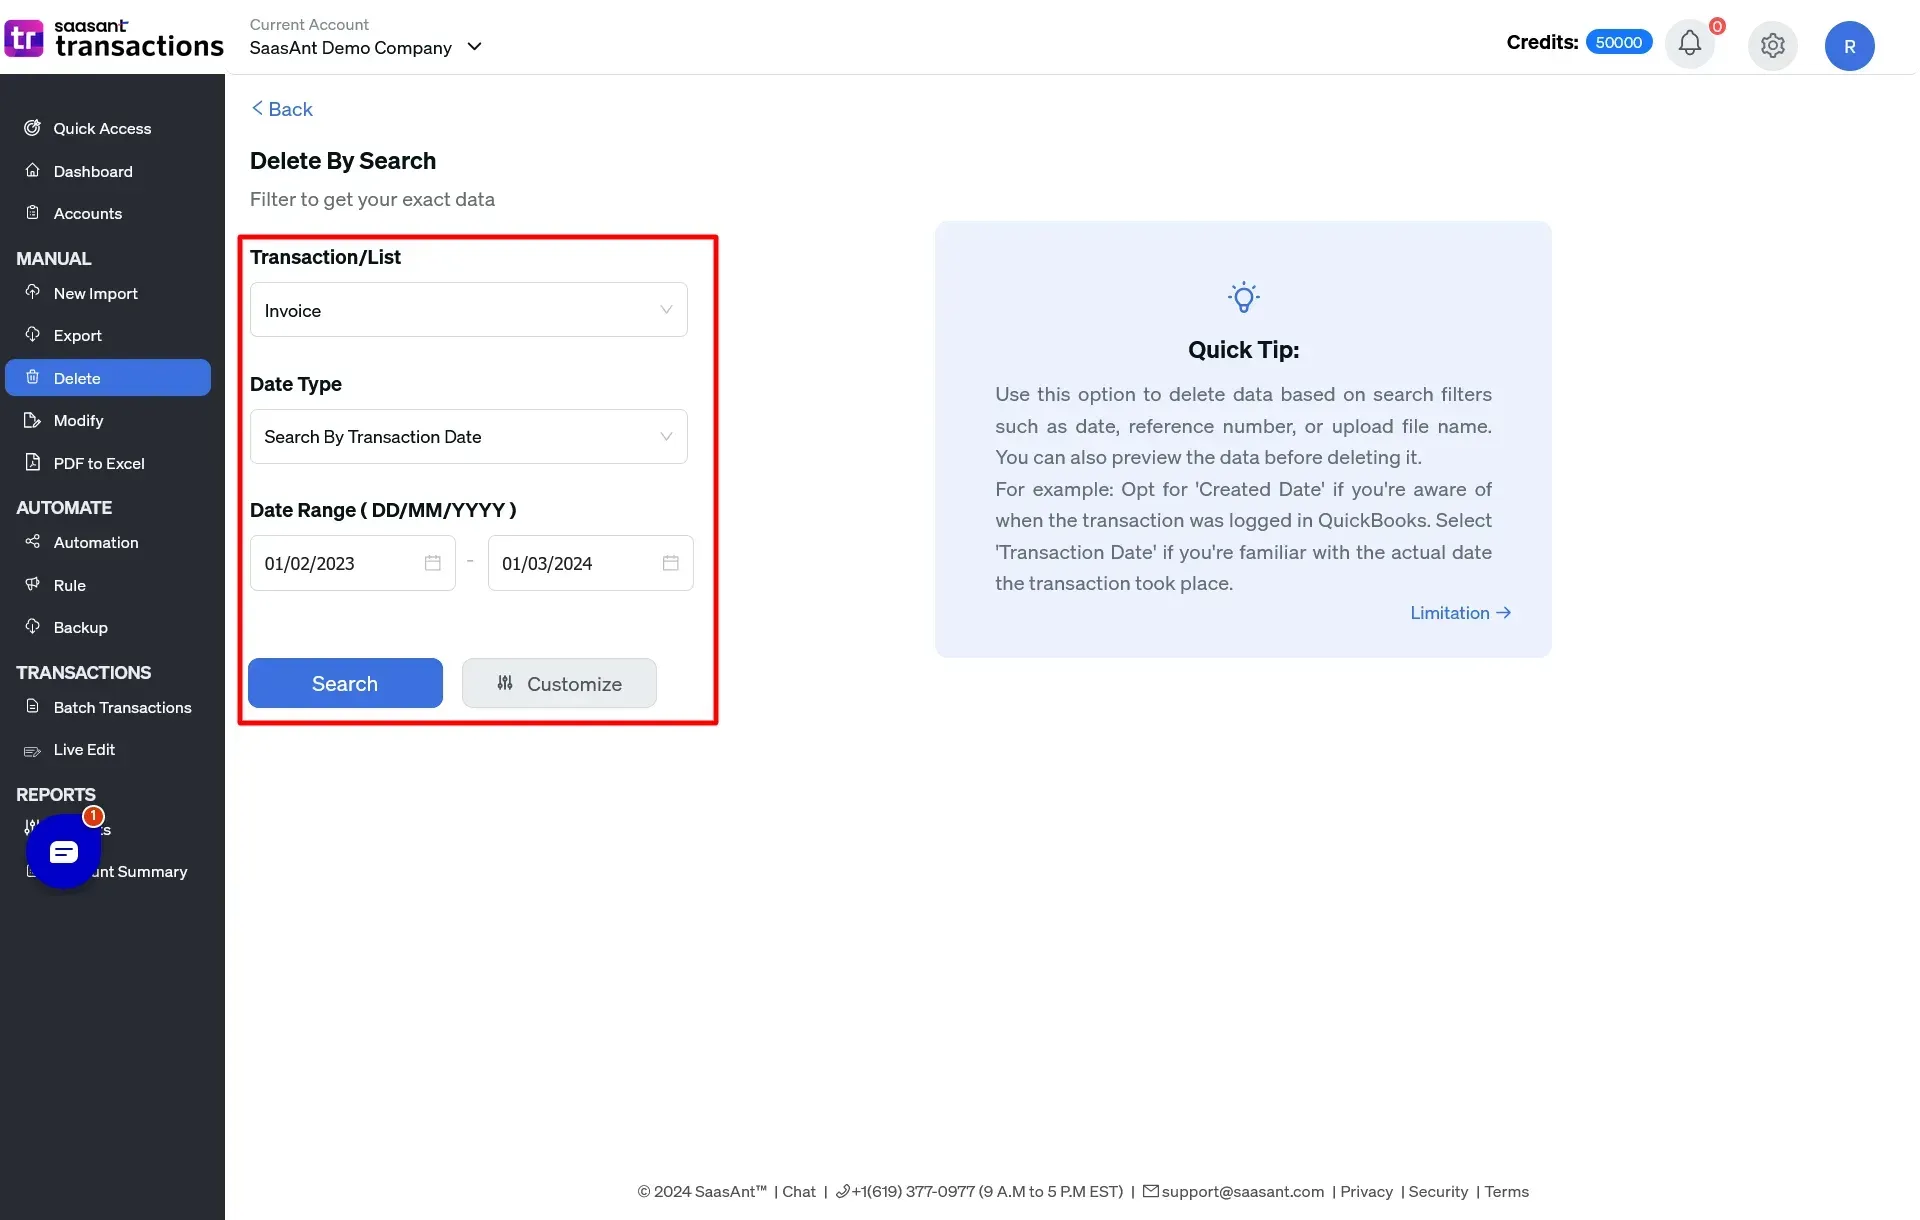
If you choose ‘Delete by searching,’ fill in the ‘Transaction type ’as ‘Bank Deposits,’ ‘Date type,’ and ‘Date Range.’
After filtering, you’ll see all the Deposit records according to your search. Delete the Deposits you need to delete.
If you choose ‘Delete by Reference,’ fill in the ‘Transaction type’ as ‘Bank Deposits’ and ‘Enter Number’ of the transaction type.
Click on the ‘Delete’ option and confirm the deletion by viewing the results.
Quick Instructions for Recording a Deposit in QuickBooks Online
To record a deposit in QuickBooks Online, follow the below steps:
Log in to QuickBooks Online.
Navigate to 'Apps,' search for 'SaasAnt Transactions,' and follow prompts to connect.
On the left, click 'New Import.'
Prepare data file (Excel/CSV).
Click 'New Import,' upload the file, or use the sample template.
Choose the specific sheet with deposit data.
Select ‘Deposits’ as the QuickBooks entity.
Opt for Neo/Classic mapping, preview, and align headers.
Verify mapped data for accuracy.
Optionally modify customization settings.
Click ‘Upload’ to initiate deposit import.
Explore and modify settings as per preferences (Optional).
Ensure alignment with QuickBooks Online requirements.
Step-by-step guide on how to delete a deposit in QuickBooks
To delete deposits in QuickBooks Online:
Step 1: Sign in to QuickBooks Online
Start by accessing the QuickBooks Online. Enter the username and password that you have registered for your Quickbooks Online account. If you have multiple accounts, ensure you’re in the correct one.
Step 2: Connect SaasAnt Transactions Online
In QuickBooks Online, go to the ‘Apps’ section. Search and locate ‘SaasAnt Transactions’ to connect and integrate with QuickBooks. Once combined, SaasAnt will access your transaction data, streamlining the deletion of the records.
Step 3: Begin with Delete
With SaasAnt Transactions Online connected, find the ‘Delete’ option in the SaasAnt Transactions menu—this option is in the left sidebar. Clicking on ‘Ready to Clean up?’ will start deleting from QuickBooks Online with different methods suitable for the users.
Step 4: Choose your Preferred way to Delete
Each deletion method serves a different purpose
Delete by Searching
You have a search bar or filters such as transaction type, Data Type, and Date Range. Suppose you remember the transaction type or the date; enter these details, and the system will pull up matching records. It is useful when you’re sure about specific details.
Delete by Reference
This option is for when you have a reference number and a transaction type for a set of deposits. By inputting this reference, SaasAnt Transactions will directly pull up related transactions, eliminating the need for manual searches.
Pick 'Bank Deposit' from the 'Transaction/List' dropdown menu.
Set the 'Date Type' to select bank deposits based on transaction date.
Specify the 'Date Range,' and then click 'Search' to retrieve the information.
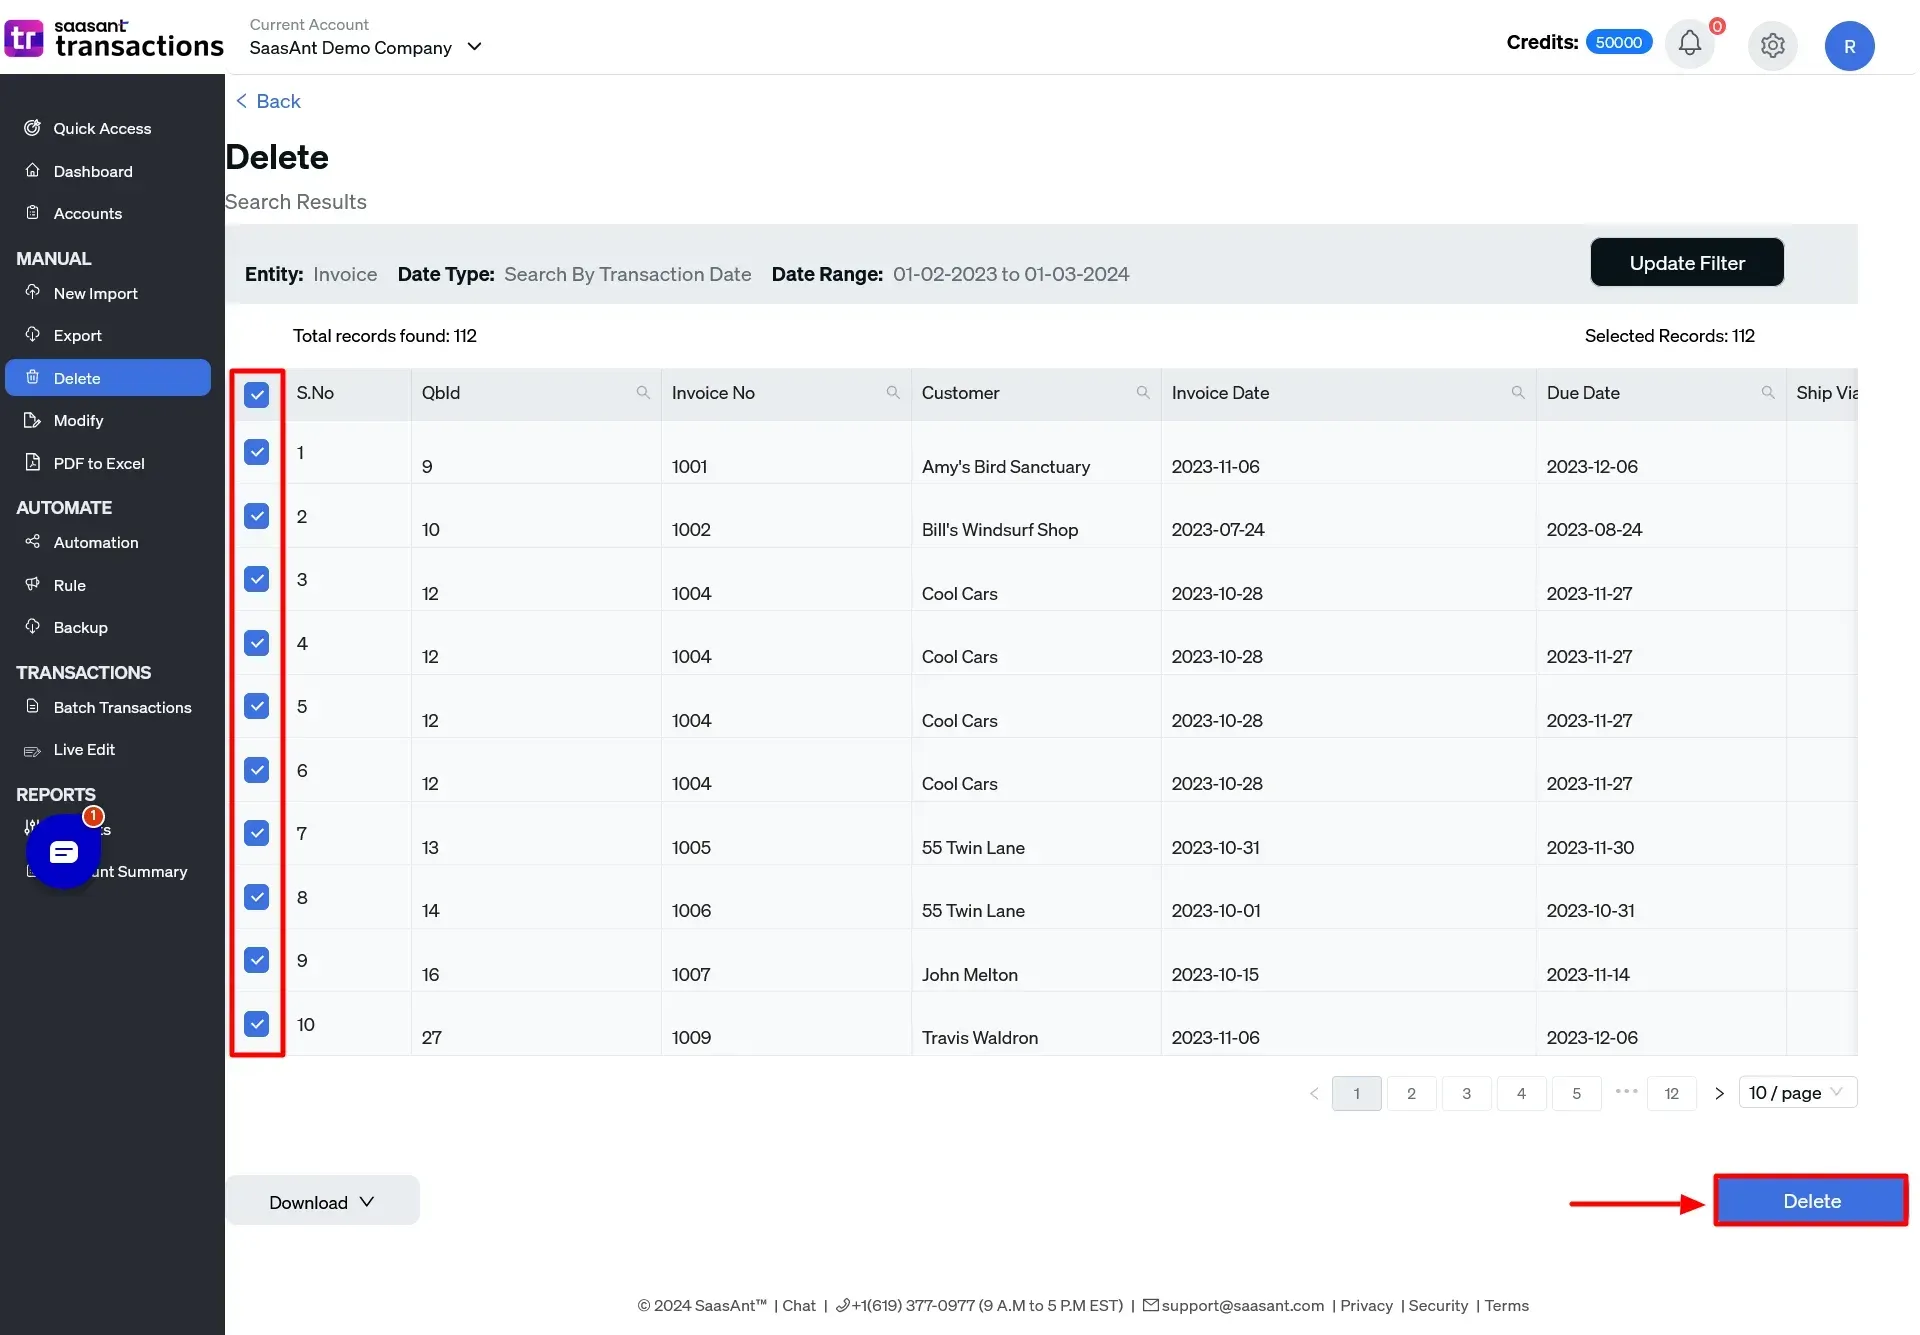
Step 5: Select the Records and Delete
You’ll receive a list of transactions after defining your search, then review the list thoroughly. Each entry might have a checkbox that selects the transactions of the deposits you’re sure you want to delete. Once selected, Click the ‘Delete’ button to process the delete function.
Step-by-step Guide on How to Import Deposits in QuickBooks Online Using SaasAnt Transactions
To Import Deposits in QuickBooks Online:
Step 1: Connect QuickBooks Online with SaasAnt Transactions
Log in to your QuickBooks Online account.
Navigate to the ‘Apps’ section within QuickBooks Online and search for ‘SaasAnt Transactions.’
Find the SaasAnt Transactions app and follow the on-screen prompts to connect it seamlessly with your QuickBooks Online account.
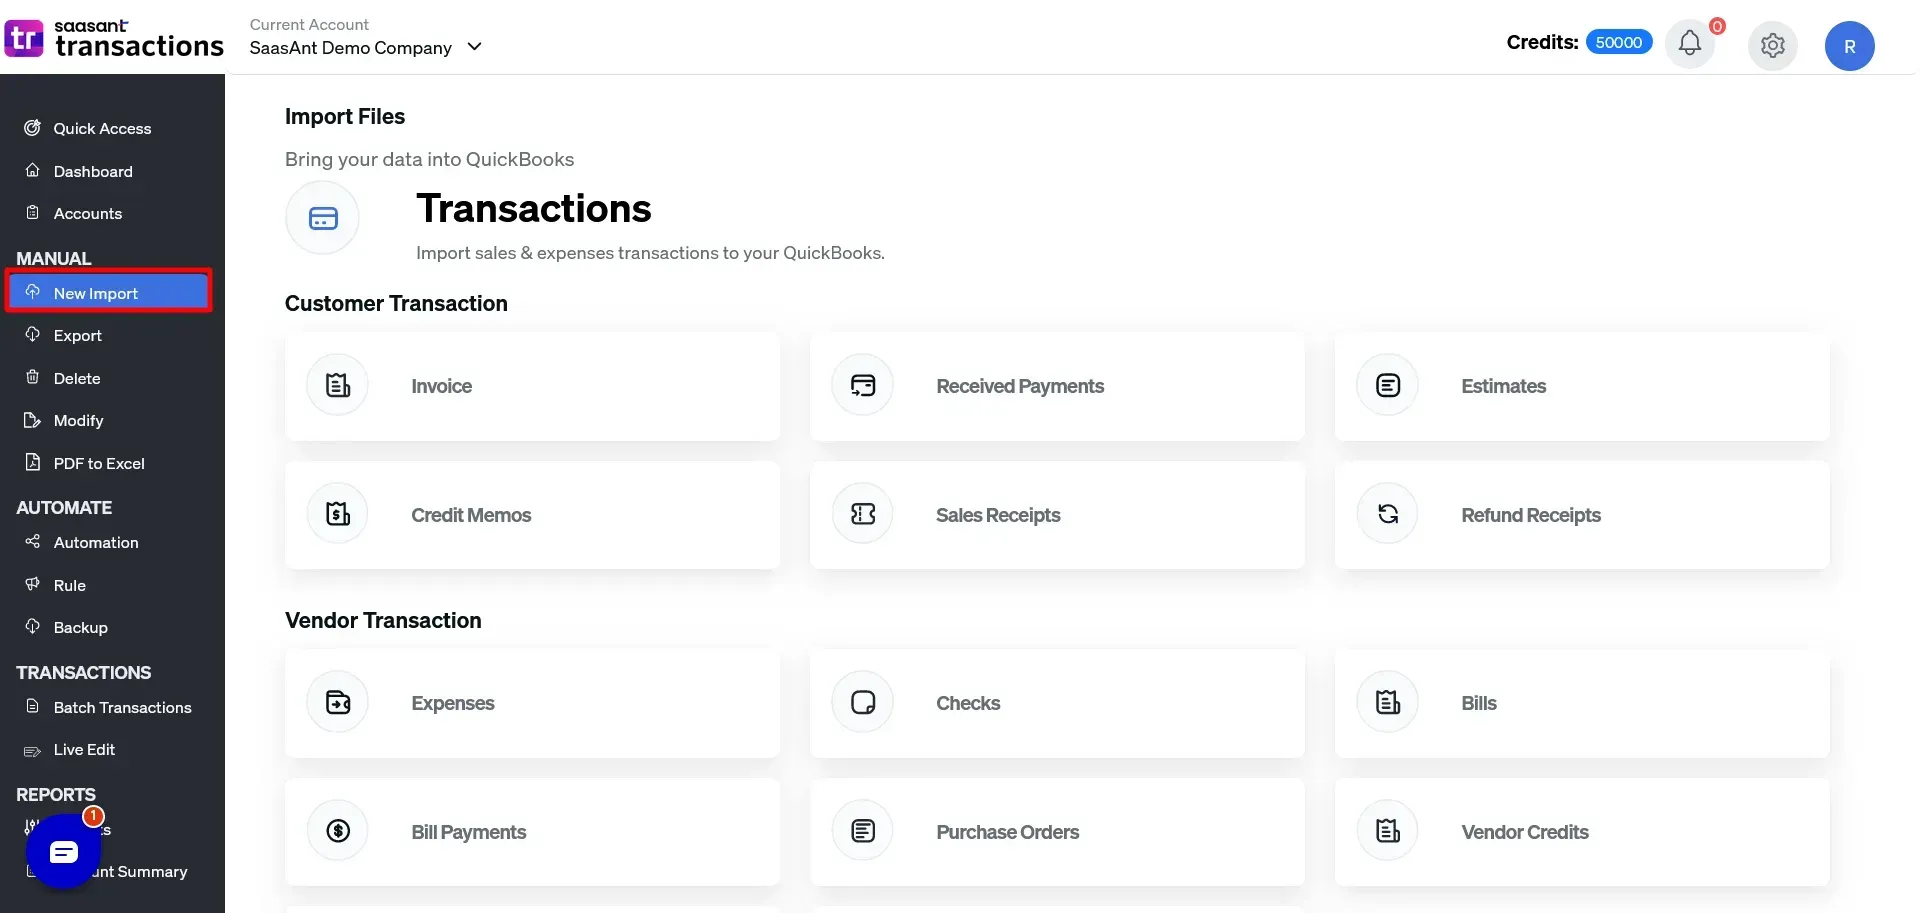
Step 2: Initiate a New Import
On the left-hand side, locate and click on the ‘New Import’ option.
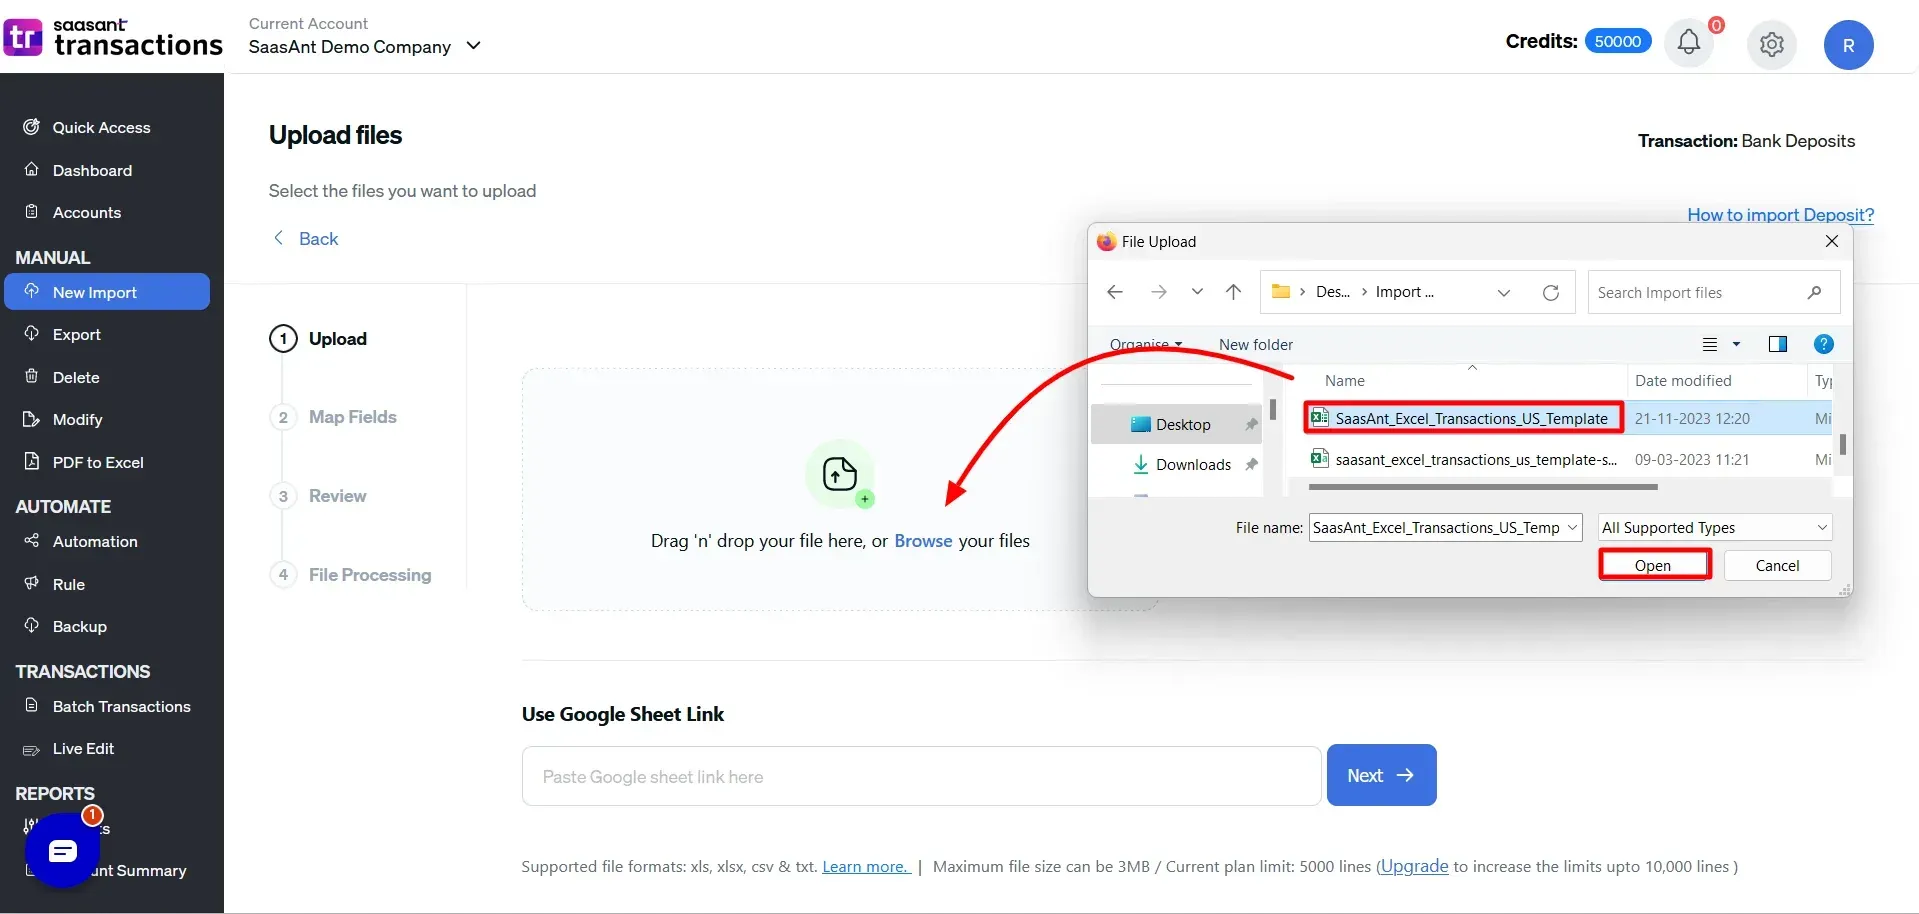
Prepare your deposit data file in either Excel or CSV format.
Optionally, use the provided sample template for guidance.

Choose the document you want to upload.
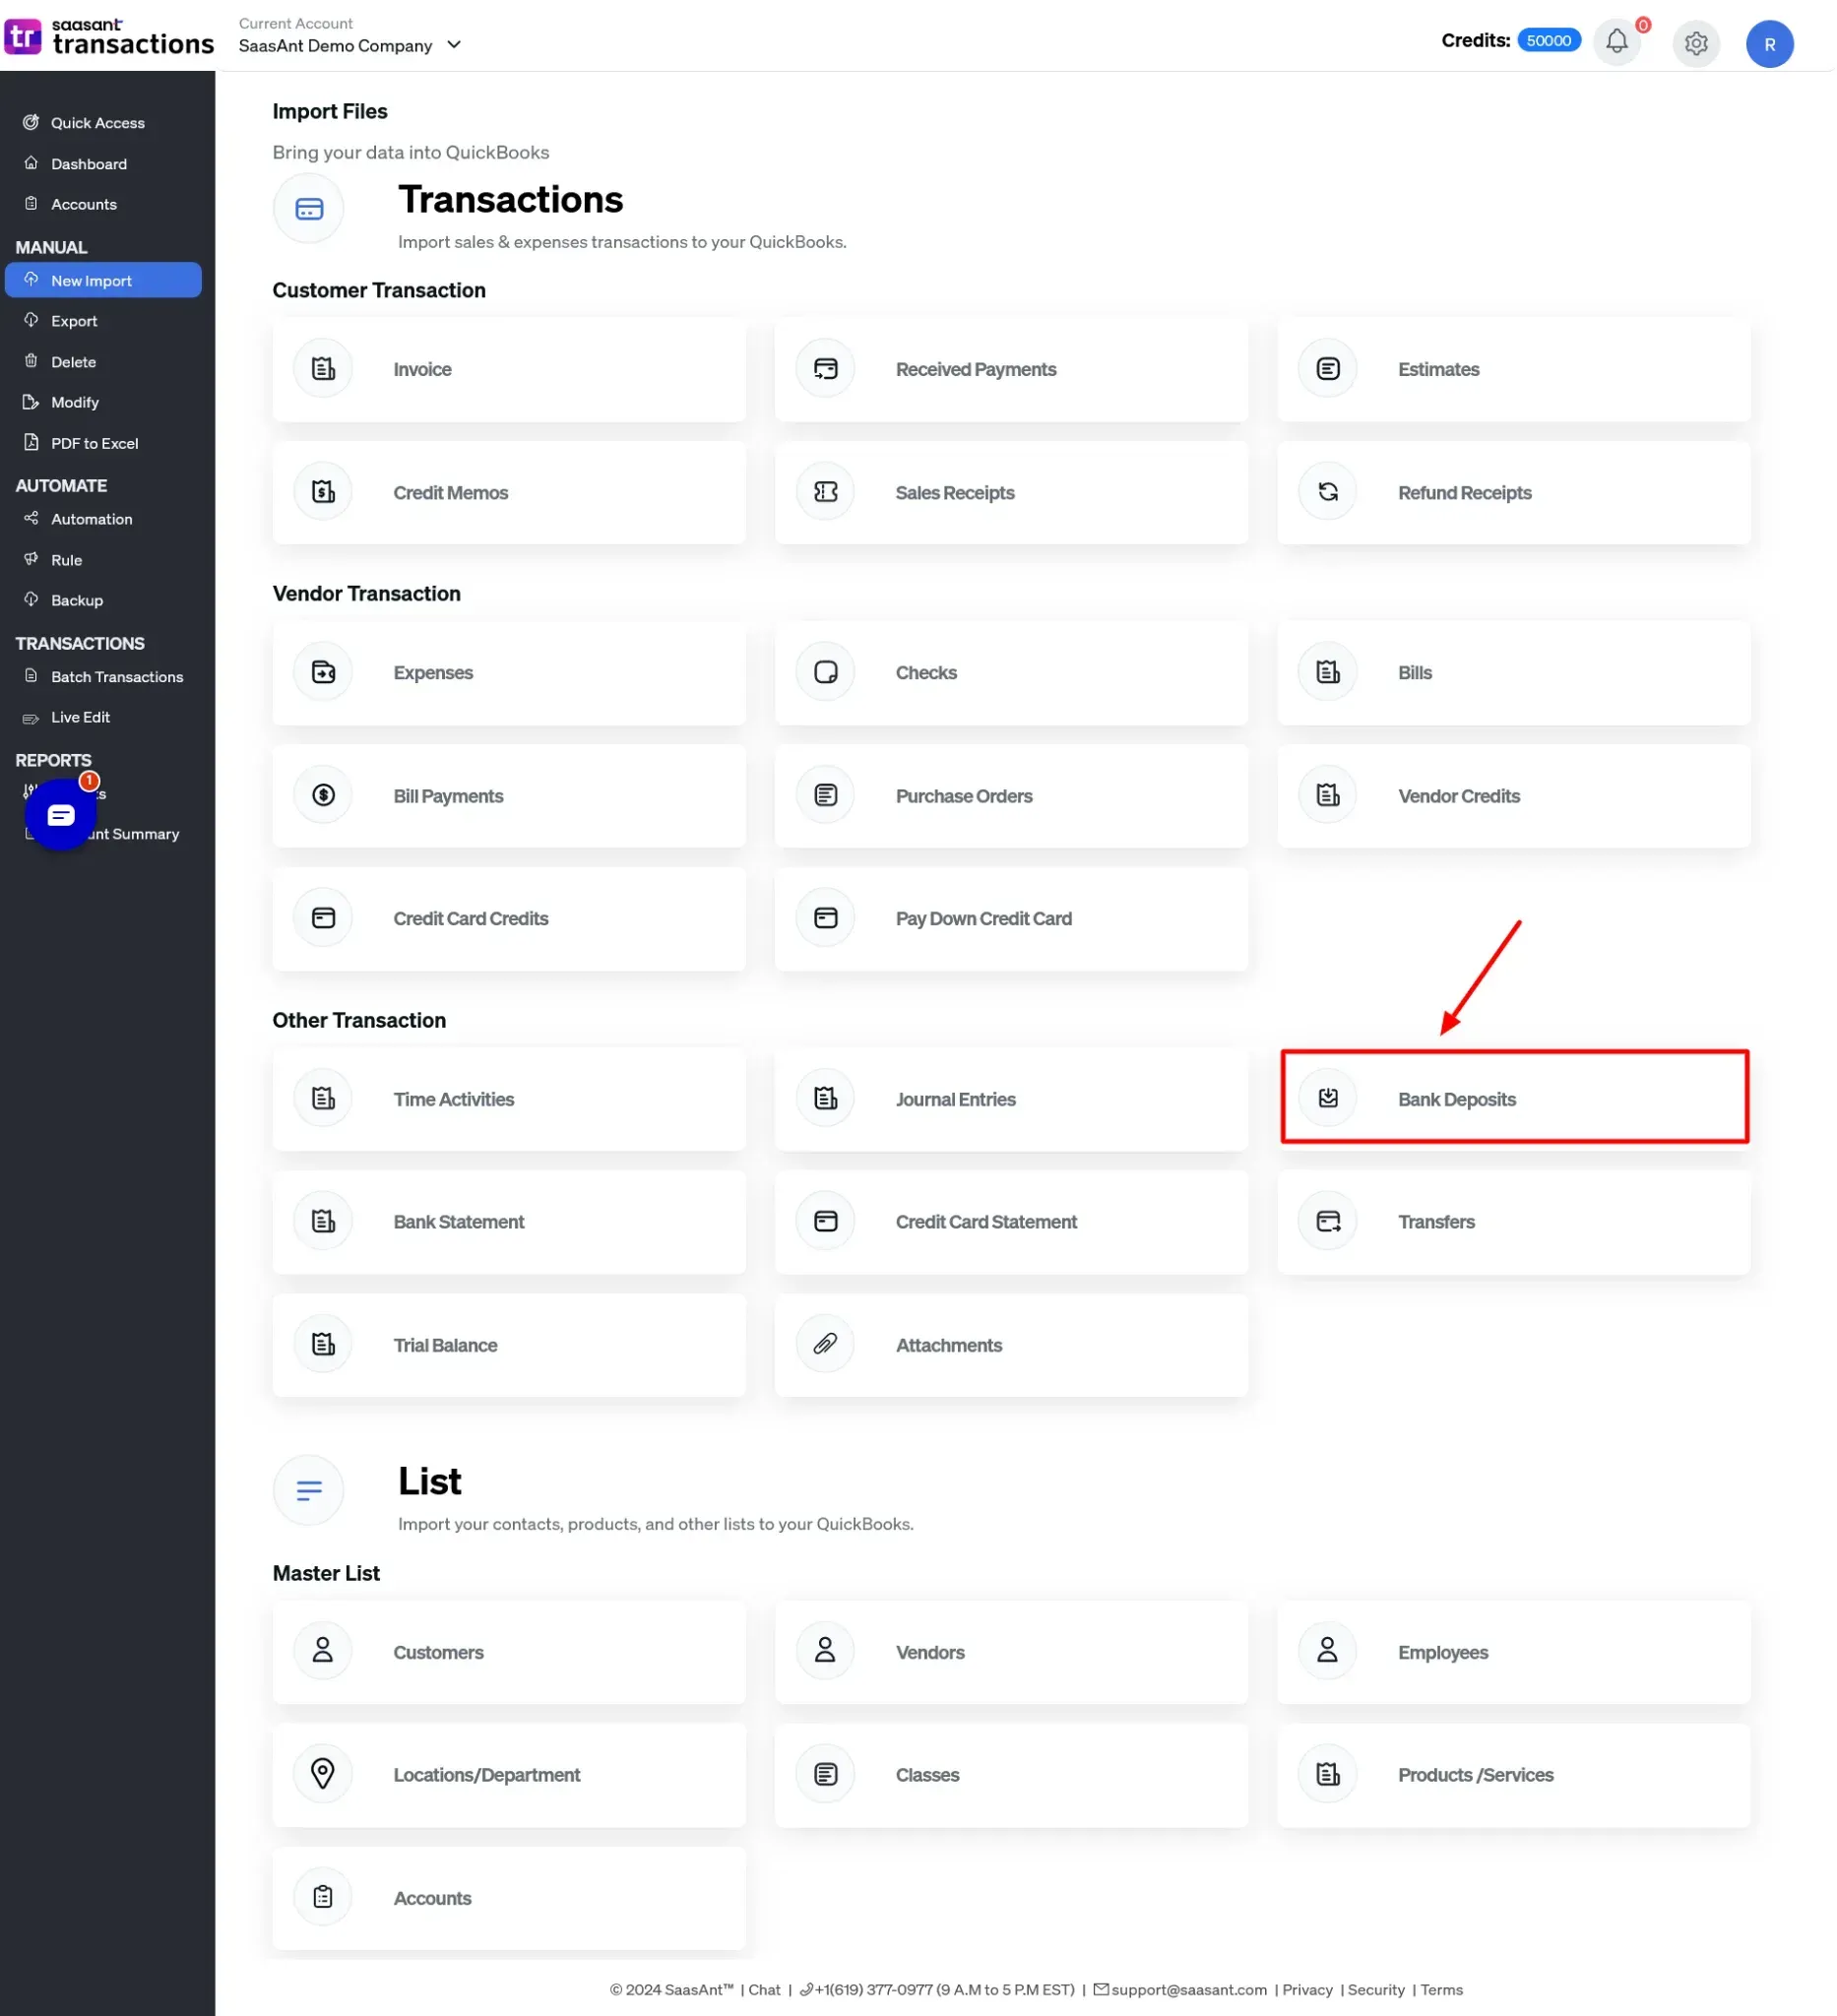
Step 3: Set QuickBooks Entity to ‘ Bank Deposits’
Select ‘Bank Deposits’ as the QuickBooks entity to specify the data type you want to import.
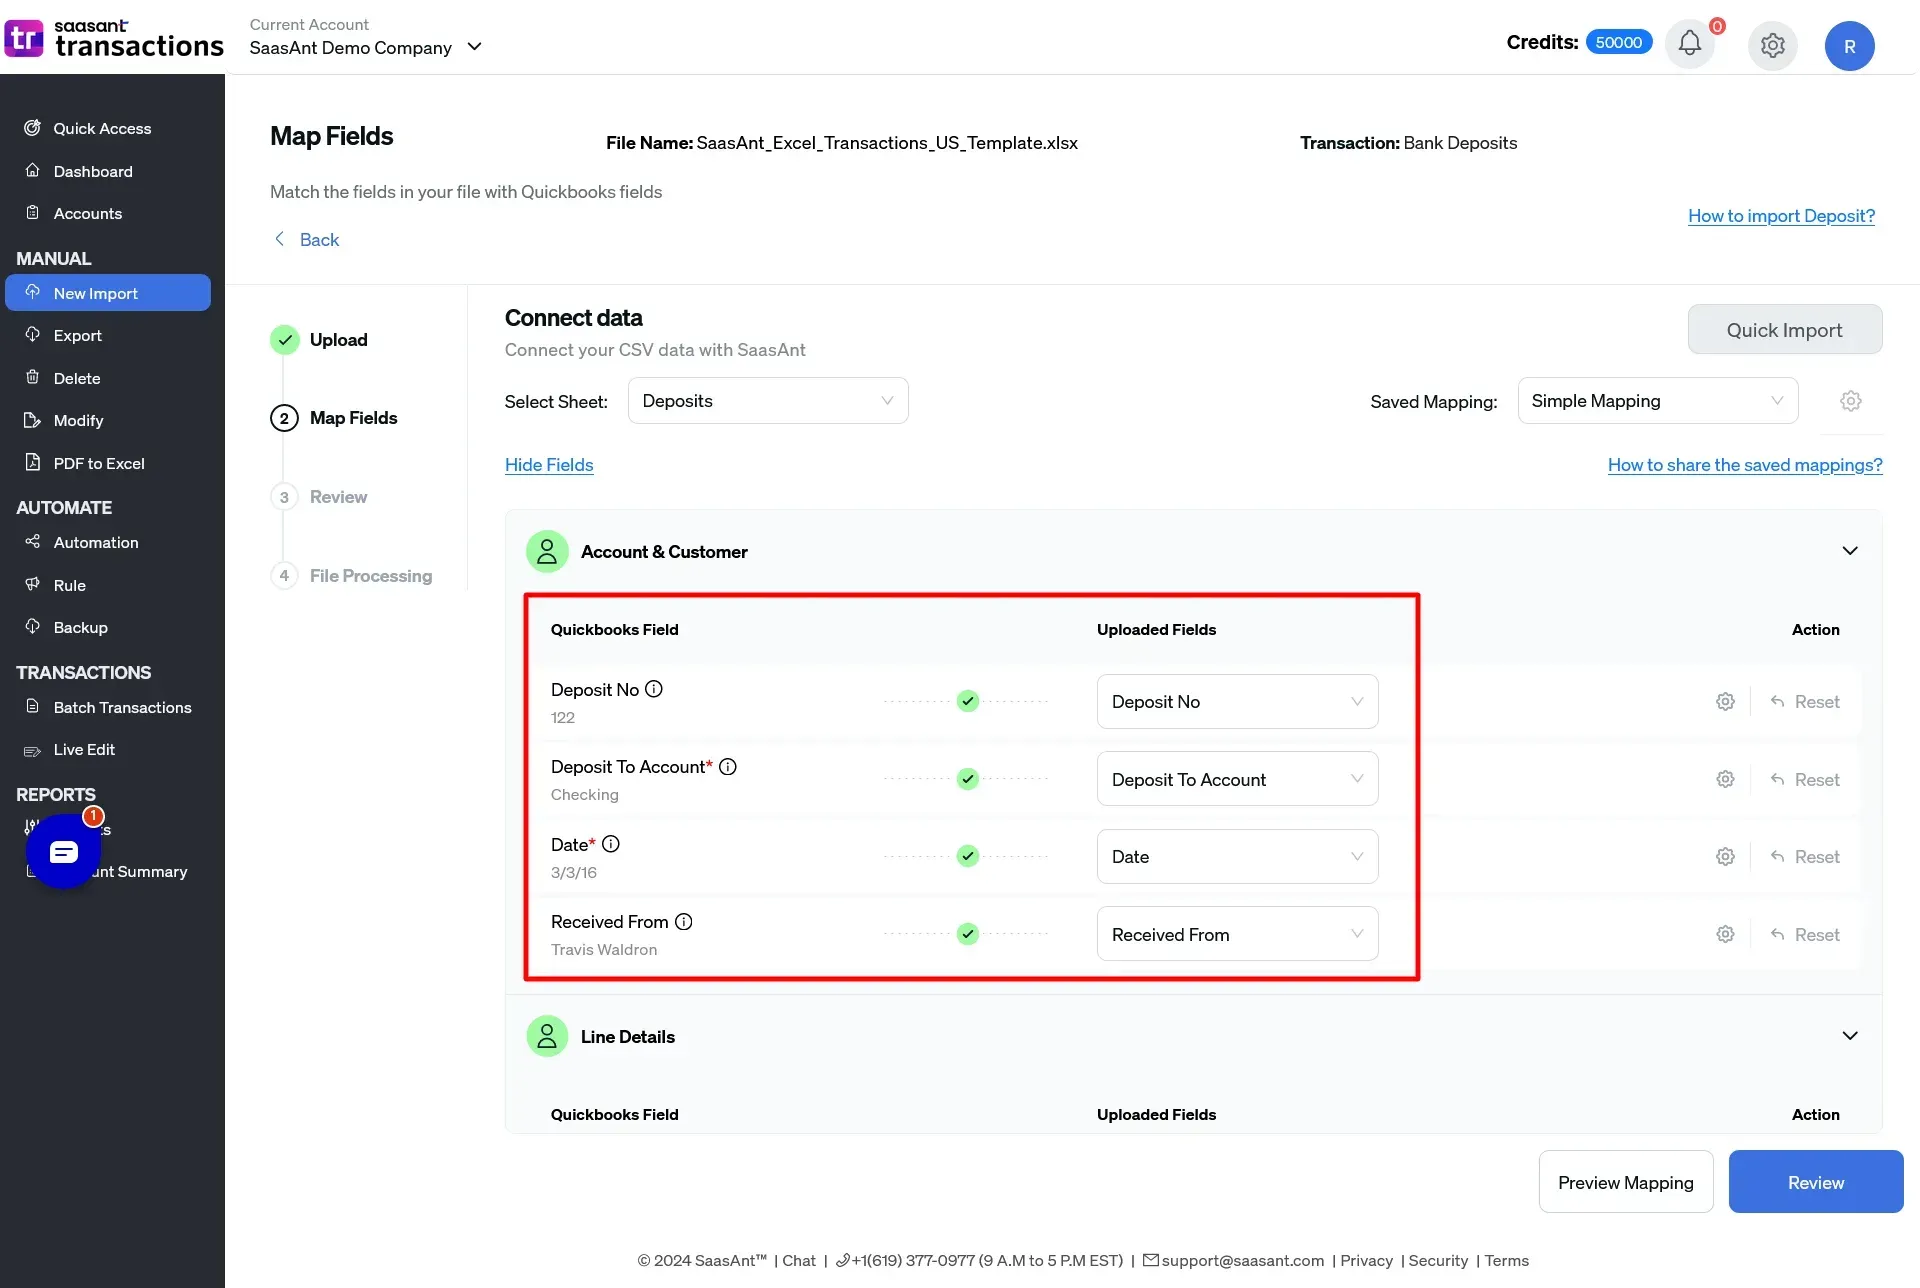
Step 4: Map File Headers to QuickBooks Attributes
Preview the mapping to ensure proper alignment of file headers with QuickBooks attributes.
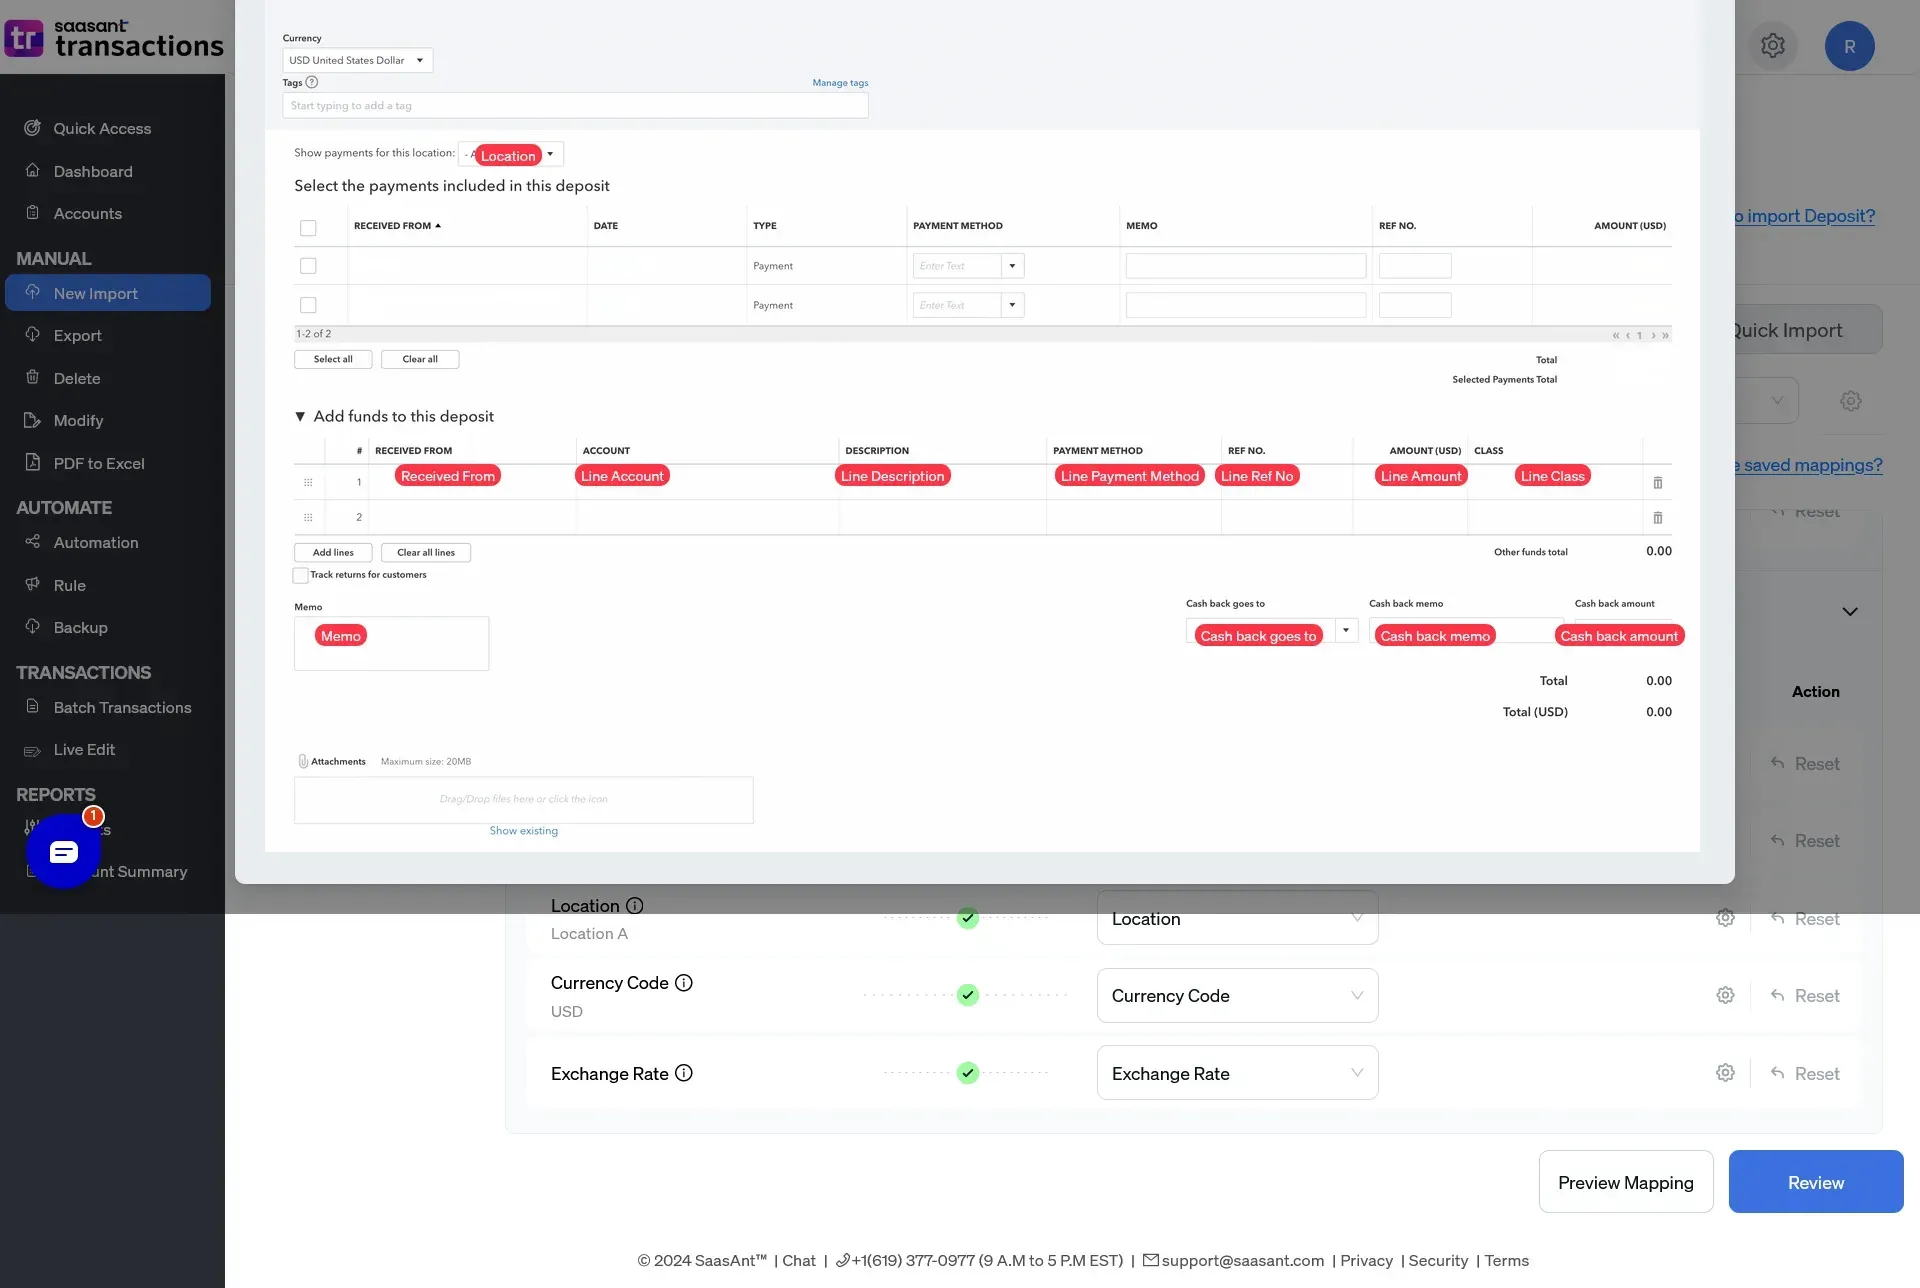
Step 5: Review Data and Settings
Review the mapped data and ensure accuracy.
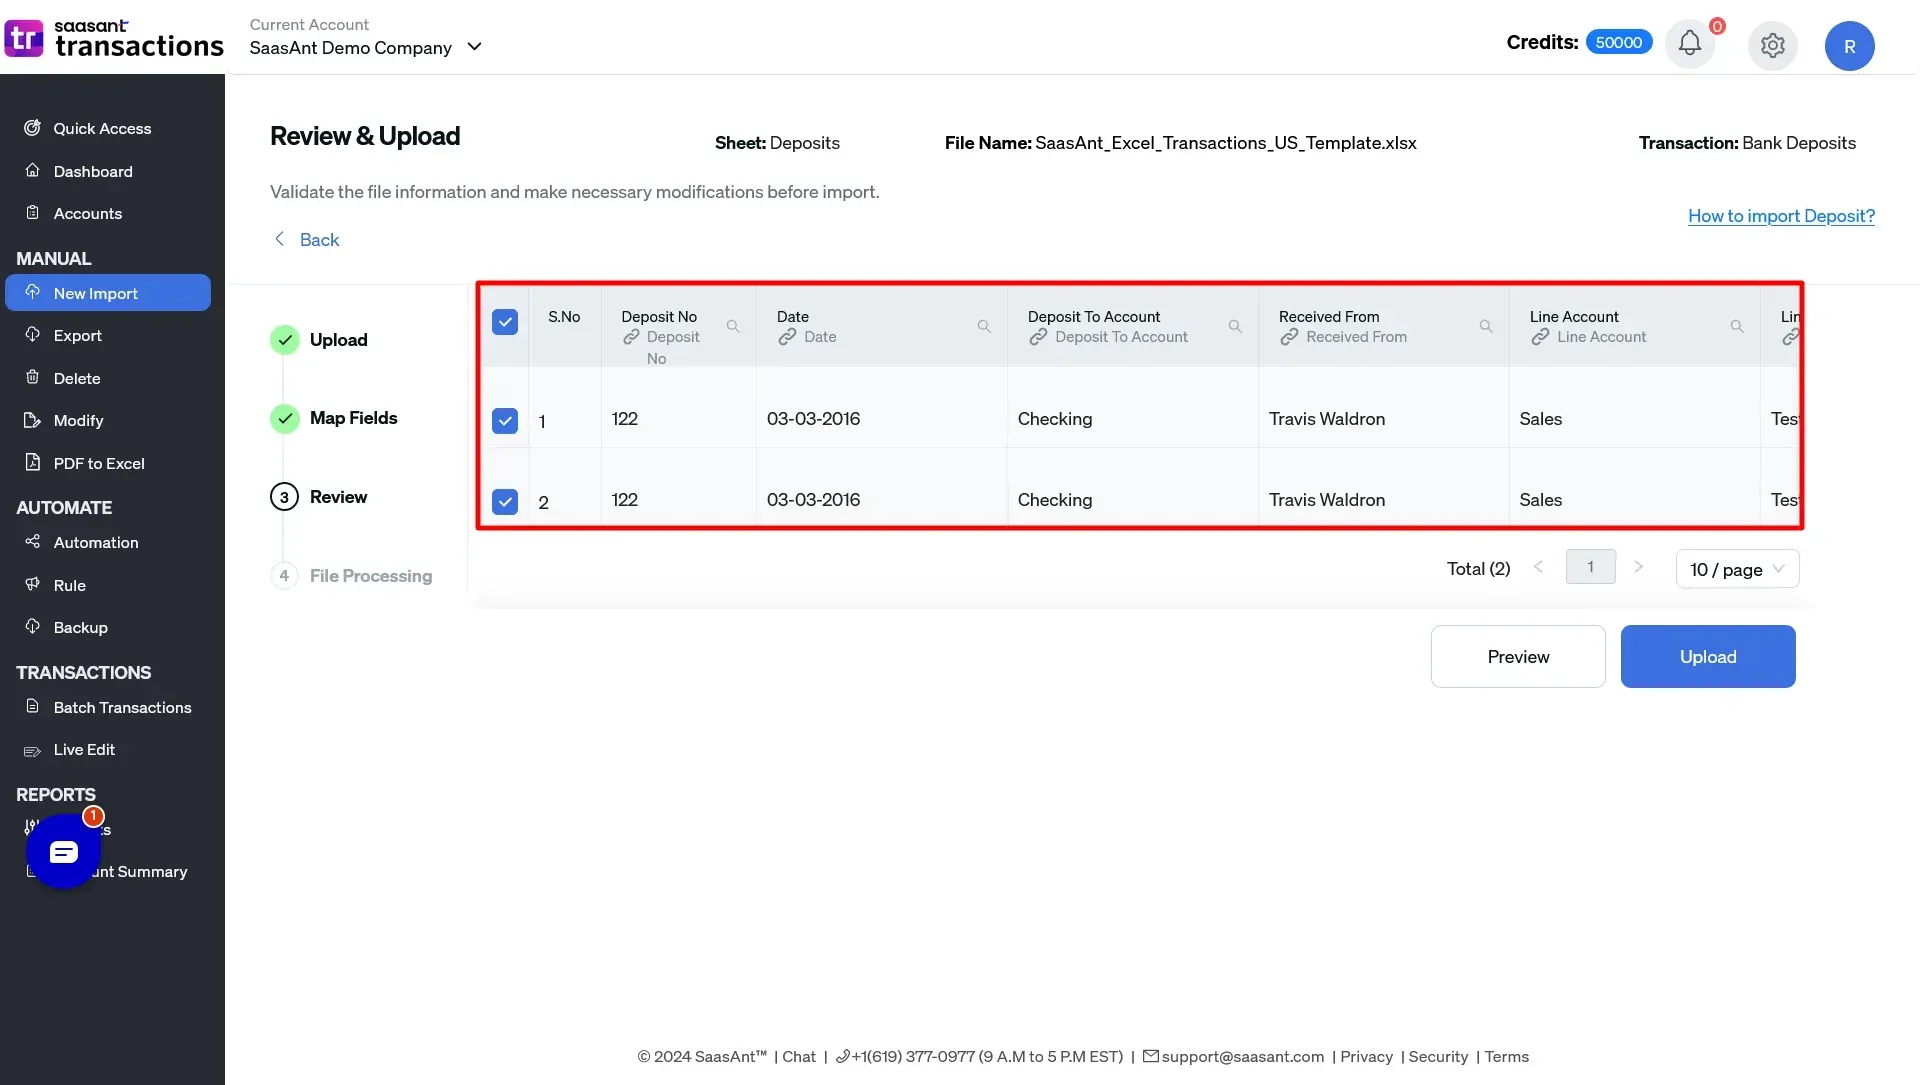
Step 6: Click ‘Upload’ to Import Deposits into QuickBooks Online
Once the mapping and settings are satisfied, click the “Upload” button to initiate the deposit import process.

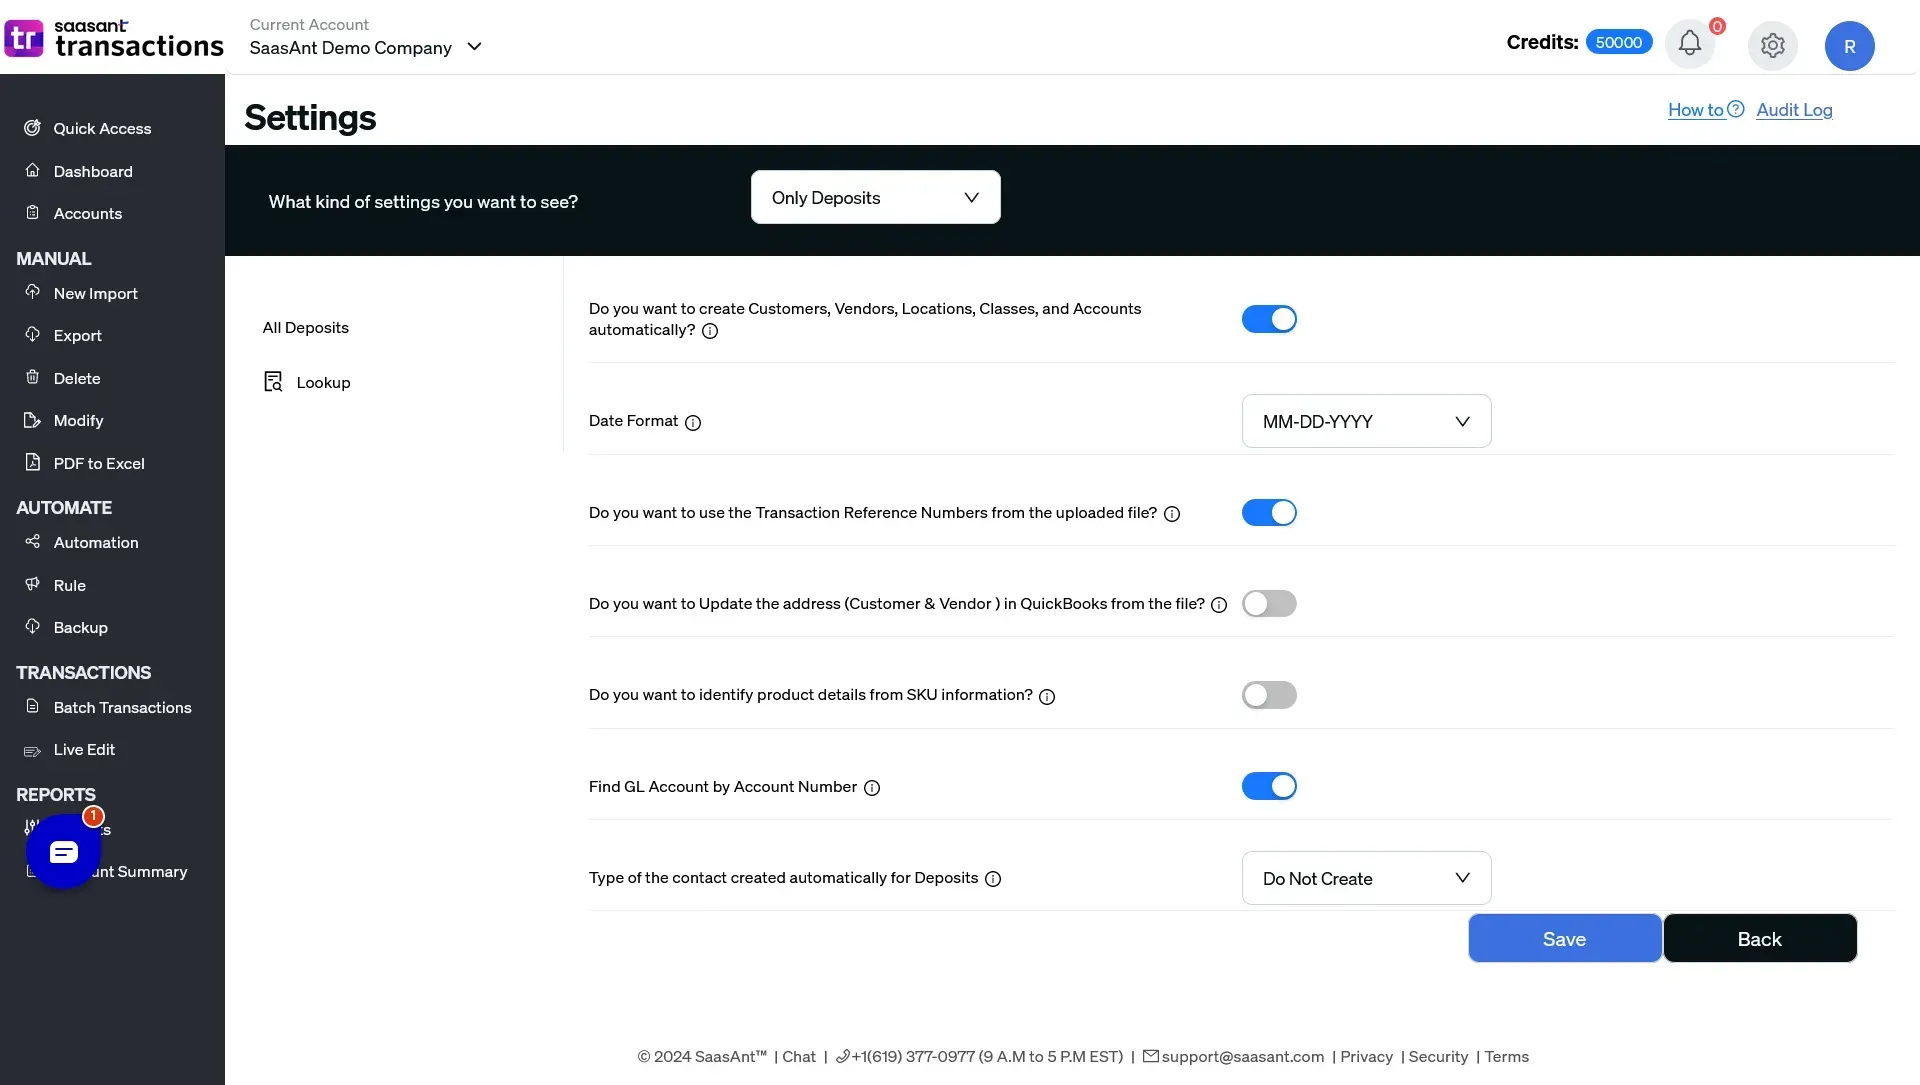
Step 7: Customize Import Settings (Optional)
Explore and modify import settings to tailor the process to your preferences.
Ensure that all parameters align with your specific QuickBooks Online requirements.
Understanding Deposits in QuickBooks
Deposit in QuickBooks represents a transactional entry marking the addition of funds to a company’s bank account. With every deposit logged, businesses can confidently move with financial ledgers in QuickBooks.
Significance of Deposits
A business gains valuable insights for finance management by consistently monitoring deposit entries. This information becomes the foundation for financial decisions. Additionally, accurate deposit recording in accounting activities is an efficient bank reconciliation.
Types of Deposits
Customer Payments: From invoices sent to clients, entries are updated as ‘Paid’ in QuickBooks, ensuring data flow between Accounts Receivable and bank ledgers.
Undeposited Funds: Money is temporarily held in QuickBooks before it’s grouped and added to the bank. This method ensures that when we group many payments in QuickBooks, it matches the sum in the bank, making it easier to double-check and confirm our records.
Miscellaneous Deposits: A category encompassing a wide array of entries, from business owners contributing capital to earnings from interest and occasional reimbursements.
Steps and tips for effectively managing deposits
Initiate Deposits in QuickBooks
QuickBooks simplifies the task of recording financial transactions, including deposits.
Navigate to the Bank Deposits within QuickBooks, and it will prompt you to choose the appropriate bank account, ensuring that the deposit is attributed correctly. After entering the requisite details, record the deposit.
Data Preparation & Organization
Before integrating data into QuickBooks, it’s vital to ensure consistency and accuracy in the raw data. Compile all your deposit data from bank statements, sales records, or other financial systems. Format this data into a CSV or Excel sheet, ensuring that critical fields such as Date, Amount, and Memo are clearly labeled and organized.
Seamless Import with SaasAnt Transactions
SaasAnt Transactions is an efficient application that bridges external data sources with QuickBooks, ensuring seamless data integration. Launch SaasAnt and select the ‘Import’ feature. Here, you can upload your formatted deposit data file. Ensure that each column from your file matches its corresponding field in QuickBooks. After completing the mapping successfully, confirm the import.
Post-Import Verification
Data import is complete with a thorough verification process. After using SaasAnt Transactions, delve into QuickBooks to inspect the newly integrated deposits.
Periodic Reconciliation of Deposits
Reconciliation is confirming that your QuickBooks records are the same as your actual bank statements. Regularly initiate the reconciliation process within QuickBooks. If any discrepancies occur, such as unmatched deposits. Use SaasAnt’s ‘Modify’ Data function to batch edit erroneous data, ensuring alignment between your records and bank statements.
Prioritize Backups
Data safety is essential when making bulk changes or imports. Always ensure you have an up-to-date backup of your QuickBooks file.
Procedure for Deleting
If you identify an error within QuickBooks, locate the specific deposit entry. You’ll have options such as ‘Delete’ or ‘Edit.’ Choose accordingly based on the required action.
Potential pitfalls when deleting deposits
1. Disruption of Financial Records: Erasing a deposit can break the continuity of your financial data, leading to mismatches during reconciliations.
2. Recovery Challenge: While SaasAnt does maintain detailed transaction logs, restoring vast amounts of data after unintended deletions can be complex and prone to errors.
Best practices for managing deposits
1. Timely Recording
Enter deposits as soon as they occur. Recording reduces the risk of forgetting or overlooking transactions, ensuring that your books are up-to-date.
2. Use the ‘Undeposited Funds’ Account
QuickBooks offers an ‘Undeposited Funds’ feature, a temporary fund holding area. This feature will group multiple payments before making a consolidated bank deposit, ensuring easier reconciliation.
3. Regular Reconciliation
Consistently reconcile your QuickBooks deposits with bank statements. This practice helps identify any discrepancies early, making them easier to address.
4. Detailed Descriptions
When recording deposits, provide clear and detailed descriptions. It helps identify each deposit’s source and purpose, especially during reviews or audits.
5. Backup Frequently
Regularly backup your QuickBooks data to safeguard against data loss or errors. It ensures you have a backup option in case of unexpected issues.
Troubleshooting deposit management issues
1. Mismatched Balances
Suppose your QuickBooks balance doesn’t align with your bank statement. Double-check recent deposits for inaccuracies. Ensure recording of all transactions and that there aren’t any duplicate entries.
2. Orphaned Payments
For unlinked payments to any invoice or sales receipt, use QuickBooks’s ‘Receive Payments’ feature to connect these orphaned payments to the appropriate invoices correctly.
3. Unrecorded Deposits
Deposits that appear in your bank statement but aren’t in QuickBooks. Manually enter these deposits or utilize import to integrate them. Ensure that any external financial application connected to QuickBooks is regularly updated.
4. Duplicate Entries
You are seeing the same deposit recorded multiple times. Review recent transactions for any repeated entries. Delete or merge duplicates as necessary.
5. Undeposited Funds’ Confusion
Funds appear in the ‘Undeposited Funds’ account but not in the main bank account. Ensure that funds are regularly moved from ‘Undeposited Funds’ to the primary bank account in QuickBooks.
Conclusion
Handling deposits in QuickBooks needs careful attention. It’s crucial to make entries on time, check them regularly, and fix any issues quickly. By following these rules, businesses can keep their financial records clear and accurate. Staying updated with QuickBooks along with SaasAnt transaction changes and using it helps companies to make better money decisions.
FAQs
What is the ‘Undeposited Funds’ feature in QuickBooks?
The ‘Undeposited Funds’ is a temporary holding account in QuickBooks where you can group multiple payments. Once ready, you can move these funds as a single deposit to your bank account, making matching your real-life bank deposits easier.
Why do I see mismatched balances between QuickBooks and my bank statement?
Mismatched balances can arise due to missed transactions, duplicate entries, or incorrect data entry. Regular reconciliation and careful review of deposits can help identify and correct these discrepancies.
How do I delete or modify a deposit entry?
Locate the specific deposit entry in QuickBooks to modify or delete a deposit. You can ‘Edit’ or ‘Delete’ the transaction based on your needs.
Are there risks with batch deletions using applications like SaasAnt Transactions?
Yes, batch deletions can lead to mass removal of essential data if not done cautiously. Always back up your data and review your selections thoroughly before performing batch operations.
How often should I reconcile my deposits?
Regular reconciliation, such as monthly, is advisable. It helps promptly catch discrepancies and ensures that your QuickBooks records align with your bank statements.
Related articles: