Import Bills into QuickBooks Online - Complete Guide
Importing bills into QuickBooks Online can be complex due to diverse bill formats and data requirements. However, SaasAnt Transactions simplifies this task significantly.
This guide will walk you through the step-by-step process of importing bills using SaasAnt Transactions, ensuring seamless integration with QuickBooks Online. From preparing your data to confirming successful import, you'll learn how SaasAnt Transactions, an Accountant's Favorite and User's choice award-winning app enhances efficiency, reduces errors, and streamlines your bill management process.
Contents
Import Bills into QuickBooks Online: Quick Instructions
Import Bills into QuickBooks Online: Step-by-Step Guide
Why Import Bills?
Conclusion
FAQs
Import Bills into QuickBooks Online: Quick Instructions
For users looking to streamline the process of importing bills into QuickBooks Online, here's a straightforward guide to get you started:
Connect SaasAnt Transactions from the QuickBooks app store
Upload your Excel file containing the transactions into saasant Transactions.
Click on import to start importing your transactions into QuickBooks
Click on rollback or undo if you wish to restore data.
Getting Started with Importing Bills
Importing bills into QuickBooks Online can be challenging due to varying bill formats, leading to confusion and potential errors. SaasAnt Transactions streamlines this process by converting different formats into a consistent structure, ensuring seamless integration with QuickBooks Online. As a safe certified app, SaasAnt ensures your data stays safe and secure. This eliminates format friction, reduces errors, and guarantees accurate data entry, making bill management more efficient.
Additionally, SaasAnt Transactions automates the data entry process, capturing bill details and transferring them accurately to QuickBooks Online, regardless of bill volume. It also provides transparent templates for bills with ambiguous information, ensuring precise data field mapping. SaasAnt Transactions simplifies and enhances bill management, making it a valuable business tool.
Import Bills into QuickBooks Online: Step-by-Step Guide
Step 1: Prepare Your DataSheet
Ensure your datasheet is in a compatible format like Excel, CSV, or TXT, PDF, or Images (PNG, JPEG) and convert it if necessary. It is also recommended that you use the SaasAnt Transactions Template for data preparation. You can upload receipts and bills in any form, including PDF, or scan them and upload them into QuickBooks with ease.
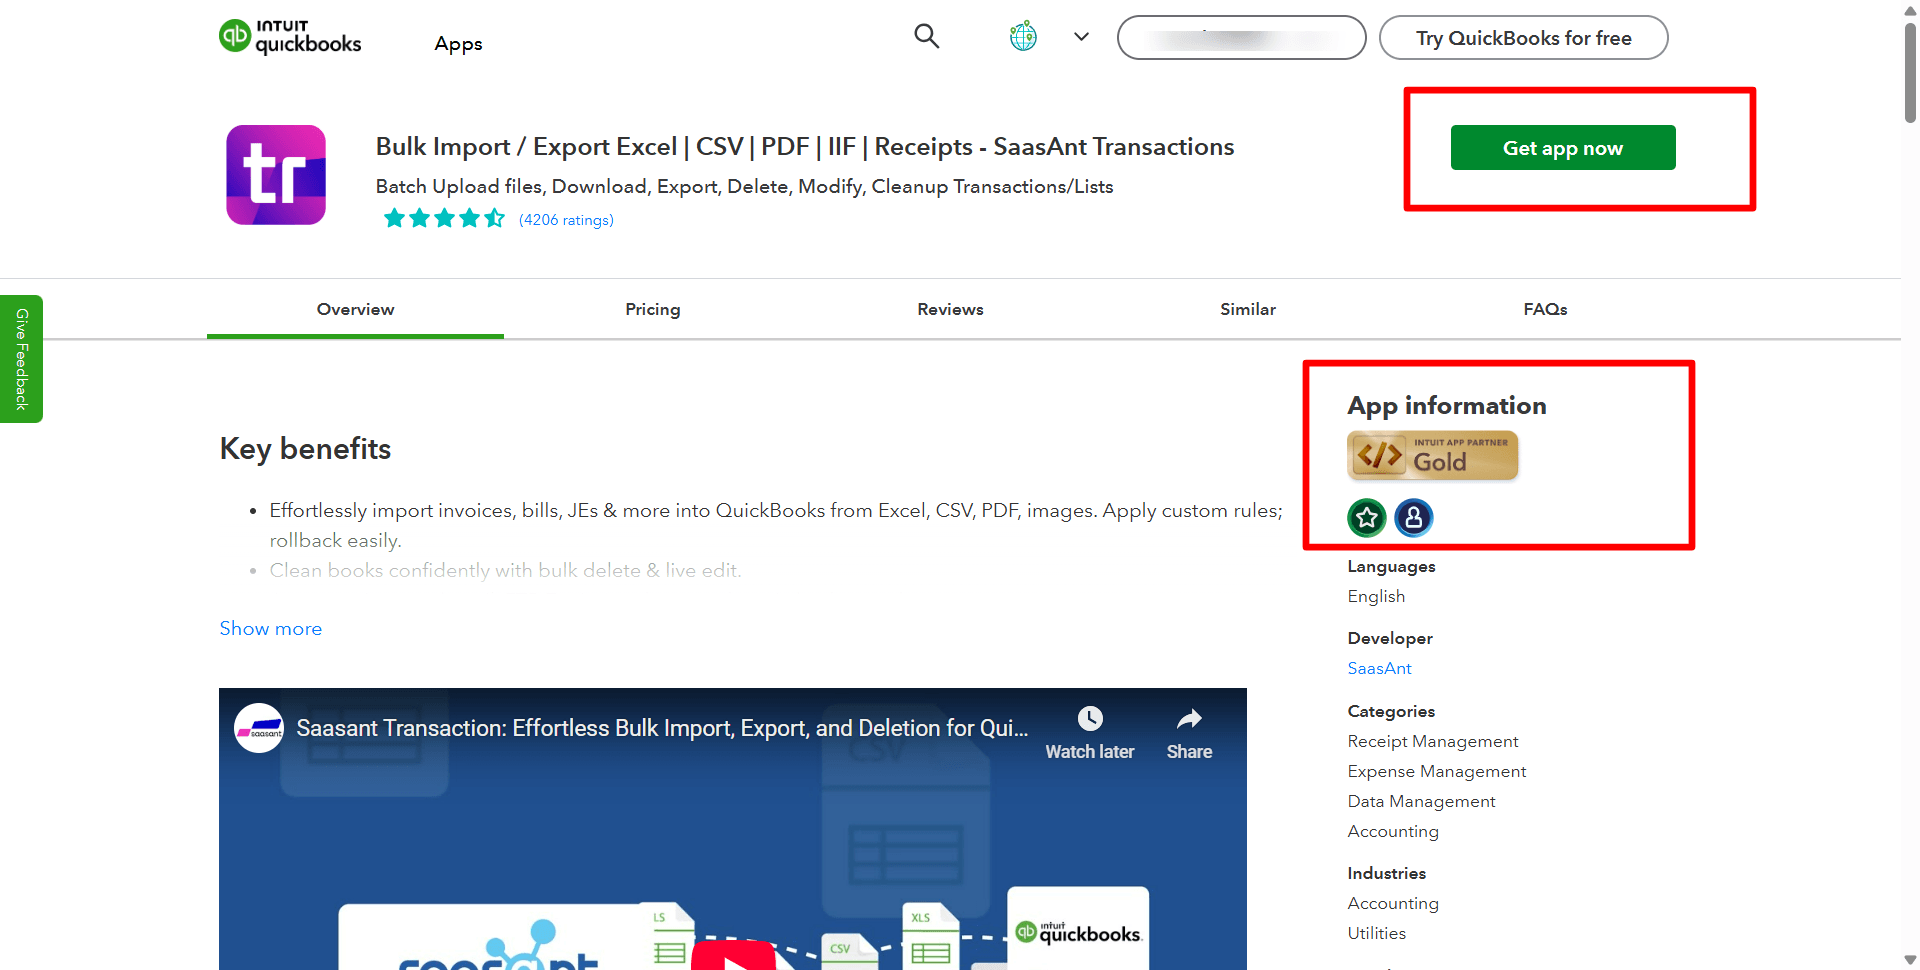
Step 2: Launch SaasAnt Transactions via the QuickBooks App Store
Open QuickBooks, connect SaasAnt Transactions from the QuickBooks App Store and sign in.
Step 3: Arrange and Transfer the Files
To upload your bill data in SaasAnt Transactions, click 'New Import,' select 'Bills' as the transaction type, connect to QuickBooks Online, and use 'Browse' to upload your file in a supported format like Excel or CSV. (All formats supported: PDF, Images, IIF, CSV, Excel).This process prepares your data for mapping.

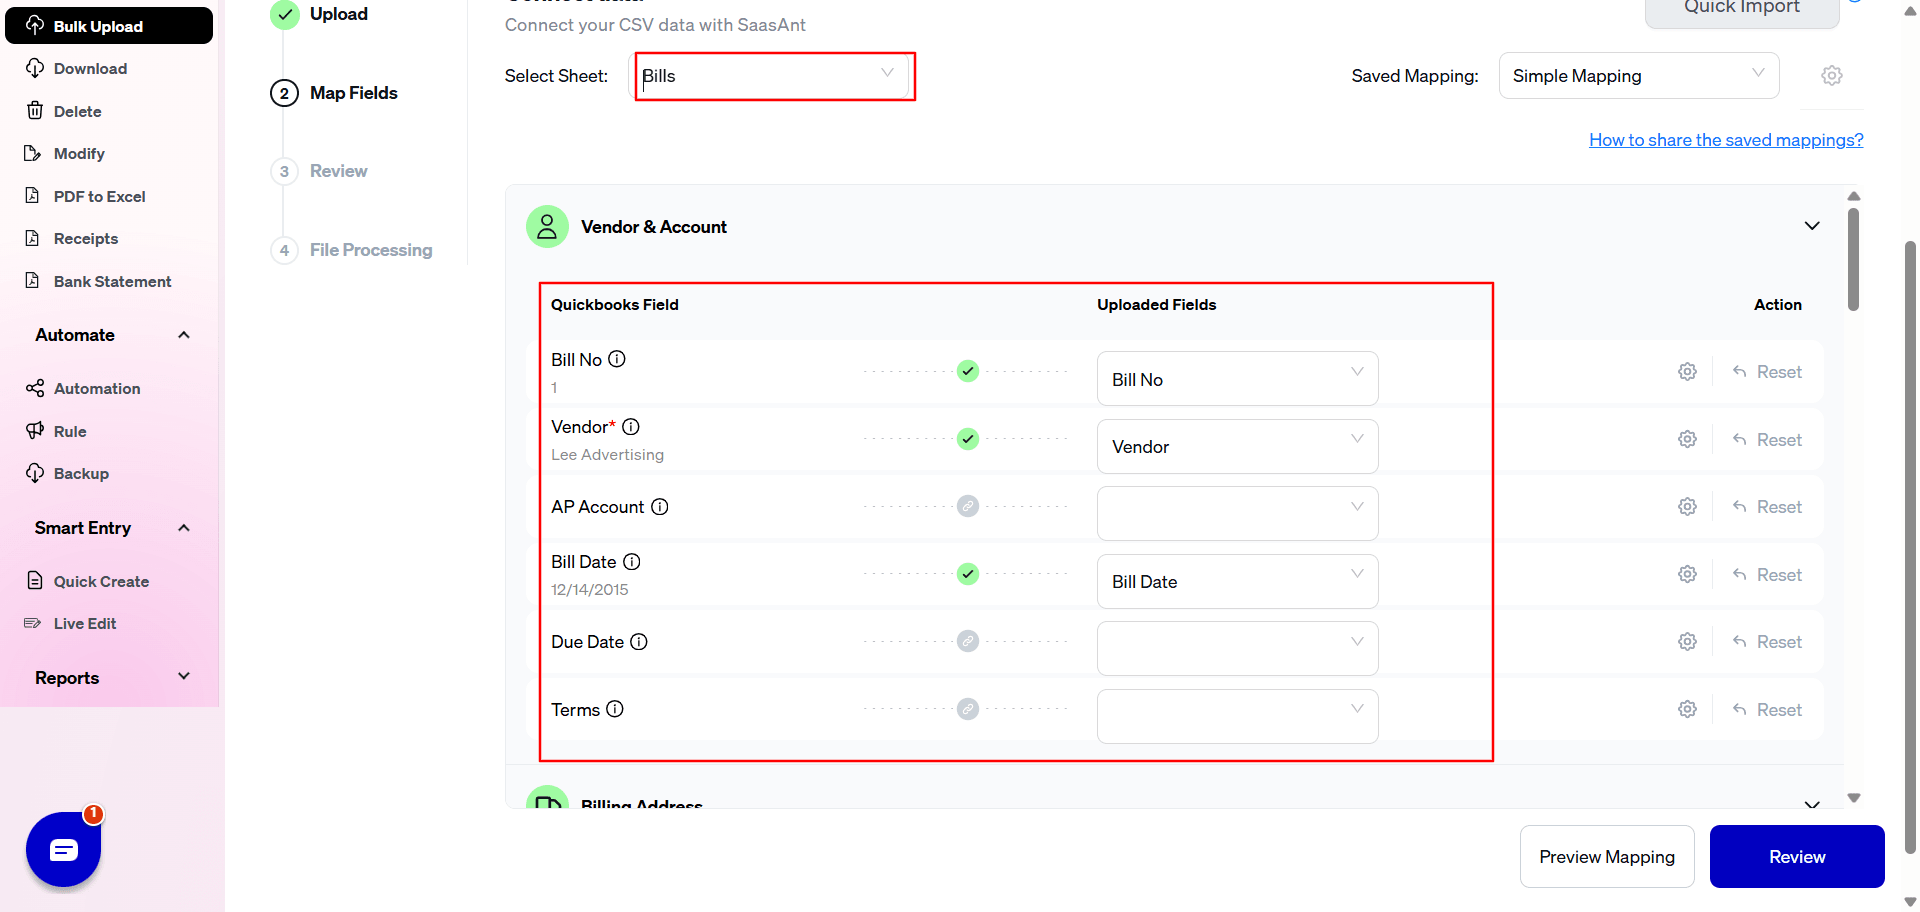
Step 4: Map the Data Fields
Accurate mapping of your bill data is essential for seamless integration with QuickBooks Online, minimizing errors. SaasAnt Transactions simplifies this with an intuitive interface and a 'Preview Mapping' feature. Ensure precise mapping of fields like bill numbers, dates, accounts, and vendor names. Comprehensive guides on the SaasAnt support portal provide additional assistance for a smooth, error-free bill import process.
Step 5: Review Mapping and Initiate 'Import'
Before proceeding with your bill import, thoroughly review the mapped data to identify and correct any errors. SaasAnt Transactions simplifies this step, allowing you to easily review and adjust your data to ensure everything aligns correctly, thus ensuring a smooth and hassle-free import process.
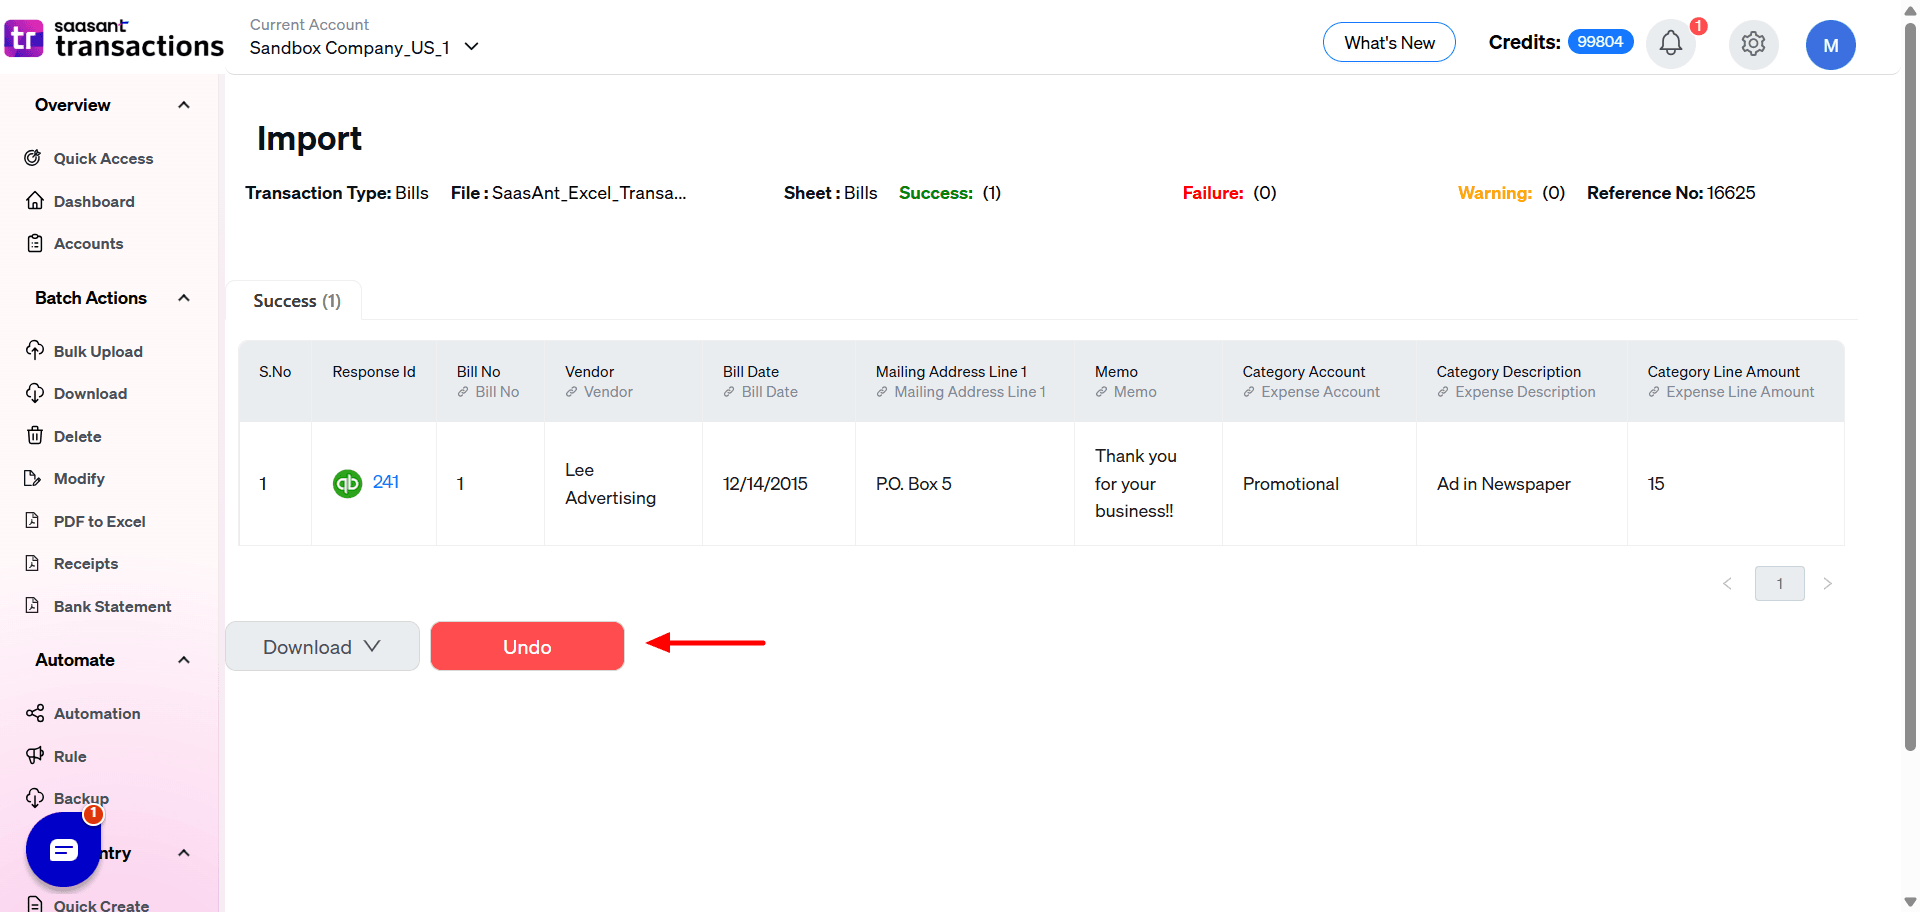
Step 6: Confirm Successful 'Import'
At the final stage of your bill import process, click the ‘Import’ button in SaasAnt Transactions. This will transfer your reviewed bill data into QuickBooks Online, efficiently organizing your bills and completing the import process.
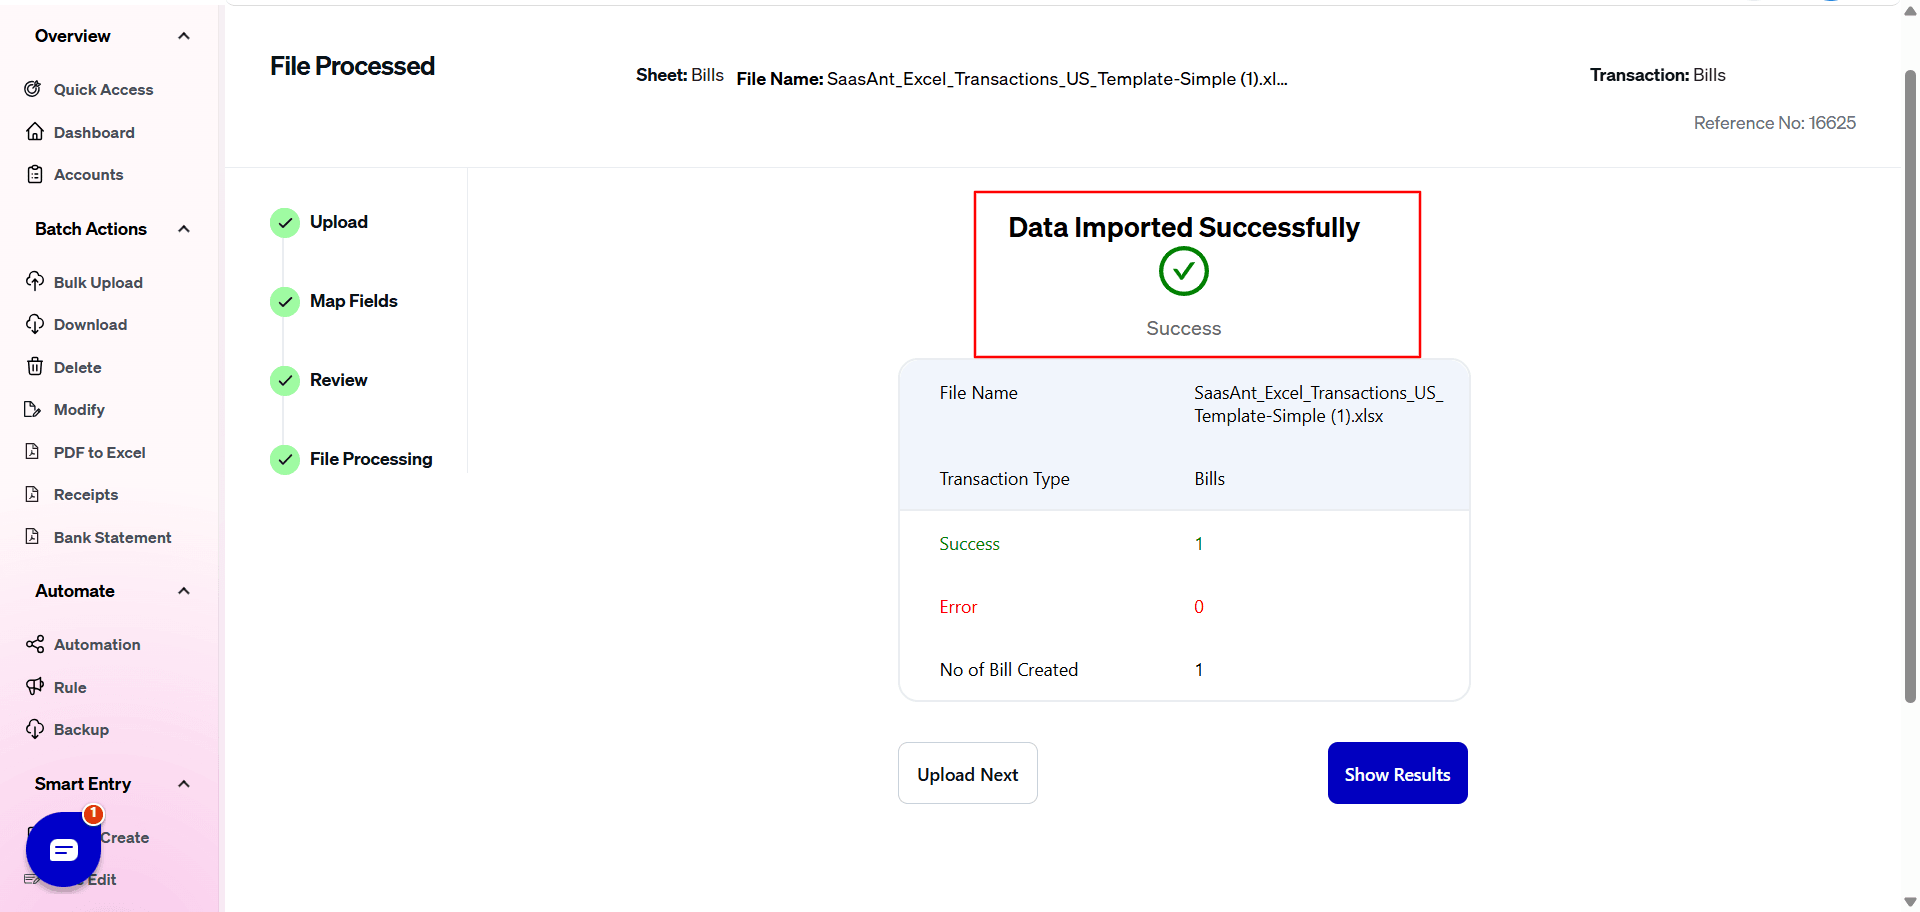
Step 7: Checking the Imported Bills
After importing bills, validate their accuracy in QuickBooks Online by clicking the 'Number with QuickBooks' icon. This allows you to review the data and ensure its correctness.
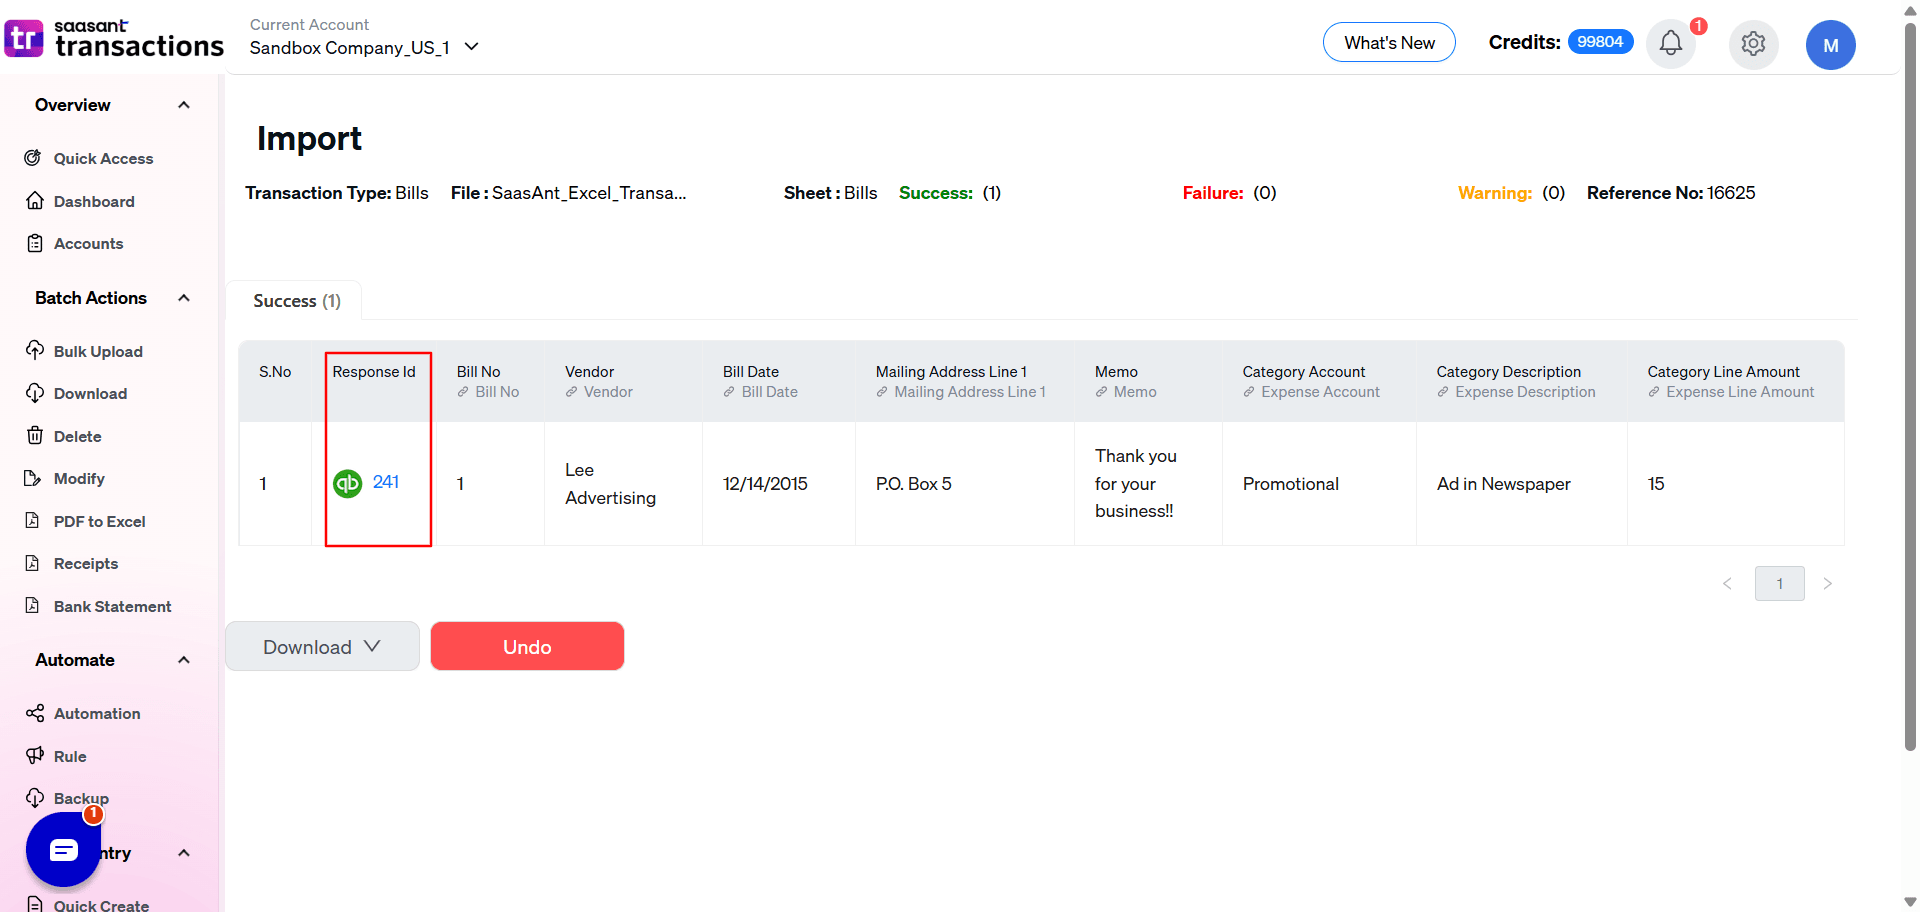
Option: Roll Back
If you encounter any errors during the import, don't worry; you can easily undo the import and restore the data using the rollback feature.
Why Import Bills?
Real-World Use Cases
SaasAnt shines across different scenarios. Here’s how it helps real users:
Small Business Owner
A café owner gets 30 supplier bills monthly—coffee beans, pastries, utilities. Manually entering them took hours and led to mistakes. With SaasAnt, they upload a single CSV, map it once, and import everything in minutes. Now, their expense tracking is accurate, and they’ve got more time to focus on customers.Accountant with Multiple Clients
An accountant manages 10 clients, each with 20-50 bills monthly. SaasAnt lets them import all those bills in bulk, cutting their workload by half. No more late nights fixing typos—just clean data across every client’s books.Manufacturing Firm
A manufacturer deals with bills for raw materials, equipment, and shipping. Some bills have multiple line items, making manual entry a nightmare. SaasAnt handles the complexity, importing detailed bills accurately so they can track production costs and stay profitable.
These cases show SaasAnt’s flexibility, no matter your industry or scale.
Advantages of SaasAnt Transactions
Automating the import process saves considerable time compared to manual entry, allowing business owners and accountants to focus on more strategic tasks.
Automated imports minimize human errors, ensuring data accuracy and integrity essential for precise financial reporting.
SaasAnt Transactions efficiently handles large volumes of data, making it ideal for businesses with extensive transaction management needs.
SaasAnt offers customizable import templates to align with specific QuickBooks Online setups, catering to various business requirements and ensuring smooth integration.
Importing bills directly from Excel ensures data is current and correctly categorized, streamlining reconciliation and improving efficiency during audits.
Get a 30-day free trial, and no credit card is required, allowing businesses to experience its benefits risk-free.
These features make SaasAnt Transactions an invaluable tool for businesses looking to optimize their bill management process in QuickBooks.
For step-by-step instructions on how to import bills into QuickBooks, check the video
Conclusion
In conclusion, SaasAnt Transactions streamlines bill imports into QuickBooks Online with its cost-effective, automated, and error-handling features. It offers email and FTP/SFTP integrations, Zapier support, live edits, batch transactions, and detailed reporting. It is a valuable tool for optimizing financial operations with comprehensive management options, premium support, and a 30-day free trial.
FAQs
Can you import bills to QuickBooks Online?
Yes, bills can be imported into QuickBooks Online.
How do I import bills into QuickBooks Online?
To import bills into QuickBooks Online, connect SaasAnt Transactions to your QuickBooks account, upload your bill data file, map the fields, and initiate the import.
Can SaasAnt Transactions handle a large volume of bills?
Yes, SaasAnt Transactions can efficiently handle a large volume of bills.
Does SaasAnt Transactions provide customizable bill templates?
Yes, SaasAnt Transactions provides customizable bill templates to suit various business needs.
How does SaasAnt Transactions enhance bill importing in QuickBooks Online?
SaasAnt Transactions seamlessly integrates with QuickBooks Online, automating processes, reducing errors, and enhancing accuracy in bill importing. The import process includes the following key steps:
Data Sheet Preparation: Ensure proper data organization in a supported format, such as Excel or CSV.
Organization: Arrange and match your data with QuickBooks Online headers.
Mapping: Map your data fields accurately to the corresponding fields in QuickBooks Online.
Review: Double-check your data mapping for accuracy.
Initiation: Start the import process, allowing SaasAnt Transactions to transfer your data seamlessly to QuickBooks Online.
This comprehensive approach simplifies the bill-importing process, making it more efficient and less prone to errors.
Does SaasAnt Transactions provide customizable bill templates?
Yes, SaasAnt Transactions often offers the flexibility to customize bill templates. But if you struggle to format your data into fields like in QuickBooks Online, you can use the SaasAnt Transactions Bill Template for a seamless upload.
How can I easily import transactions into QuickBooks?
You can easily import transactions into QuickBooks using SaasAnt Transactions, which automates and simplifies the process.
Read also:
How to Delete a Bill in QuickBooks Online