How to Import Bank Transactions into QuickBooks Online?
Manually entering bank transactions takes time. It also increases the chance of missed lines, wrong dates, and wrong amounts.
If you are trying to bring transactions into QuickBooks Online, start with one question: what do you have from the bank?
A spreadsheet export (Excel or CSV)
Or only a PDF statement
This guide covers both. You will see two practical ways to import:
Excel or CSV transaction file import
PDF bank statement import that extracts lines and creates transactions
Contents
Can you import transactions into QuickBooks Online?
What type of transactions can be imported into QuickBooks Online?
Before you import, avoid the most common problems
How to import transactions into QuickBooks Online from CSV
How to import transactions into QuickBooks Online from Excel
How to import bank transactions into QuickBooks Online from Excel
How to import bank transactions into QuickBooks Online from a PDF statement
How to automate recurring imports
Import settings that improve accuracy
How to fix mistakes after import
Pros and cons of importing transactions into QuickBooks Online
FAQs Frequently Asked Questions
Can you import transactions into QuickBooks Online?
Yes, you can import transactions into QuickBooks Online.
If you already have an Excel or CSV export, you can bring those lines in quickly instead of retyping. If you only have a PDF statement, you can still bring the data in. The goal is to convert statement lines into real QuickBooks transactions you can review and reconcile.
SaasAnt Transactions supports both workflows.
With a spreadsheet, you can upload the file, map the columns once, preview the data, and import safely.
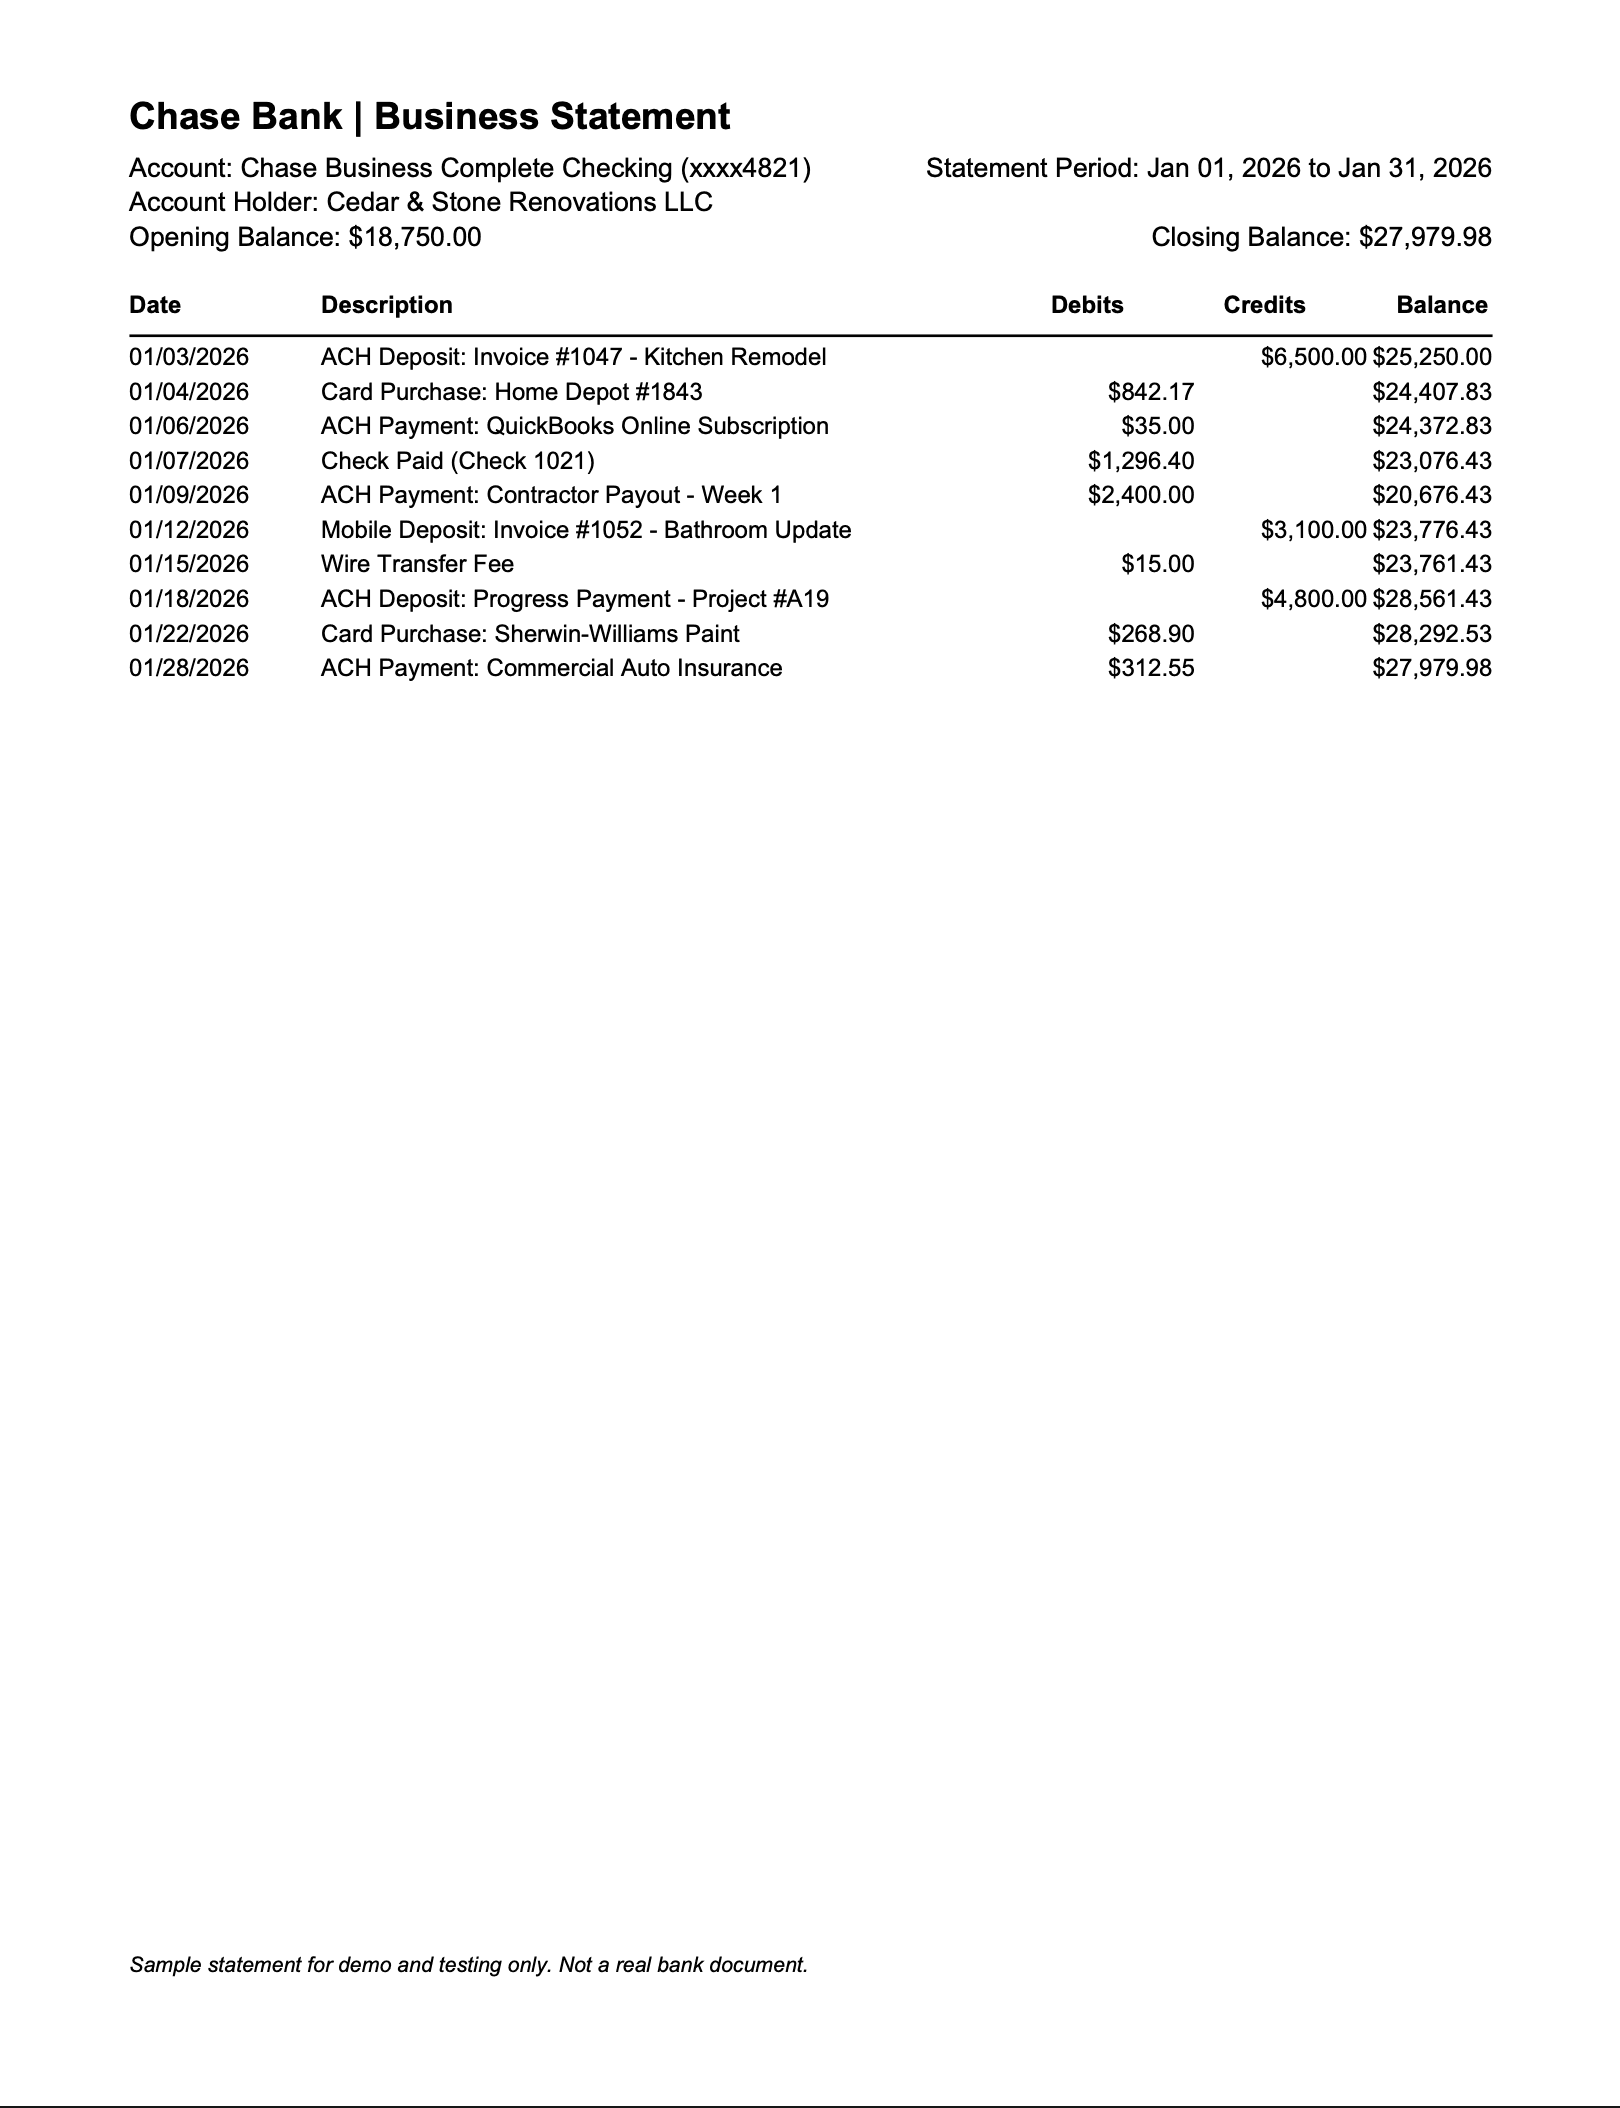
With a statement PDF, you can upload the statement, extract the lines, review them, and then create QuickBooks transactions such as Deposits, Expenses, and Checks.
This matters for common scenarios like:
Catch-up bookkeeping for older months
Bank feeds that stop at a limited history
Clients who only share PDF statements
Fixing a month that will not reconcile because the register is incomplete
Uploading check-heavy activity where check numbers matter
What type of transactions can be imported into QuickBooks Online?
When people say “transactions,” they usually mean bank activity:
Money in
Money out
Checks
Transfers between accounts
In real bookkeeping work, imports are usually used for:
Backfilling missing months
Cleaning up a new client file
Rebuilding a period so reconciliation matches the bank statement
Loading activity from a bank that does not provide a clean download
The best method depends on your source file. If you have a bank export in Excel or CSV, use the spreadsheet method. If you only have a PDF statement, use the statement method.
Before you import, avoid the most common problems
Most failed imports and messy cleanups happen because of a few predictable issues. If you handle these early, the rest becomes smooth.
Overlapping date ranges that create duplicates
Separate debit and credit columns that confuse amounts
Inconsistent date formats inside the same file
Blank rows, subtotals, or totals included in the export
Extra header rows above the transaction table
Names in the file that do not match what exists in QuickBooks
If you are importing transactions as bank statement style entries that include both deposits and expenses, your file also needs enough detail to post cleanly. A good baseline is:
Date
Description
Amount
Bank Account
Account
Payee
Check No (only if you have it)
How to import transactions into QuickBooks Online from CSV
If your file is already CSV, you are ready to upload. If it is Excel, you can save it as CSV first.
Basic CSV prep checklist:
One row per transaction
A clear Date column
A Description column
An Amount column that reflects money in or money out correctly
If your bank export shows two amount columns (debit and credit), convert it into one signed Amount column before upload.
If you want deposits and expenses in the same upload, also include Bank Account, Account, and Payee so the transactions post with proper accounting context.
How to import transactions into QuickBooks Online from Excel
Excel is often the most common starting point. Banks usually export as XLS, XLSX, or CSV. Even when you start in Excel, the goal is the same: make the data consistent, upload it, and review it before it hits the books.
How to import bank transactions into QuickBooks Online from Excel
This method is best when you have a clean export from your bank. It is also best when you want to control the date range and import month by month.
Step 1: Export transactions from your bank
Download the date range you need.
If you are catching up multiple months, export by statement period. For example, one file for November and one file for December. This makes reconciliation much easier later.
Tip: If you are doing cleanup work, keep each import aligned to the statement ending date. It reduces duplicate risk and makes month-end reconciliation faster.
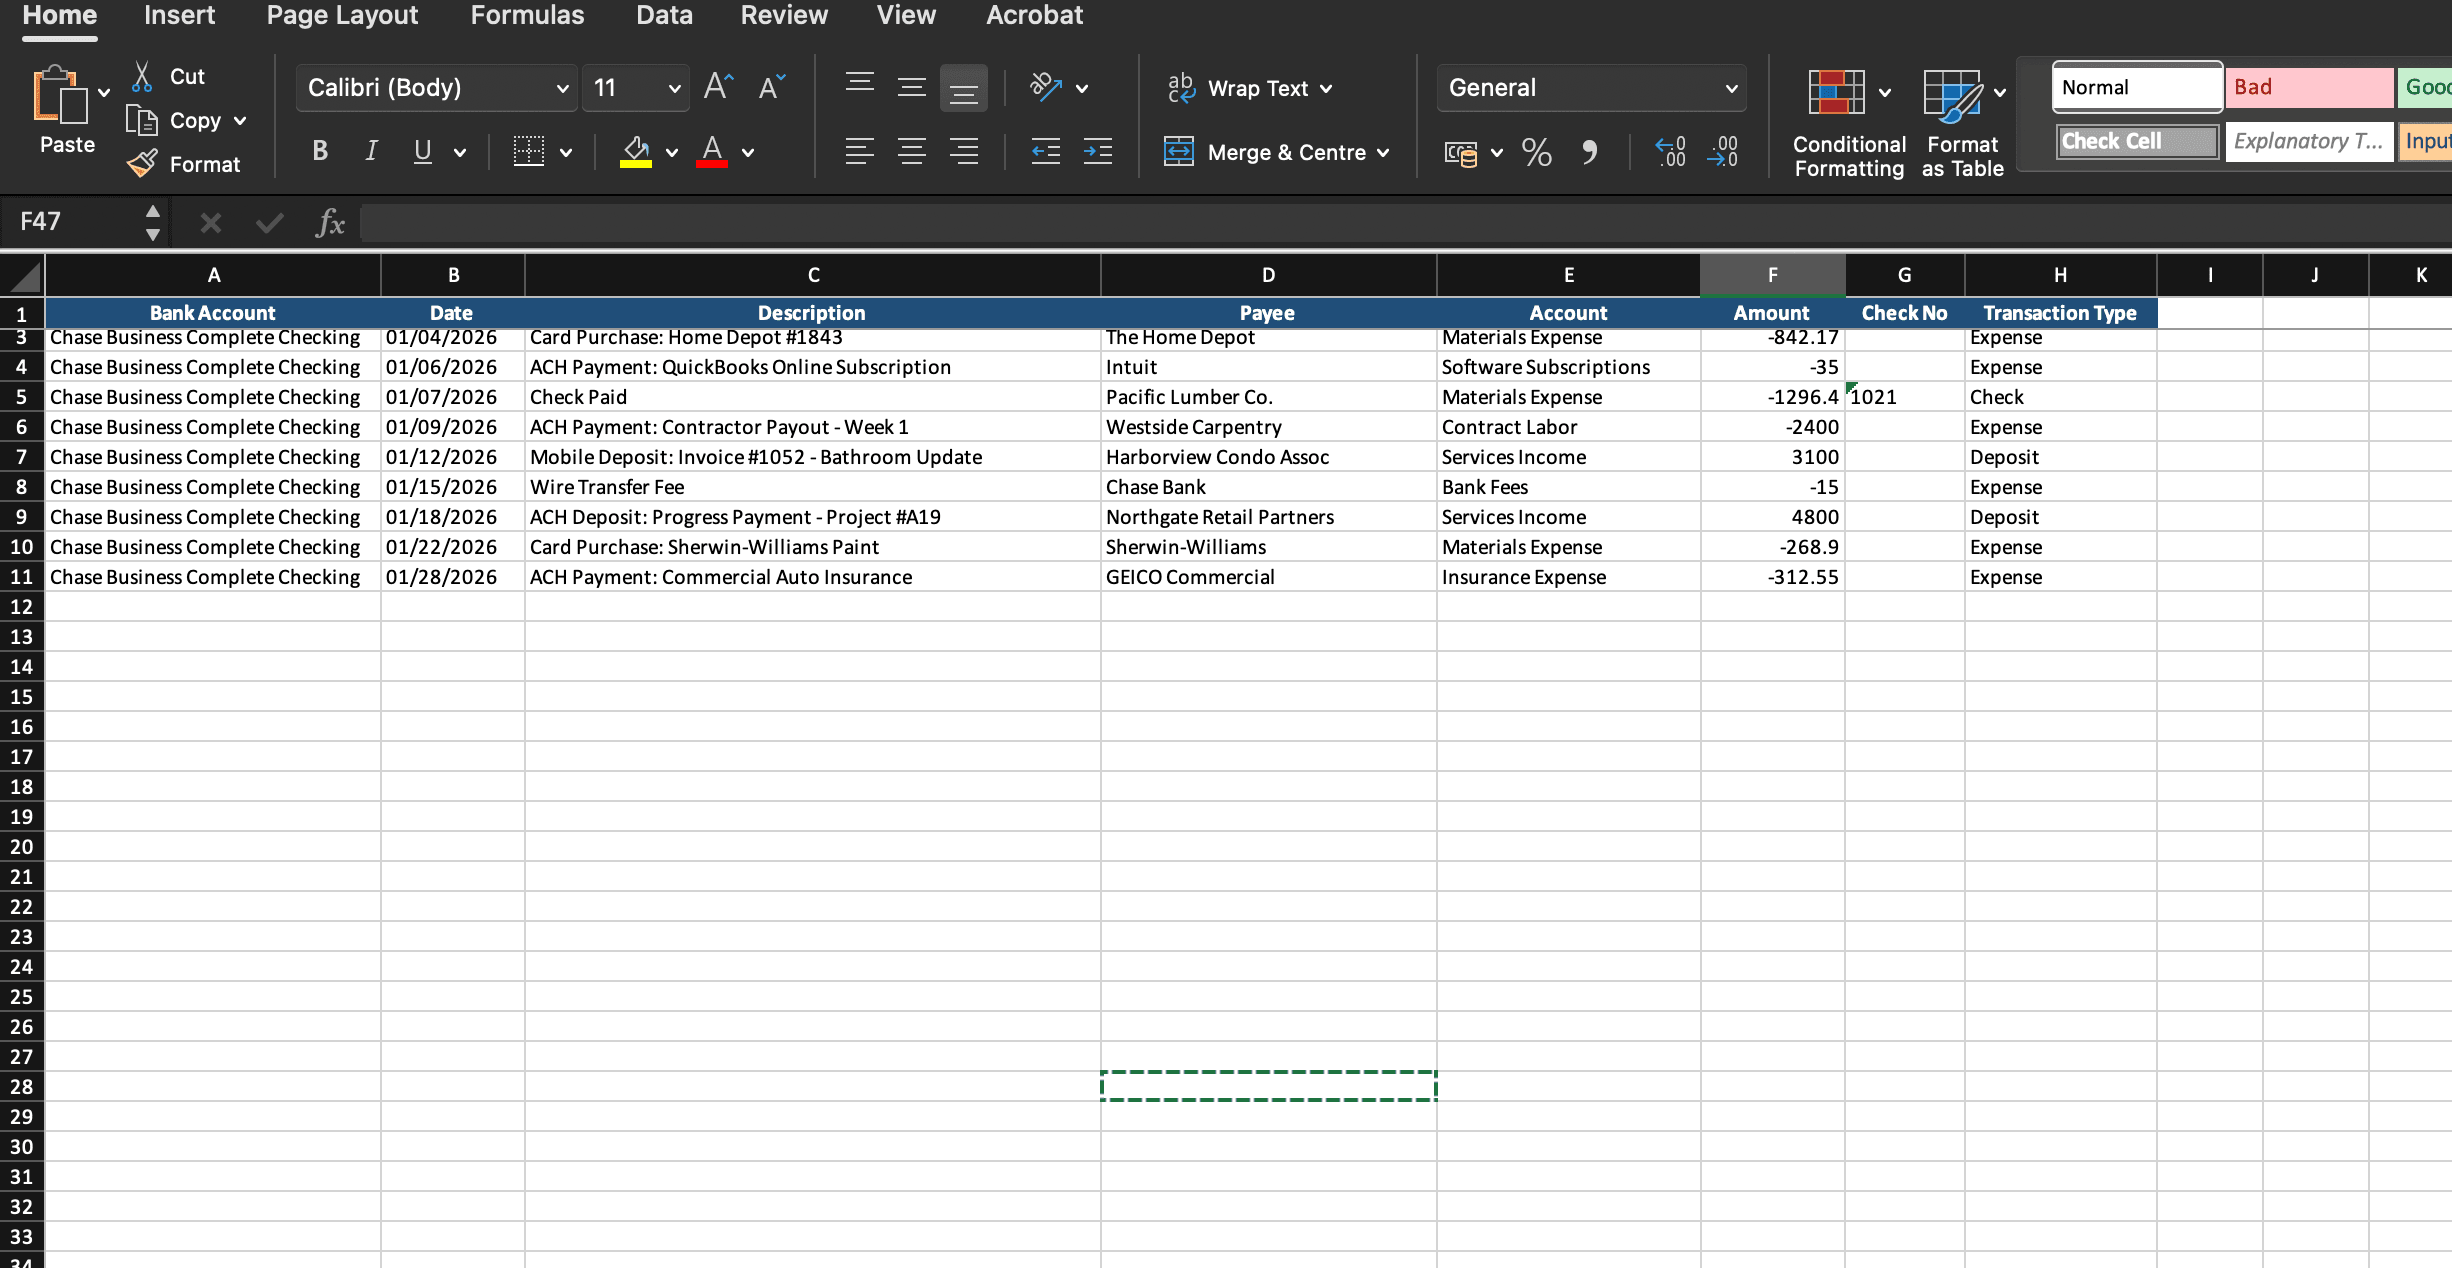
Step 2: Prepare your Excel file
Keep it simple.
Make sure the date format is consistent across the whole file
Remove blank rows and totals
Avoid extra header lines above the table
Confirm amounts are correct so money out does not become money in, and credits and debits are not swapped.
If you have separate debit and credit columns, convert them into one signed Amount column.
To post deposits and expenses correctly, include these columns when possible:
Bank Account
Account
Payee
Check No (if your statement provides check numbers)
Step 3: Upload the file and start the import
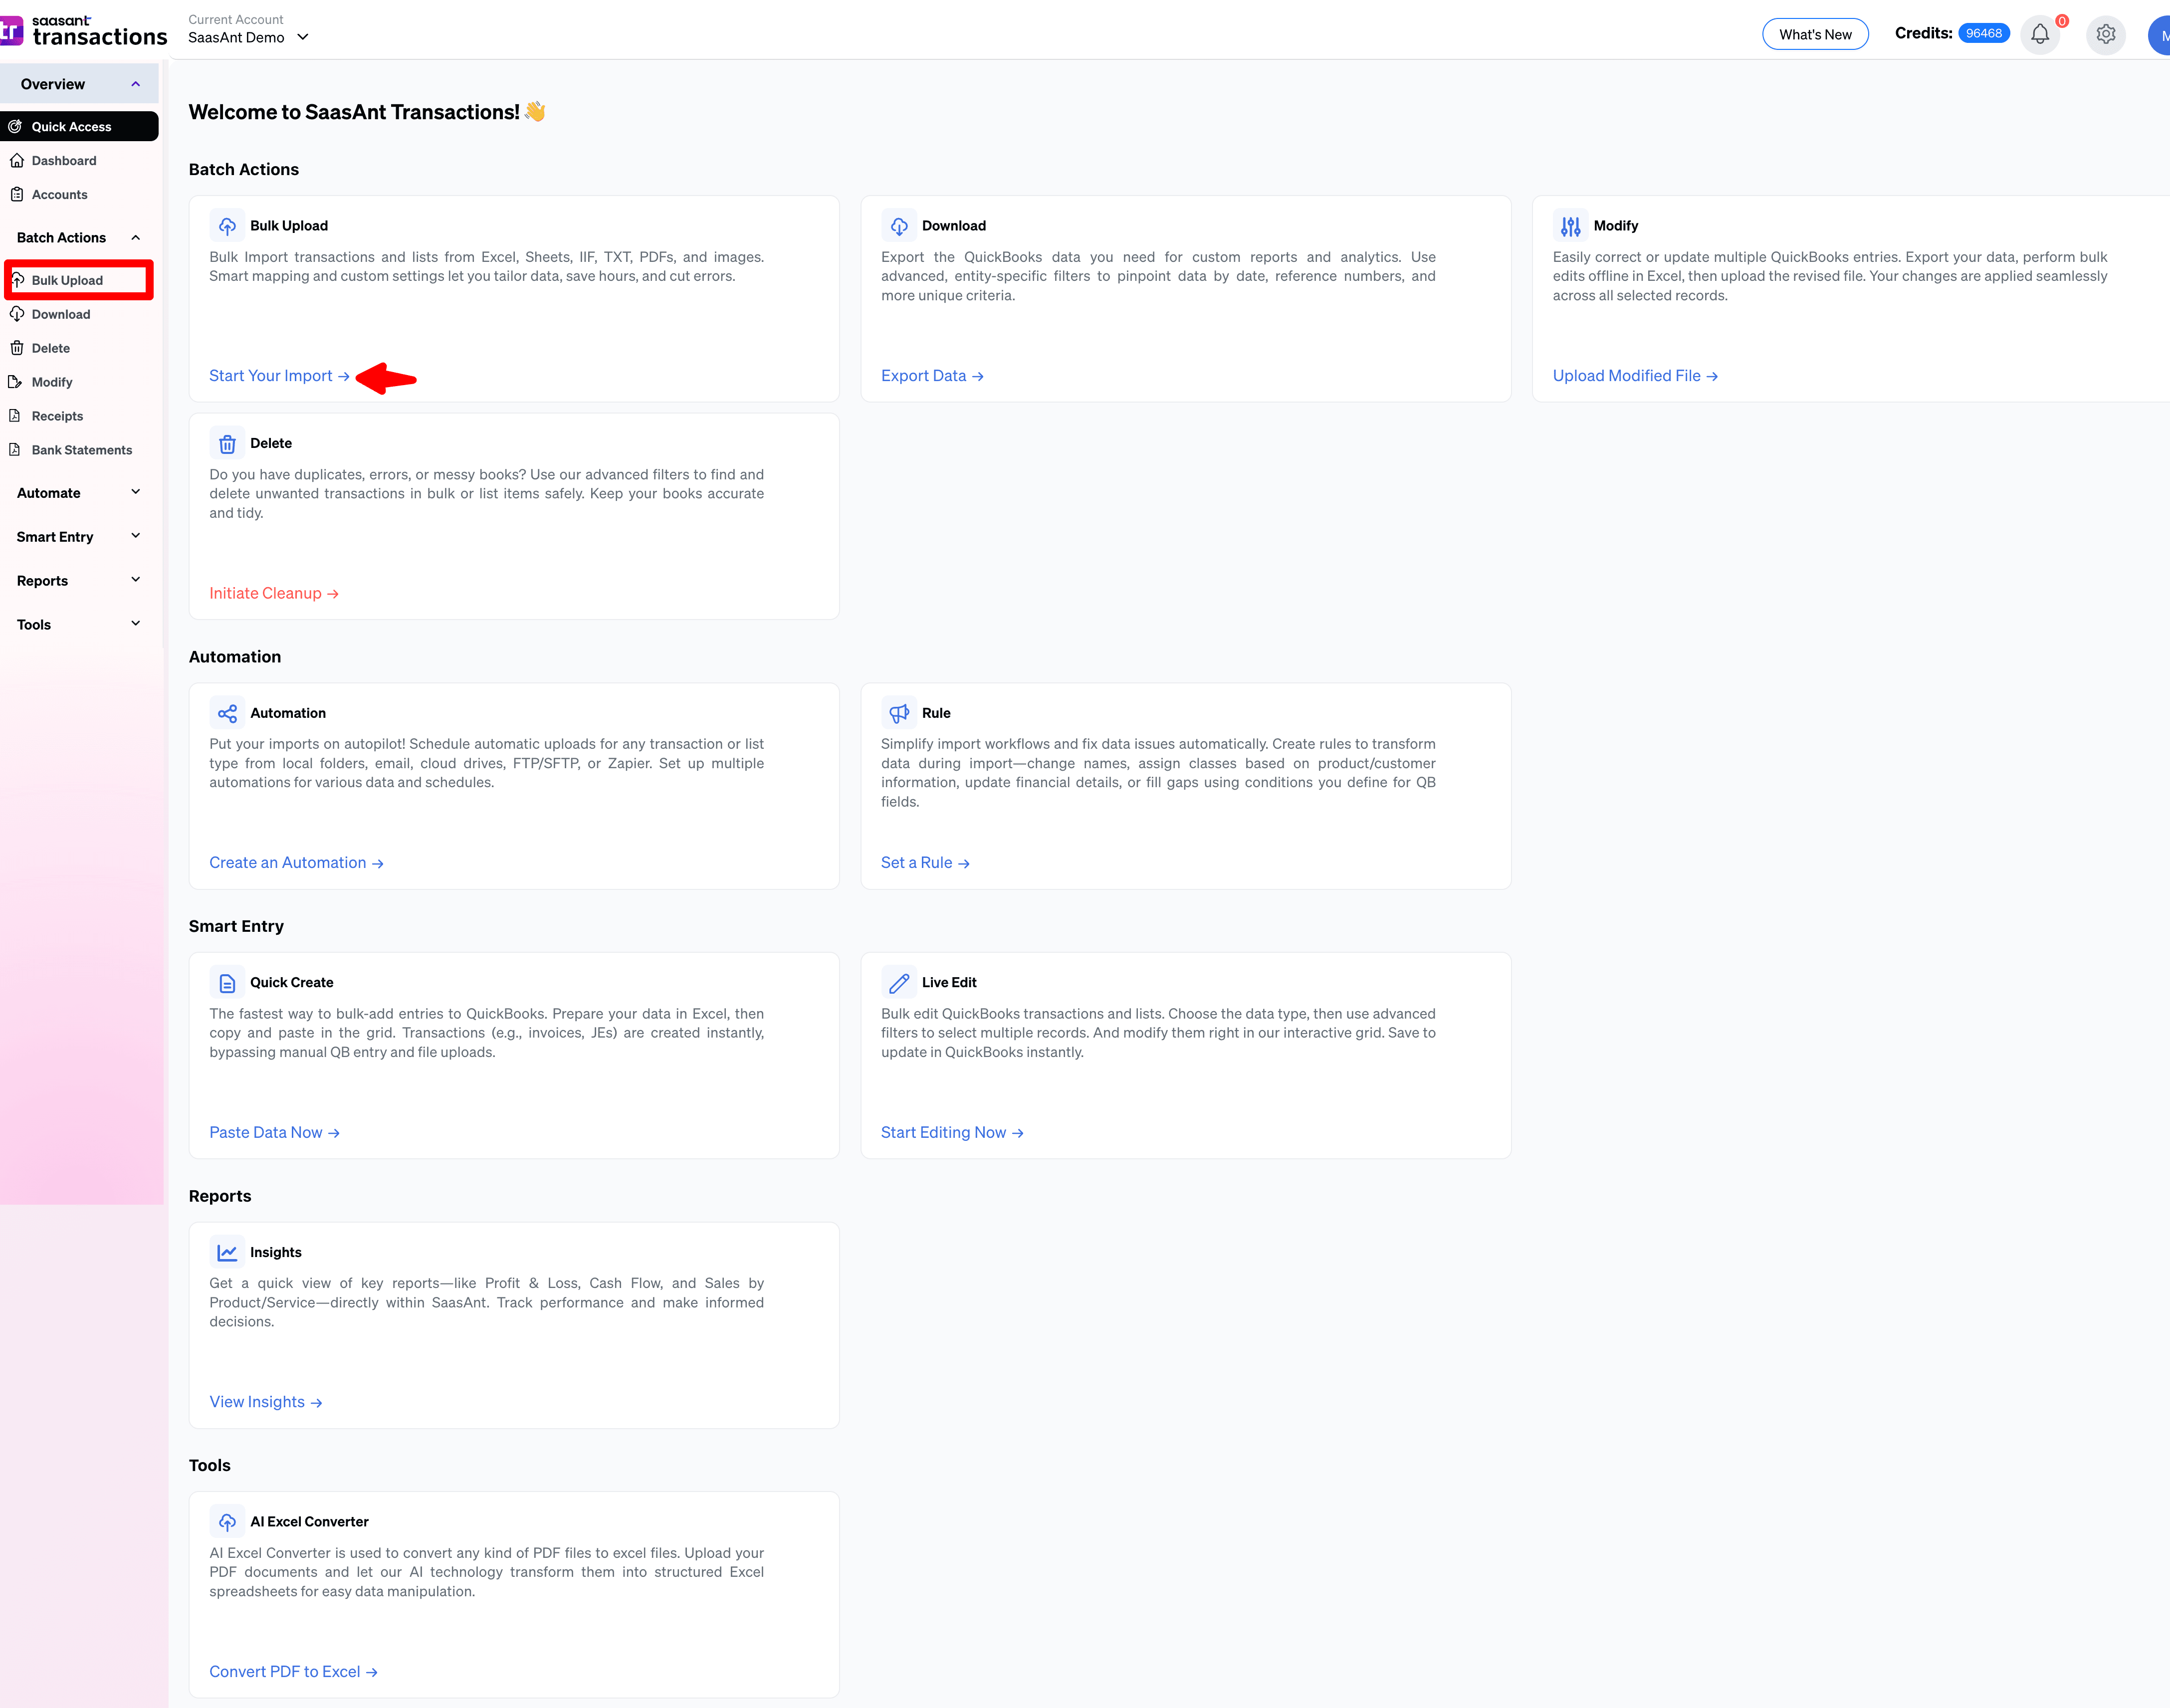
Open SaasAnt Transactions and start a new import.
Go to Bulk Upload
Click Let’s import
Choose the transaction type as Bank Statements
Then upload your Excel file.
If your file has multiple sheets, pick the sheet that contains the transaction lines. Avoid sheets with summaries or pivot tables.

Step 4: Map your columns

Mapping is where most import errors happen, and it is also where you prevent cleanup later.
At minimum, map these columns for a bank statement style import:
Bank Account
Date
Description
Amount
Account
Payee
Check No (if present)
How the transactions get created:
Positive Amount is treated as a Deposit
Negative Amount is treated as an Expense or Check
If you need to control the transaction type explicitly instead of relying on positive or negative values, add a Transaction Type column and use values such as Deposit, Expense, or Check.
If you import the same bank format regularly, save your mapping as a template so you can reuse it next time.
If a value is the same for every row, use default values in mapping to apply it consistently without editing your source file.
Step 5: Preview and review before import
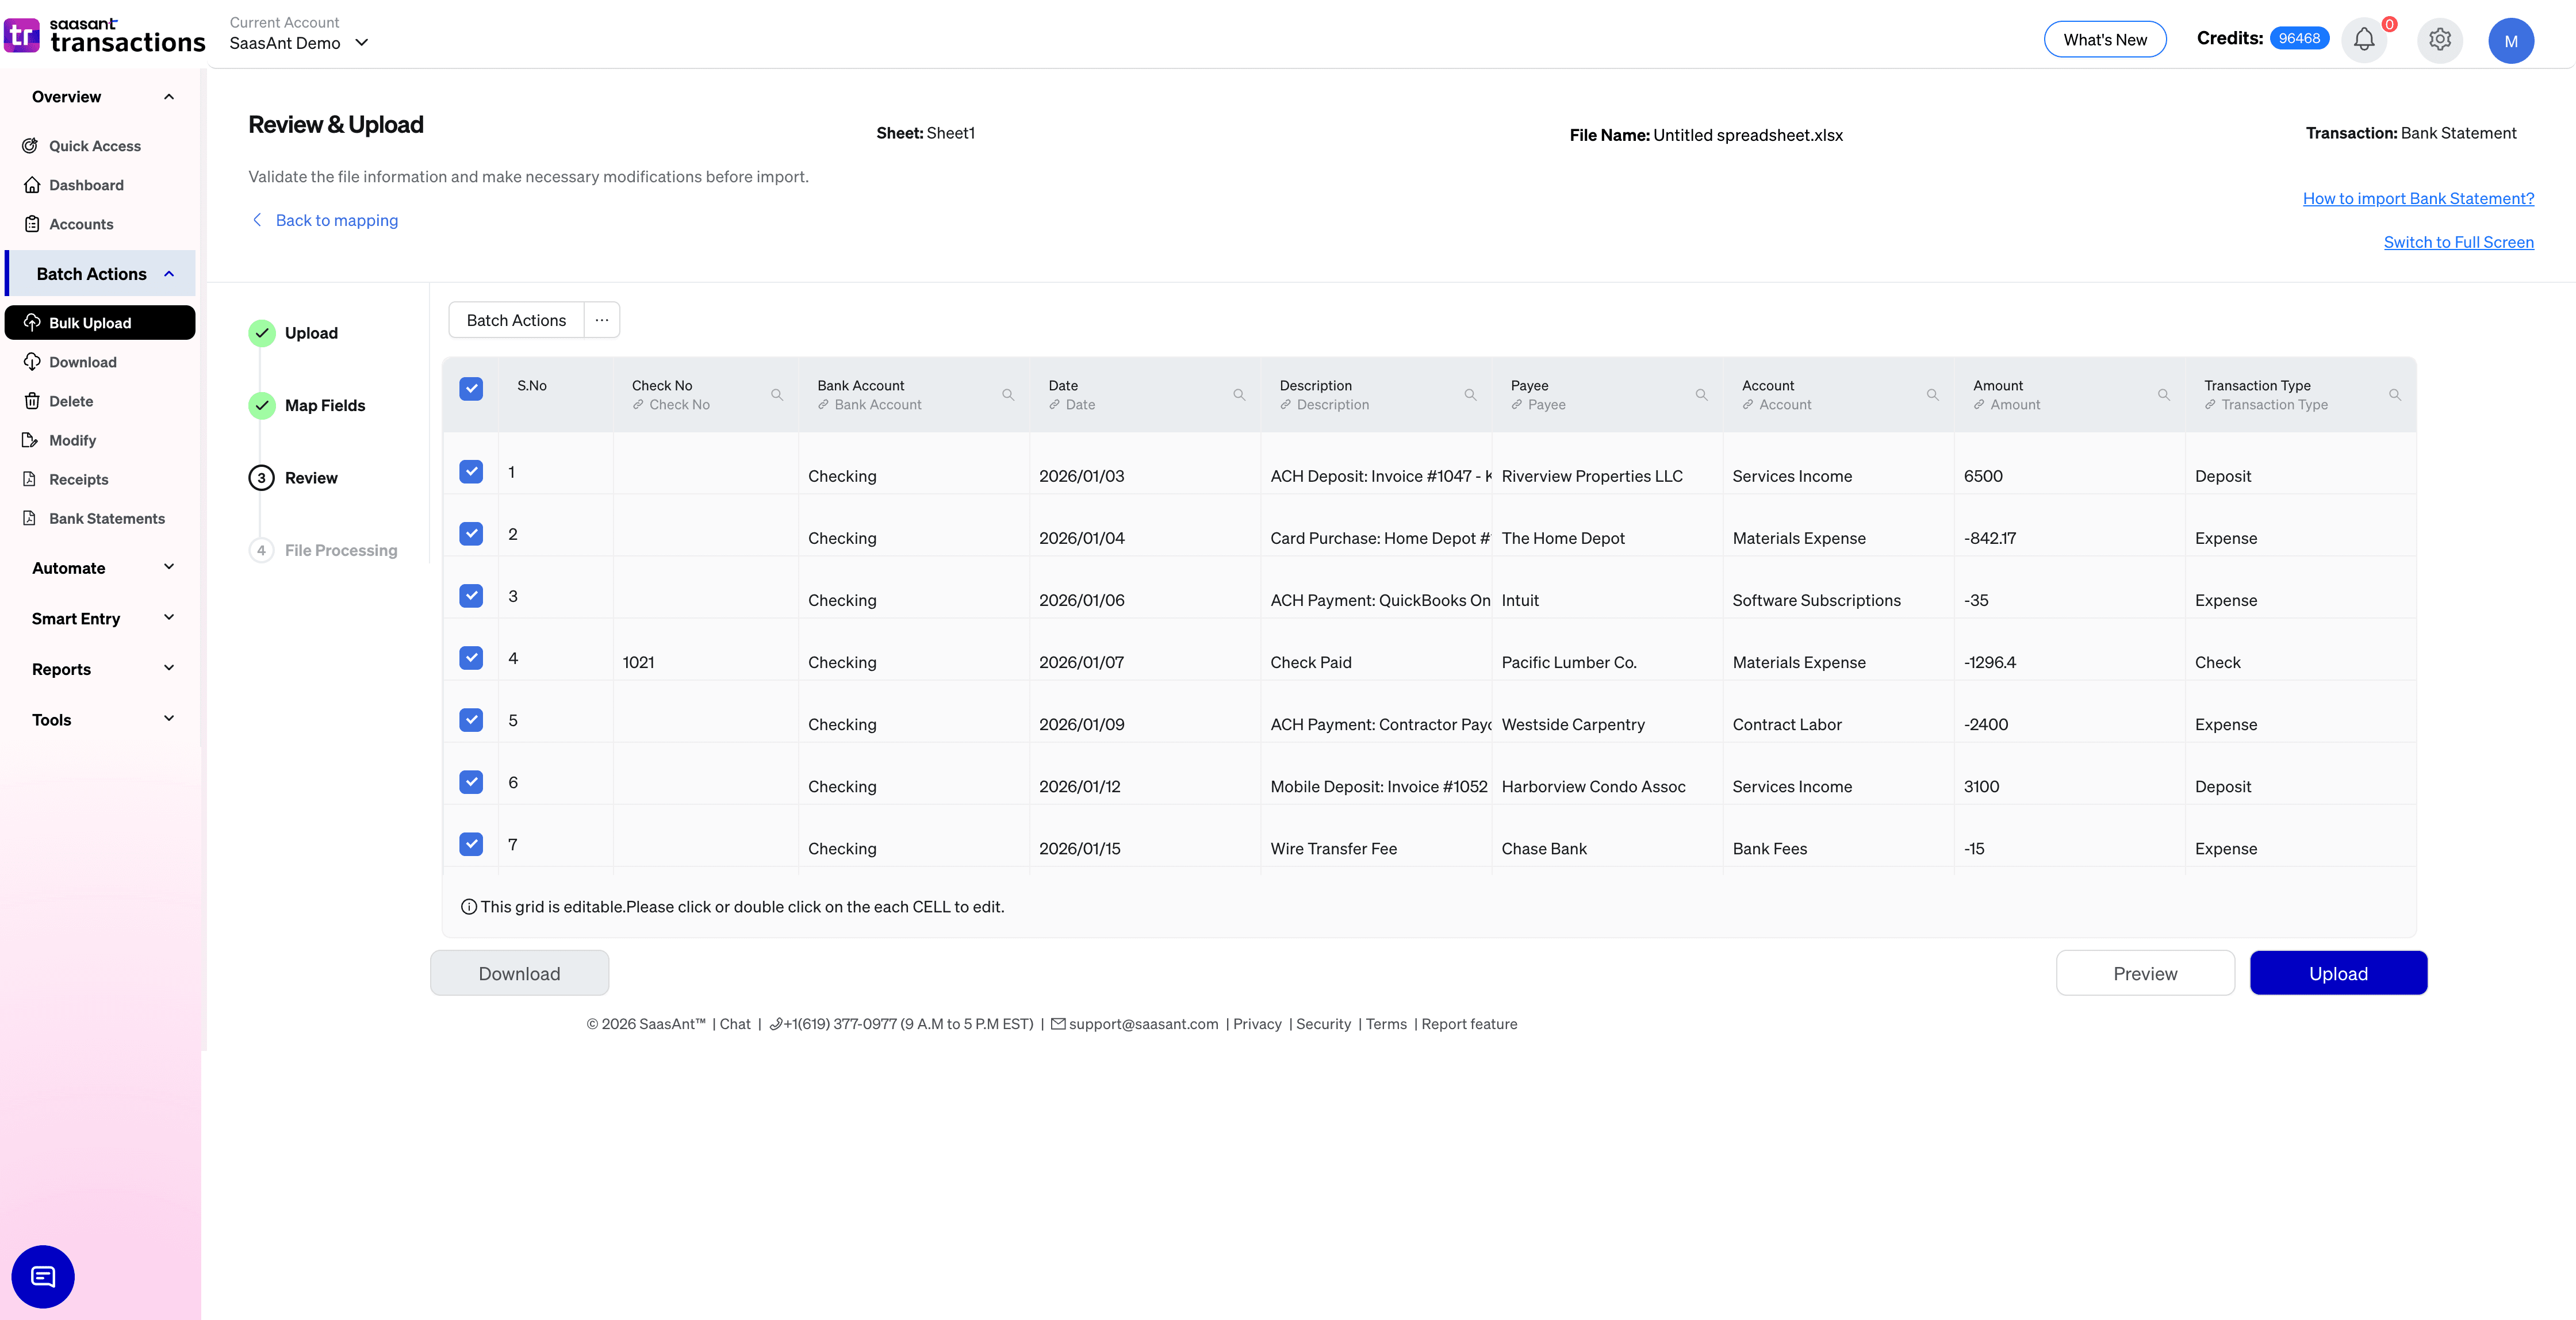
Do a quick review before you upload:
Confirm the date range
Spot-check a few large deposits and large payments
Look for duplicates if the same period already exists in QuickBooks
Check that money in and money out look correct
If this is your first time importing, test with a small date range first, then import the full statement period.
Step 6: Import and verify in QuickBooks Online
Complete the upload, then verify inside QuickBooks Online:
Confirm the count matches your file
Confirm a few key transactions by date and amount
Confirm the period looks complete for reconciliation
SaasAnt Transactions generates an import summary and highlights failed rows with reasons. Fix the problem rows and re-import only what failed.
If you imported the wrong file or wrong date range, you can undo that batch. This makes testing safer, especially on client files.
How to import bank transactions into QuickBooks Online from a PDF statement
This method is best when the statement is your only source of truth.
It is also best for older months beyond bank feed history, closed accounts where downloads are not available, clients who only send statements as PDFs, and rebuilding a period so reconciliation balances.
Step 1: Upload the PDF statement
Go to Bank Statements and upload the PDF statement.
Best practice is to upload one account and one statement period at a time. If a PDF contains multiple accounts, split it first.
Clear digital PDFs work best. Scanned PDFs can work if the text is readable and not cropped.
Step 2: Extract statement lines into transactions
Once uploaded, the statement lines are extracted and prepared as transactions.
In general:
Money in becomes Deposits
Money out becomes Expenses
Lines with check numbers become Checks
Step 3: Review before posting
Review is where you avoid duplicates and wrong classification.
Quick review checklist:
Confirm statement start date and end date
Spot-check a few large lines
Watch for duplicates if the same month already exists from bank feed activity
Confirm check number lines are captured correctly
If a single charge should be split across categories, split it during review.
If vendors, customers, accounts, classes, or locations are missing in QuickBooks, SaasAnt import settings can auto-create missing list entries so the batch does not fail.
Step 4: Sync to QuickBooks Online
Once review looks correct, sync the transactions.
After sync, your statement period exists in the register, and you can reconcile like a normal month.
Step 5: Reconcile the statement period
In QuickBooks Online, reconcile the same bank account for the same statement period.
Use the statement ending date and statement ending balance. When the extracted lines match the statement, reconciliation becomes straightforward.
How to automate recurring imports
If you import transactions frequently, repeating the same steps can become the next bottleneck.
SaasAnt Transactions supports automation options that help you run recurring imports with less effort:
Reuse saved mapping templates for the same bank export format
Set up scheduled imports from a local folder so files dropped into that folder are picked up automatically
Use email-based imports by sending files as attachments to your SaasAnt import email
Turn on email notifications so you receive success and failure reports after each run
These options work well for teams handling multiple clients or businesses importing on a weekly schedule.
Import settings that improve accuracy
SaasAnt Transactions includes settings that help reduce common QuickBooks Online import errors and keep results consistent.
Depending on your data and workflow, these settings can add a lot of value:
Auto-create missing list entries like customers, vendors, products, classes, and locations
Skip zero amount rows so empty lines do not clutter the register
Convert negative amounts to positive where QuickBooks does not accept negatives for certain transaction types
Truncate text that exceeds QuickBooks field limits to prevent failures
Match names exactly to avoid mapping to the wrong vendor or customer
Match accounts by account number, or products by SKU, if your chart of accounts and items use codes
How to fix mistakes after import
Even with good prep, mistakes happen. The key is how fast you can correct them.
If the wrong file or date range was imported, undo the batch.
If the import is mostly correct but some fields need changes, bulk edit the impacted transactions instead of opening them one by one.
If duplicates were created, filter the impacted transactions and remove them in bulk before reconciliation.
Pros and cons of importing transactions into QuickBooks Online
Importing is a big time saver, but the outcome depends on the file quality and the method you choose.
Pros
You avoid manual entry
You can load months of data quickly
You can import statement periods and reconcile faster
You can review before posting, which reduces cleanup work
PDF statement import adds a big advantage. You can start from the statement itself, avoid rebuilding a spreadsheet line by line, and backfill missing history when feeds stop.
Cons
If you import overlapping date ranges, duplicates can happen
If the file has inconsistent data, mapping can fail
If the statement PDF is unclear, some lines may need manual review
These are manageable issues. The key is choosing the right method and doing a short review before syncing.
Check out our detailed guide on import bank transactions into QuickBooks Desktop for more insights.
FAQs Frequently Asked Questions
My import process failed. What should I do?
Start with file checks:
Confirm the date format is consistent
Remove blank rows, totals, and extra header lines
Confirm Amount signs are correct for money in and money out
Confirm you included Bank Account, Account, and Payee if you are importing as Bank Statements
Then try again with a smaller date range first, for example one week, then the full statement period.
If you are importing from PDF, check that the PDF is clear, make sure it is one account and one statement period, and avoid cropped scans and blurred text.
Also check SaasAnt import settings that prevent common failures, like truncating long text fields or skipping zero amount lines.
Can I import transactions into QuickBooks Online directly without a CSV format?
QuickBooks supports certain file types, but upload rules can be strict. If your goal is to get transactions in fast and clean, a guided import flow helps: upload the file, map it once, preview before syncing, and undo if needed.
If you need repeatability, save your mapping template so you do not remap the same columns each time.
Can I import a PDF bank statement into QuickBooks Online?
QuickBooks itself is not designed to turn a PDF statement into transactions. You can import PDF statements into QuickBooks Online and create transactions based on them using SaasAnt.
If you only have the PDF, the practical approach is to upload the statement, extract the lines, review them, then sync as deposits, expenses, and checks. That is exactly what the bank statement workflow in SaasAnt Transactions is built for.
How do I avoid duplicates when importing?
Use statement periods as your date ranges, and do not overlap imports across methods.
If you are importing from Excel and also have bank feeds turned on for the same account, avoid importing the same days twice.
If duplicates happen, fix them before reconciliation.
I made a mistake. Can I undo the import?
If you imported the wrong period or wrong file, you want a clean rollback path.
SaasAnt Transactions keeps an import history and supports undo for the batch, so you can reverse the entries it created and re-import correctly.
Can SaasAnt help when names do not match what is in QuickBooks?
Yes.
Depending on how you want to control matching, you can enable exact name matching to avoid wrong matches, or enable auto-create for missing customers or vendors so the import does not fail.
If your chart of accounts uses account numbers or your products use SKUs, you can also match using those codes for more reliable identification.
Can I automate this so I do not upload files every time?
Yes.
You can reuse mapping templates and use automation options like local folder scheduling or email-based imports, then review the import summary and error report after each run.
Read also
How to Upload Bank Statements to QuickBooks Online: A Comprehensive Guide
Importing Excel into QuickBooks : Detailed Guide
Workflow Automation for Bookkeeping and Accounting Professionals
How to Download Bank Statements into QuickBooks Online