How to Import Sales Order in QuickBooks Desktop
Manually creating sales orders in QuickBooks Desktop can be tedious, especially when handling large volumes of data. Whether you're migrating old records, syncing information from another system, or processing frequent orders, automation can significantly help streamline your processes. With SaasAnt Transactions Desktop, the process of importing sales orders into QuickBooks becomes easy, saving time, reducing errors, and improving data accuracy.
In this guide, we will show you how to import your sales orders into QuickBooks Desktop efficiently and correctly.
Also Read: How to import Sales Invoices into QuickBooks Online?
A mid-sized wholesale distribution business receives numerous sales orders daily via emails and spreadsheets from various sales representatives. The manual entry of each order into QuickBooks Desktop slows down the team, increases the likelihood of data errors, and affects fulfillment. By using SaasAnt Transactions Desktop to import sales orders in bulk, the company automates data entry, improves accuracy, and ensures quicker order processing, saving hours of manual work every week.
This blog is ideal for operations managers, accountants, and business owners who handle high-volume sales data in QuickBooks Desktop and are looking to automate manual entry and streamline order management efficiently.
Contents
How to Import Sales Order into QuickBooks Desktop: Step-By-Step Guide
Wrap Up
Frequently Asked Questions
How to Import Sales Order into QuickBooks Desktop: Step-By-Step Guide
Follow the steps below to import the Sales Order in QuickBooks Desktop using SaasAnt Transactions Desktop.
Step 1: Install and Connect SaasAnt Transactions
Download the latest SaasAnt Transactions Desktop version.
Run SaasAntTransactions-Setup.exe as an administrator.
Accept the license agreement and complete the installation.
Open the app, go to Subscription > Register.
Enter the license key from your confirmation email.
Keep your internet connection active.
Step 2: Launch SaasAnt Transactions Desktop
Start by opening the SaasAnt Transactions Desktop app on your system.
Ensure that QuickBooks Desktop is open and connected to your company file before proceeding.
Step 3: Connect to QuickBooks Desktop
To access invoices, you need to connect SaasAnt Transactions Desktop with QuickBooks Desktop. Here's how:
Go to the ‘File’ menu in the top-left corner of SaasAnt Transactions Desktop.
Click ‘Connect to QuickBooks’ from the dropdown.
Step 4: Open SaasAnt Transactions
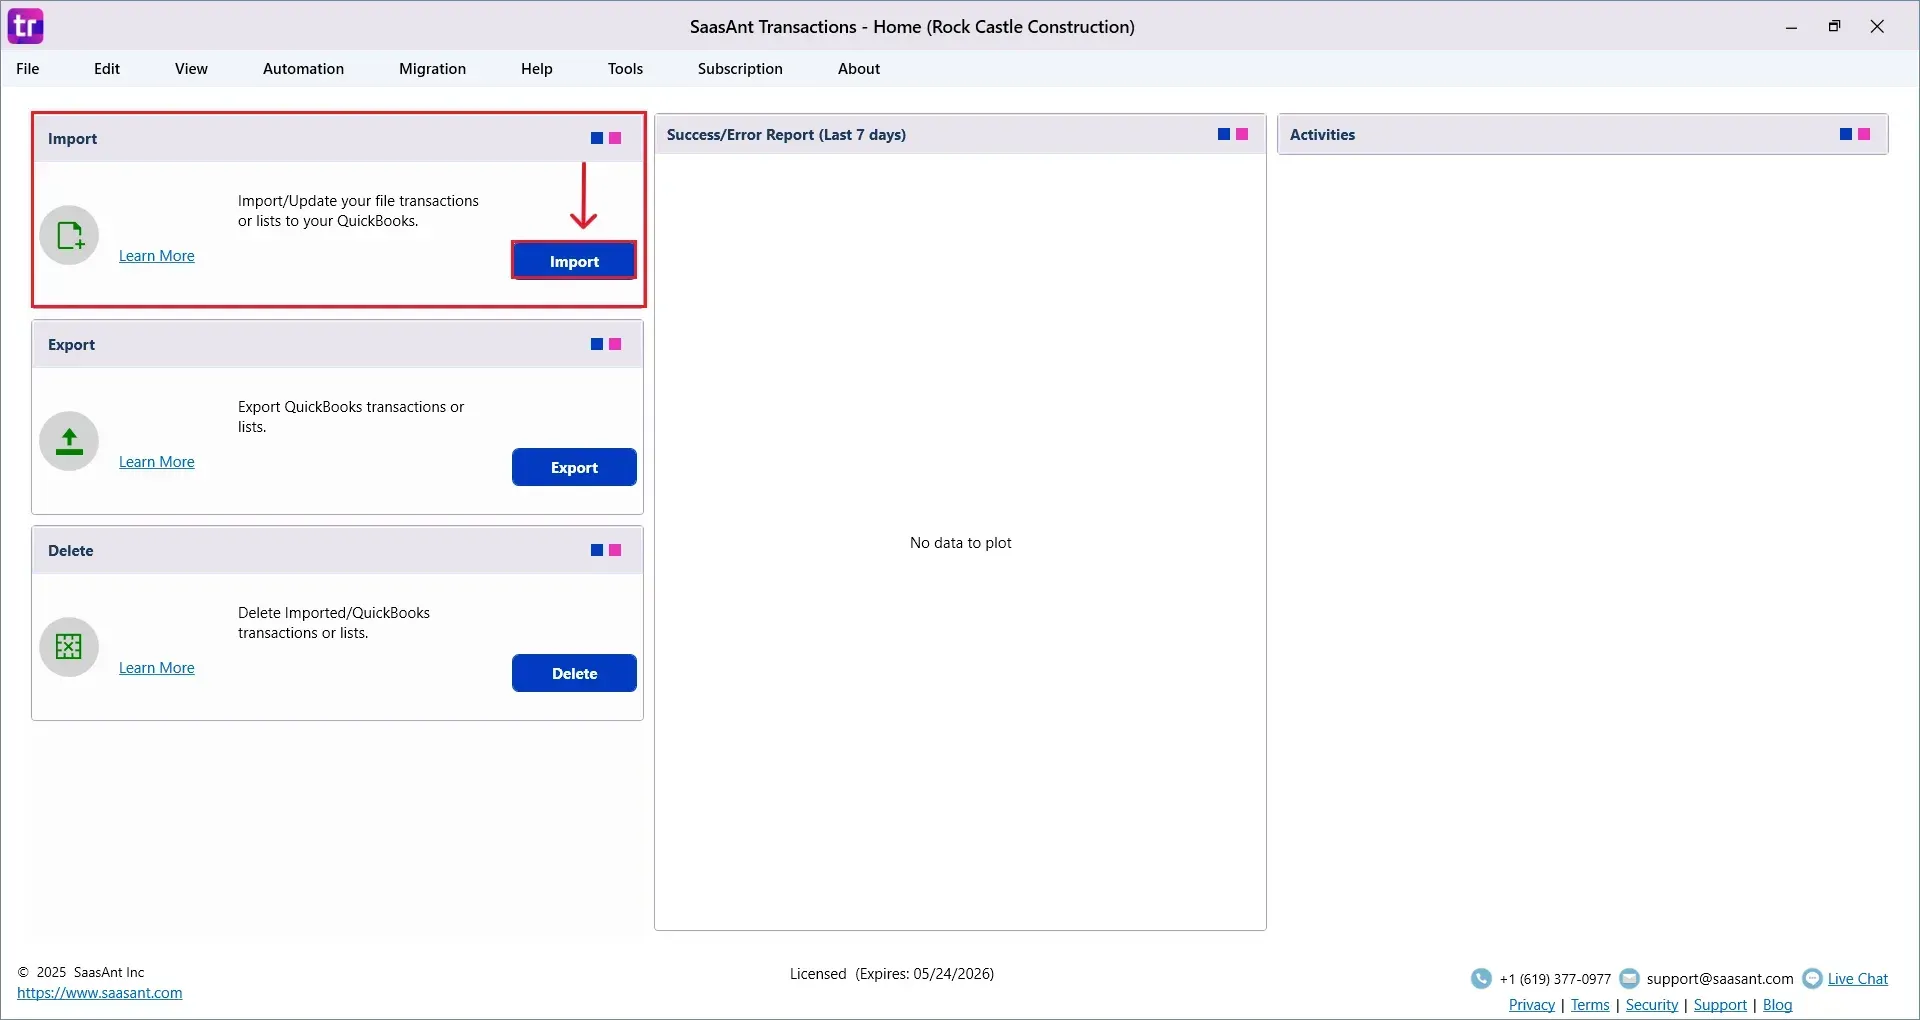
On the SaasAnt dashboard:
On the top left side of the SaasAnt Transactions dashboard, you can see the menu bar with various options.
Select “Edit,” and select “Import” under the edit dropdown.
The Dashboard appears as shown in the image below.
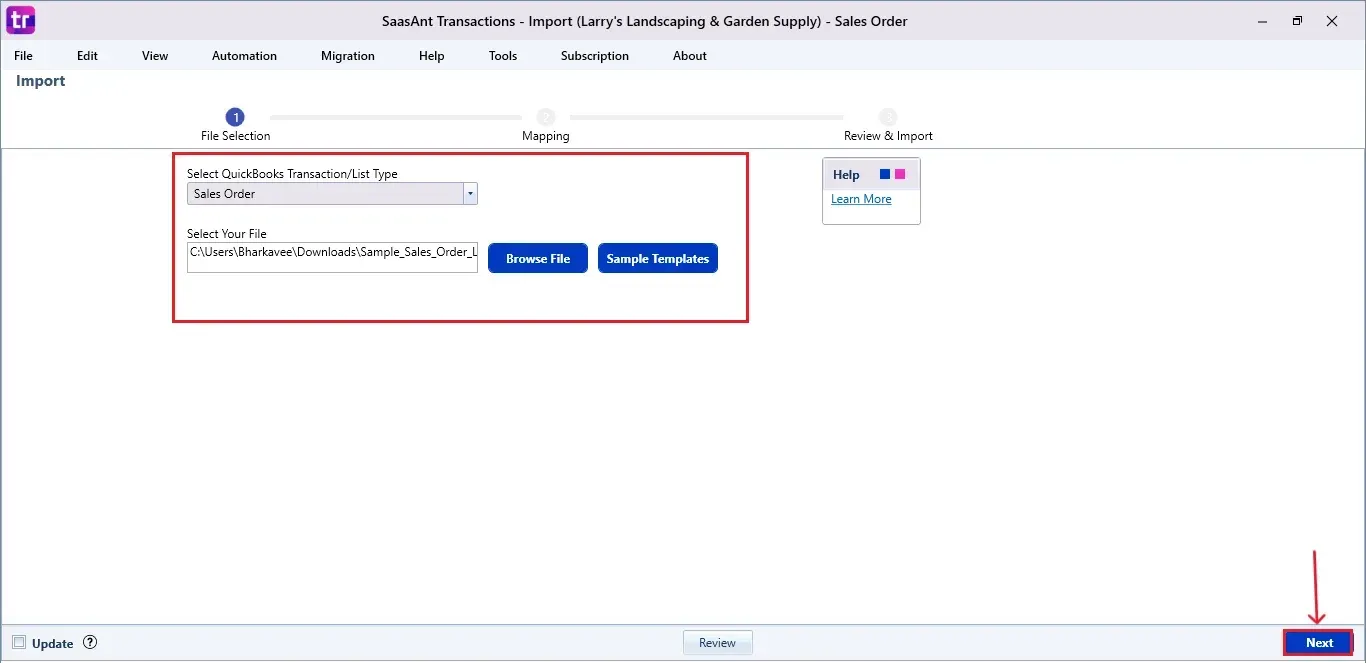
Select “Sales Order” from the SaasAnt Transaction Type dropdown and upload your Excel or CSV file.
Select “SaasAnt Default Mapping” under the Saved Mapping dropdown.
Since you use the SaasAnt Transaction Desktop frequently, it automatically selects the “SaasAnt Default Mapping” option.
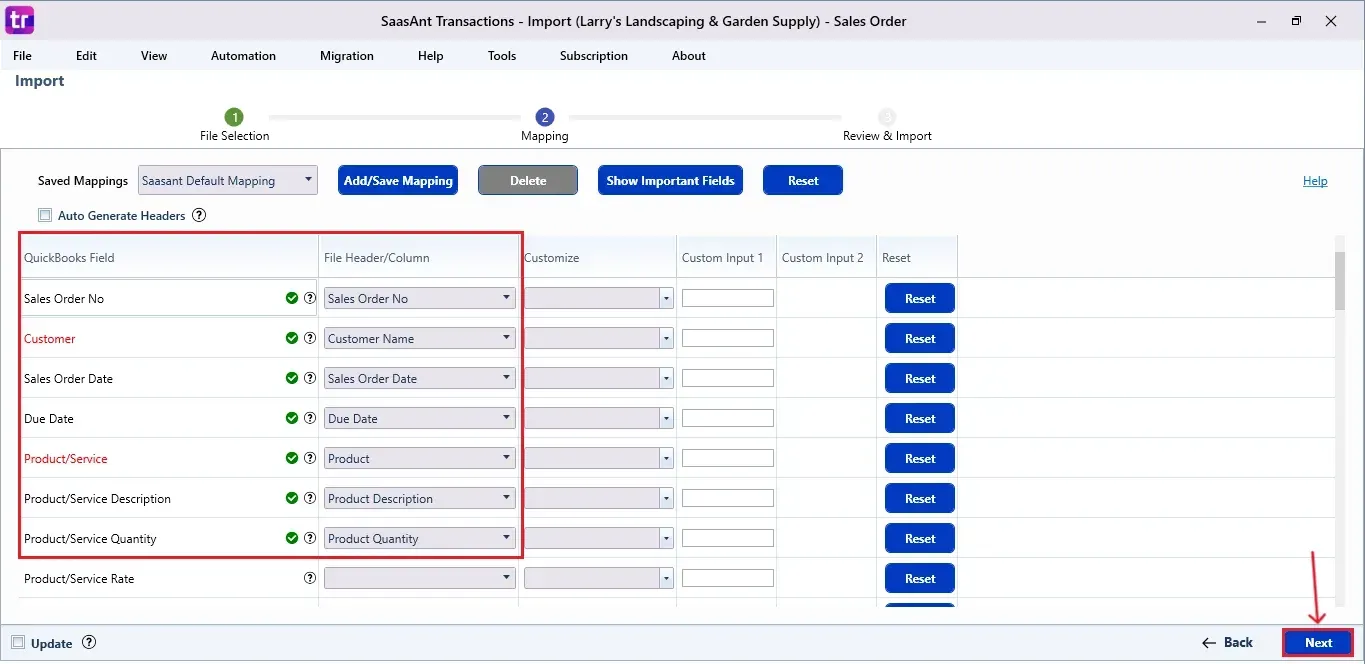
Step 5: Mapping Fields
Ensures the mapping of essential fields, including sales order number, customer name, sales order date, due date, product description, and other relevant details.
Select “Next” at the bottom right of the dashboard.
Step 6: Review and Import the Data
Before importing, SaasAnt allows you to preview and edit the Sales Order data directly within the interface.
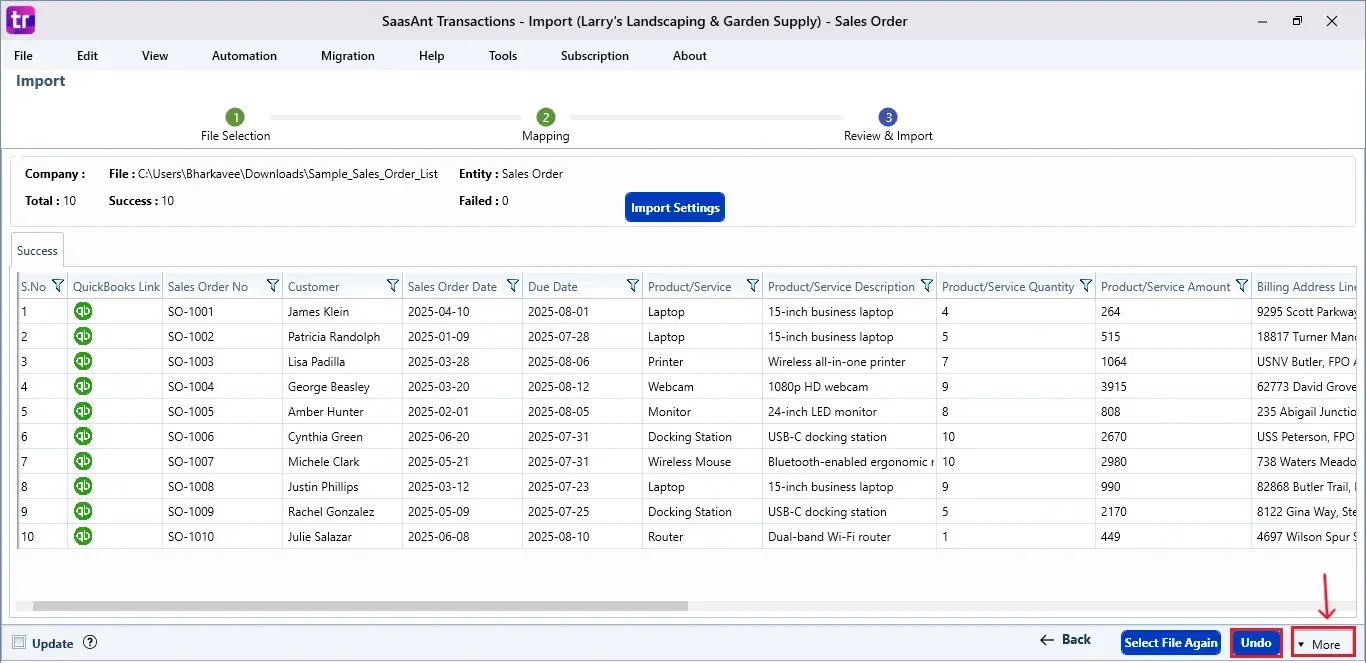
Click the “Send to QuickBooks” option at the bottom right of the dashboard, as shown in the image below.
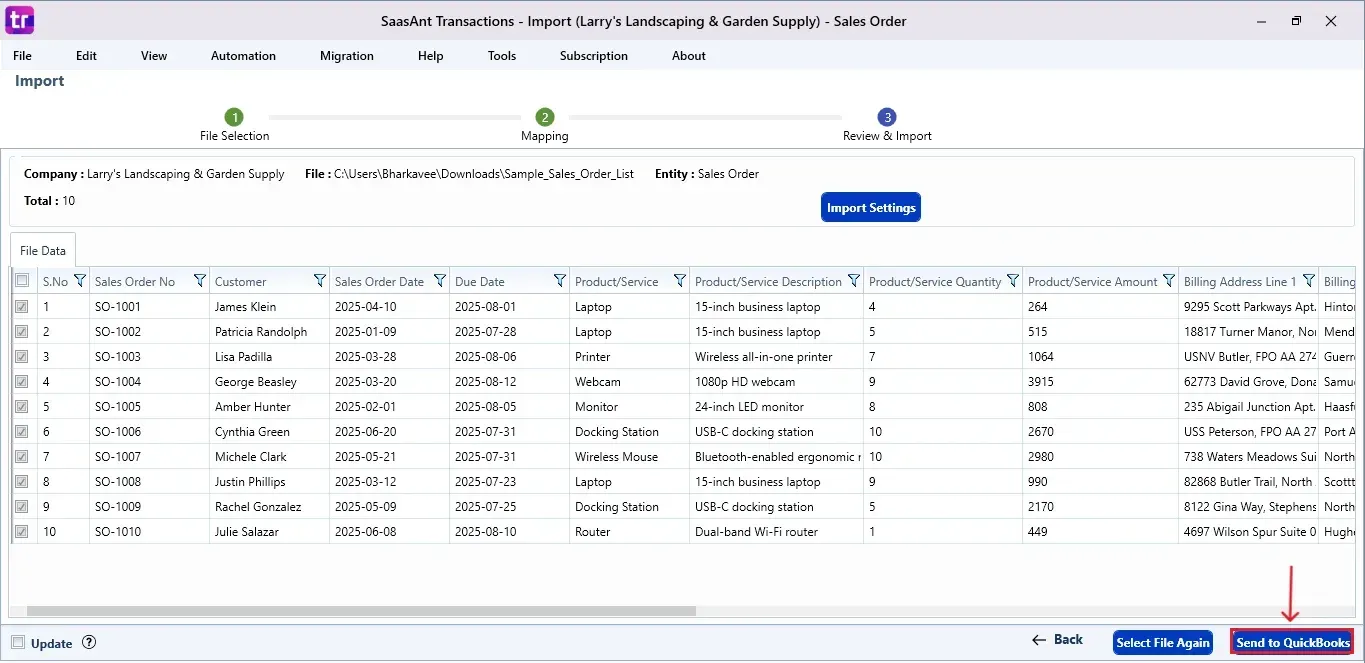
SaasAnt will now push the Sales Order into your connected QuickBooks Desktop account.
The Sales Order is reflected in the dashboard.
At the bottom right, click the “More” dropdown and select the option to download your Sales Order for reference.
Additionally, next to the download option, you can see “Undo”, which allows you to roll back your “Sales Order” data.
Step 7: Verify in QuickBooks Desktop
Open QuickBooks Desktop, go to the “Customers” menu, and select “Customer Centre”.
Search for the customer name you imported.
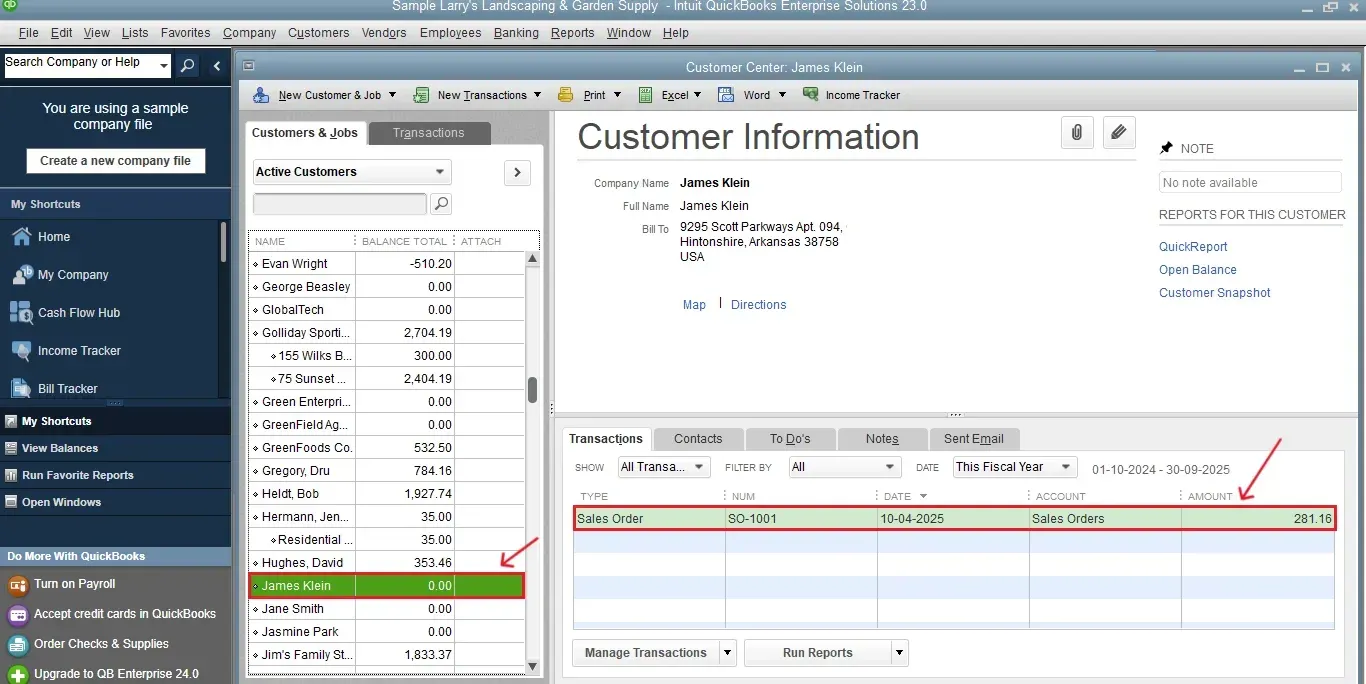
This final step ensures that your data is accurate and appropriately reconciled within QuickBooks.
Also Read: How to Import Invoices into QuickBooks Desktop
Wrap Up
Importing sales orders into QuickBooks Desktop can be simple and quick. With SaasAnt Transactions Desktop, you can automate the import process with just a few clicks, making sure your data is accurate and consistent. From setup to verification after import, this tool simplifies your workflow and improves your accounting efficiency. Whether you are managing a few entries or many, SaasAnt helps you maintain control of your data without needing to do it manually.
By leveraging trustworthy platforms like QuickBooks for your accounting processes and SaasAnt for transaction management and automation, you can enhance the overall workflow, minimize errors, save time, and acquire greater financial insight.
If you have inquiries regarding our products, features, trial, or pricing, or if you require a personalized demo, contact our team today. We are ready to help you find the ideal solution for your QuickBooks workflow.
Frequently Asked Questions
1) Can I map custom fields while importing sales orders?
Yes. SaasAnt provides custom field mapping, allowing you to align your file columns with QuickBooks fields as required.
2) Can I undo a sales order import if I make a mistake?
Yes. SaasAnt has an "Undo" option that enables you to roll back imported data right from the dashboard.
3) Can I save the mapping configuration for future imports?
Yes. Once you have mapped your fields, you can save the configuration as a template for future use, allowing you to save time on imports that you perform frequently.
4) How do I verify if the sales order was successfully imported?
Navigate to the 'Customer Centre' in QuickBooks Desktop and look for the customer. You will find the newly imported Sales Order displayed in their profile.
Read Also
How to Import Bills into QuickBooks Desktop
How to Import Invoices into QuickBooks Desktop
How to Import Credit Card Transactions into QuickBooks Desktop
How to Import Item List into QuickBooks Desktop