Import Employee List into QuickBooks from Excel: How to Guide
Efficiently managing employee data is crucial for any business using QuickBooks Online. Manually entering employee information is time-consuming and prone to errors. While QuickBooks Online offers a built-in method for importing employee data from Excel (XLSX or CSV) files, it has limitations.
This guide covers both the built-in QuickBooks method and a more robust, automated solution using SaasAnt Transactions, an Accountant's Favorite and User's choice award-winning app. We'll help you choose the best approach for your needs.
Challenges of Manual Employee Data Entry
Before diving into the "how-to," let's acknowledge the common problems associated with manual employee data entry in QuickBooks Online:
Time Consumption: Entering each employee's details individually is incredibly slow, especially for larger companies or growing teams.
Error Prone: Manual data entry is susceptible to typos, incorrect formatting, and inconsistent data, leading to payroll and reporting issues.
Data Duplication: It's easy to accidentally create duplicate employee records when entering data manually.
Lack of Automation: QuickBooks Online's built-in import features for employee lists are relatively basic and lack advanced automation capabilities.
Data Consistency: Maintaining consistent data formatting (e.g., capitalization, abbreviations) is difficult with manual entry.
Importing Employee Lists into QuickBooks Online's Built-In Method
QuickBooks Online provides a built-in import feature for employee data. Here's a step-by-step guide, based on the Intuit documentation:
Step 1: Download the Employee Template
Access Payroll Settings: In QuickBooks Online, go to Payroll.
Select Payroll Settings: Click on the Payroll Settings tab.
Find Data Extracts: Select Data Extracts (usually located under a "Business Management" or similar heading).
Choose Employee Data: Under "Data Type," select Employee Data and Empty Template.
Select File Format: Choose your desired file format (XLSX or CSV).
Download: Click Download.
Step 2: Prepare Your Data in the Template
Open the Template: Open the downloaded template file in Excel or your preferred spreadsheet program.
Enter/Paste Data: Carefully enter or paste your employee data into the corresponding columns of the template. Pay close attention to the required fields (listed below).
Save the File: Save the completed template file.
Required Fields (Minimum):
The Intuit documentation specifies the following minimum required fields for a successful import:
TaxFileNumber
FirstName
Surname
DateOfBirth
ResidentialStreetAddress
ResidentialSuburb
ResidentialState
ResidentialPostCode
PostalStreetAddress (If different from residential)
PostalSuburb (If different from residential)
PostalState (If different from residential)
PostalPostCode (If different from residential)
StartDate
EmploymentType
PaySchedule
PrimaryPayCategory
PrimaryLocation (Using Fully Qualified Location names)
PaySlipNotificationType
Rate
RateUnit
HoursPerWeek
BankAccount1_BSB
BankAccount1_AccountNumber
BankAccount1_AccountName
BankAccount1_AllocatedPercentage
SuperFund1_FundName (For superannuation/retirement funds)
SuperFund1_MemberNumber
SuperFund1_AllocatedPercentage
Important Note on Locations: For locations, you must use the "Fully Qualified Location" name. For example, if you have a location hierarchy of "All Offices" -> "NSW Offices" -> "Strathfield," you would enter "All Offices / NSW Offices / Strathfield" in the PrimaryLocation and Locations columns.
Step 3: Import the Template into QuickBooks Online
Return to Payroll: In QuickBooks Online, go to Payroll.
Select Import Employees: Click the dropdown arrow next to Add Employees and choose Import Employees.
Select File: Click Select File, choose your completed template, and click Open.
Confirm Upload: Click Confirm Upload.
Automatic Location Creation (Optional): Tick the "Automatically create missing locations" checkbox. This is highly recommended to avoid import errors if your template contains locations that don't already exist in QuickBooks Online.
Review Results: After the import, QuickBooks will display the results, indicating the status of each employee record (success, error).
Limitations of the Built-In Method:
Template Dependence: You are required to use the specific template provided by QuickBooks Online. This can be inflexible if your existing data is in a different format.
Complex Field Requirements: The large number of required fields, including specific banking and superannuation details, can make the template preparation process complex and time-consuming.
Limited Error Handling: While QuickBooks provides some feedback on import results, troubleshooting errors can be challenging.
No Data Mapping Flexibility: You cannot customize the mapping of data fields; you must adhere strictly to the template structure.
No Automations: There is no option to automate, schedule, bulk edit, or roll back.
SaasAnt Transactions is a powerful application that seamlessly integrates with QuickBooks Online, providing a robust and efficient solution for importing employee lists from Excel and other file formats. It eliminates the limitations of manual entry and streamlines the entire process.
Key Benefits of Using SaasAnt Transactions:
Direct Excel Import: Import your employee list directly from Excel (.xls, .xlsx) and CSV files, eliminating the need for complex data conversions.
Automated Data Mapping: SaasAnt Transactions intelligently maps the columns in your Excel file to the corresponding fields in QuickBooks Online, minimizing setup time and reducing errors.
Bulk Imports: Import hundreds or even thousands of employees in a single upload, saving significant time compared to manual entry.
Data Validation: SaasAnt Transactions validates your data before import, identifying potential errors and inconsistencies to ensure accuracy.
Customizable Mapping: You have full control over the field mapping, allowing you to customize the import process to match your specific data structure.
Error Handling: Detailed error logs provide clear explanations of any import issues, making troubleshooting easy.
Bulk Edit and Delete: Make changes or remove imported employee data in bulk, providing flexibility and control.
Rollback Functionality: Undo entire imports with a single click, providing a safety net in case of errors.
Scheduled Imports (Optional): While less common for employee lists than bank statements, you can schedule recurring imports if needed.
Import Employees into QuickBooks Online from Excel: Step-by-Step Guide
Ready to import your employee list quickly and accurately? Follow these simple steps:
Step 1: Prepare Your Excel File
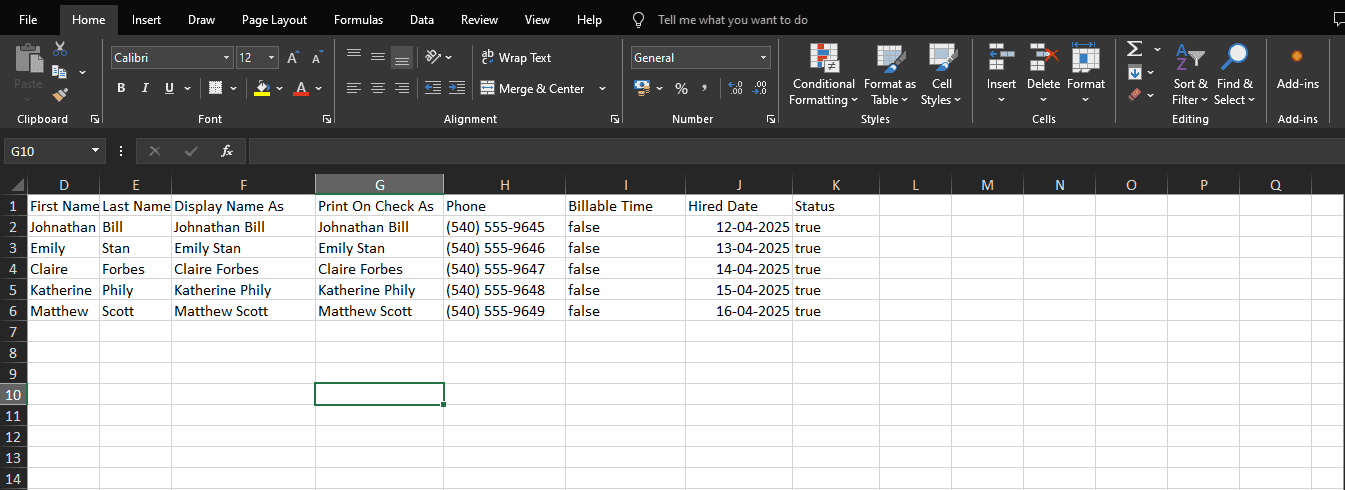
Organize Your Data: Ensure your Excel file has a clear header row with column names that describe the data (e.g., First Name, Last Name, Email, Address, etc.). This will make the mapping process much easier.
Data Consistency: Use consistent formatting for dates, phone numbers, and other fields.
Required field: Ensure that you have added a "Display Name" that will be unique for all employees.
Step 2: Log in to SaasAnt Transactions
Search for SaasAnt Transactions in the QuickBooks Apps page.
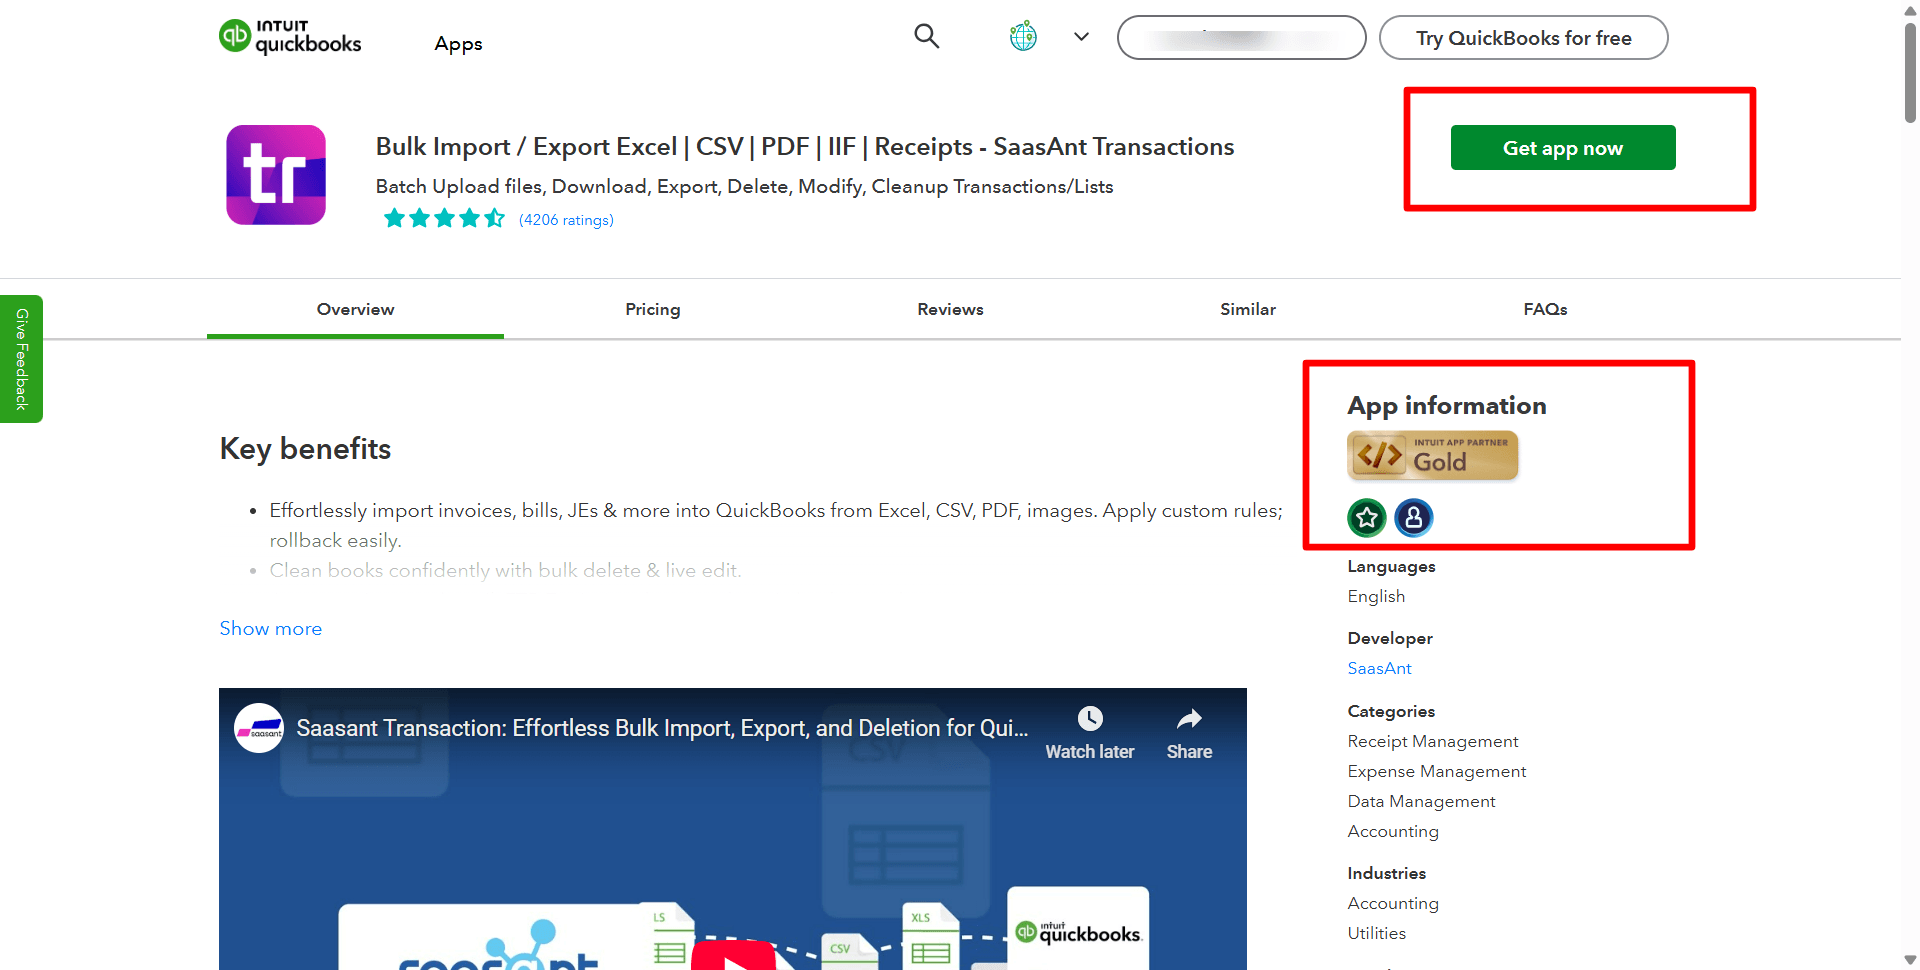
Access the SaasAnt Transactions Online application. If you don't have an account, start a free trial.
Log in using your credentials.
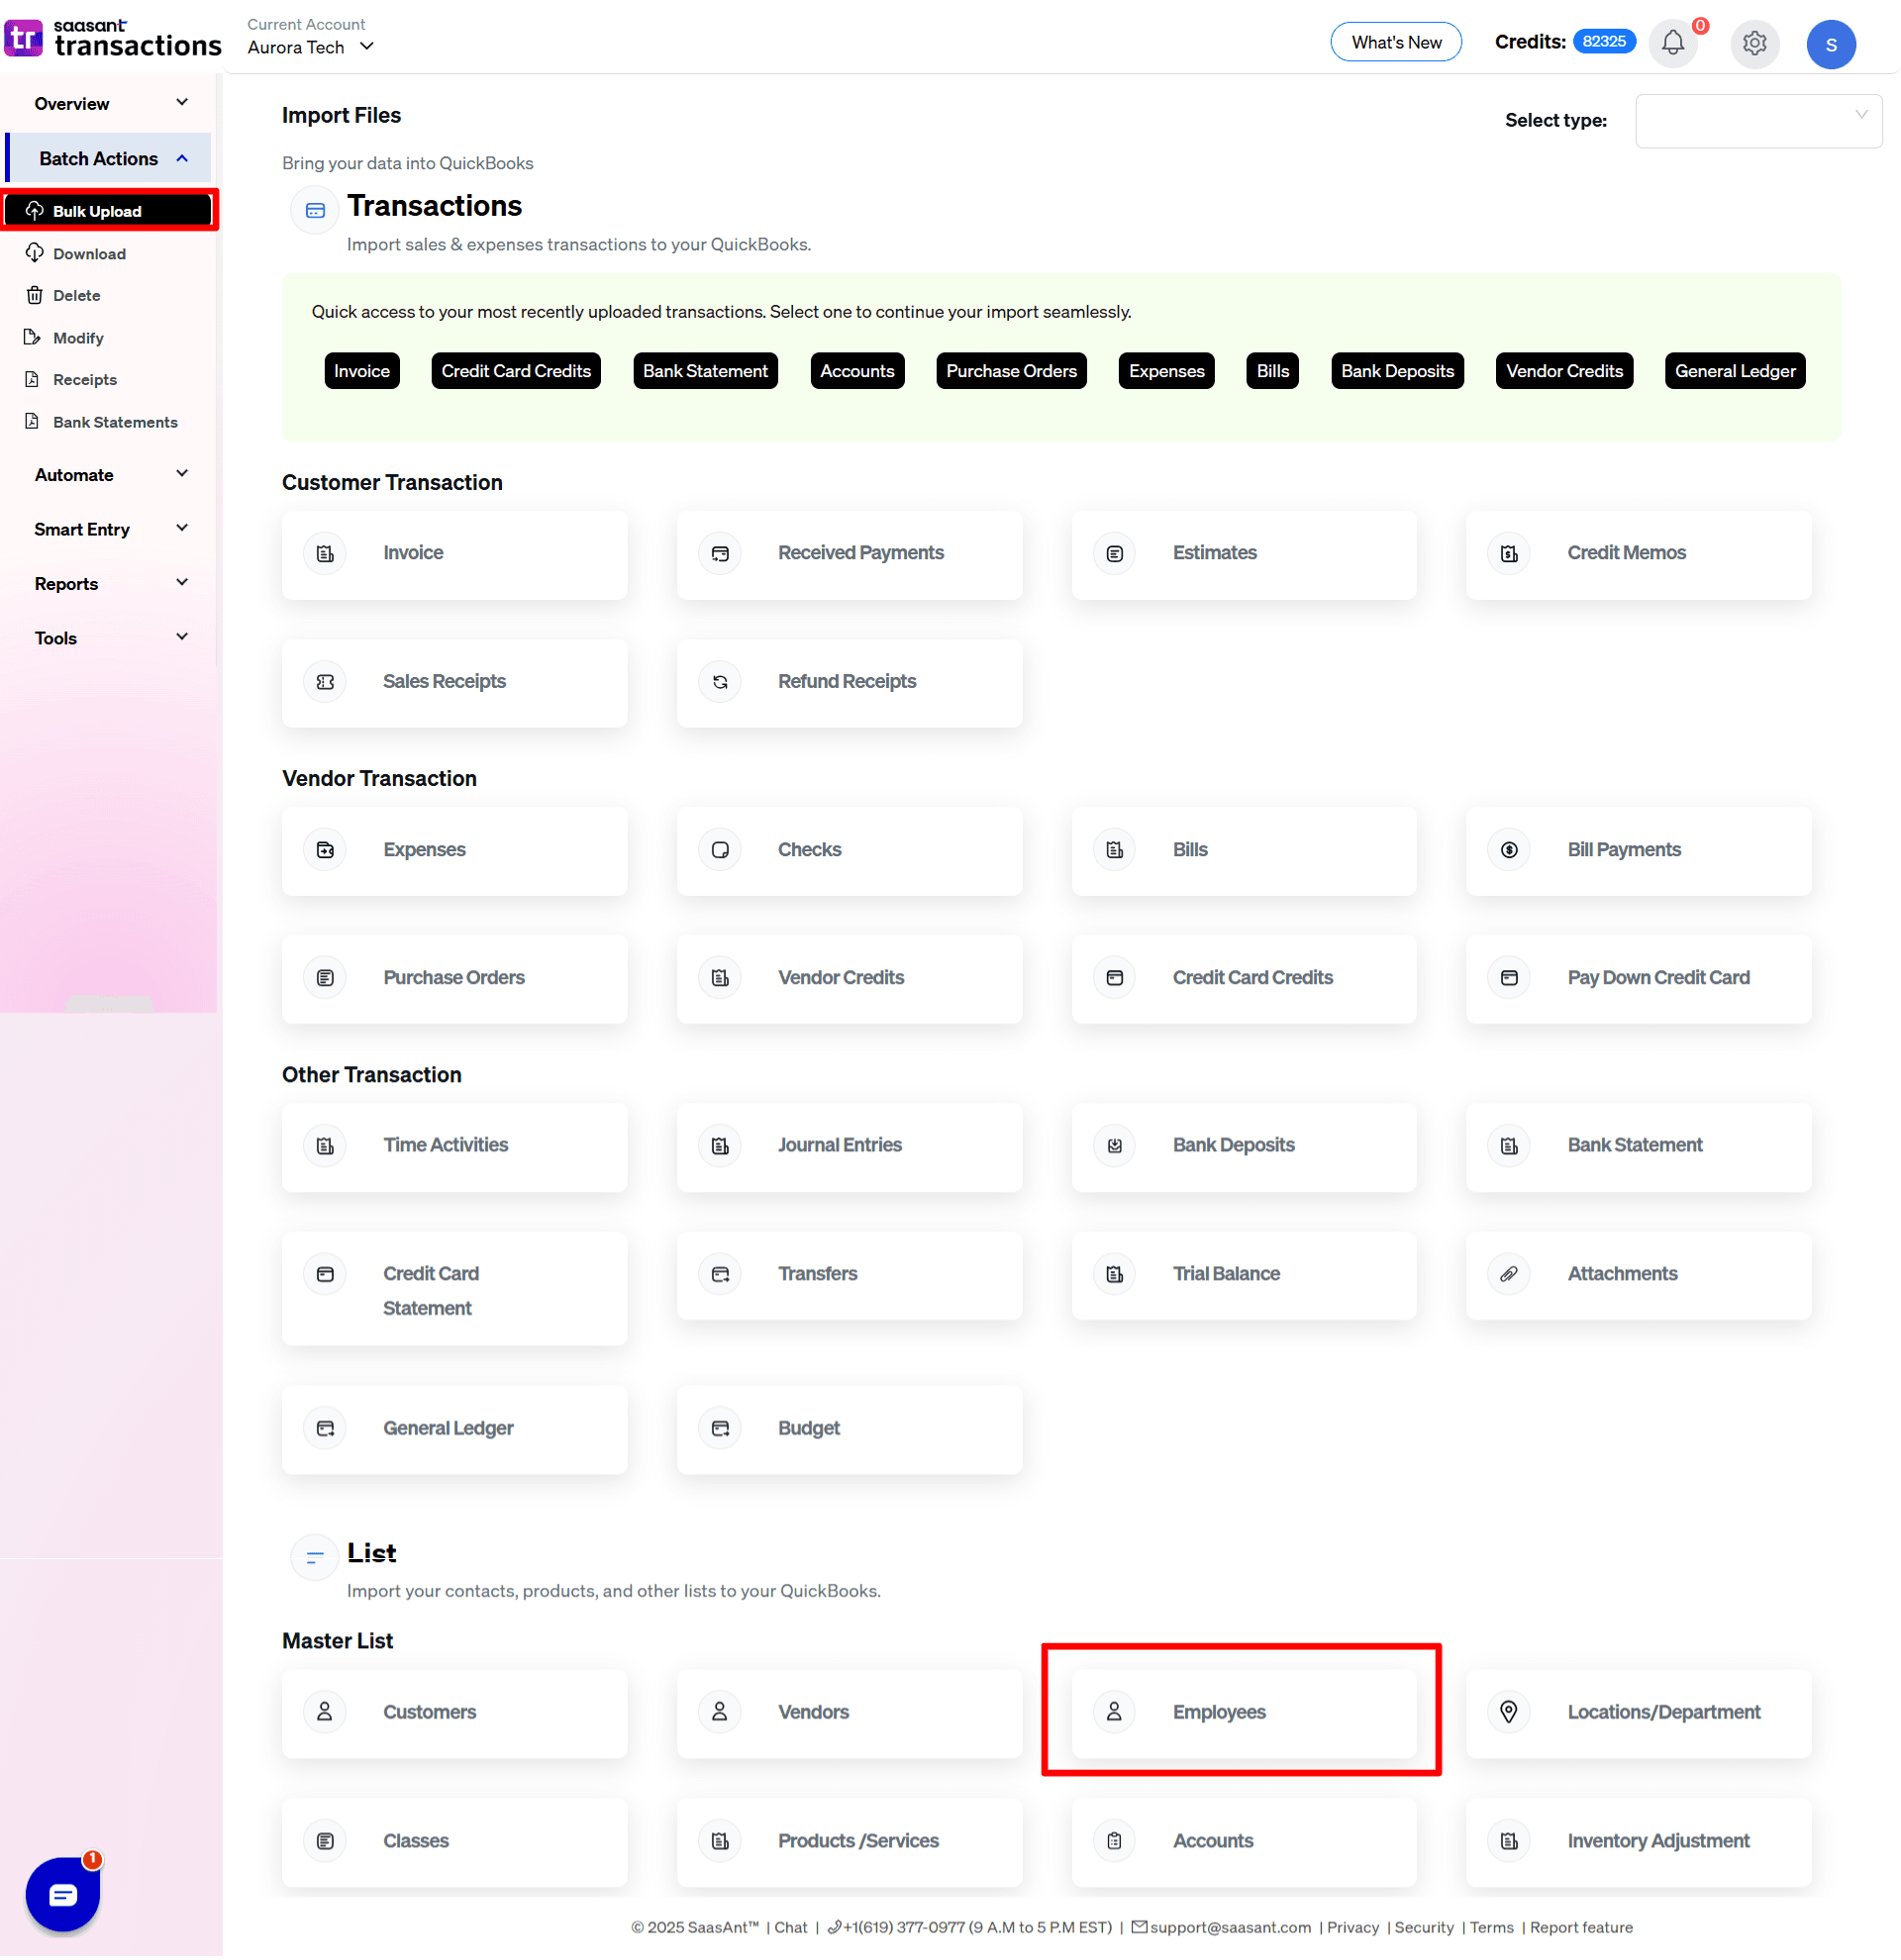
Step 3: Start a New Import
Click the Bulk Upload tab and select import type
Choose Let's Import.
Select Transaction, List, or Attachment. For Employee Lists, select List.
From the list of QuickBooks entities, choose Employees.
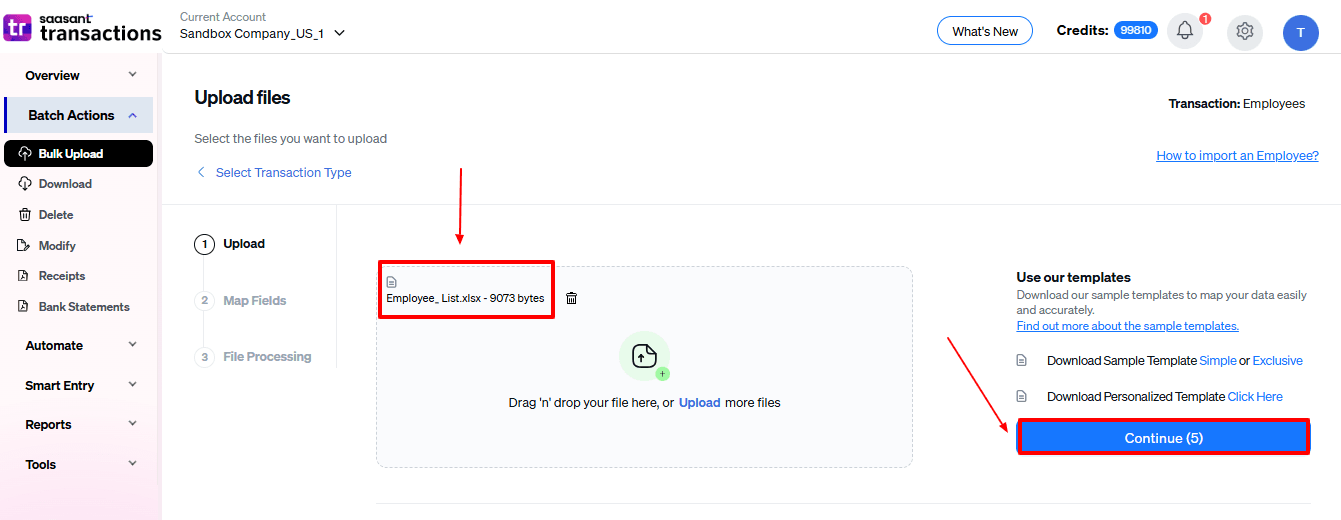
Step 4: Upload Your Excel File
Click the Browse or Select File button.
Locate your Excel file on your computer and select it.
Click Open or Upload.
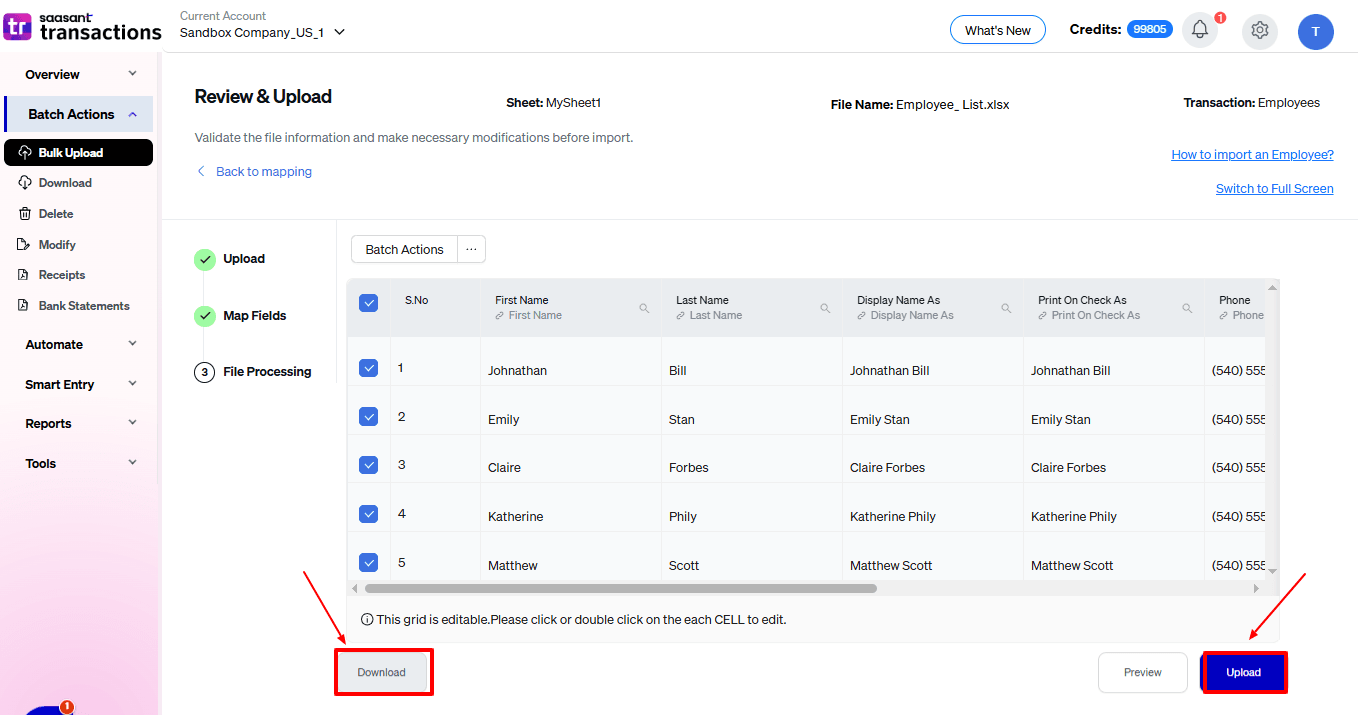
Step 5: Map Your Data Fields
This is the crucial step where you connect the columns in your Excel file to the corresponding fields in QuickBooks Online. SaasAnt Transactions will attempt to automatically map the fields, but you should always review and confirm the mapping.
Key Fields to Map:
Display Name As: This is a required field in QuickBooks Online and must be unique for each employee. It's how the employee will be identified within QuickBooks.
First Name, Middle Name, Last Name: Map these to the appropriate columns in your Excel file.
Title, Suffix: If applicable, map these fields.
Print On Check As: How the employee's name should appear on printed checks.
Address Fields (Line 1, Line 2, Line 3, City, State, Postal Code, Country): Map all relevant address fields.
Phone, Mobile, Fax, Email: Map contact information.
Employee Number: If you use employee numbers, map this field.
SSN: Map the Social Security Number (U.S. only). Be mindful of data privacy and security when handling SSNs.
Billable Time, Billable Rate: If relevant, map these fields.
Gender: Map the employee's gender.
Notes: Any additional notes about the employee.
Hired Date, Released Date, Birth Date: Map important dates.
Use the dropdown menus next to each SaasAnt Transactions field to select the corresponding column from your Excel file.
The provided images will help you.

Step 6: Initiate the Import
Once you are satisfied with the mapping, click the Upload tab.
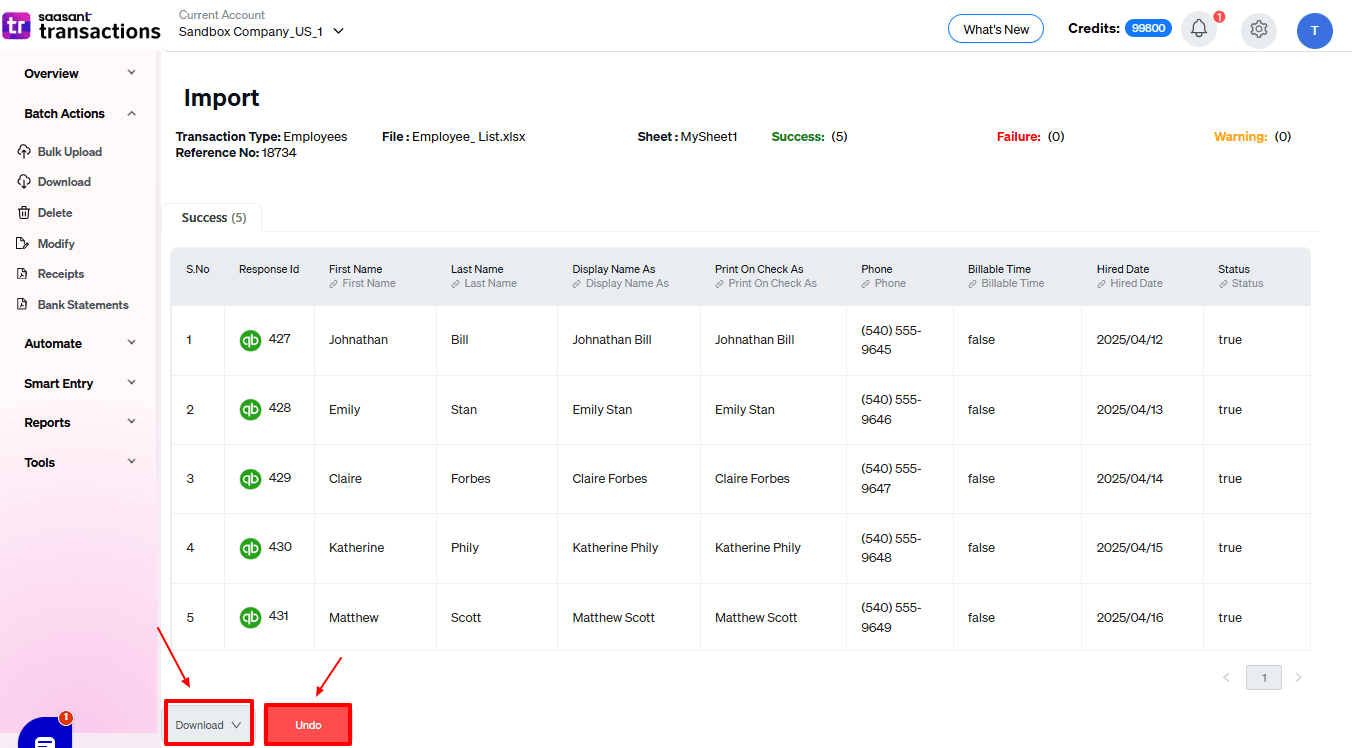
Step 7: Review Import Results
SaasAnt Transactions will process your import. A message will indicate whether the import was successful.
Review the detailed import log for any errors or warnings.
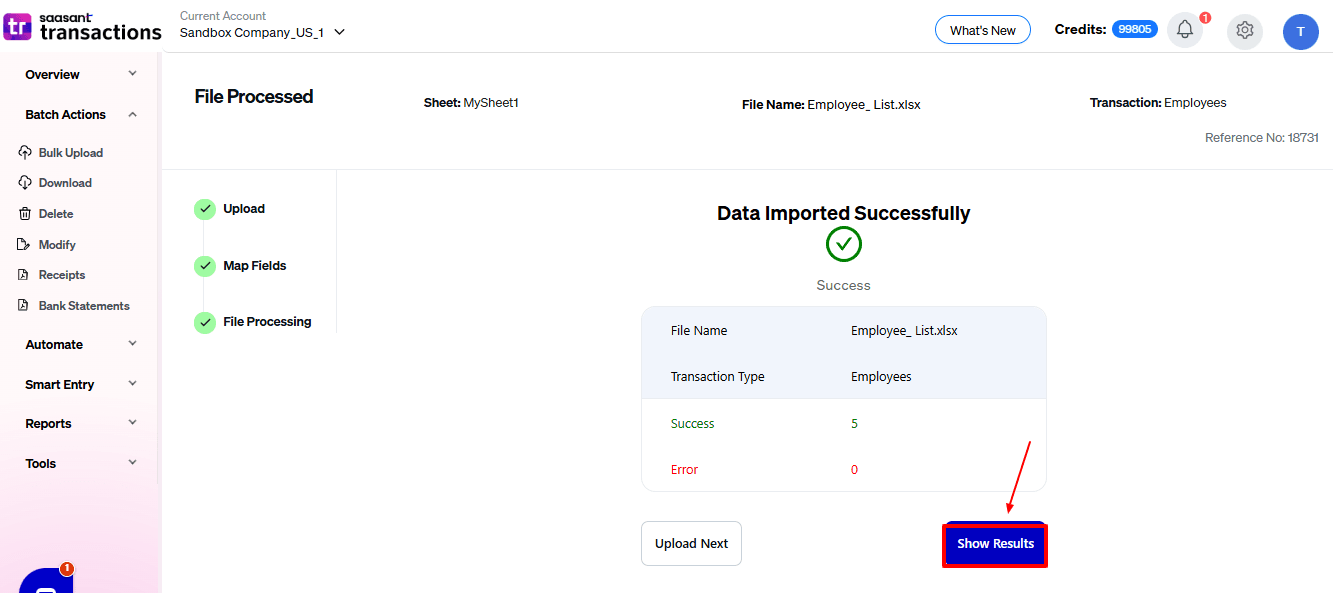
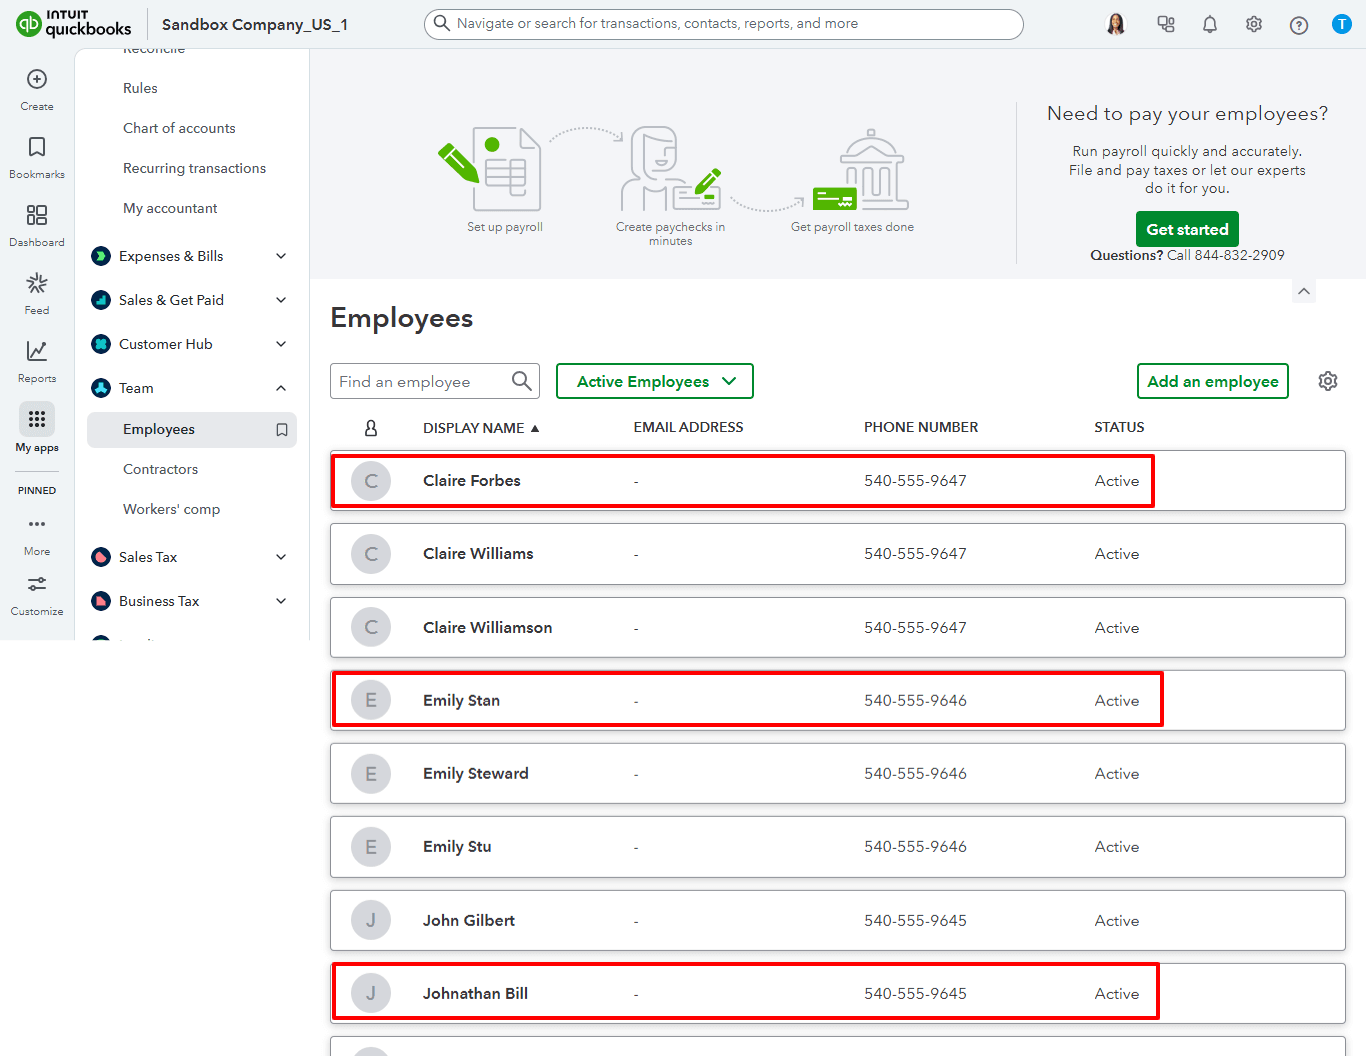
Verify the imported data in your QuickBooks Online account.
Step 8: Undo if needed
If you made a mistake or need to correct the import, you can undo the import and roll it back.
Troubleshooting Common Import Errors
This section will address the "Possible Failures & Troubleshooting Tips" provided in the original text:
"Employee object does not contain a city, state, or zip code!": Ensure your Excel file includes valid and complete address information for each employee.
"Another employee, vendor, or customer is already using this name. Please enter a different name.": The "Display Name As" field in QuickBooks Online must be unique. You'll need to modify the Display Name for the employee in your Excel file to resolve this conflict.
"Invalid social security number!": Verify that the SSN is formatted correctly and is a valid Social Security Number.
"This is a duplicate Social Security Number belonging to another employee.": Ensure each employee has a unique and correct SSN.
"Phone number must be formatted like xxx-xxx-xxxx.": Adjust the phone number format in your Excel file to match the required format.
"Invalid value Allowed values are [ MALE, FEMALE ].": The values has to be either of these two.
Read also
Export Employee Data From QuickBooks Online
Workflow Automation for Bookkeeping and Accounting Professionals
Payroll Journal Entry Examples in QuickBooks
How to Delete Employees in QuickBooks Online