How to Import CSV into QuickBooks Online (Step-by-Step CSV Upload Guide)
Managing a lot of financial data in QuickBooks Online gets messy fast when you are entering transactions one by one. If you are dealing with invoices, expenses, bills, journal entries, or bank transactions, importing a CSV into QuickBooks Online is one of the quickest ways to keep your books accurate without spending hours on manual data entry.
In this guide, you will learn how to import CSV into QuickBooks Online using SaasAnt Transactions Online. You will also see what to check before uploading, how mapping works, how to verify results in QuickBooks, and what to do if you need to roll back an import.
Contents
Import CSV to QuickBooks Online: Quick Instructions
How to Upload a CSV File to QuickBooks Online (Step-by-Step)
How to Undo a CSV Import in QuickBooks Online (If Something Goes Wrong)
Wrap Up
Frequently Asked Questions
Import CSV to QuickBooks Online: Quick Instructions
Connect SaasAnt Transactions Online from the QuickBooks App Store
Upload your CSV file
Map fields and preview the data
Import into QuickBooks Online
Verify results, using the QB ID.
If needed, undo the uploaded batch or delete the imported records

How to Upload a CSV File to QuickBooks Online (Step-by-Step)
Follow the steps below to import CSV seamlessly into QuickBooks Online using SaasAnt Transactions.
Step 1: Log In to Your QuickBooks Account
Log in to your QuickBooks account.
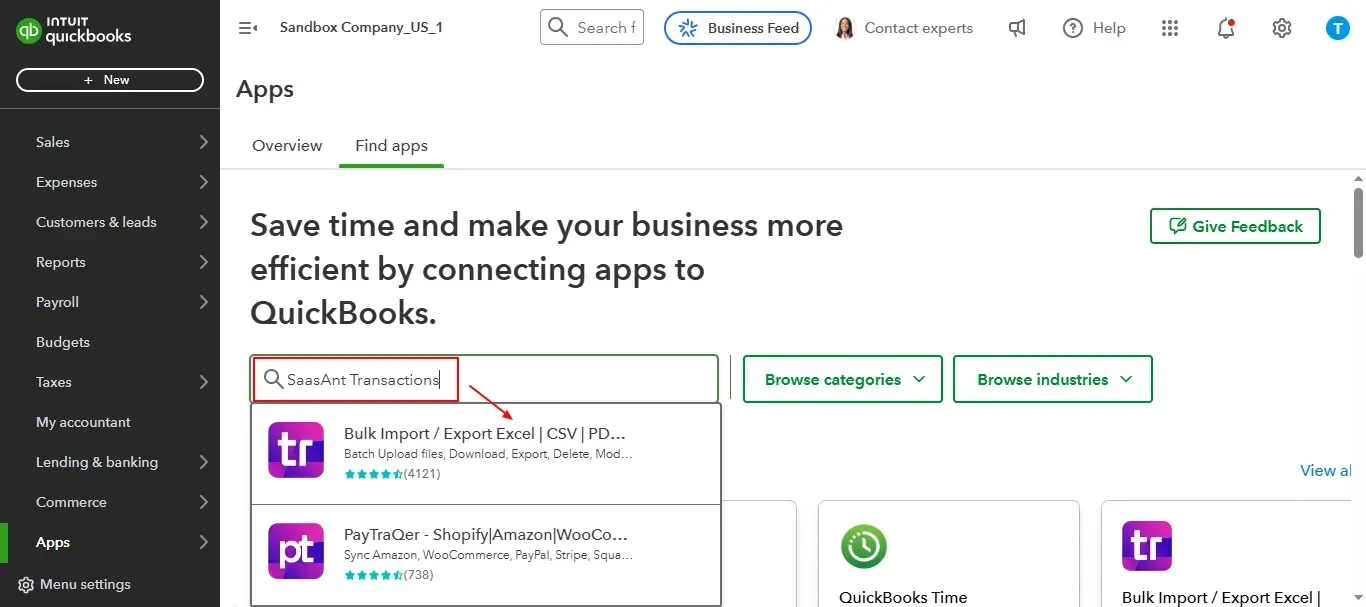
Step 2: Navigate to the Apps Menu
On the left side of the QuickBooks dashboard, you can see the menu bar, which offers various options.
Select “Apps.” Click the dropdown and select “Find Apps.”
Step 3: Search and Install SaasAnt Transactions
In the search bar, type “SaasAnt Transactions.”
Select “Get App Now” to install the application.
Step 4: Open SaasAnt Transactions
Once installed, QuickBooks will automatically sync with the SaasAnt Transactions app, which will open in a new browser tab.
On the SaasAnt dashboard:
On the left side of the SaasAnt Transactions dashboard, you can see the menu bar with various options.
Select “Bulk Upload.”
Select “Invoice” in the customer transaction section.
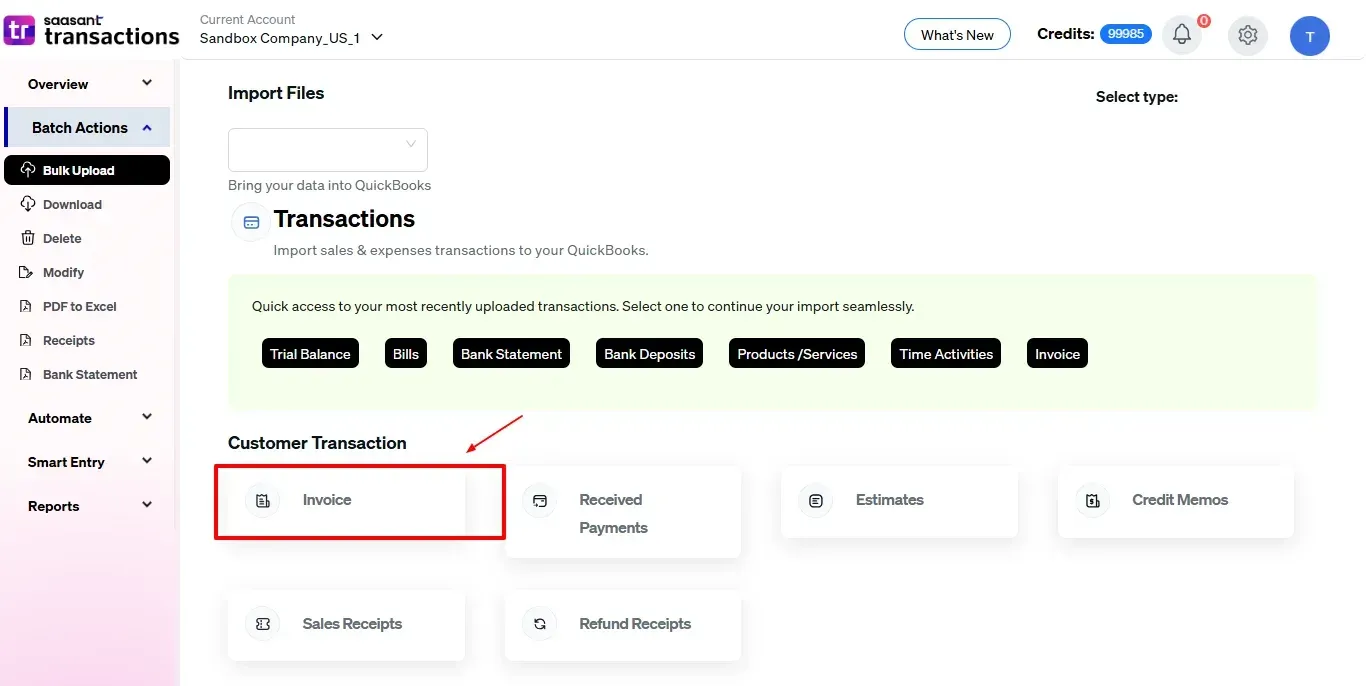
To import QuickBooks entities, such as invoices, expenses, or purchase orders, simply prepare your data in a CSV file and upload it using SaasAnt Transactions.
Note: You can import various file formats, including XLS, XLSX, CSV, IIF, images, PDF, and text files.
Below is a detailed list of the transactions and lists types that are supported:
Vendor Transactions | Customer Transactions | Other Transactions | Lists |
Expenses | Invoice | Journal Entry | Customer |
Checks | Receive payments | Time Activity | Vendor |
Bill Transactions | Estimates | Credit Card Statements | Employee |
Bill Payments | Credit memo | Bank Statements | Location |
Purchase Orders | Sales receipts | Trial Balance | Product/Service |
Vendor Credits | Refund receipt | General Ledger | Chart Of Accounts |
Credit Card Credits | Budget | ||
Pay Down Credit Card | Inventory adjustments |
Step 5: Upload Files
Browse and select the CSV file you want to import into QuickBooks (Invoices).

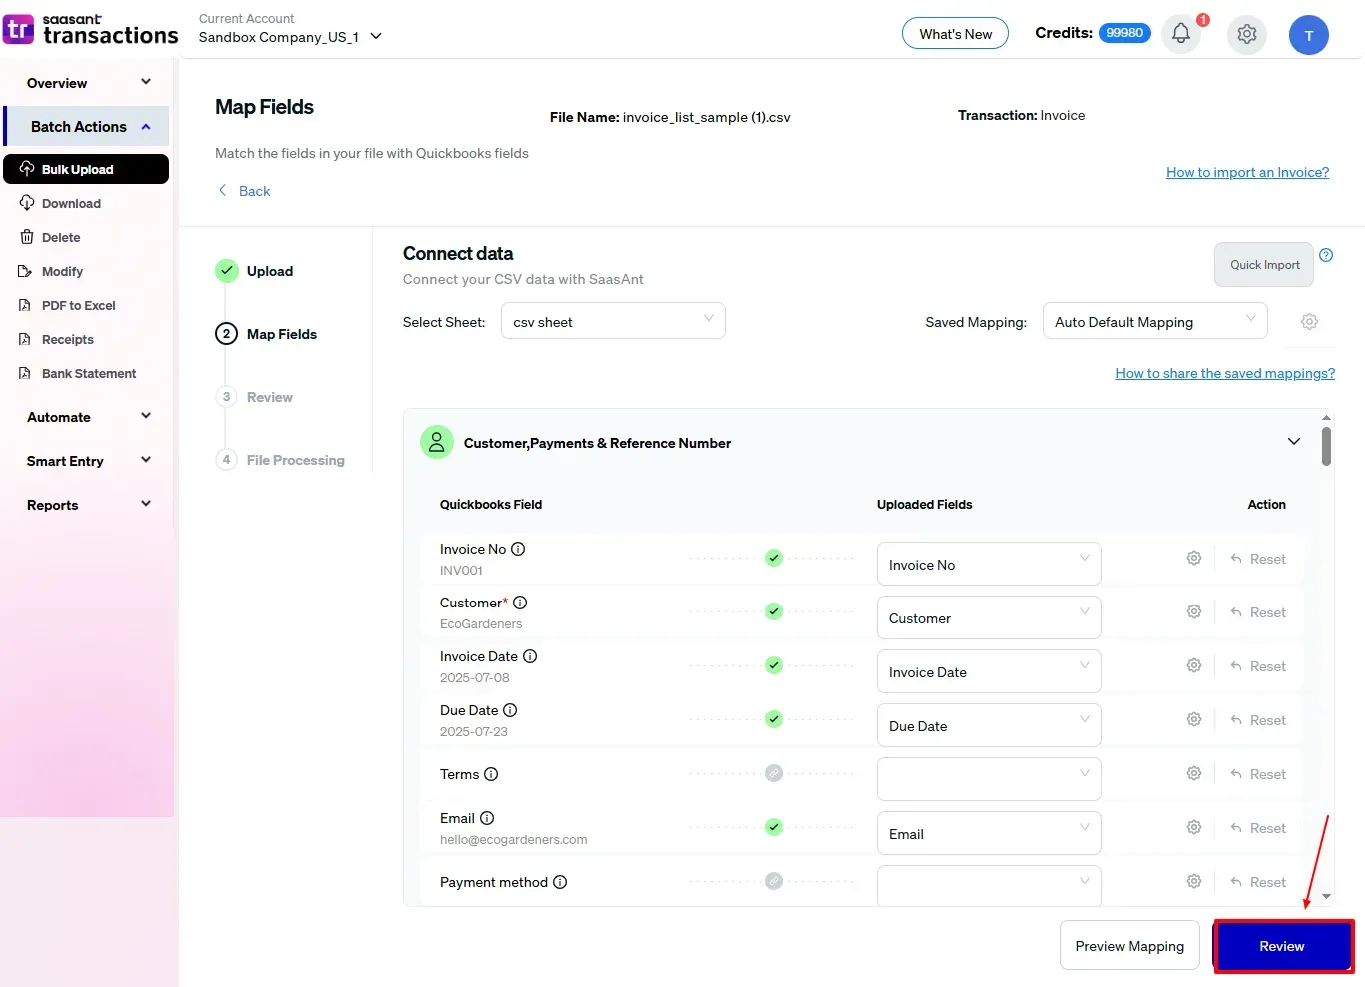
Step 6: Mapping Fields
Ensures the accurate mapping of essential fields, including invoice number, customer name, invoice date, and due date etc.
The ‘Preview Mapping’ feature allows users to verify field alignment before import.
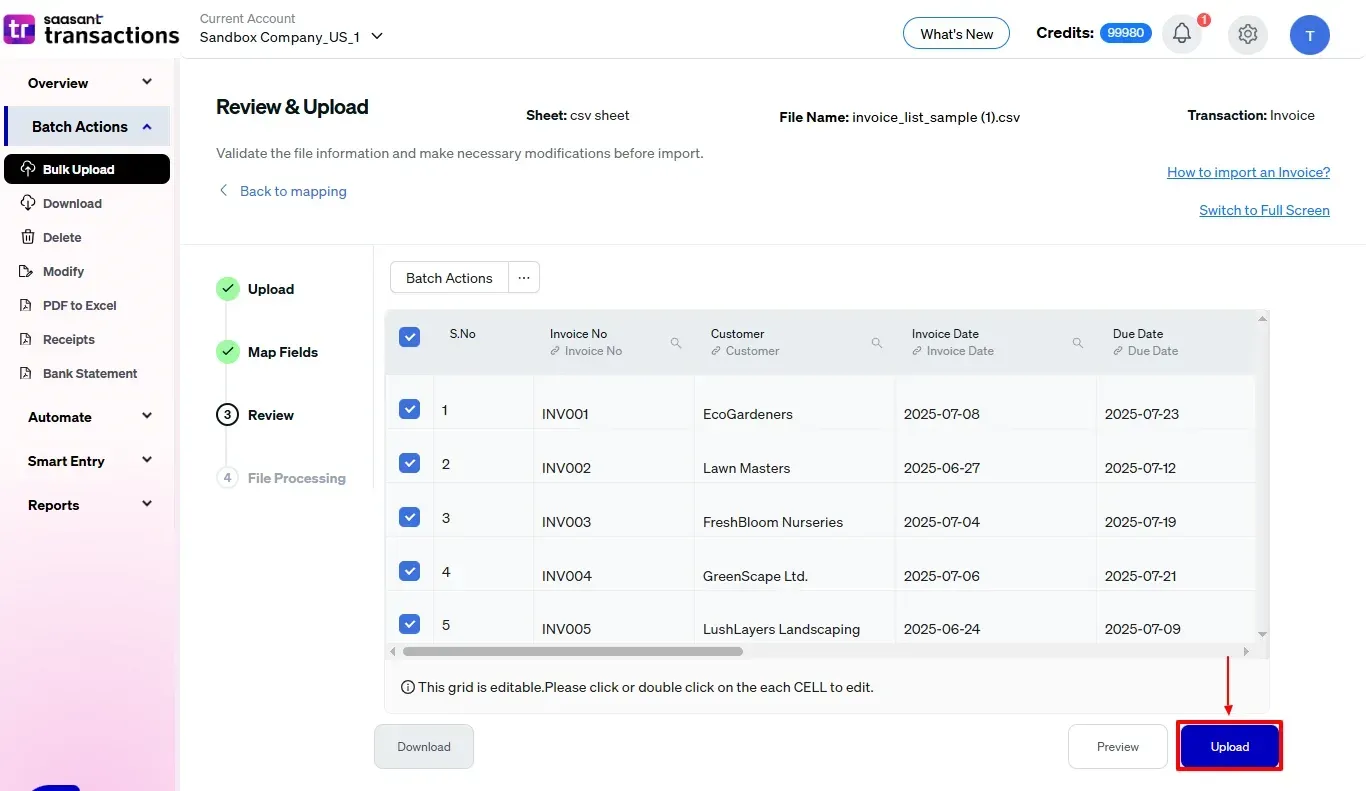
Step 7: Review and Import Your Data
Finalize the import after mapping all fields.
Review the mapped data for accuracy.
Select “Upload” and proceed with the import if everything is correct.
Step 8: Finalize and Verify
This will move your verified invoice data in CSV file format into QuickBooks Online.
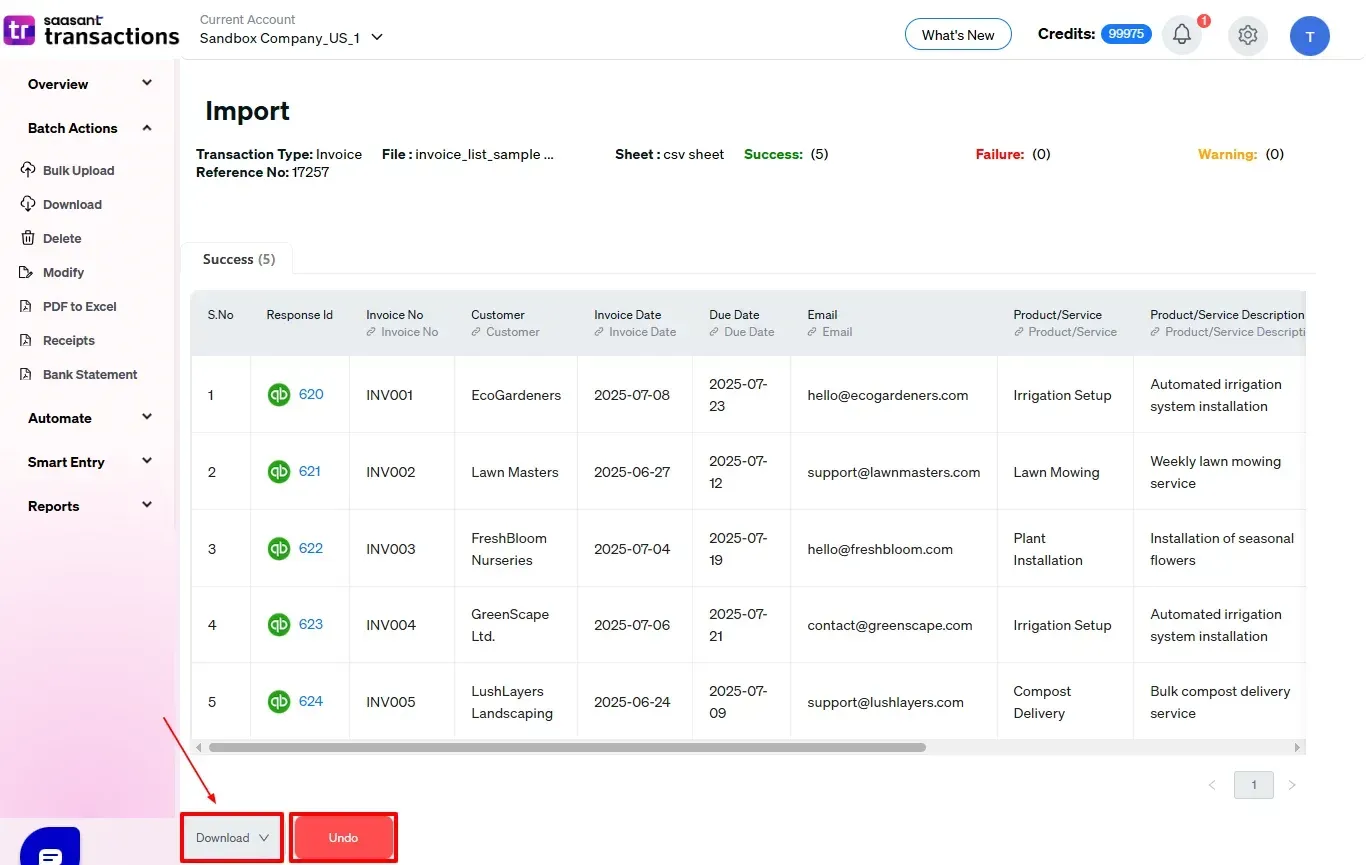
Validate the accuracy of the imported data.
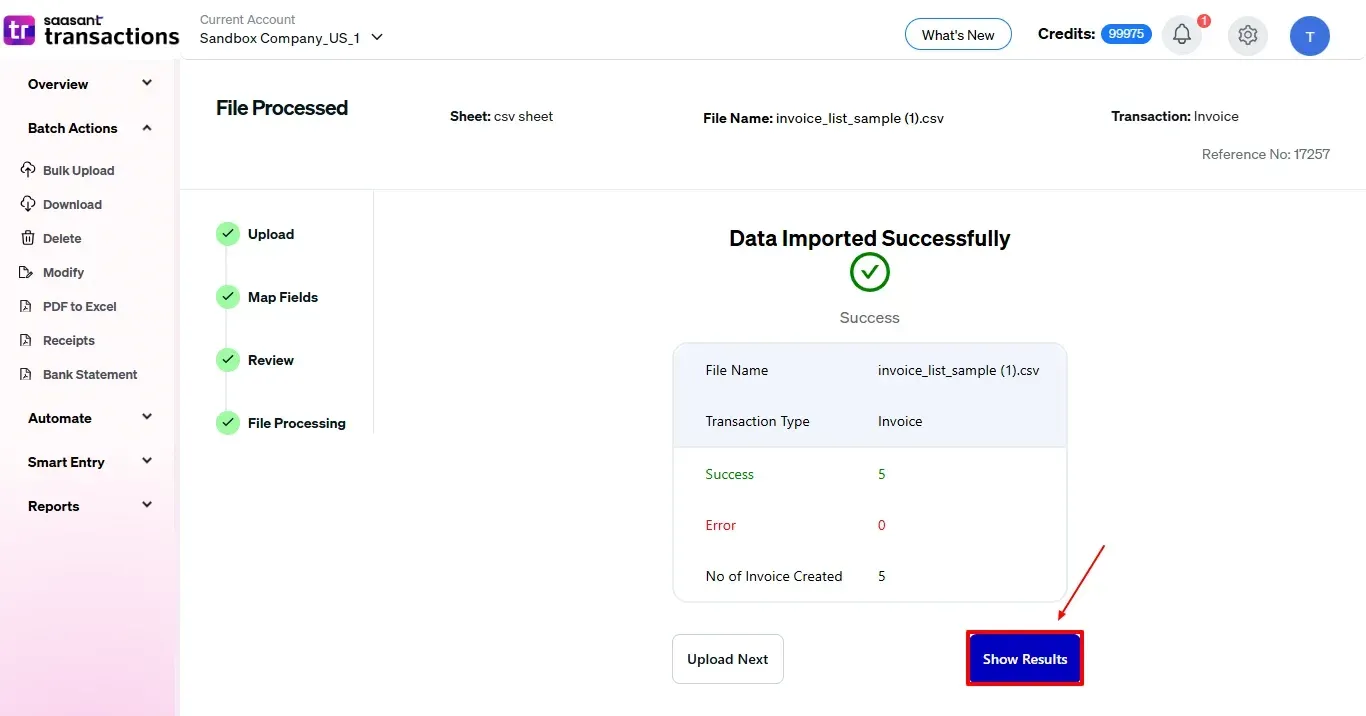
You can also download your imported invoice in CSV or Excel file format for your reference.
And also next to download, you can see “Undo”, where your invoice data will be rolled back.
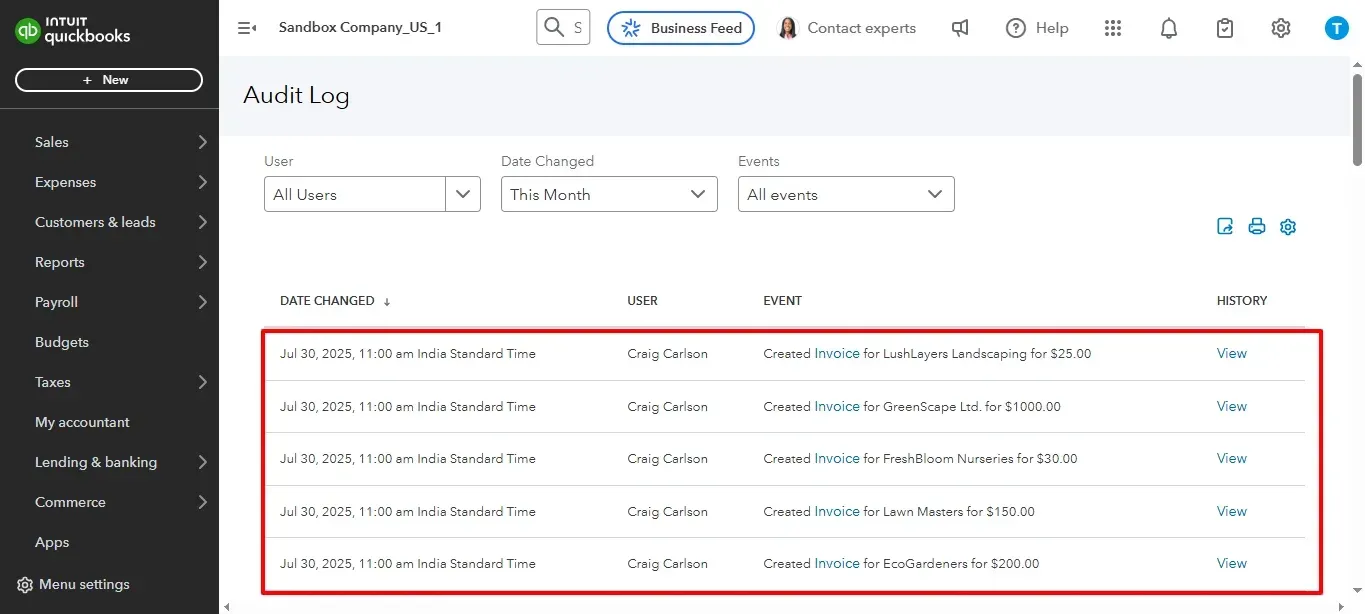
Your imported invoice data in CSV file format is shown in the Audit Log of QuickBooks Online, as shown in the image below.
How to Undo a CSV Import in QuickBooks Online (If Something Goes Wrong)
Rolling back is important because mistakes happen, especially with large CSV uploads.
In SaasAnt, there are two common recovery options:
Undo the uploaded batch (where available in the import history or dashboard)
If you need a full cleanup, use Delete Transactions to remove the imported records from QuickBooks Online (especially when the mapping was wrong or the batch created unusable data).
Tip: Always download your import report before rolling anything back. It makes it easier to re-import cleanly.
Common QBO CSV Import Problems (and Quick Fixes)
“Some rows did not import”
Usually caused by:
Missing required fields (like customer/vendor, account, or date)
Invalid product/service names
Unsupported fields for that transaction type
Fix: correct the CSV, then re-upload the file.
“Dates are not recognized”
Fix: use one consistent date format across the full file and match the date format selection during import.
“Duplicate names already exist”
QuickBooks often blocks importing contacts that already exist with the same name. Fix duplicates first, then re-import.
Wrap Up
If you are handling high-volume bookkeeping, learning how to import a CSV file into QuickBooks Online is one of the easiest ways to save time and reduce manual errors. With SaasAnt Transactions Online, the workflow is straightforward: upload your CSV, map fields, preview, import, verify in QuickBooks, and keep an exportable report for your records.
Frequently Asked Questions
1) Can I import CSV into QuickBooks Online?
Yes. QuickBooks Online supports CSV imports for several data types (like customers, suppliers, chart of accounts, products and services, invoices, bills, bank transactions, and journal entries).
2) How do I upload a CSV file to QuickBooks Online?
You can upload a CSV through SaasAnt Transactions Online for bulk imports and wider workflows.
3) What is the easiest way to do a QBO CSV import for large files?
If your file is large, splitting into batches helps. QuickBooks import screens often have row limits in certain flows, so a bulk import tool can make the process smoother for high-volume work.
4) What file types does SaasAnt support for QuickBooks imports?
SaasAnt supports spreadsheet formats like CSV and Excel for most QuickBooks Online entities. It also supports PDF and image formats for specific document imports like receipts, invoices, bank statements, checks, and expenses.
5) Can I undo or roll back an import?
Yes. SaasAnt provides rollback options such as Undo (where available in the import history) and Delete Transactions for removing imported records from QuickBooks Online if a batch needs to be reversed.
Read Also
How to Import Expenses into QuickBooks Online
Import Invoices into QuickBooks Online: Step-by-Step Guide
How to Import Lists Into QuickBooks Online
Importing Excel into QuickBooks : Detailed Guide