How to Import CSV file into QuickBooks Desktop
Manually entering invoices and transactions into QuickBooks Desktop can be tedious, especially when handling large amounts of financial data. Whether you're an accountant, bookkeeper, or small business owner, finding a reliable way to import CSV files directly into QuickBooks Desktop can streamline your workflow and enhance accuracy.
This blog will walk you through importing CSV files into QuickBooks Desktop using SaasAnt Transactions Desktop.
This blog is ideal for accountants, bookkeepers, small business owners, and QuickBooks Desktop users who want to import CSV files efficiently, automate financial data entry, and reduce errors using SaasAnt Transactions Desktop.
Contents
Import CSV File into QuickBooks Desktop: Quick Instructions
How to Import CSV File into QuickBooks Desktop: Step-By-Step Guide
When to Use CSV Import and How SaasAnt Helps?
Example mini workflows
Why choose SaasAnt for importing your CSV Files into QuickBooks Desktop?
Wrap Up
Frequently Asked Questions
Import CSV File into QuickBooks Desktop: Quick Instructions
Connect SaasAnt Transactions Desktop to the QuickBooks Desktop.
Upload your CSV file
Check and Import.
Rollback (undo) if needed.
How to Import CSV File into QuickBooks Desktop: Step-By-Step Guide
Follow the steps below to import the CSV file format in QuickBooks Desktop using SaasAnt Transactions Desktop.
Step 1: Install and Connect SaasAnt Transactions
Download the latest SaasAnt Transactions Desktop version.
Run SaasAntTransactions-Setup.exe as an administrator.
Accept the license agreement and complete the installation.
Open the app, go to Subscription > Register.
Enter the license key from your confirmation email.
Keep your internet connection active.
Step 2: Launch SaasAnt Transactions Desktop
Start by opening the SaasAnt Transactions Desktop app on your system.
Ensure that QuickBooks Desktop is open and connected to your company file before proceeding.
Step 3: Connect to QuickBooks Desktop
Now you need to connect the SaasAnt Transactions Desktop with QuickBooks Desktop. Here's how:
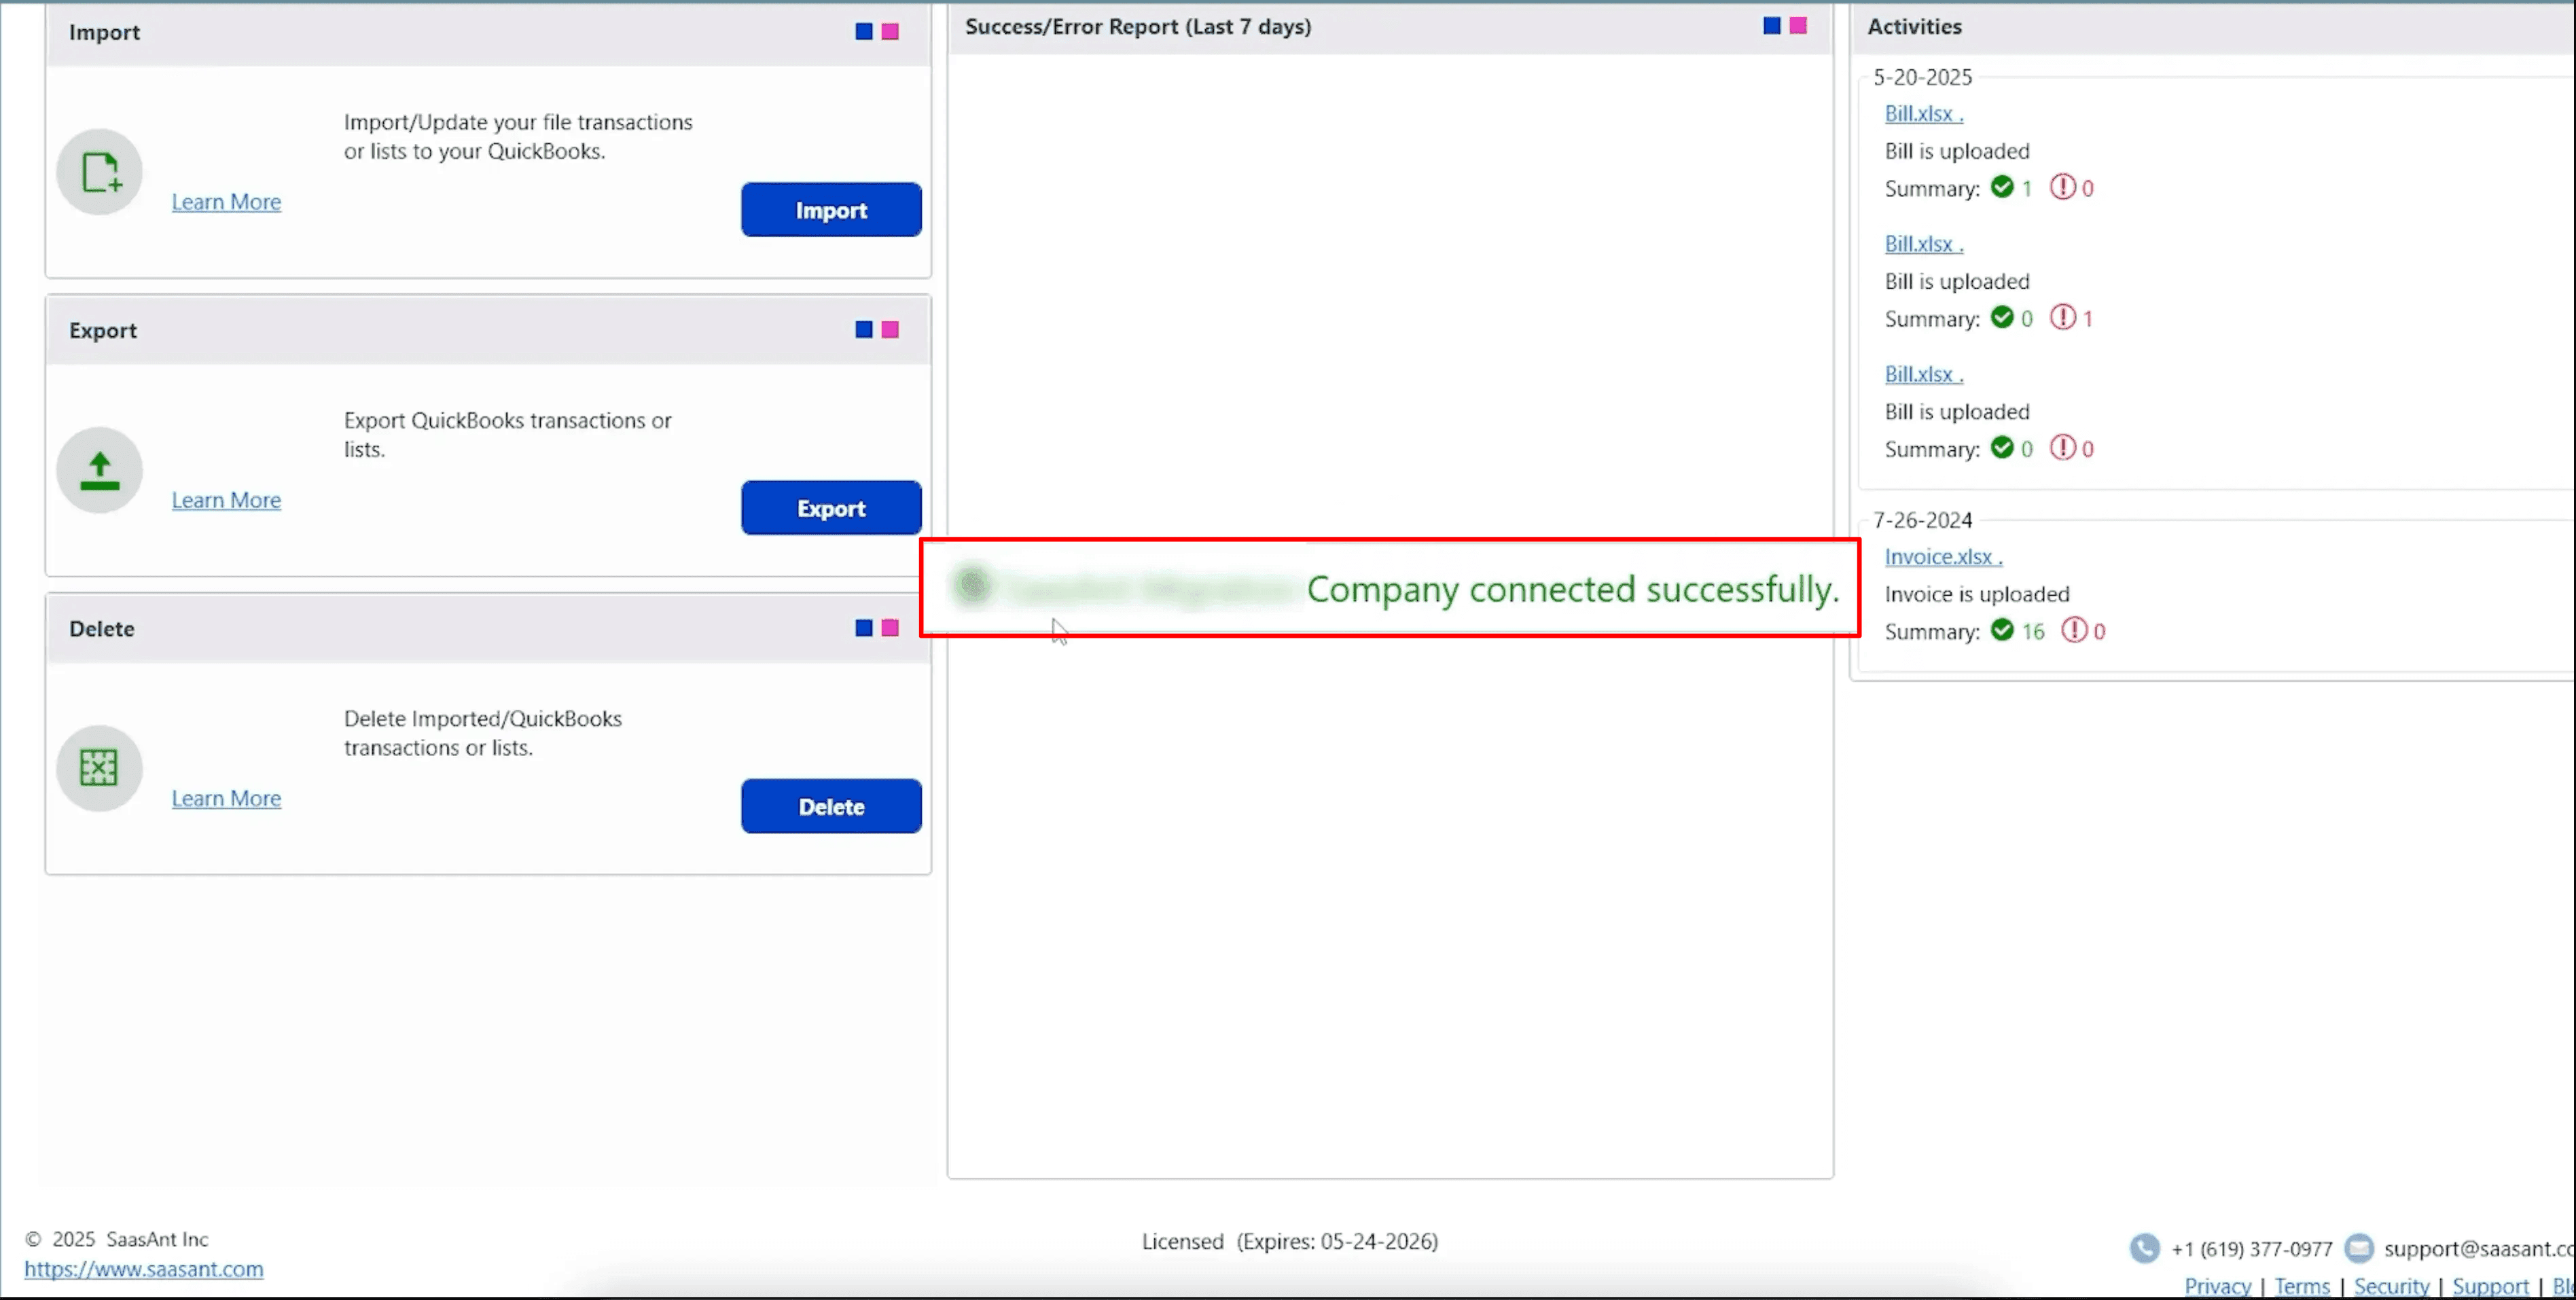
Go to the ‘File’ menu in the top-left corner of SaasAnt Transactions Desktop.
Click ‘Connect to QuickBooks’ from the dropdown.
To learn how to connect SaasAnt Transactions Desktop with QuickBooks Desktop and get started with automating your bookkeeping, here is a detailed guide:
Step 4: Open SaasAnt Transactions
On the SaasAnt dashboard:
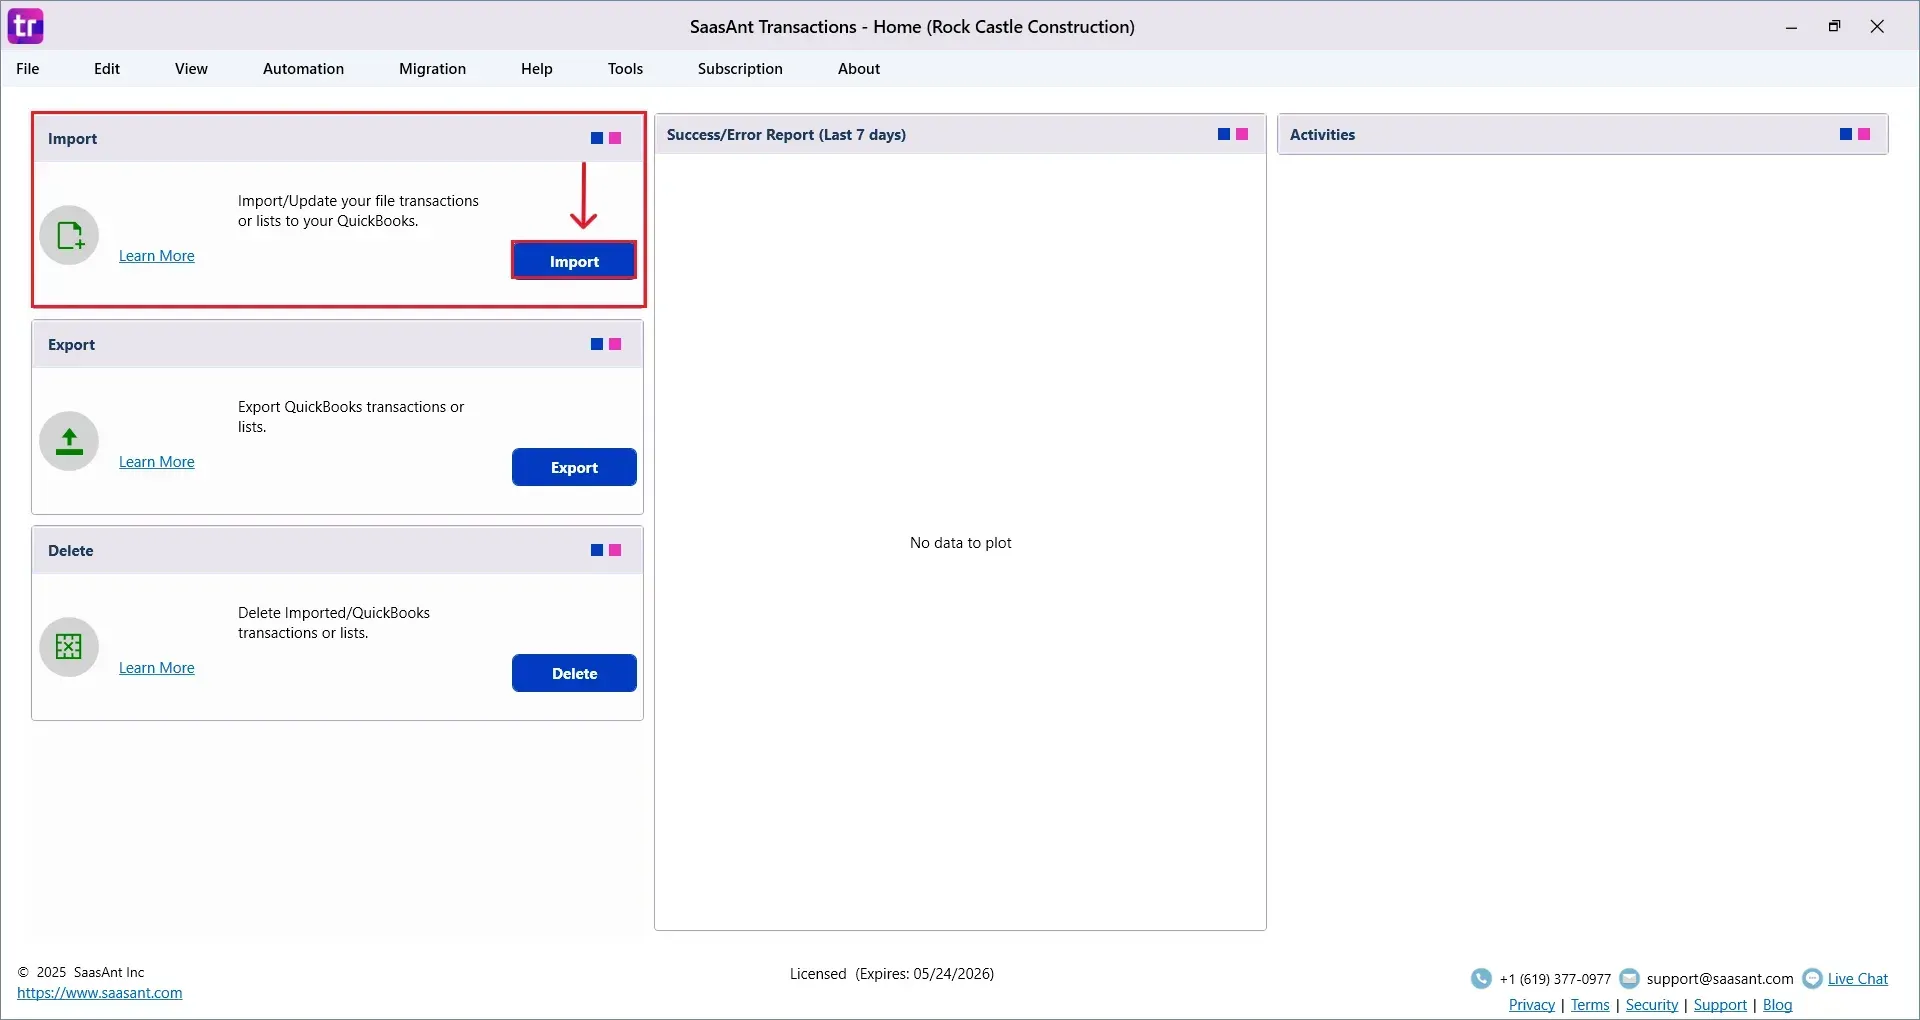
On the top left side of the SaasAnt Transactions dashboard, you can see the menu bar with various options.
Select “Import” from the dashboard.
The Dashboard appears as shown in the image below.
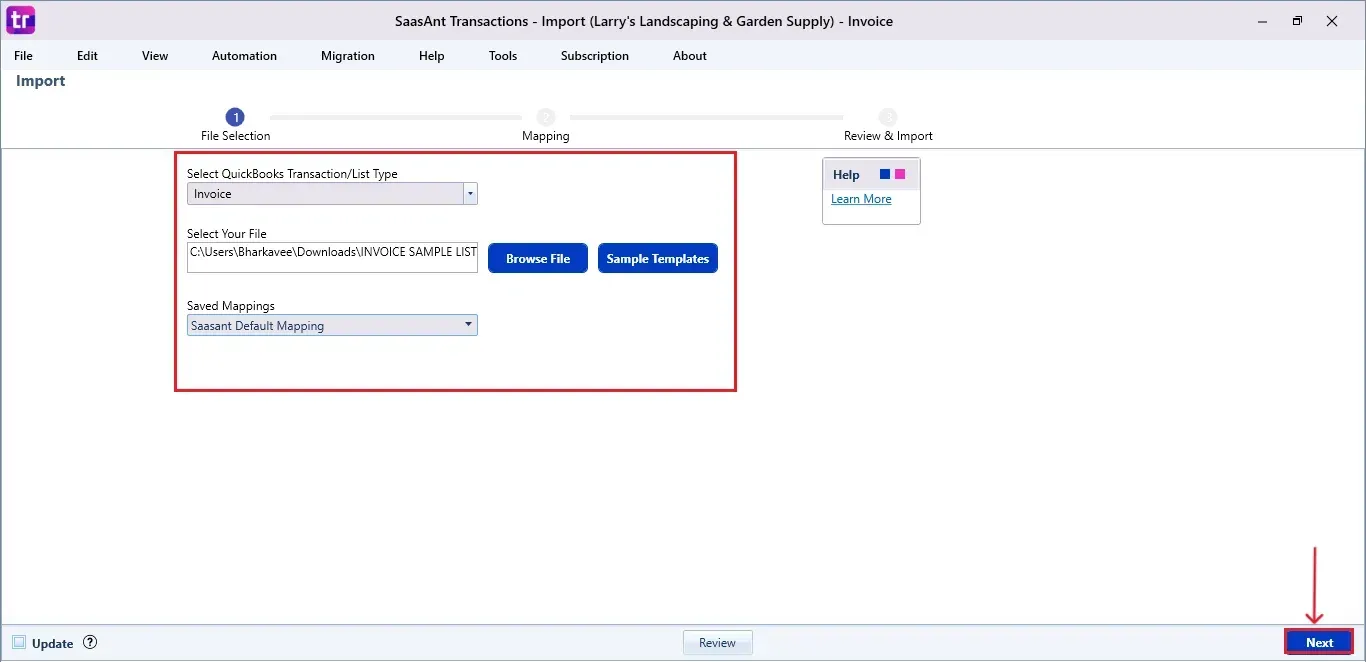
Select “Invoice” from the SaasAnt Transaction Type dropdown and upload your CSV file.
Select “SaasAnt Default Mapping” under the Saved Mapping dropdown.
Note: You can import various file formats, including XLS, XLSX, CSV, IIF, text files.IFF, .QIF, .OFX, .ACCDB, .MDB, .XLSM, .XLSB and XLS.
Below is a detailed list of the transactions and list types that are supported:
Vendor Transactions | Customer Transactions | Other Transactions | Lists |
Bill | Invoice | Journal Entry | Customer |
Checks | Receive payments | Time Tracking | Vendor |
Item Receipt | Estimates | Credit Card Statements | Employee |
Bill Payments | Credit memo | Bank Statements | Location |
Purchase Orders | Sales Order | Trial Balance | Product/Service |
Credit Card Charge | Refund | Deposit | Accounts |
Credit Card Credits | Statement Charge | Transfer | Attachments |
Item Receipt with Bill | Inventory adjustments | Assembly Items | |
Vehicle Mileage | Item | ||
Item Payment | |||
Item Discount | |||
Item Group | |||
Inventory Item | |||
Inventory Assembly | |||
Fixed Asset | |||
Price Level | |||
Other Name | |||
Sales Tax | |||
Sales Tax Group | |||
Class |
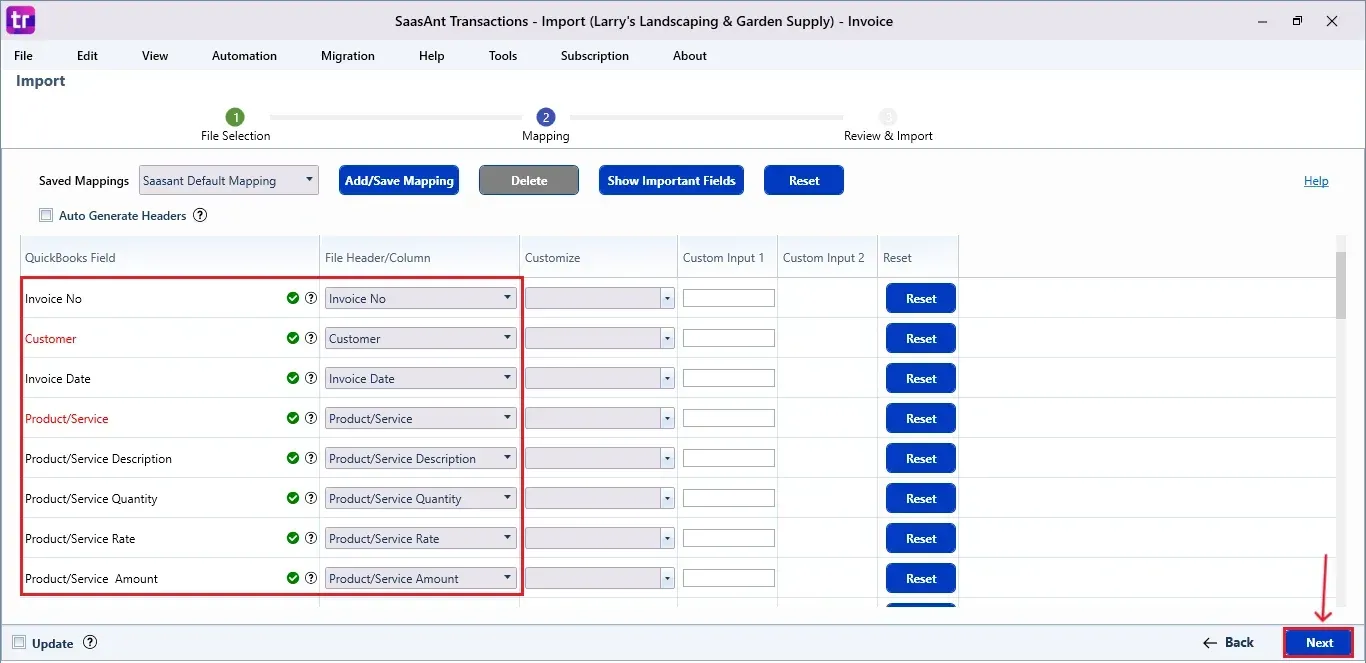
Step 5: Mapping Fields
Ensures the mapping of essential fields, including invoice number, customer, invoice date, etc.
Select “Next” at the bottom right of the dashboard.
Step 6: Review and Import the Data
Click the “Send to QuickBooks” option at the bottom right of the dashboard, as shown in the image below.
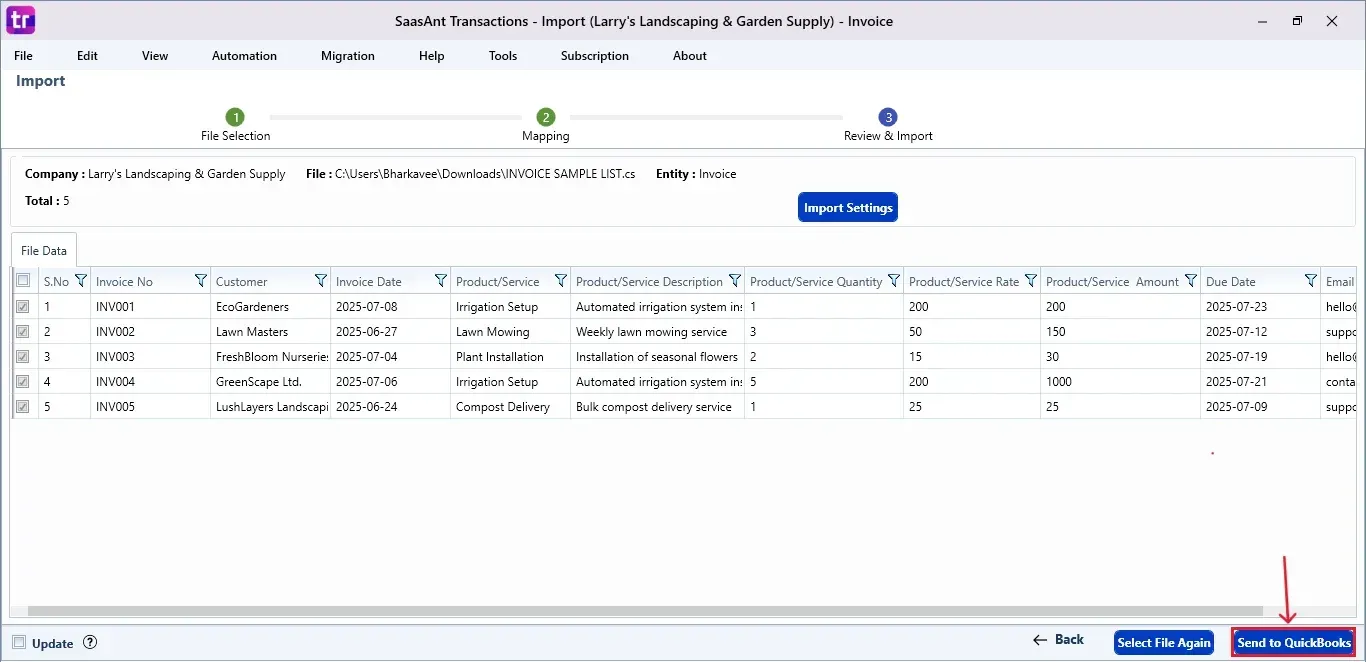
SaasAnt will now push your Invoice in CSV file format into your connected QuickBooks Desktop account.
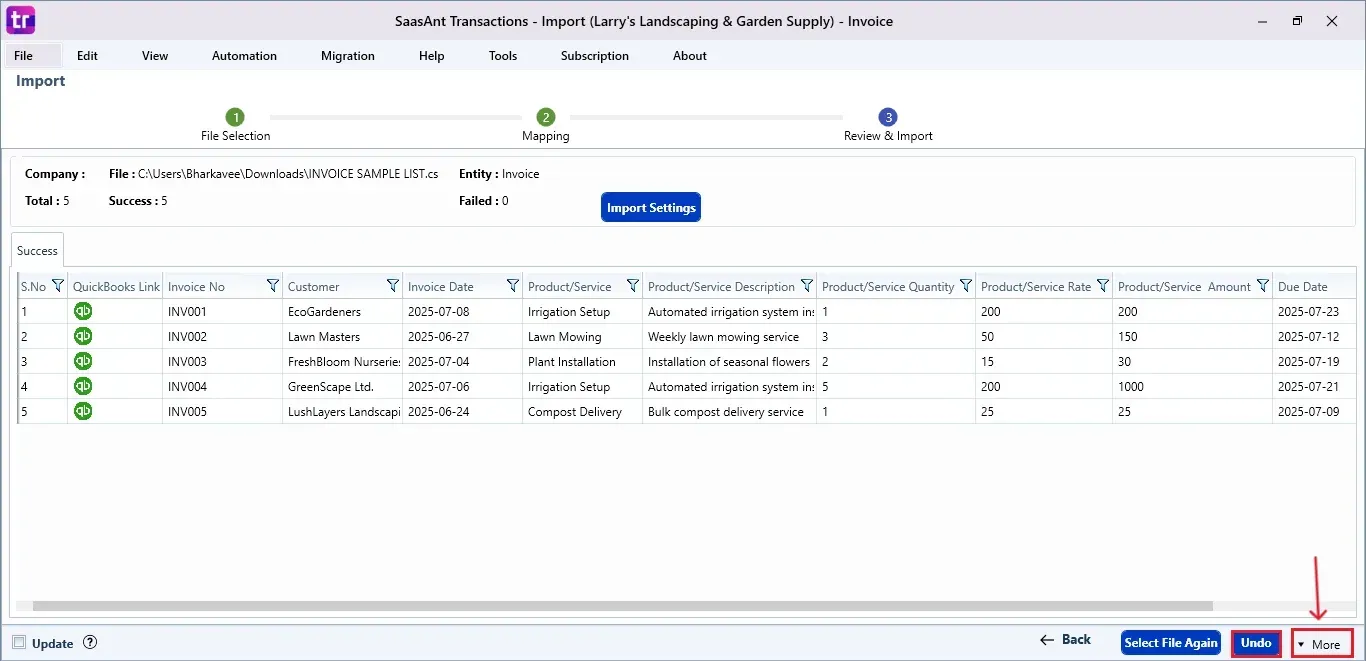
The Invoice is reflected in the dashboard.
At the bottom right, click the “More” dropdown and select the option to download your Invoice for reference.
Additionally, next to the download option, you can see “Undo”, which allows you to roll back your imported “Invoices”.
Step 7: Verify in QuickBooks Desktop
Open QuickBooks Desktop, go to the “Customers” menu, and select “Customer Centre”.
Search for the customer name you imported.

This final step ensures that your data is accurate and appropriately reconciled within QuickBooks.
Also Read: How to Import Invoices into QuickBooks Desktop
When to Use CSV Import and How SaasAnt Helps?
Importing by CSV is most useful when you need accuracy at scale without hand entry. Below are common real-world scenarios, what the user is trying to achieve, and exactly how SaasAnt Transactions Desktop helps.
1) New file setup or re-build
Situation: You created a fresh QuickBooks Desktop file or fixed a damaged one and now need to bring in customers, vendors, items, and opening transactions.
Goal: Stand up a clean file with correct lists and starting balances.
How SaasAnt helps:
Import lists first, then transactions, using ready templates for Customers, Vendors, Items, and Chart of Accounts.
Save your column mapping so you can re-use it across multiple imports.
Validate totals during review to confirm AR, AP, and inventory postings match your source.
2) Catch-up or clean-up work
Situation: Months of invoices, bills, or journals are sitting in spreadsheets.
Goal: Post a large backlog quickly with minimal corrections.
How SaasAnt helps:
Line-level mapping for items, quantities, rates, tax, and classes.
Preflight checks flag missing customers, items, or tax codes so you can fix them before posting.
Undo lets you roll back a batch if something is off, then re-import after corrections.
3) Migration from another system or POS
Situation: You exported sales, vendors, and inventory from a legacy tool.
Goal: Recreate history and maintain continuity in QuickBooks Desktop.
How SaasAnt helps:
Supports a wide range of entities like Invoices, Sales Receipts, Payments, Bills, Credit Memos, Journal Entries, Inventory Adjustments, and more.
Flexible date and number parsing reduces format errors from mixed data sources.
Duplicate checks help prevent re-posting when you run in phases.
4) Price updates and catalog changes
Situation: You need to update item prices, descriptions, or custom fields at scale.
Goal: Apply consistent product changes without touching records one by one.
How SaasAnt helps:
Import list updates for Items and Price Levels directly from CSV.
Map only the fields you want to change to avoid accidental edits elsewhere.
Keep an export copy and the SaasAnt import log for audit readiness.
5) Project, class, and job costing alignment
Situation: You track classes, jobs, or locations and must attach them to every line.
Goal: Maintain clean cost reporting after import.
How SaasAnt helps:
Field mapping supports Classes and Jobs at header or line level.
Consistency checks surface missing references early, so your P&L by class and job reports stay correct.
6) Sales tax and multi-currency nuance
Situation: Your CSV includes mixed tax codes, rates, or multiple currencies.
Goal: Preserve correct tax treatment and currency values.
How SaasAnt helps:
Import tax codes and line tax flags where your QBD edition supports them.
Validates references to tax items or codes to reduce “tax not found” errors.
Honors currency fields in supported QBD editions to reduce manual edits later.
7) Inventory control and adjustments
Situation: You must true up quantities or costs after a warehouse count or system switch.
Goal: Accurate on-hand and valuation numbers without manual journals.
How SaasAnt helps:
Import Inventory Adjustments with item, site or bin (if applicable), quantity, and value.
Batch import reduces timing gaps between count and update.
Logs provide a clear trail for reviewers.
8) Bank, card, and statement-driven posting
Situation: You receive CSV exports of bank or card activity that must become Expenses, Deposits, or Transfers.
Goal: Get transactions into QBD with vendor, account, memo, and class details intact.
How SaasAnt helps:
Map each column to the correct QuickBooks target field.
Use saved mappings for each bank format to cut set-up time next month.
Run a 10-row test, then post the rest once totals align.
What this changes for your workflow
Lower input effort: Replace repetitive data entry with a predictable import routine.
Fewer errors: Preflight validation and reference checks reduce surprises in QuickBooks.
Safer iteration: Use Undo to revert a batch, correct the CSV, and re-import.
Repeatable process: Save mappings per transaction type or per data source and re-use them.
Better audit trail: Keep your source CSV, SaasAnt logs, and a quick reconciliation note.
Quick checklist before you import
Confirm you are on the right QBD company file and edition.
Create a backup of your company file.
Standardize date, number, and currency formats in the CSV.
Ensure customers, vendors, items, tax codes, and classes exist, or include them in a prior list import.
Run a small test batch. Verify totals and a sample record inside QuickBooks.
Keep your mapping saved for the full run and future repeats.
Example mini workflows
Invoice backlog from a spreadsheet
Import or verify Customers and Items.
Import Invoices with line items, rates, tax, and class.
Open a few posted invoices in QBD to confirm numbering, dates, and amounts.
If anything looks off, use Undo, fix the CSV, and re-run.
Inventory true-up after a physical count
Export current on-hand, compare to the count, and prepare an adjustment CSV.
Import Inventory Adjustments with the correct accounts.
Review the Inventory Valuation Summary and spot check items.
Vendor bill import from a procurement tool
Import Vendors.
Import Bills with items or expense lines, due dates, and classes.
Confirm AP totals match the source report before closing the period.
Why choose SaasAnt for importing your CSV Files into QuickBooks Desktop?
Broad coverage across lists and transactions, including advanced inventory and journals.
Clear mapping UI with header and line support.
Preflight validation to catch missing references early.
Safe Undo to back out a batch without hunting down records.
Saved mappings so recurring imports take minutes, not hours.
Detailed logs that help reviewers and auditors trace each run.
Use this section as the intent-driven bridge between the intro and your step-by-step steps. It speaks to why the reader is here, the problems they face, and how SaasAnt fits into a reliable, testable, and auditable import process.
Wrap Up
Importing CSV files into QuickBooks Desktop is not as hard as it seems. With SaasAnt Transactions Desktop, you can automate the import of data, cut down on manual efforts, and maintain clean and consistent financial records. This improves your accounting efficiency and gives you more time to concentrate on essential business tasks. Whether you are working with invoices, bills, or journal entries, SaasAnt simplifies and strengthens your import process.
By leveraging trustworthy platforms like QuickBooks for your accounting processes and SaasAnt for transaction management and automation, you can enhance the overall workflow, minimize errors, save time, and acquire greater financial insight.
If you have inquiries regarding our products, features, trial, or pricing, or if you require a personalized demo, contact our team today. We are ready to help you find the ideal solution for your QuickBooks workflow.
Frequently Asked Questions
1) Can I import other entities besides invoices using SaasAnt?
Yes, SaasAnt Transactions allows you to import various other entities such as bills, journal entries, payments, credit memos, and others.
2) Do I need to open QuickBooks Desktop while importing?
Yes, you need to have QuickBooks Desktop open and connected to your company file while importing.
3) Can I undo an import if I made a mistake?
Certainly. SaasAnt has an "Undo" option that allows you to easily revert imported transactions.
4) What happens if there's a mismatch in the CSV data?
SaasAnt will notify you about errors in the mapping or review process, allowing you to resolve them before the final import.
5) What are the file types supported by SaasAnt Transactions Desktop?
SaasAnt Transactions Desktop supports various file formats, including XLS, XLSX, CSV, IIF, text files.IFF, .QIF, .OFX, .ACCDB, .MDB, .XLSM, .XLSB and XLS.
Read Also
How to Import Bills into QuickBooks Desktop
How to Import Bank Transactions to QuickBooks Desktop
How to Import Checks into QuickBooks Desktop
Bulk Import, Export, Edit, Delete in QuickBooks Desktop using SaasAnt Transactions Desktop
How to Import Transactions into QuickBooks Desktop
How to Delete Multiple Transactions in QuickBooks Desktop?
How to Export Data from QuickBooks Desktop to Excel
How to Edit Transactions in QuickBooks Desktop