How to Use QuickBooks for Personal Finances
Navigating the world of personal finances can take time and effort, especially if you have multiple income sources and expenses. That's where financial management software, like QuickBooks, comes into play. While QuickBooks is renowned for its business-oriented functionalities, it's also an effective solution for managing individual finances.
This guide, ‘How to Use QuickBooks for Managing Personal Finances,’ will unveil how you can adapt this software, tailored for businesses, for your personal financial needs. It will also walk you through setting up QuickBooks for individual use, classifying transactions, devising budgets, and creating insightful reports to assess your economic well-being.
Whether you're already familiar with QuickBooks or a first-time user, this article aims to equip you with the knowledge to streamline your financial management using QuickBooks. Ready to get started? Let's dive in!
Contents
Why QuickBooks for Personal Finances?
Step-By-Step Guide for Using QuickBooks to Manage Personal Finances
Step 1: Purchase and access the QuickBooks Online
Step 2: Connect Your Bank and Credit Card Accounts
Step 3: Categorize Your Transactions
Step 4: Set Up Your Budget
Step 5: Track Your Finances
Step 6: Track and Monitor Debt
Step 7: Generate and Run Reports
Step 8: Collaborate with Your Accountant
FAQs
Why QuickBooks for Personal Finances?
Budget Management: QuickBooks lets you create monthly, quarterly, or annual budgets. You can categorize your income and expenses and track your spending against your budget.
Tax Reporting: Taxpayers need to keep accurate records for income tax filing. QuickBooks makes this easy by tracking and categorizing all financial transactions.
Expense Tracking: This feature lets you record and categorize business expenses, facilitating better budget management and tax preparation.
Mileage Tracking: QuickBooks automatically tracks the miles you drive for business purposes, helping you claim deductions accurately during tax season.
Bill Payments: This functionality lets you organize and make payments for your bills directly through QuickBooks, streamlining your accounts payable process.
Ease of Access: QuickBooks Online is a cloud-based tool that allows you to access your financial data from anywhere, at any time, and on any device. This feature can help you manage your finances more proactively.
Integration: QuickBooks integrates seamlessly with many banks, credit card companies, and other financial institutions. You can import your transactions directly into QuickBooks, making record-keeping a breeze.
Financial Reports: QuickBooks offers comprehensive financial reports, including profit-loss statements, balance sheets, and cash flow statements, that provide valuable insights into your business's financial health and performance.
Step-By-Step Guide for Using QuickBooks to Manage Personal Finances
Step 1: Purchase and access the QuickBooks Online
To purchase and access QuickBooks Online, visit the QuickBooks website, select the desired subscription plan, complete the purchase process, and log in with your credentials to access the service.
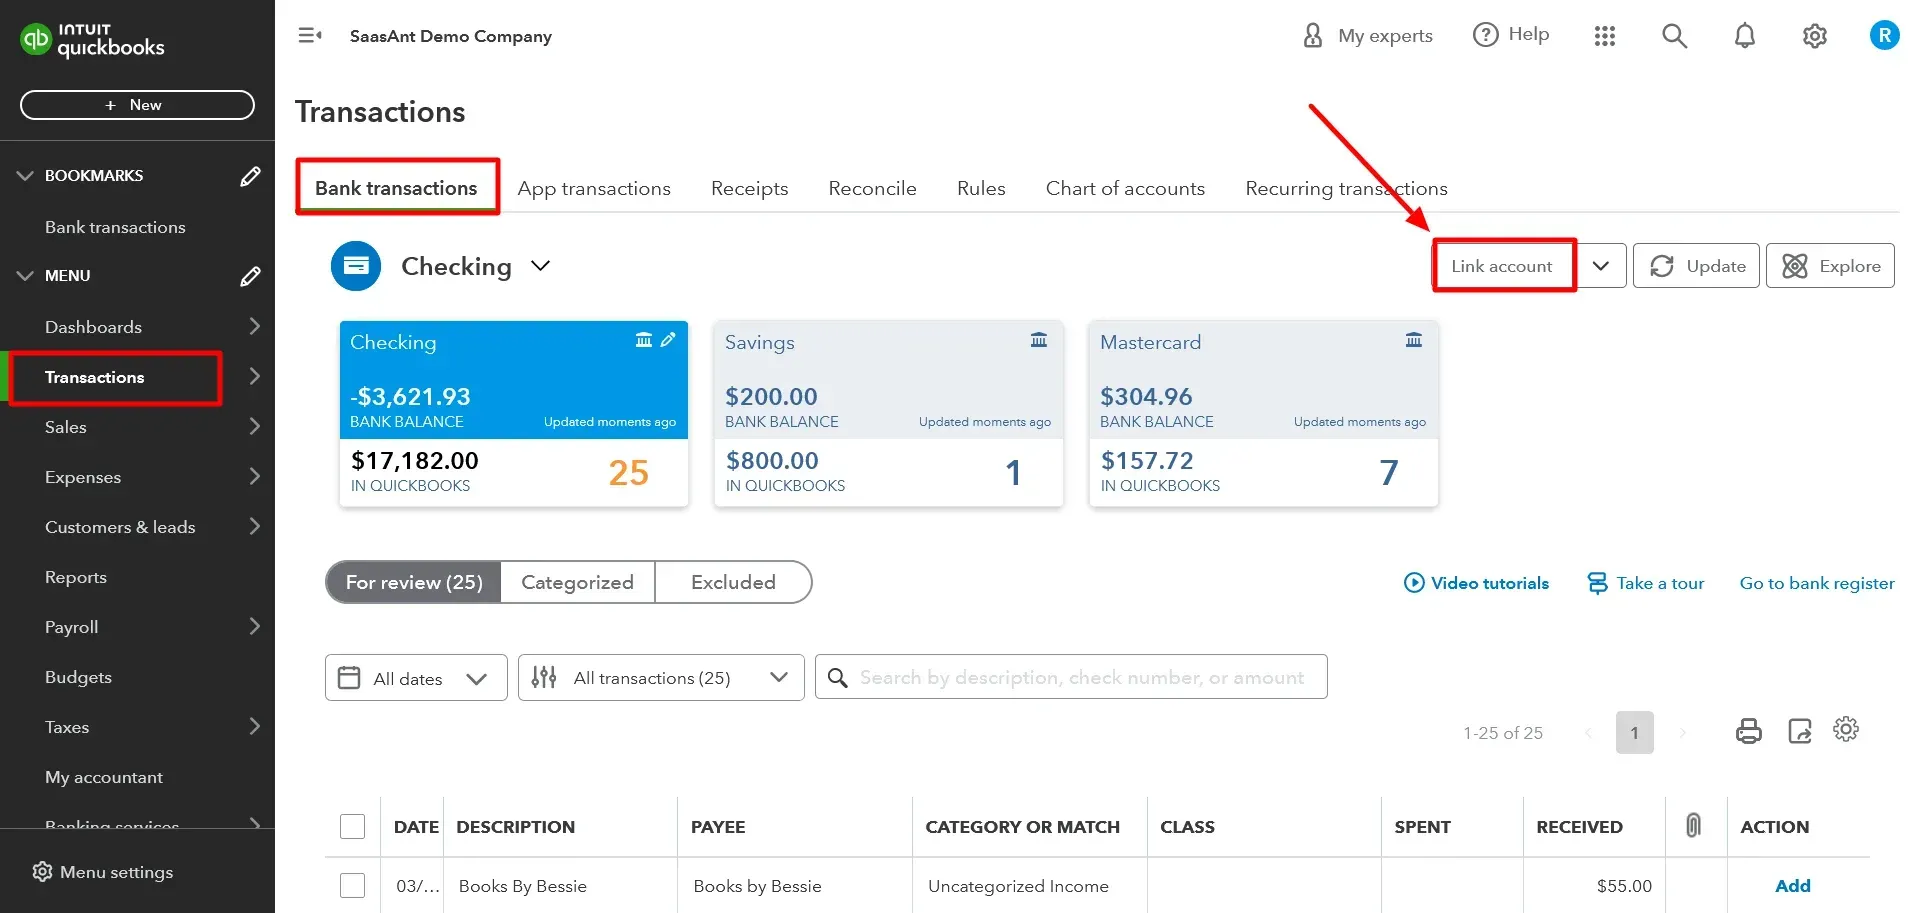
Step 2: Connect Your Bank and Credit Card Accounts
Once you’ve logged in, from the dashboard, select ‘Banking,’ then ‘Link Account,’ and search for your financial institution. Once you find it, enter your online banking login information. QuickBooks will securely connect to your bank account and download transactions.
Step 3: Categorize Your Transactions
QuickBooks will automatically categorize many of your transactions, but you may need to categorize some manually. To learn more about categorizing your transactions, go through the link. Review and categorize your transactions regularly to keep your records up to date.
Step 4: Set Up Your Budget
Setting up a budget in QuickBooks streamlines personal financial management by enhancing expense tracking, facilitating goal setting, enabling future financial planning, and assisting in effective debt management. With real-time updates and customized reports, a QuickBooks budget provides a dynamic and accurate overview of your financial status, promoting informed decision-making and highlighting areas for potential improvement in spending habits.
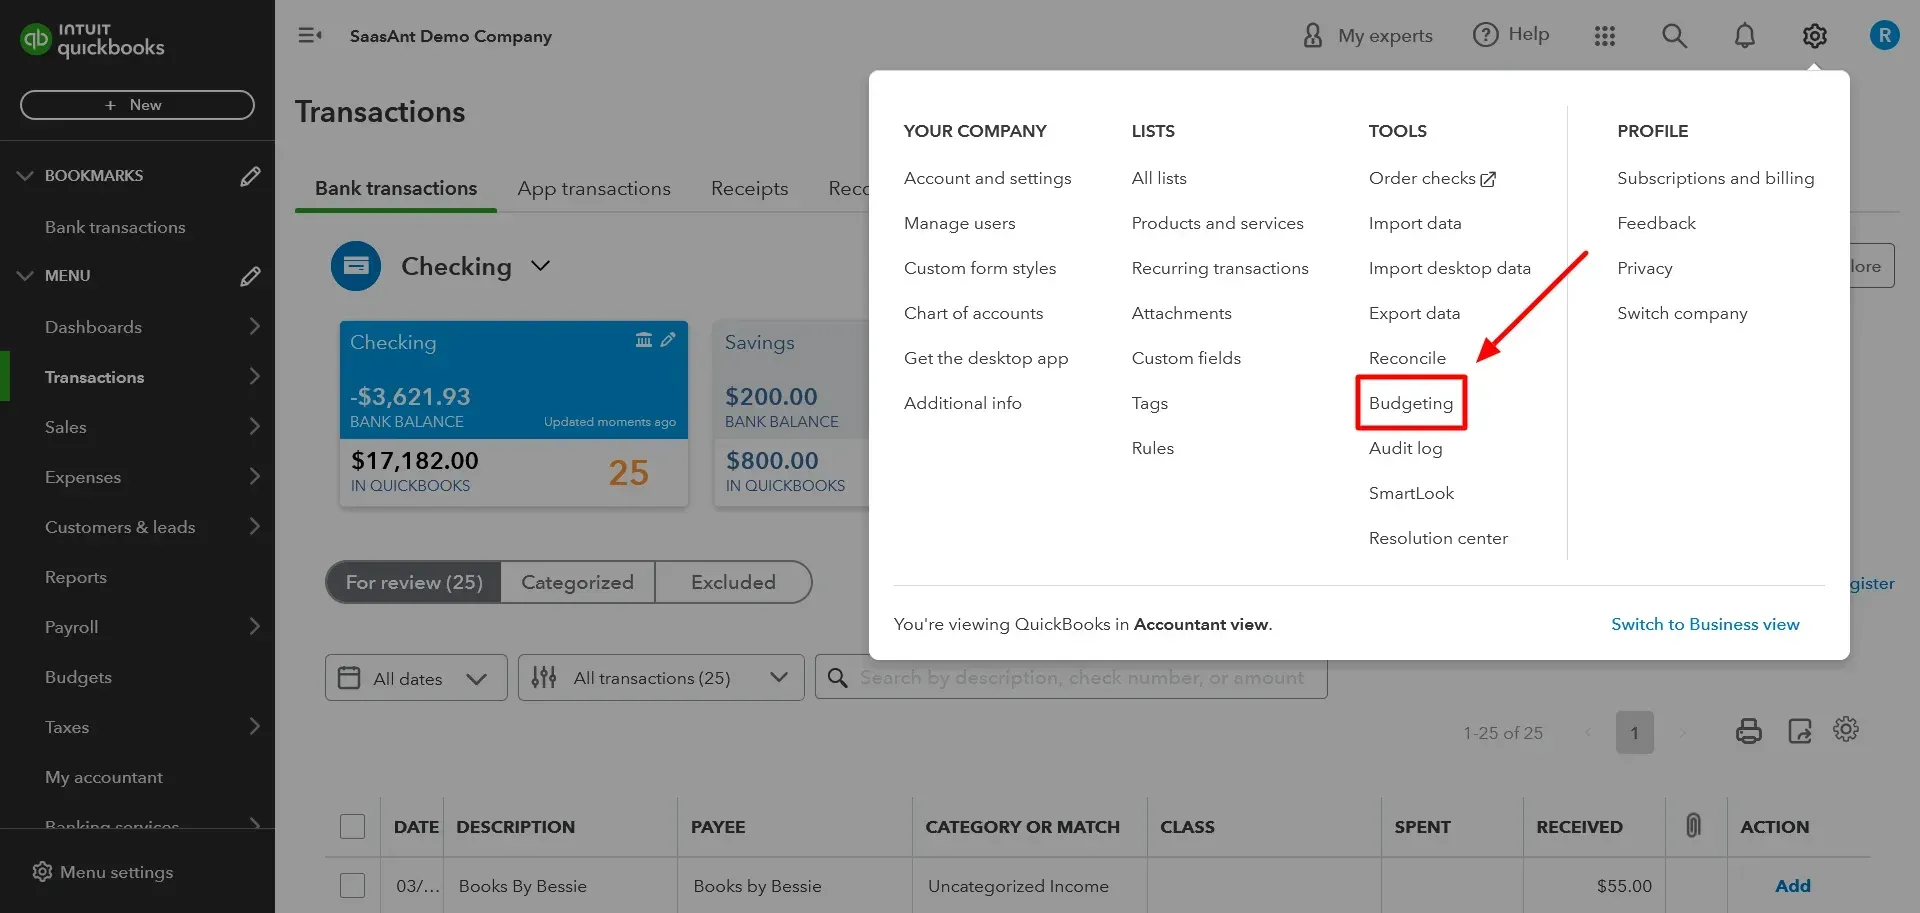
To set up a budget:
Click the ‘Gear’ icon in the upper right corner of your dashboard to navigate to the' Settings' menu. Under the ‘Tools’ section, select ‘Budgeting.’
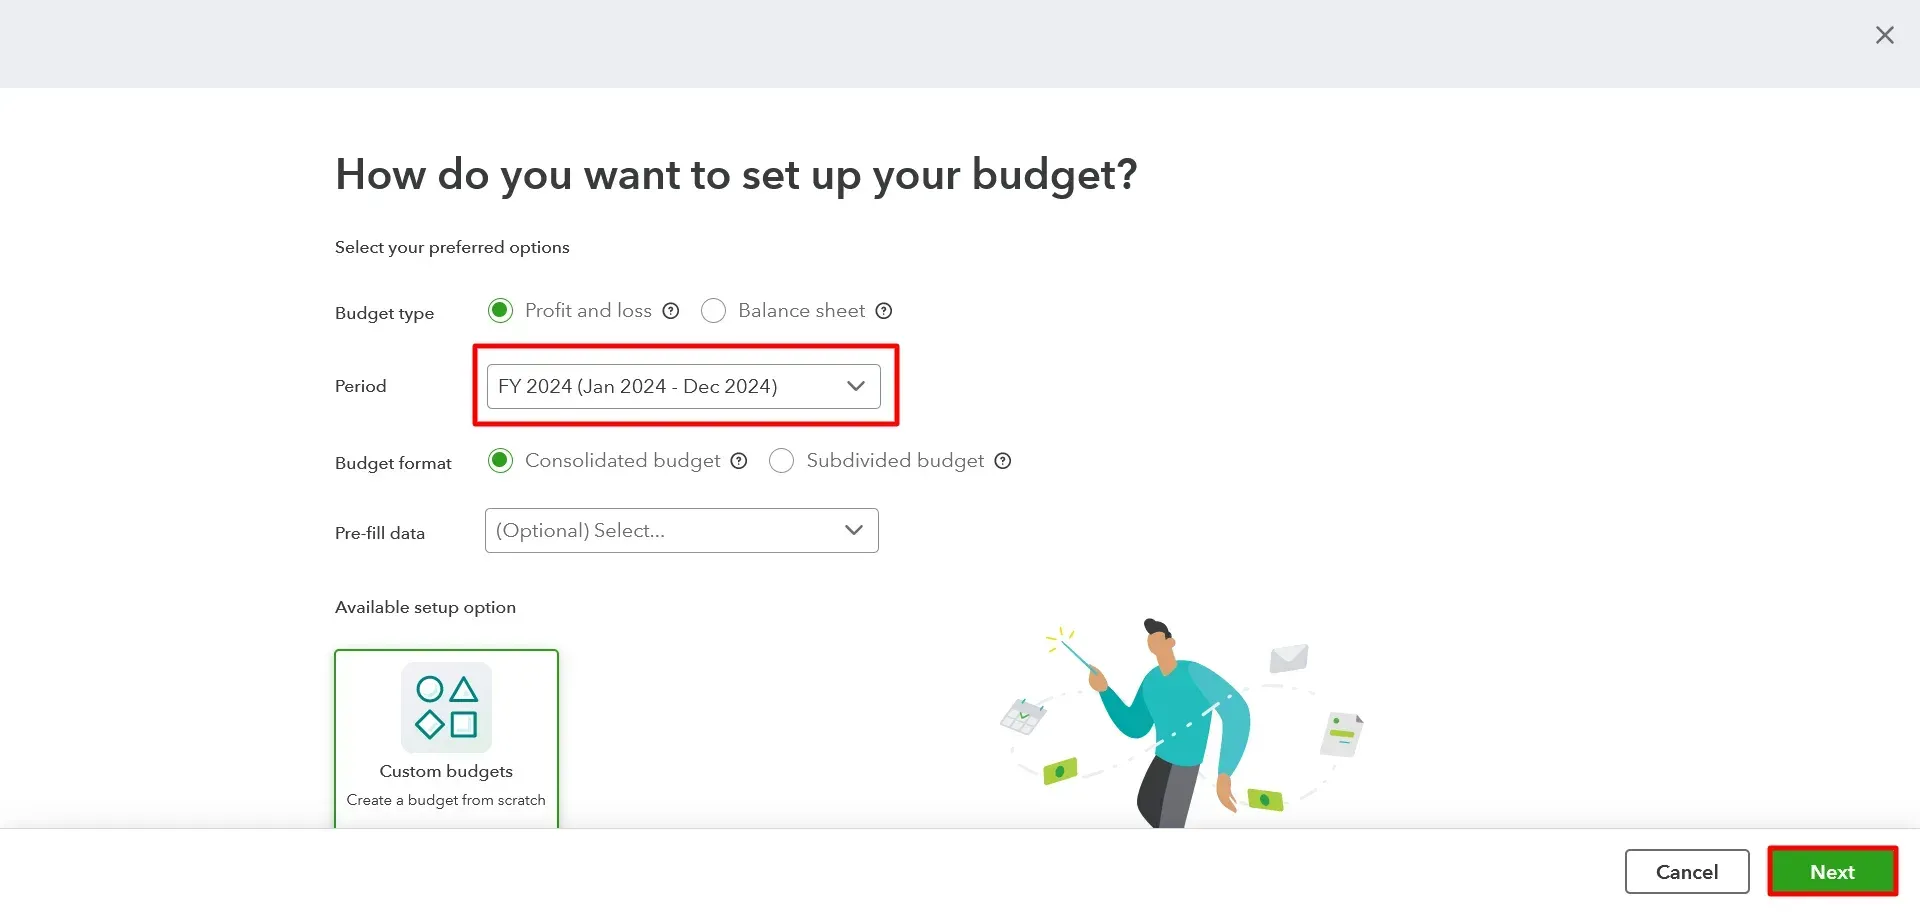
On the Budgeting page, click the 'Create a budget' button. This action will take you to a new page where you can set up your budget.
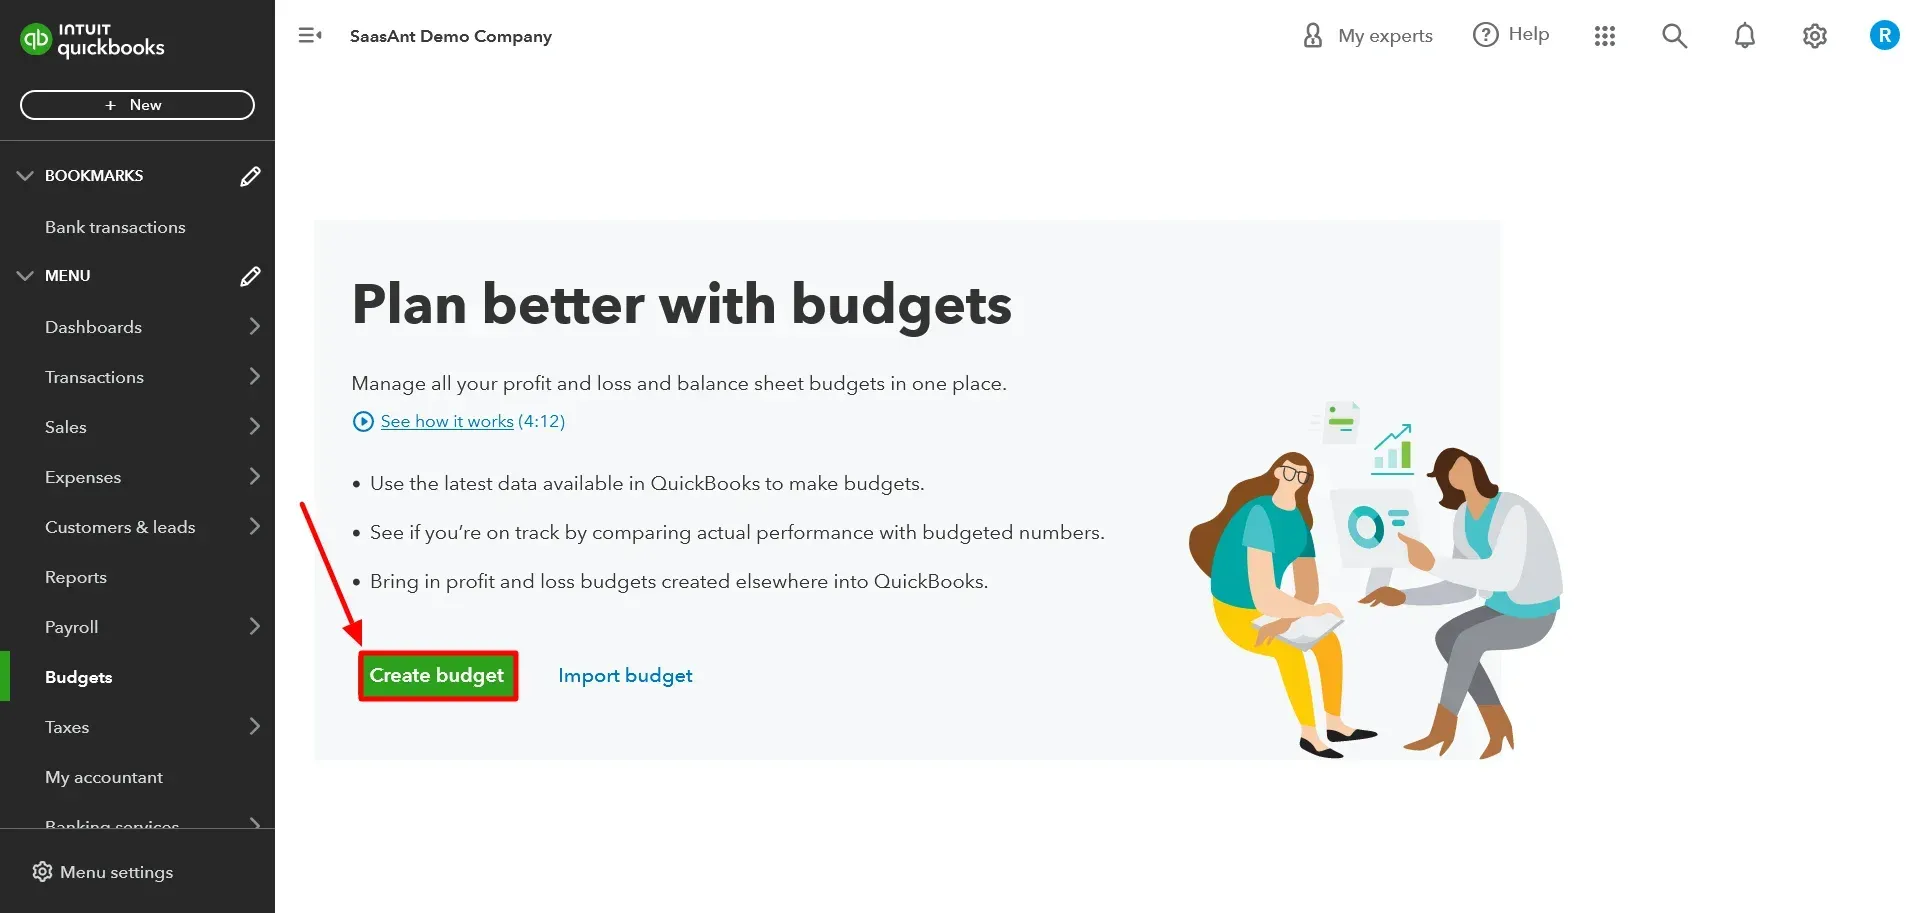
You'll need to name your budget, select the financial year for the budget, and define the interval (monthly, quarterly, or yearly). You can also choose whether to pre-fill data from the previous year to help you set your budget.
Upon successfully setting up your budget, you will be presented with a detailed table delineating your budget across various income and expense categories.
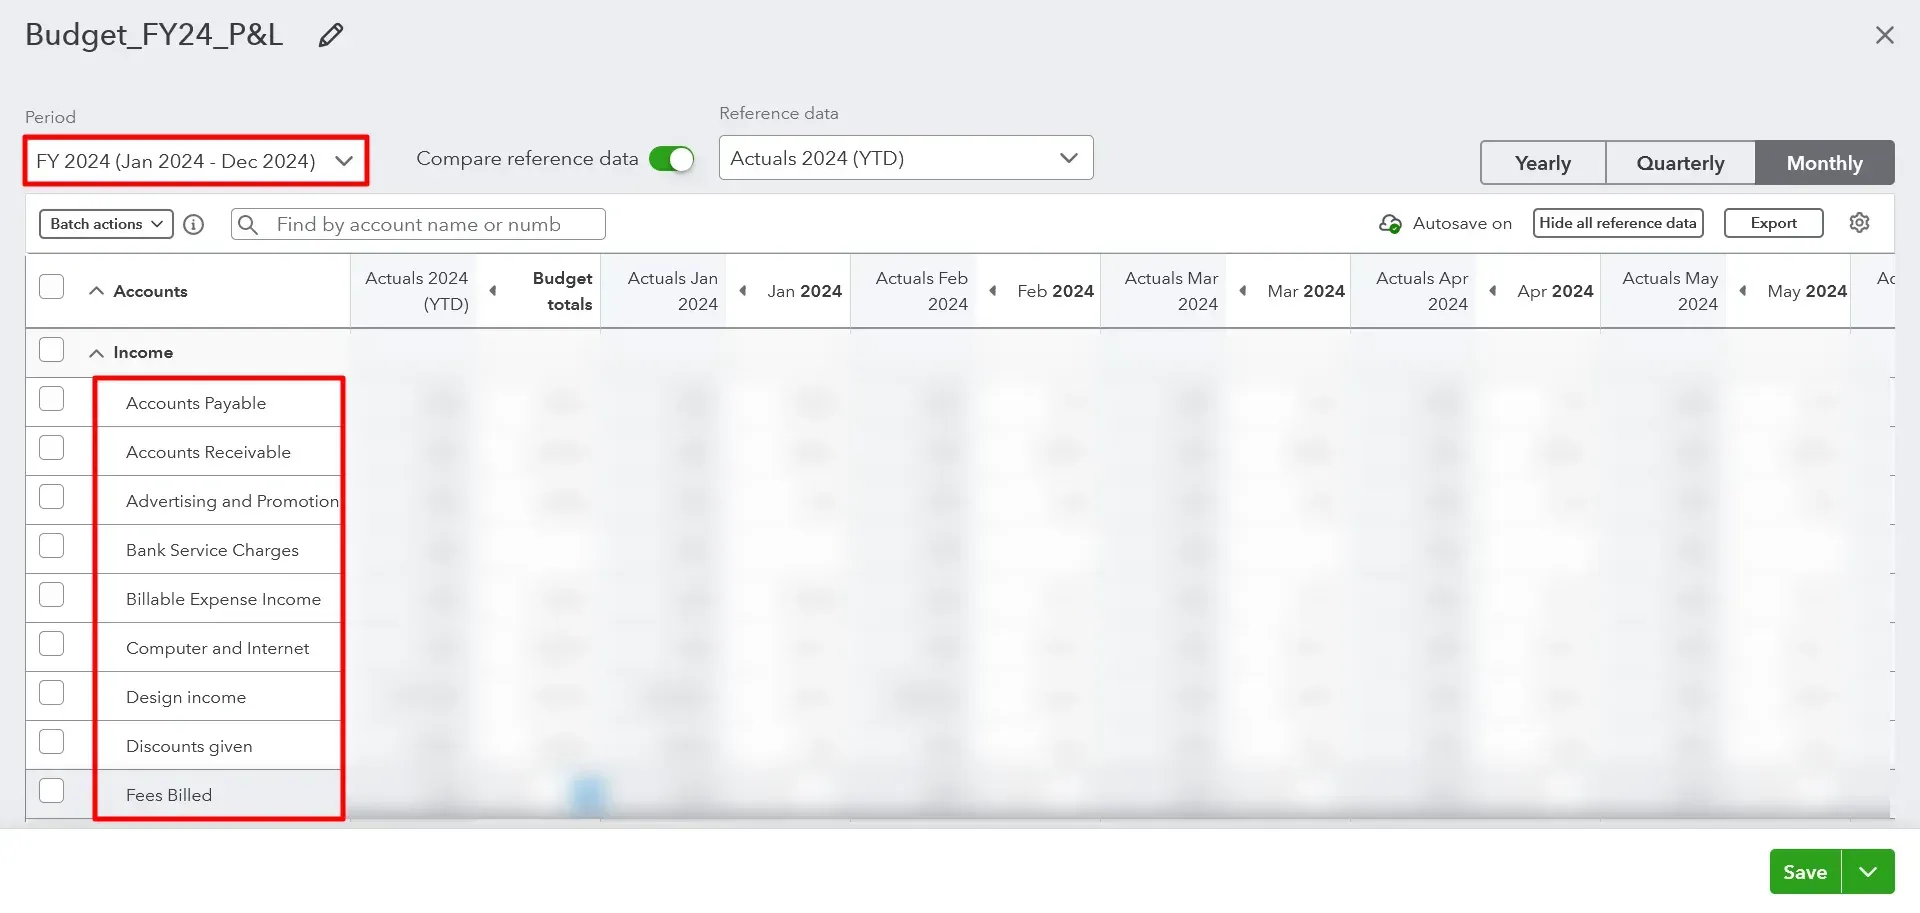
In this table, you must fill in the budgeted amount for each period on each line. It's essential to consider any anticipated variances throughout the year, such as seasonal changes that might impact your income or expenses.
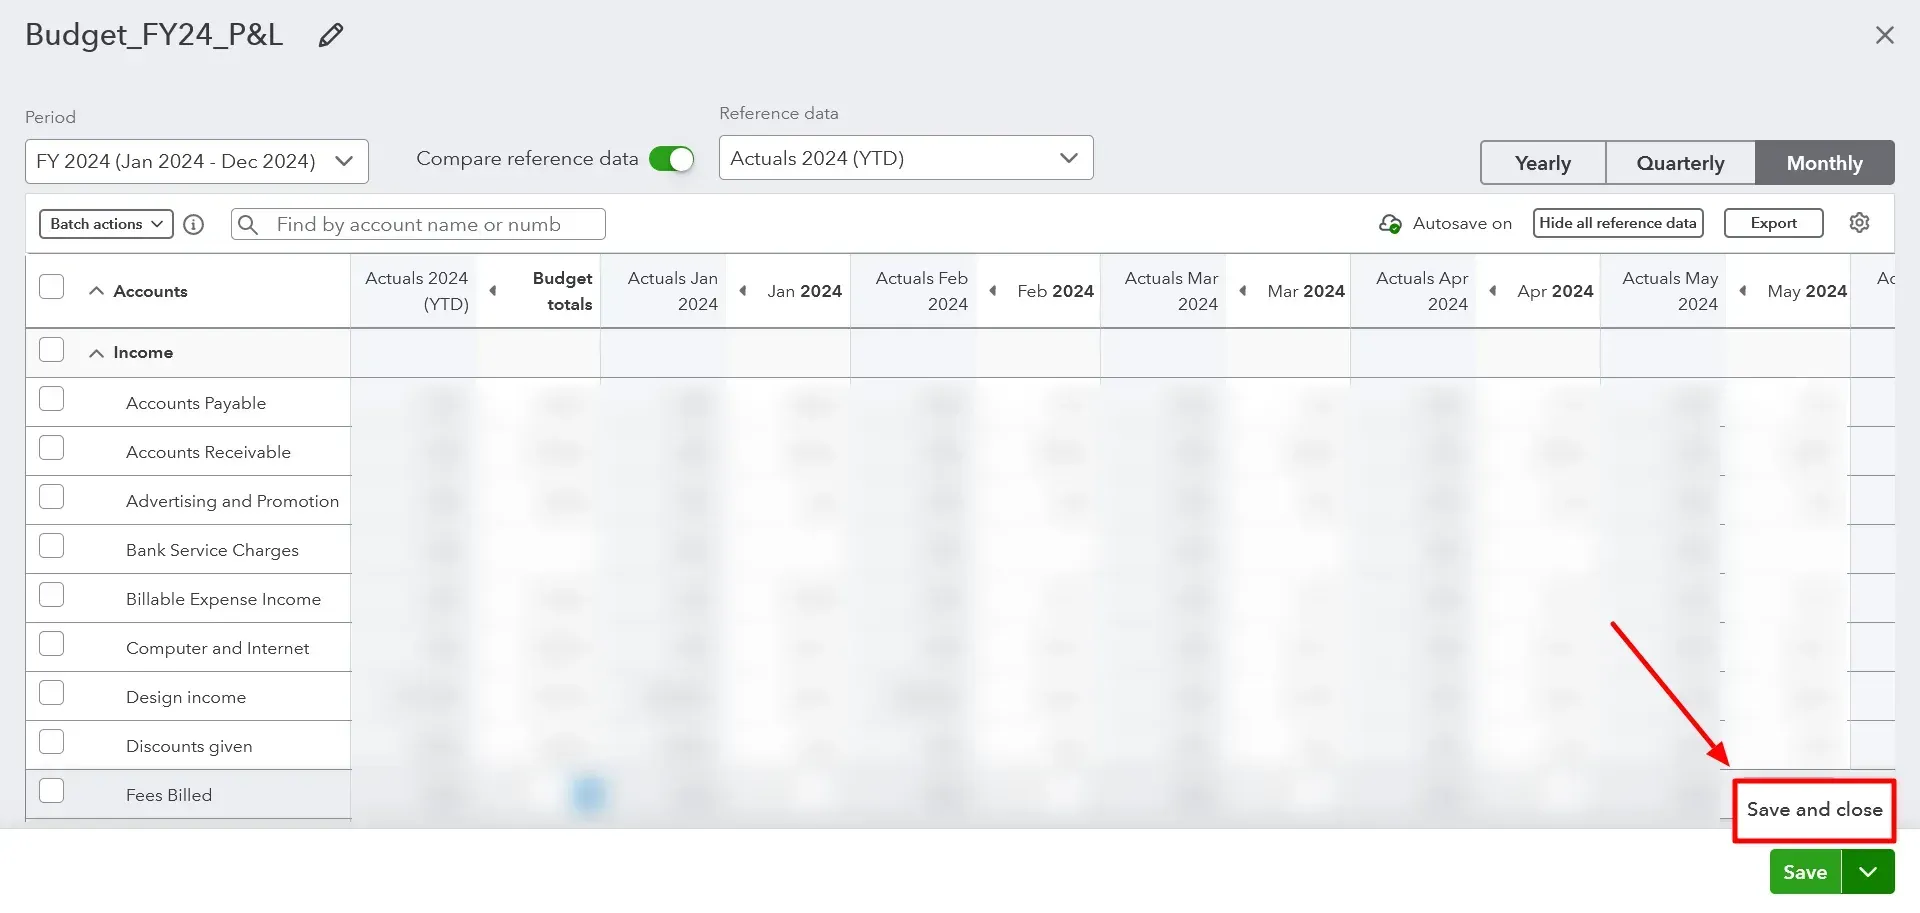
Enter your budget amounts, then click ‘Save and close’ at the bottom of the page. QuickBooks will now save your budget.
You can now review your budget anytime by navigating to the 'Budgeting' section under 'Settings.' You can also edit or copy your budget here.
Step 5: Track Your Finances
While traditionally used for small business accounting, QuickBooks can also be a robust personal finance management tool. It can help you track income and expenses, categorize transactions, create budgets, and generate financial reports.
Setting up QuickBooks for Personal Use
QuickBooks allows you to create a new company file to manage your finances. This action ensures your transactions are distinct from your business finances.
Manually Enter an Income or Expense
To manually enter:
Click the ‘Create’ (+) icon at the top of the QuickBooks Online dashboard
For income, select ‘Sales Receipt’ or ‘Deposit.’
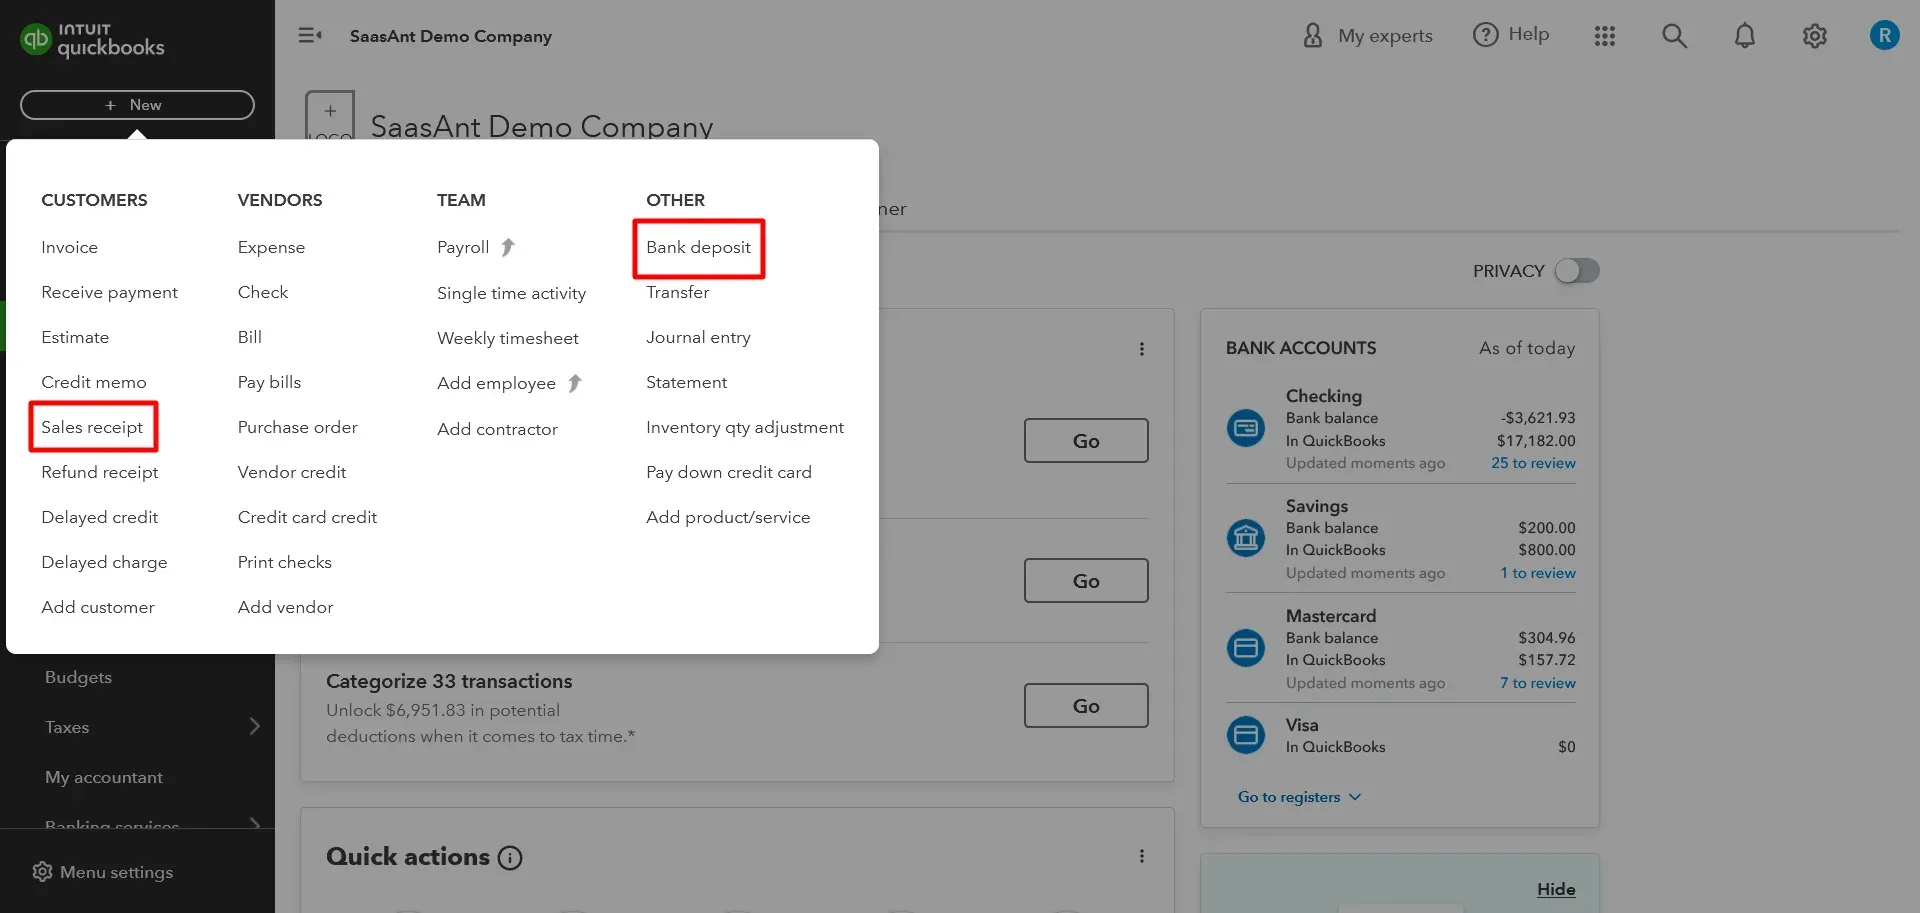
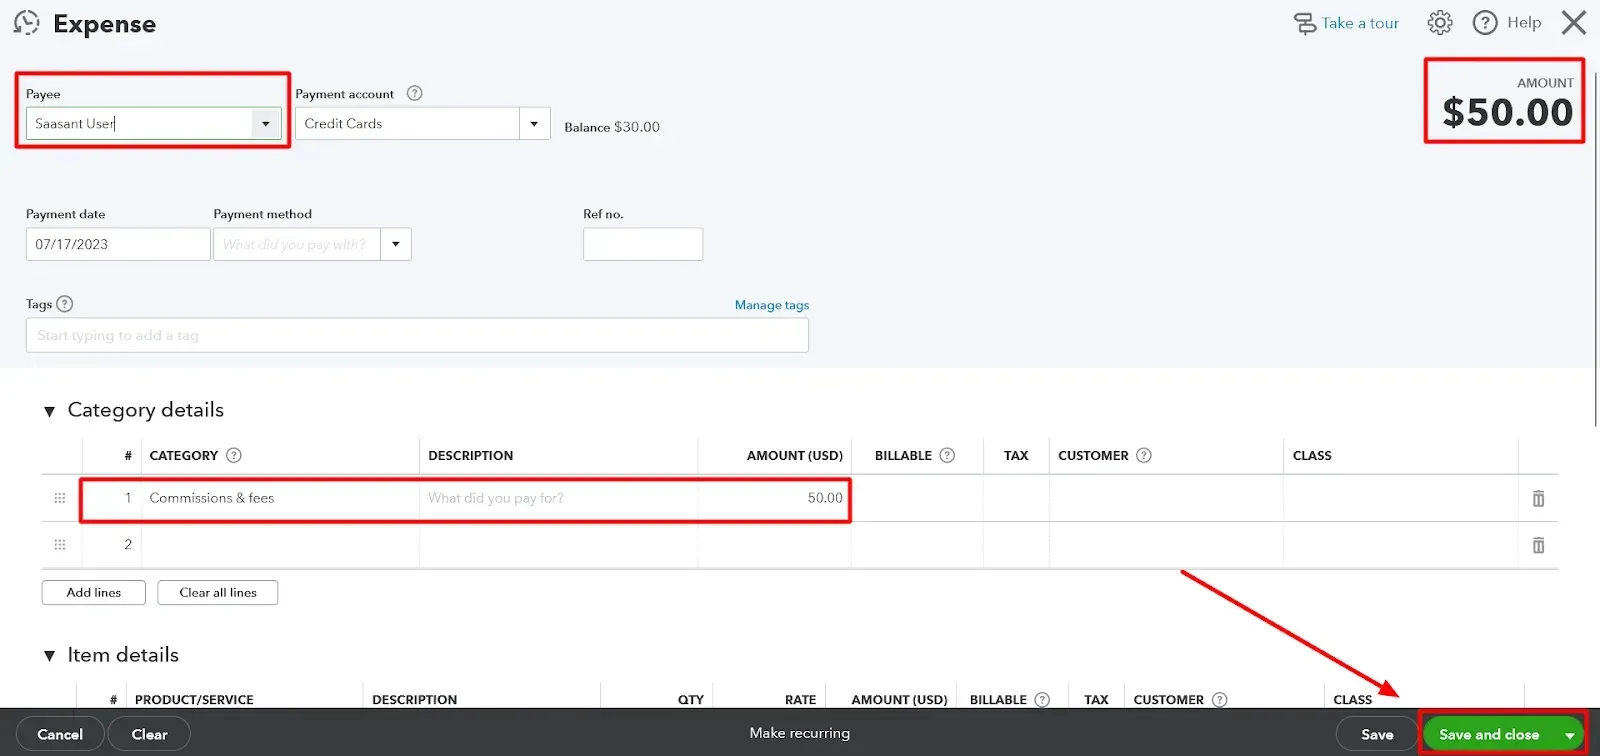
For expenses, select ‘Expense.’

Fill in the necessary details, including the source (for income)
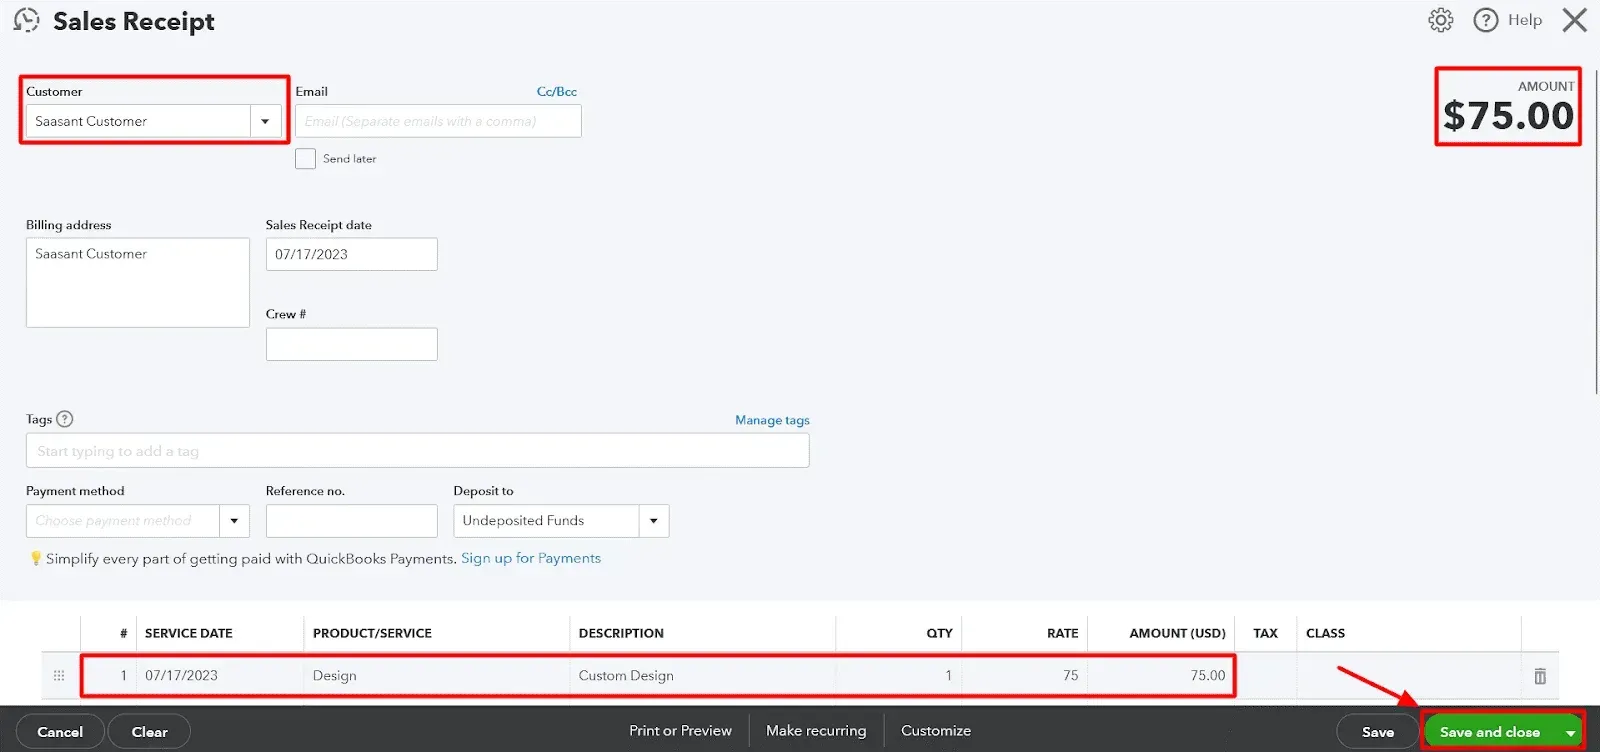
Payee (for expenses), the account, date, and amount
In the category details section, select the relevant category
Click ‘Save and close.’
Step 6: Track and Monitor Debt
QuickBooks can be a powerful tool for managing your debts. Set up your loans and credit cards in QuickBooks and regularly reconcile your balances. Managing loans and credit cards in QuickBooks Online for personal finance involves setting up and recording transactions for your liabilities. This setup will allow you to keep track of your debt and payments, ensuring your personal financial information is up-to-date.
Setting up Loans
Step 1: Set up a Liability Account
Click the ‘Gear’ icon in the upper right corner, then select ‘Chart of Accounts.’
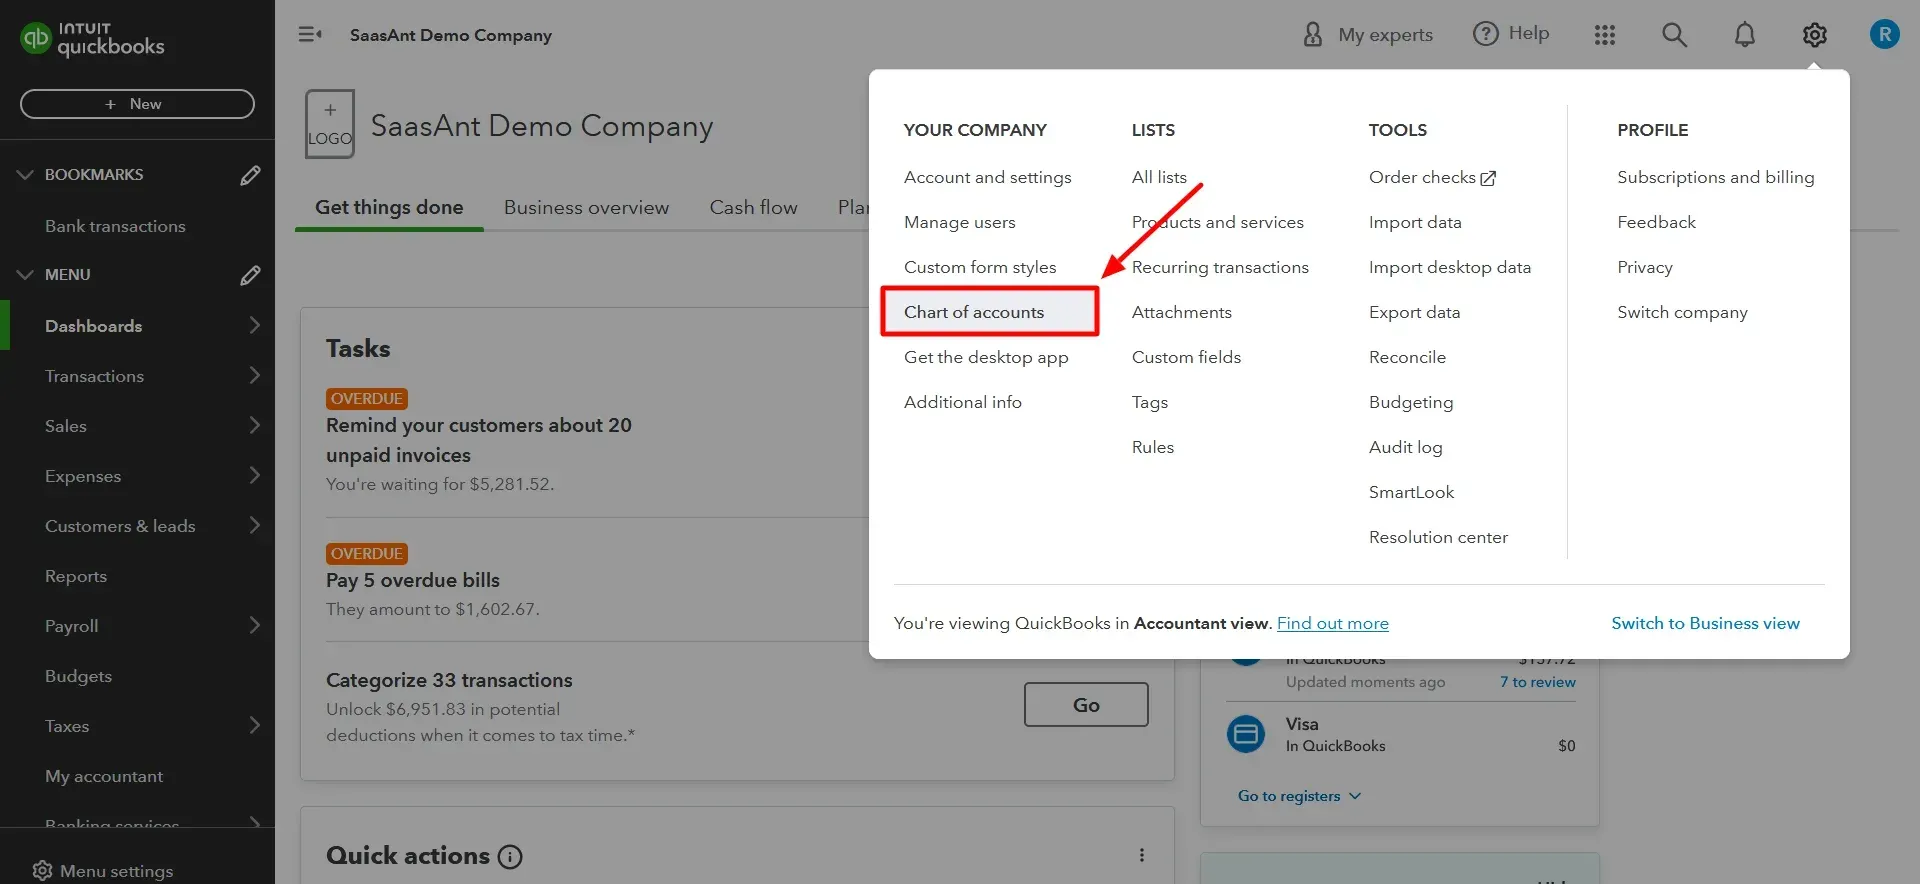
Click ' New ' in the Chart of Accounts to create a new account.

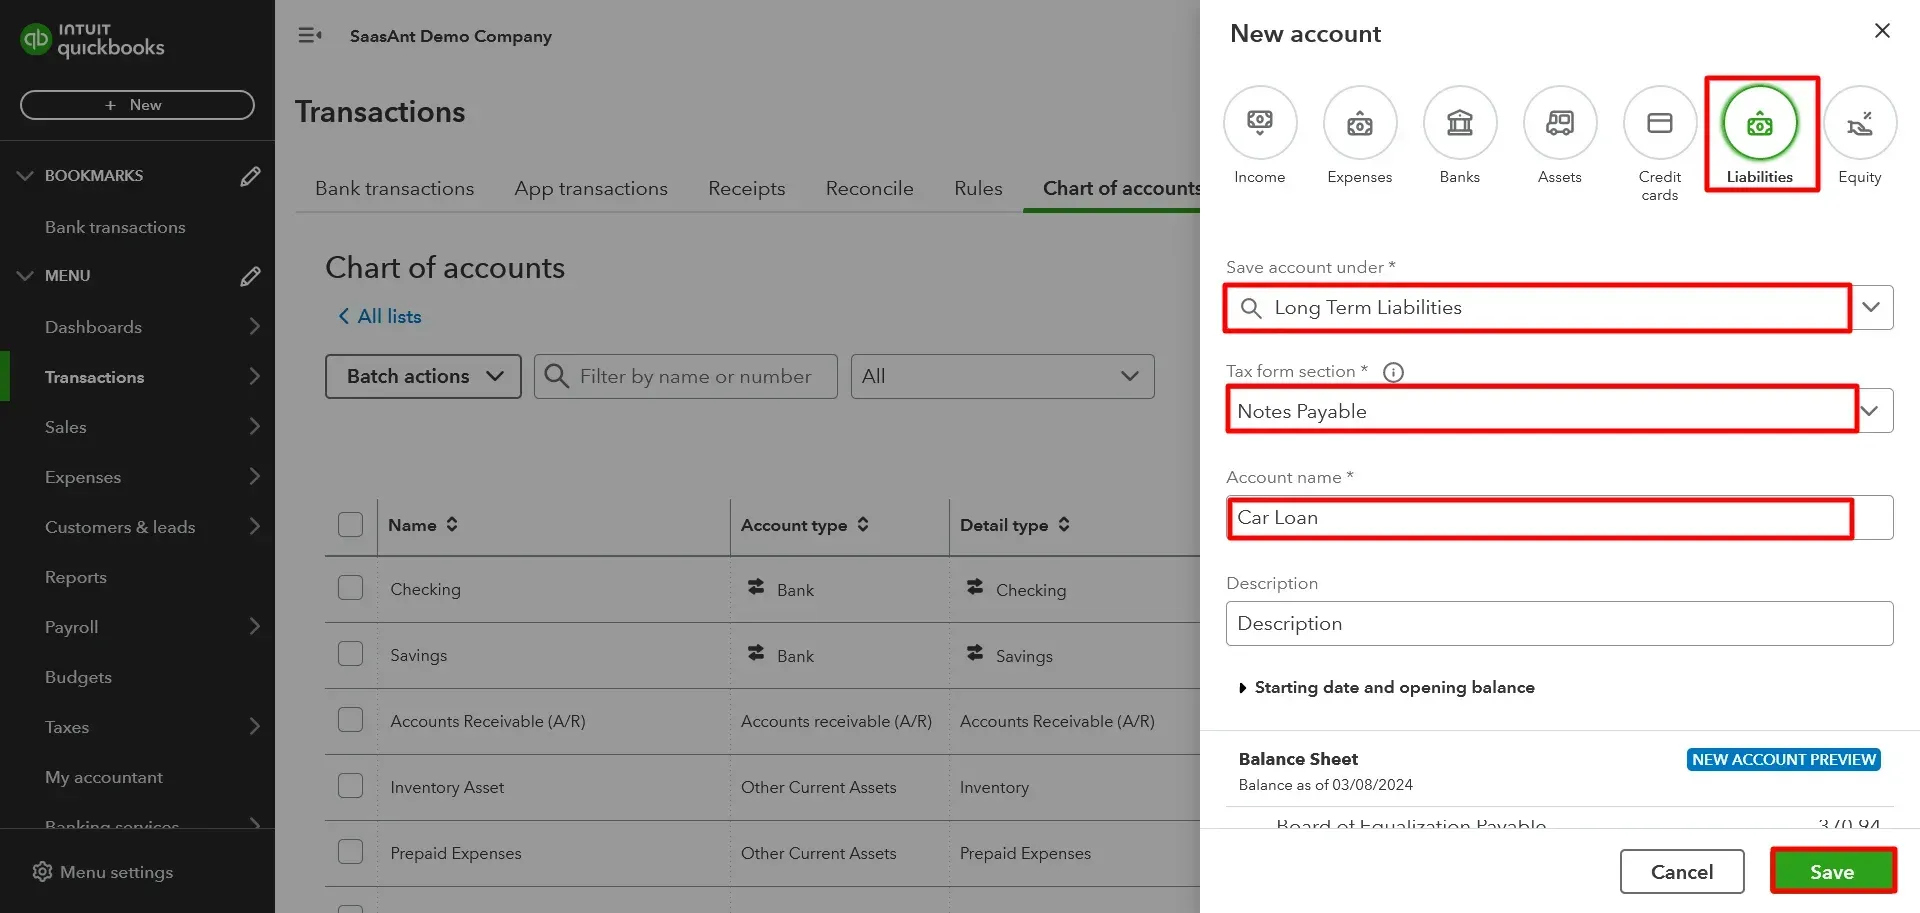
For ‘Account Type,’ select either ‘Long-term Liabilities’ (for loans to be paid off over a year) or ‘Short-term Liabilities’ (for loans to be paid off within a year)
For ‘Detail Type,’ select ‘Notes Payable’ or another appropriate type
Name something relevant to the account, like ‘Car Loan’ or ‘Personal Loan.’
Click ‘Save and Close’
Step 2: Record the Loan
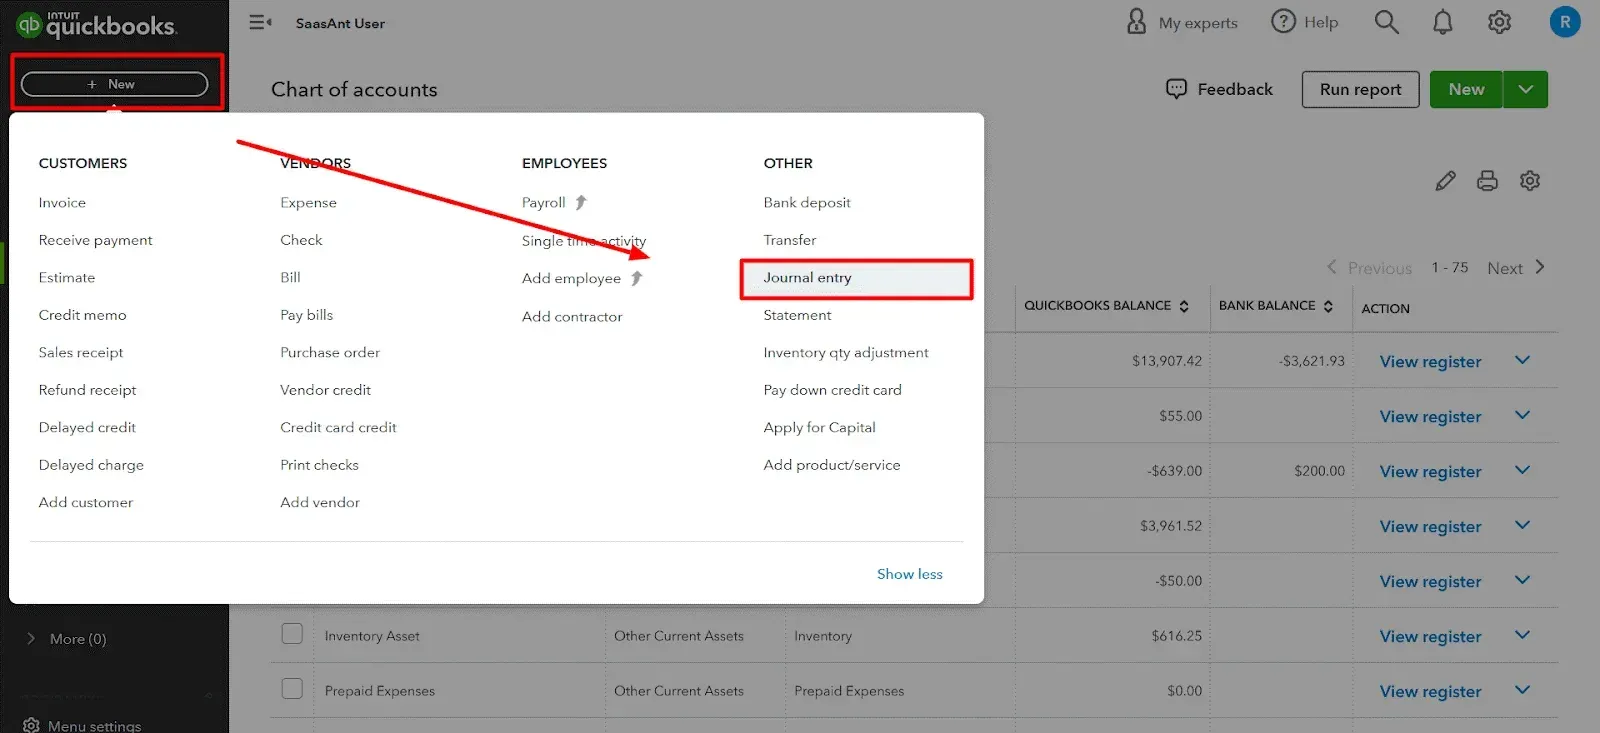
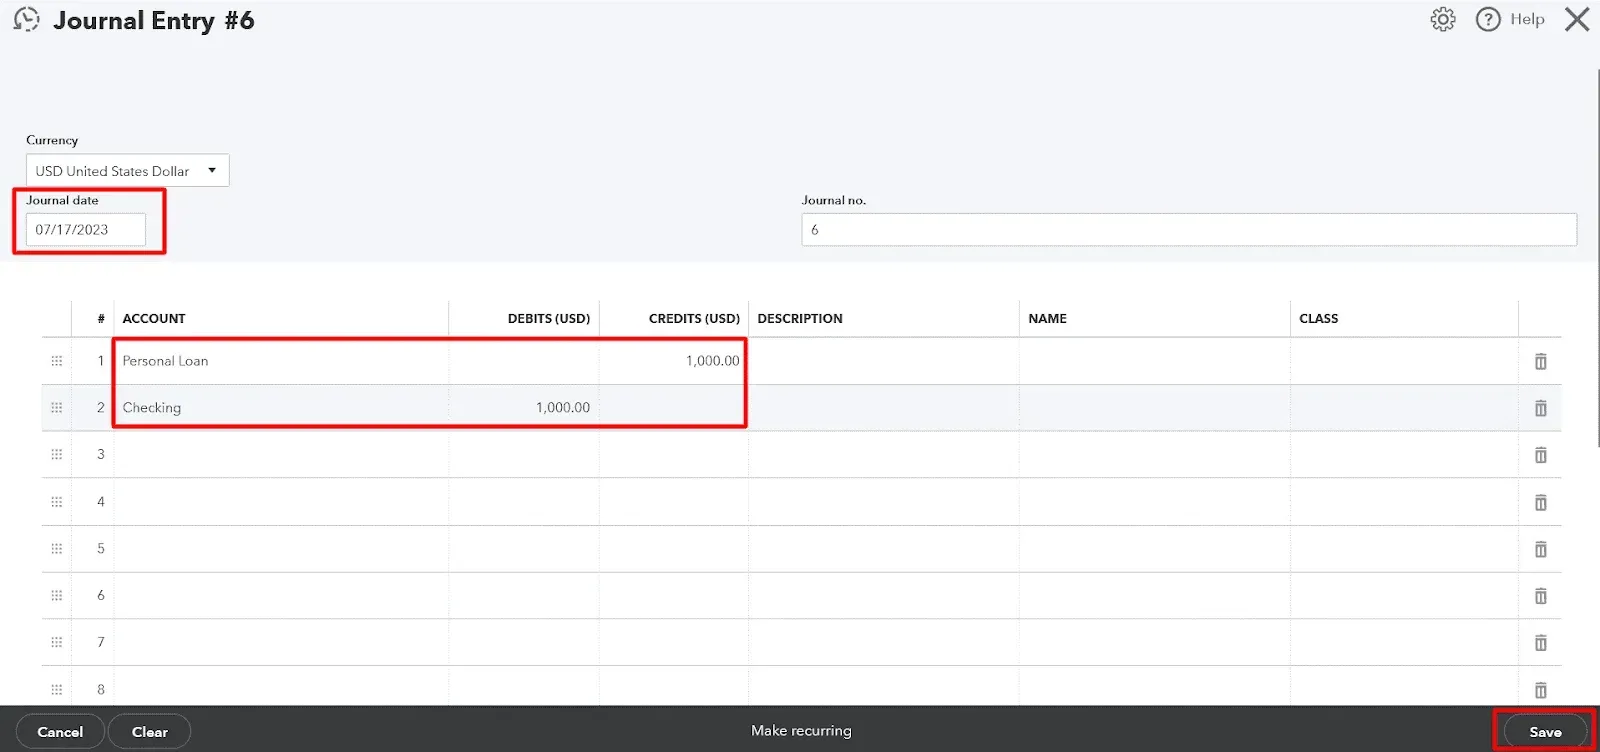
Click the ‘Create’ (+) icon, then choose ‘Journal Entry.’
Enter the date you received the loan.
On the first line, select the liability account you created from the ‘Account’ drop-down.
In the ‘Credits’ field, enter the loan amount.
On the second line, select the account into which you deposited the loan funds from the ‘Account’ drop-down.
In the ‘Debits’ field, enter the same loan amount
Click ‘Save and Close’
Setting up Credit Cards
Step 1: Set up a Credit Card Account
Click the ‘Gear’ icon in the upper right corner, then select ‘Chart of Accounts.
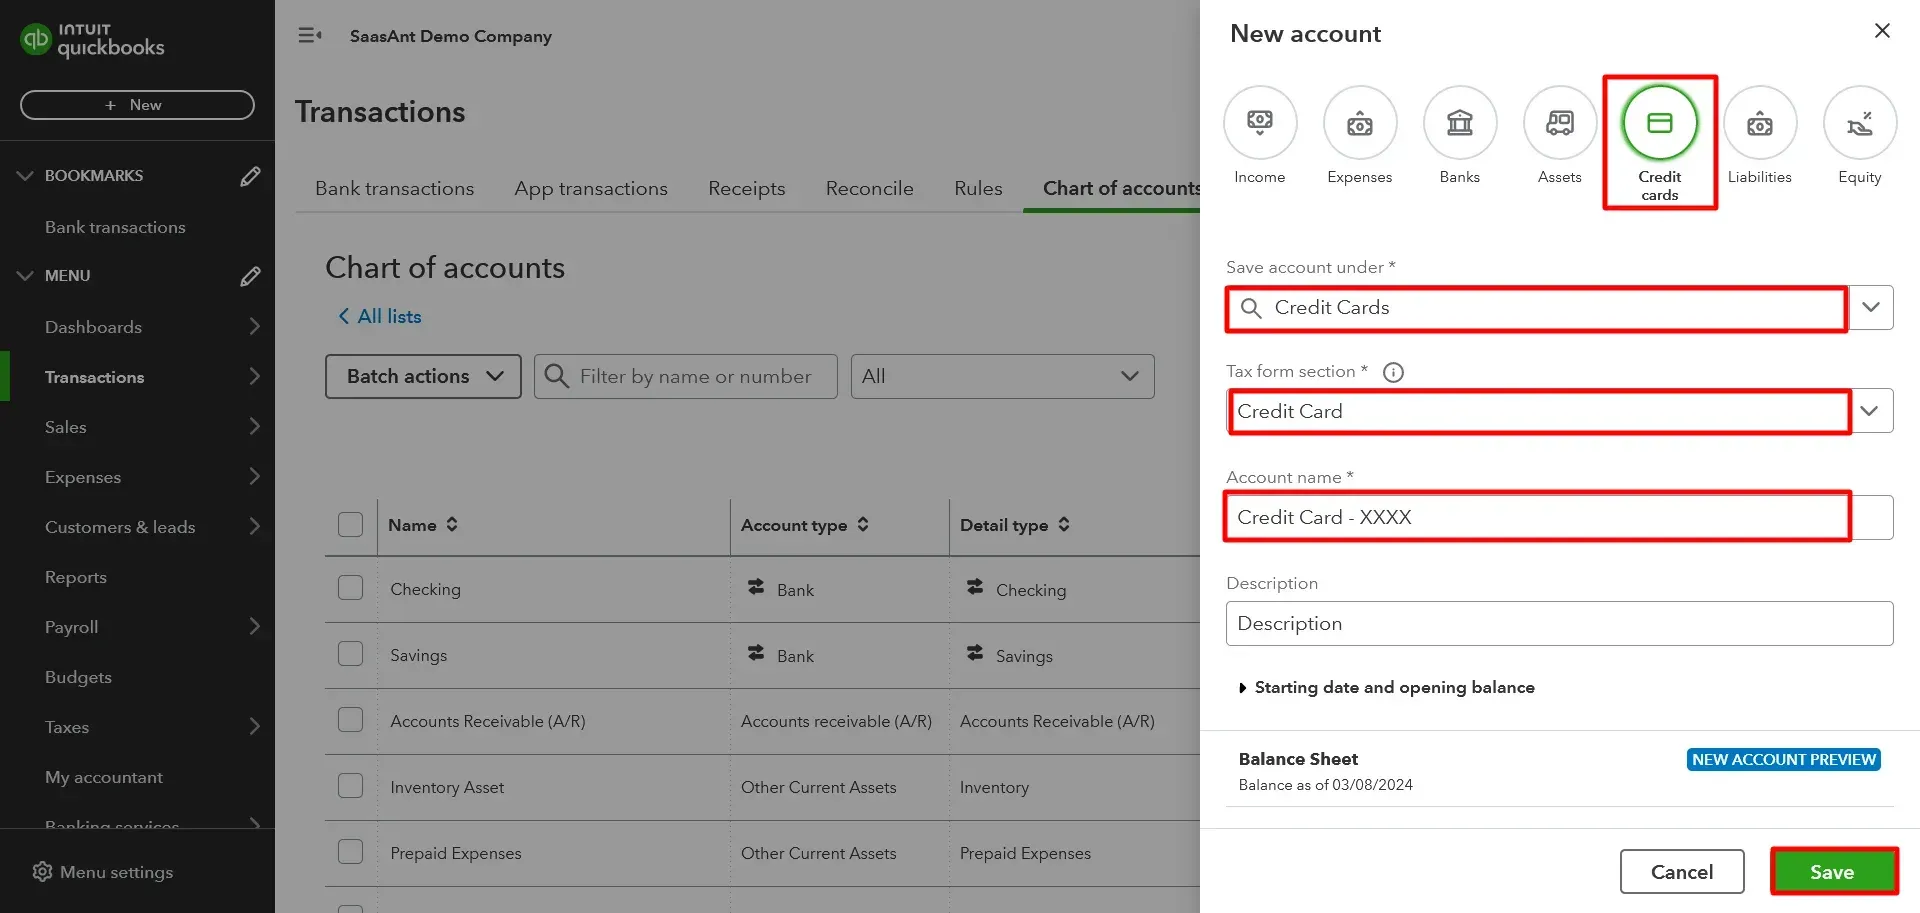
Click ' New ' in the Chart of Accounts to create a new account.
For ‘Account Type,’ select ‘Credit Card.’
Name the account in a way that identifies the card, such as ‘Credit Card Name.’
Click ‘Save and Close’
Step 2: Record Credit Card Transactions
You can link your credit card to import transactions or automatically add transactions.
To Link Your Credit Card:
Navigate to the ‘Banking’ tab, then click ‘Link Account’ or ‘Add Account.’

Follow the prompts to connect your credit card account
Once connected, your transactions will automatically be imported and categorized
To Manually Add Transactions:
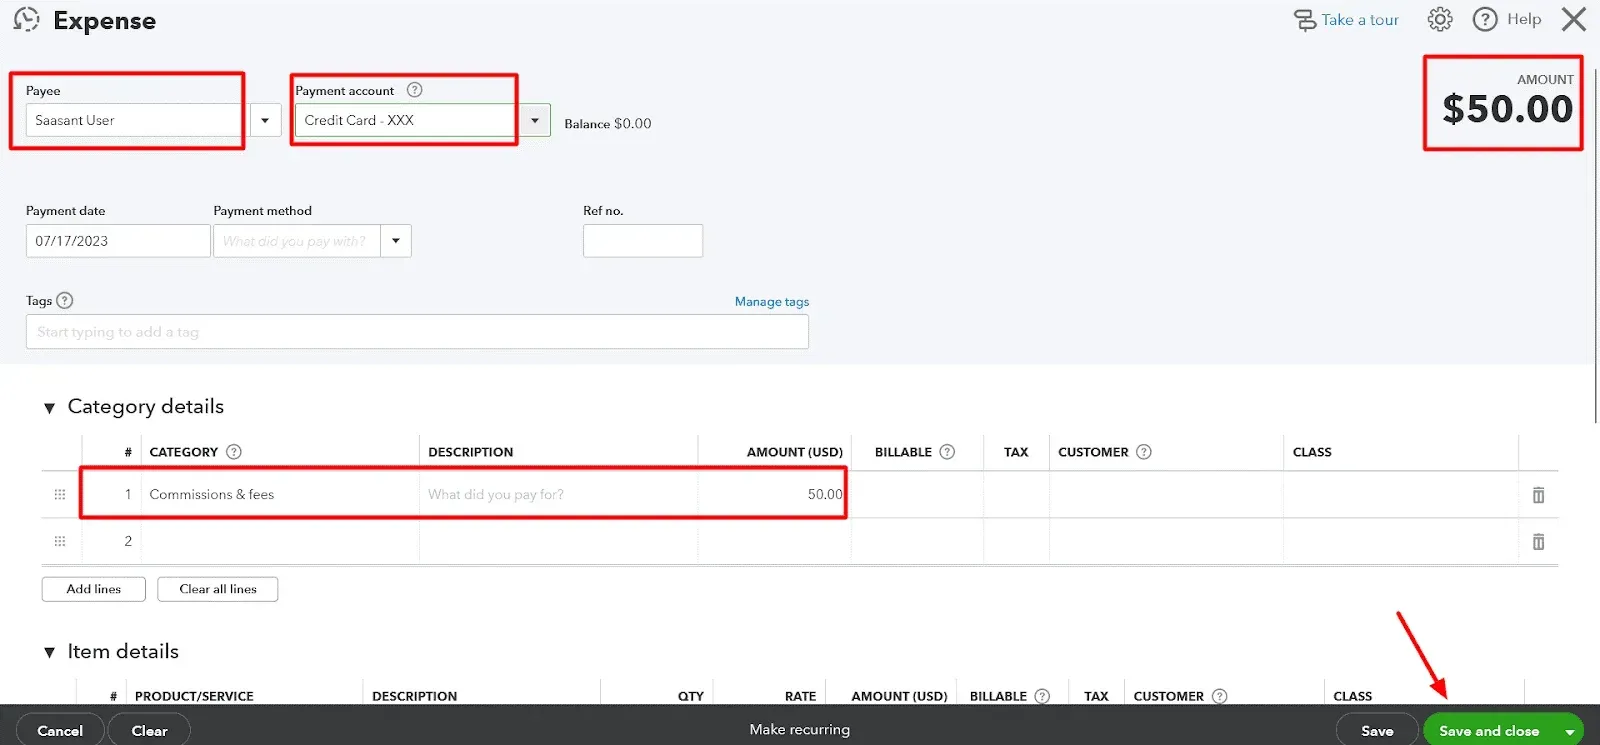
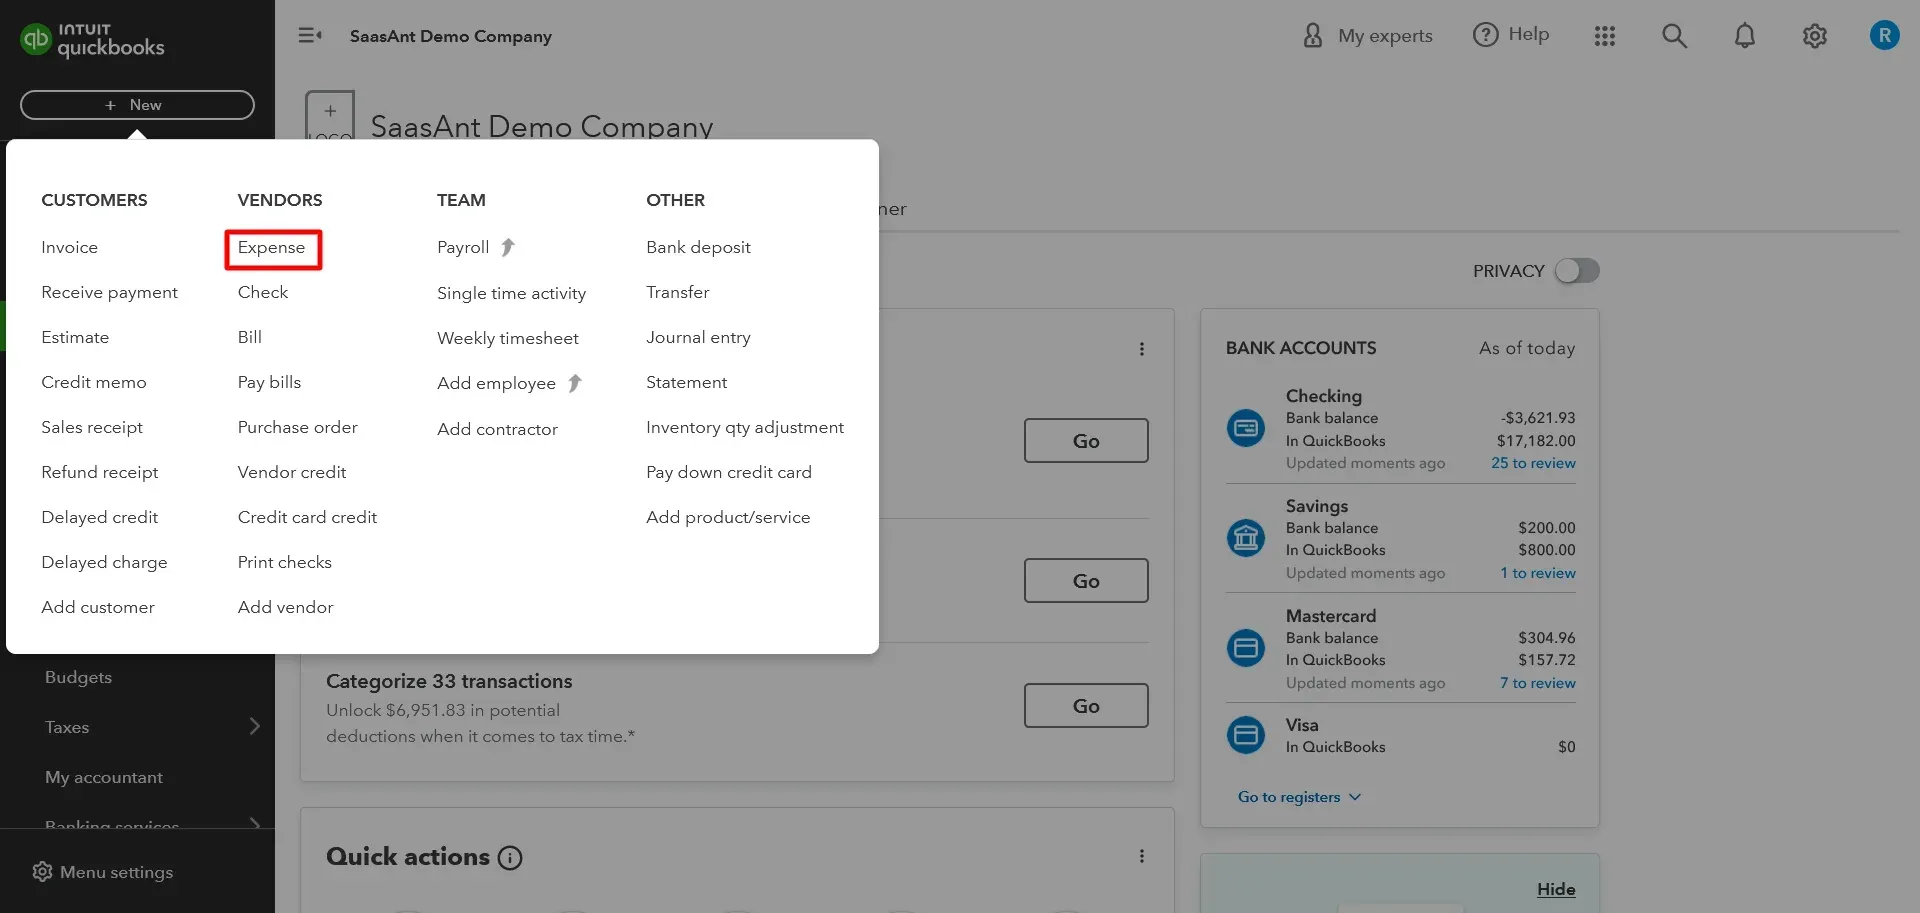
Click the ‘Create’ (+) icon, then choose ‘Expense.’
Select your credit card account from the 'Bank/Credit account' dropdown
Fill out the necessary information, including the date, vendor, and amount
Click ‘Save and Close.’
Tracking your debts allows you to monitor payment progress and identify saving opportunities on interest charges. QuickBooks can provide insights into the outstanding balance, interest rates, and repayment terms, empowering you to make strategic decisions to eliminate your debts faster.
Step 7: Generate and Run Reports
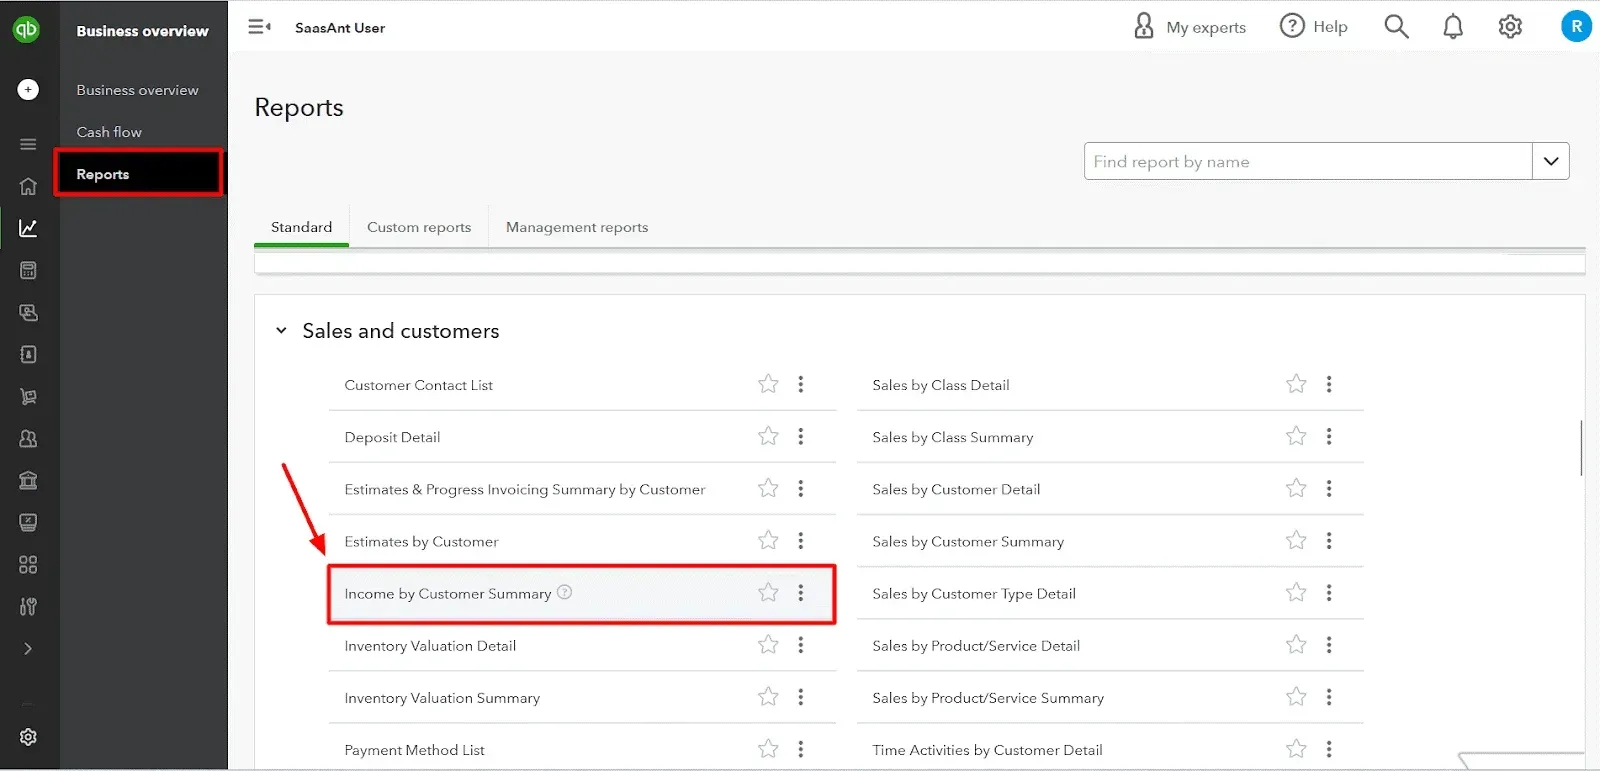
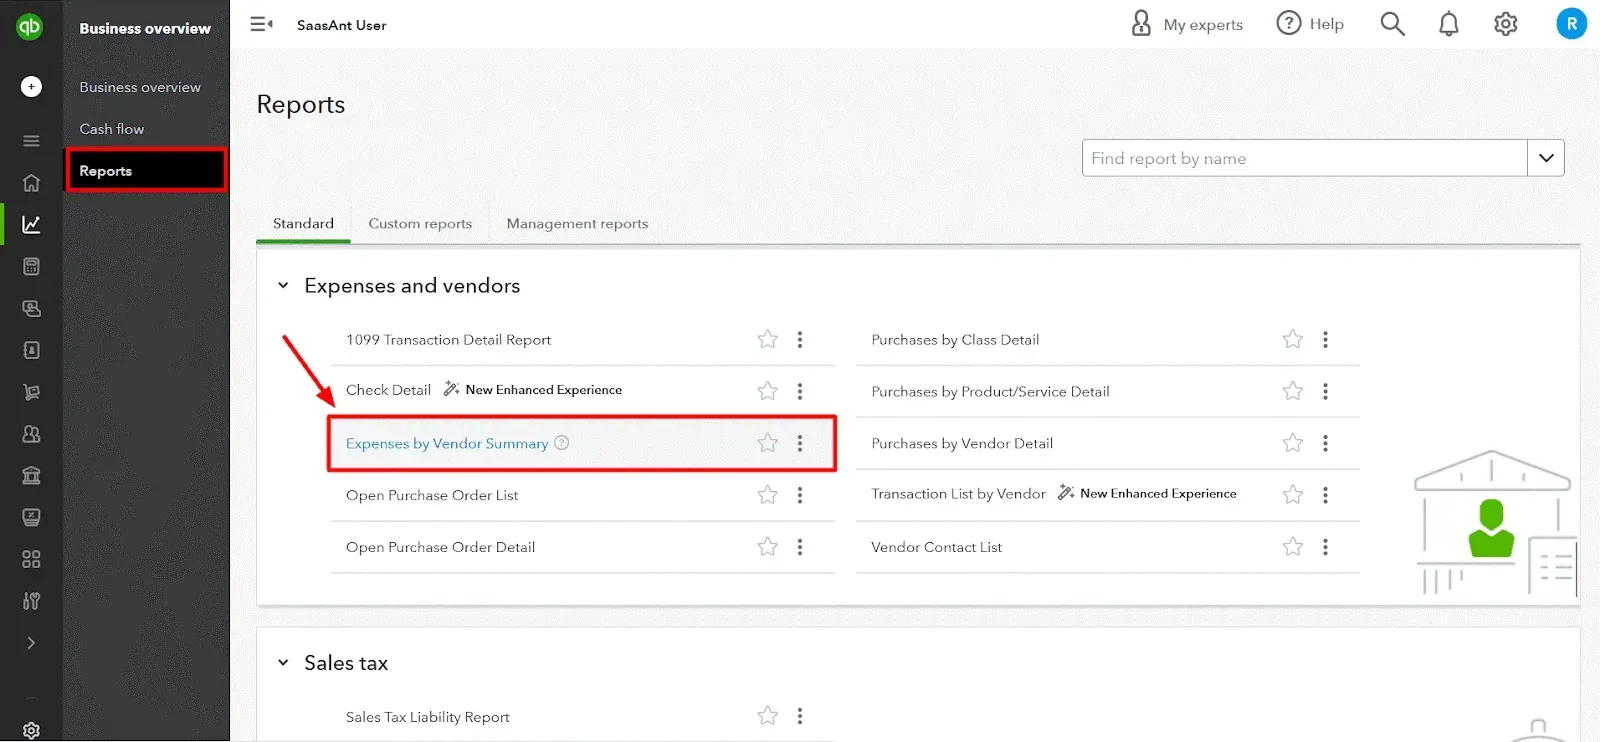
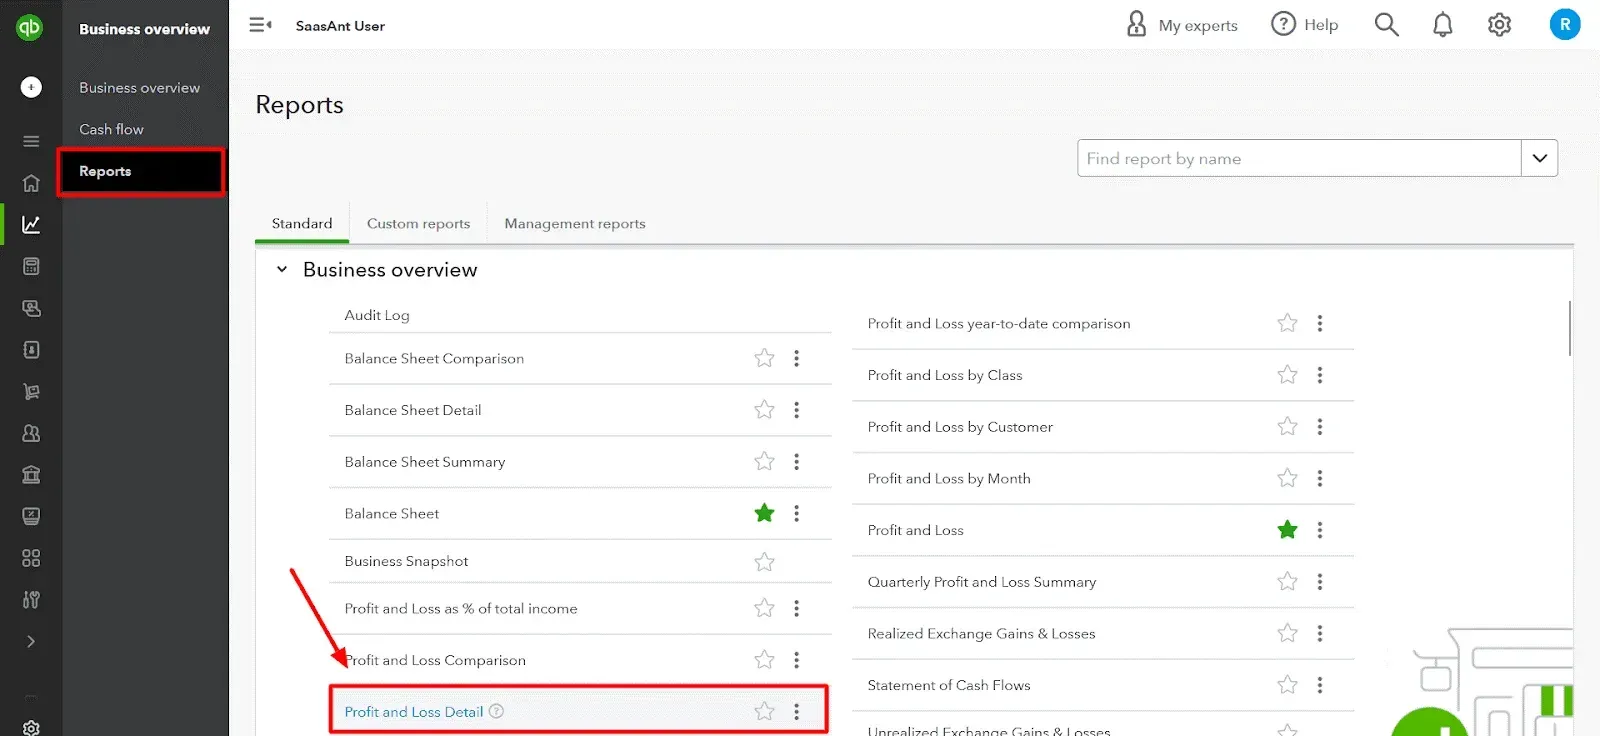
QuickBooks can generate detailed financial reports to give insights into your financial health. You can use 'Income by Customer Summary' to track income sources, 'Expenses by Vendor Summary' for expenses, and 'Profit and Loss' to view your overall financial status.
To generate these reports:
Select ‘Reports’ from the dashboard
Choose the report you want to view, then customize the date range and other details.
Utilize these reports to gain a comprehensive understanding of your financial situation. This step will help you identify areas where you may need to spend more or where you can increase your income.
Additional reports like the balance sheet, cash flow statement, and tax summary offer a comprehensive perspective on your financial well-being. Regularly review these reports to monitor your progress, identify trends, and make informed financial decisions.
Step 8: Collaborate with Your Accountant
If you work with an accountant or financial advisor, QuickBooks simplifies collaboration by providing easy access to your financial data. Invite your accountant to your QuickBooks account, allowing them to review your finances, provide guidance, and generate reports.
FAQs
Can QuickBooks Be Used for Personal Finance Management?
While traditionally used for business accounting, QuickBooks can also be a personal finance management tool. It allows you to track income and expenses, categorize transactions, create budgets, and generate detailed financial reports.
How Can I Input My Personal Income and Expenses in QuickBooks?
You can manually input your income and expenses or link your bank account. For manual entry, use the 'Sales Receipt' or 'Deposit' function for income and the 'Expense' function for expenses. When linking your bank account, QuickBooks will automatically download and categorize your transactions.
How Can I Categorize My Personal Transactions in QuickBooks?
First, you will need to create new categories in the Chart of Accounts that align with your personal finance needs:
Click the ‘Gear’ icon in the top right corner
Select ‘Chart of Accounts’
In the ‘Chart of Accounts’ screen, click the ‘New’ button
In the ‘Account Type’ dropdown, select the type that best fits the category you want to create. For example, ‘Expenses’ for personal spending or ‘Income’ for personal earnings
Select the subtype that best describes the category in the ‘Detail Type' dropdown.
Give the account a clear and descriptive name, and it should be specific to the type of transaction you want to track, like ‘Grocery Expenses’ or ‘Paychecks.’
Click ‘Save and Close’
To categorize the transactions:
Click the ‘Create’ (+) icon.
Depending on the nature of the transaction, select ‘Expense,’ ‘Check,’ or ‘Deposit.’
Enter the necessary transaction details.
Under ‘Category,’ select the appropriate personal category you created earlier.
Click ‘Save and Close’
How Do I Set Up and Track Budgets in QuickBooks?
You can create a budget by selecting ‘Budgeting’ in Settings. Enter details like the name, fiscal year, interval, and amounts for different categories. To track your budget, navigate to ‘Reports.’ then select ‘Budget Overview.’
How Can I Set Up My Loans and Credit Cards in QuickBooks?
For loans, create a new liability account in the Chart of Accounts, then record the loan amount as a journal entry:
Click the ‘Gear’ icon in the upper right corner, then select ‘Chart of Accounts.’
Click ' New ' in the Chart of Accounts to create a new account
For ‘Account Type,’ select either ‘Long-term Liabilities’ (for loans to be paid off over a year) or ‘Short-term Liabilities’ (for loans to be paid off within a year)
For ‘Detail Type,’ select ‘Notes Payable’ or another appropriate type
Name something relevant to the account, like ‘Car Loan’ or ‘Personal Loan.’
Click ‘Save and Close’
Record the loan
Click the ‘Create’ (+) icon, then choose ‘Journal Entry.’
Enter the date you received the loan.
On the first line, select the liability account you created from the ‘Account’ drop-down.
In the ‘Credits’ field, enter the loan amount.
On the second line, select the account where you deposited the loan funds from the ‘Account’ drop-down.
In the ‘Debits’ field, enter the same loan amount
Click ‘Save and Close’
For credit cards, create a new credit card account in the Chart of Accounts, then either link your credit card to download transactions automatically or manually add transactions as expenses:
Click the ‘Gear’ icon in the upper right corner, then select ‘Chart of Accounts’
In the Chart of Accounts, click ‘New’ to create a new account
For ‘Account Type,’ select ‘Credit Card.’
Name the account in a way that identifies the card, such as ‘Credit Card Name.’
Click ‘Save and Close’
Record credit card transactions
You can link your credit card to import transactions or manually add transactions automatically.
To link your credit card:
Navigate to the ‘Banking’ tab, then click ‘Link Account’ or ‘Add Account.’
Follow the prompts to connect your credit card account
Once connected, your transactions will automatically be imported and categorized
To manually add transactions:
Click the ‘Create’ (+) icon, then choose ‘Expense.’
From the ‘Bank/Credit account’ drop-down, select your credit card account
Fill out the necessary information, including date, vendor, and amount
Click ‘Save and Close’
Can I Generate Personal Finance Reports in QuickBooks?
Yes, QuickBooks can generate various reports, including income by customer summary, expenses by vendor summary, profit and loss, balance sheet, cash flow statement, and tax summary. You can customize these reports based on date range and other parameters to fit your personal finance needs.
Can I Access My QuickBooks Personal Finance Data Remotely?
If you're using QuickBooks Online, you can access your data from any device with an internet connection. You can sign in on your phone, tablet, or computer and have real-time access to your personal finance data.
Is QuickBooks Suitable for Personal Use?
While traditionally designed for businesses, QuickBooks can also be a powerful tool for managing your finances. It offers features like:
Transaction tracking: Easily record income and expenses, categorize them, and see your overall financial picture.
Budgeting: Set budgets for different categories and track your progress towards your financial goals.
Cash flow management: Understand your incoming and outgoing cash flow to make informed financial decisions.
Reporting: Generate reports to see trends in your spending, identify areas for improvement, and analyze your financial health.
Is Using QuickBooks for Personal Finances Safe?
QuickBooks uses industry-standard security measures to protect your financial data. However, practicing good security habits, such as using strong passwords and enabling two-factor authentication, is always essential.
Is There a Free Version of QuickBooks for Personal Use?
While there is no free version of QuickBooks, QuickBooks Online offers a free trial for a limited time. You can also find free personal finance apps with similar features.
I Already Use QuickBooks for My Business. Can I Use It For Personal Finances Too?
Yes, you can use the same QuickBooks account to manage your business and personal finances. However, it is recommended to keep them separate for better organization and clarity.