Importing Excel into QuickBooks : Detailed Guide
QuickBooks is the unanimously admired accounting software that has helped millions of small and mid-sized businesses, accountants, and CPAs worldwide. But as the saying goes, every coin has the other side. QuickBooks also has some limitations in terms of bulk data importing and exporting. Now, a lot of you might have the question: can I import transactions from Excel to QuickBooks online?
Yes, you can. Just integrate SaasAnt Transactions to import transactions from Excel files into QuickBooks. SaasAnt Transactions has a 4.9-star rating from approximately 4,000 users in the QuickBooks app store and is an Accountant's Favorite and User's choice award-winning app, as it saves time, reduces errors, and ensures seamless financial data integration.
This blog will provide step-by-step instructions for importing transactions into QuickBooks from Excel using SaasAnt Transactions. Learn how to import QuickBooks data with Excel files. Let’s get started with Excel to QuickBooks data import.
Contents
Importing Excel into QuickBooks: Quick Instructions
How to Import Data from Excel into QuickBooks Online?
Import transactions into QuickBooks Online from Excel: Step-by-Step Guide
FAQ
Importing Excel into QuickBooks: Quick Instructions
Prepare your Excel file
Use a single header row, clean dates and numbers, and remove totals or blank rows.
Connect SaasAnt
From QuickBooks Online, go to Apps, install SaasAnt, and connect it to the correct company.
Upload the Excel file
Select the data type you want to import and upload your Excel file.
Review and map fields
Match Excel columns to QuickBooks fields and review the preview for errors.
Import and verify
Complete the import, then spot-check a few records in QuickBooks.
Roll back if needed
If something looks wrong, undo or remove the imported batch, fix the file, and re-import.
How to Import Data from Excel into QuickBooks Online?
Instead of manually entering each transaction, which is time-consuming, redundant effort, and labor-intensive, you can import transactions from Excel. This method saves time and reduces errors associated with manual data entry. Utilize a 5-minute QuickBooks Excel import application to simplify the process and streamline transaction management effortlessly.
Import transactions into QuickBooks Online from Excel: Step-by-Step Guide
The following steps will walk you through how to import Excel into QuickBooks.
To get started, you must sign up with SaasAnt Transactions, which offers a 30-day free trial.
Step 1: Connect SaasAnt Transactions with QuickBooks
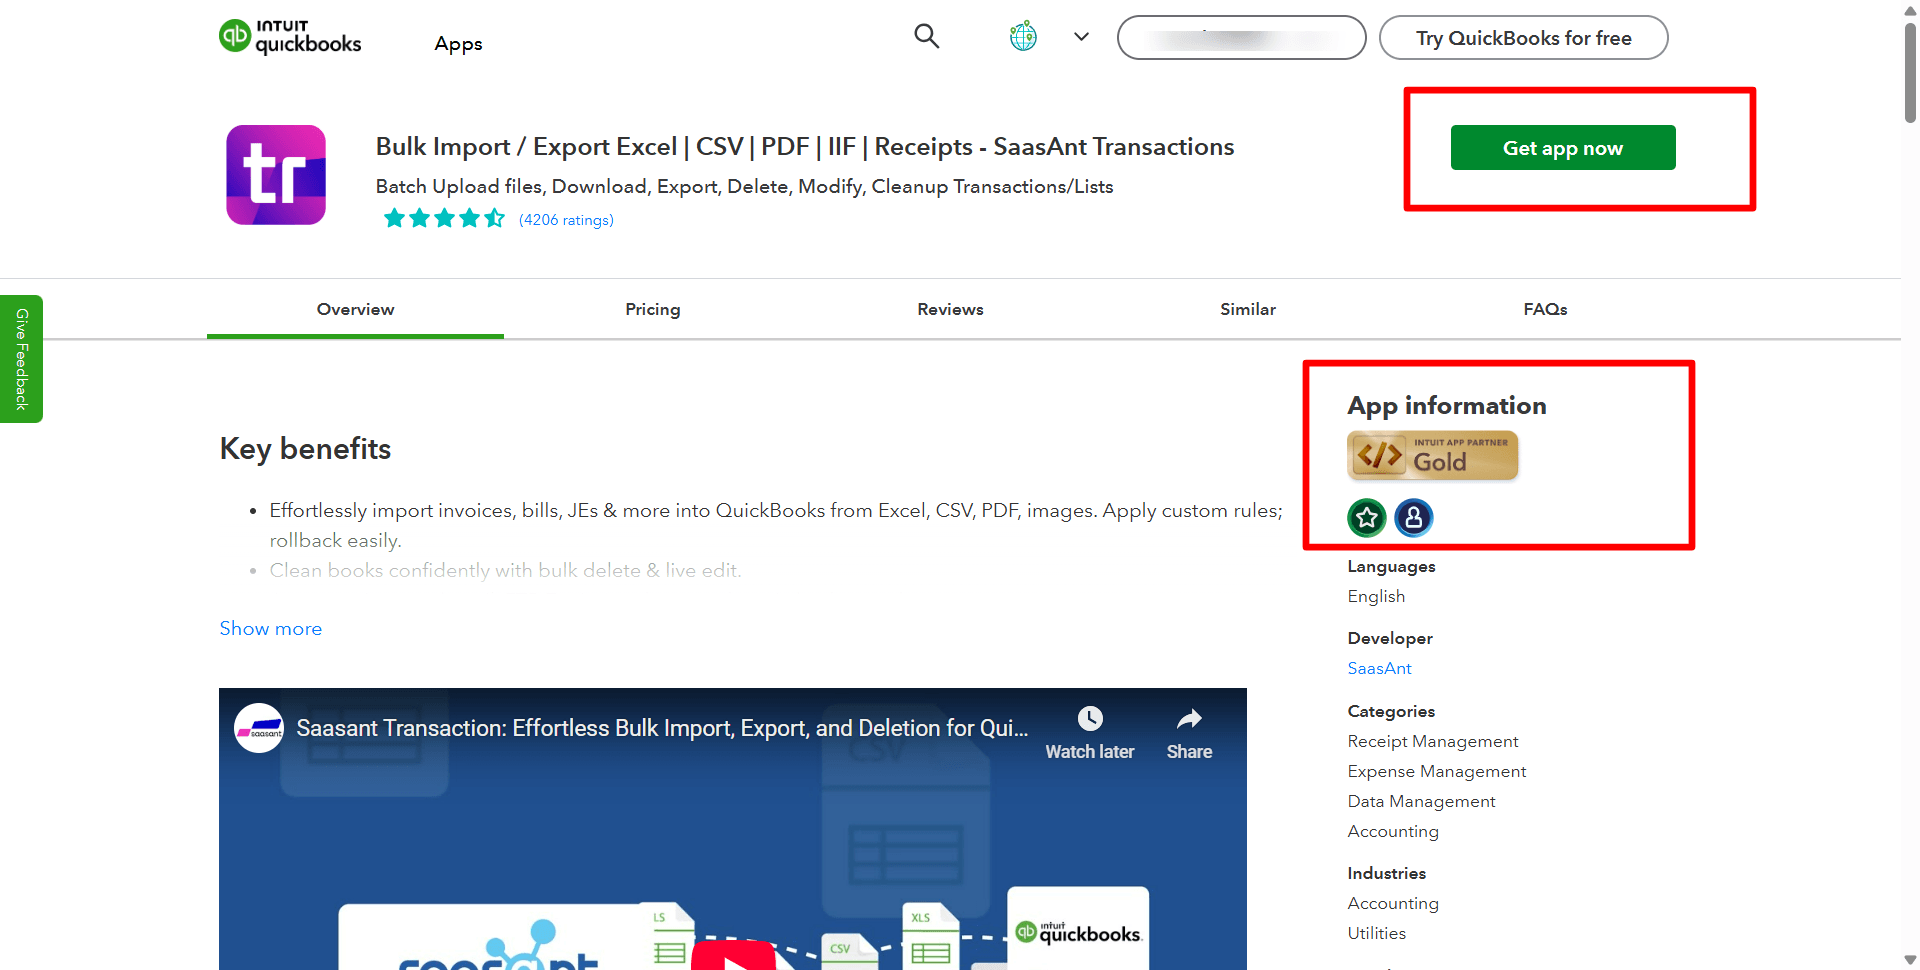
You must connect your QuickBooks account with SaasAnt Transactions. Go to the QuickBooks Apps Store. Type ‘SaasAnt’ in the search bar. The SaasAnt Transactions application will be found there. Click on the ‘Get the App Now’ button.
Step 2: Upload your File
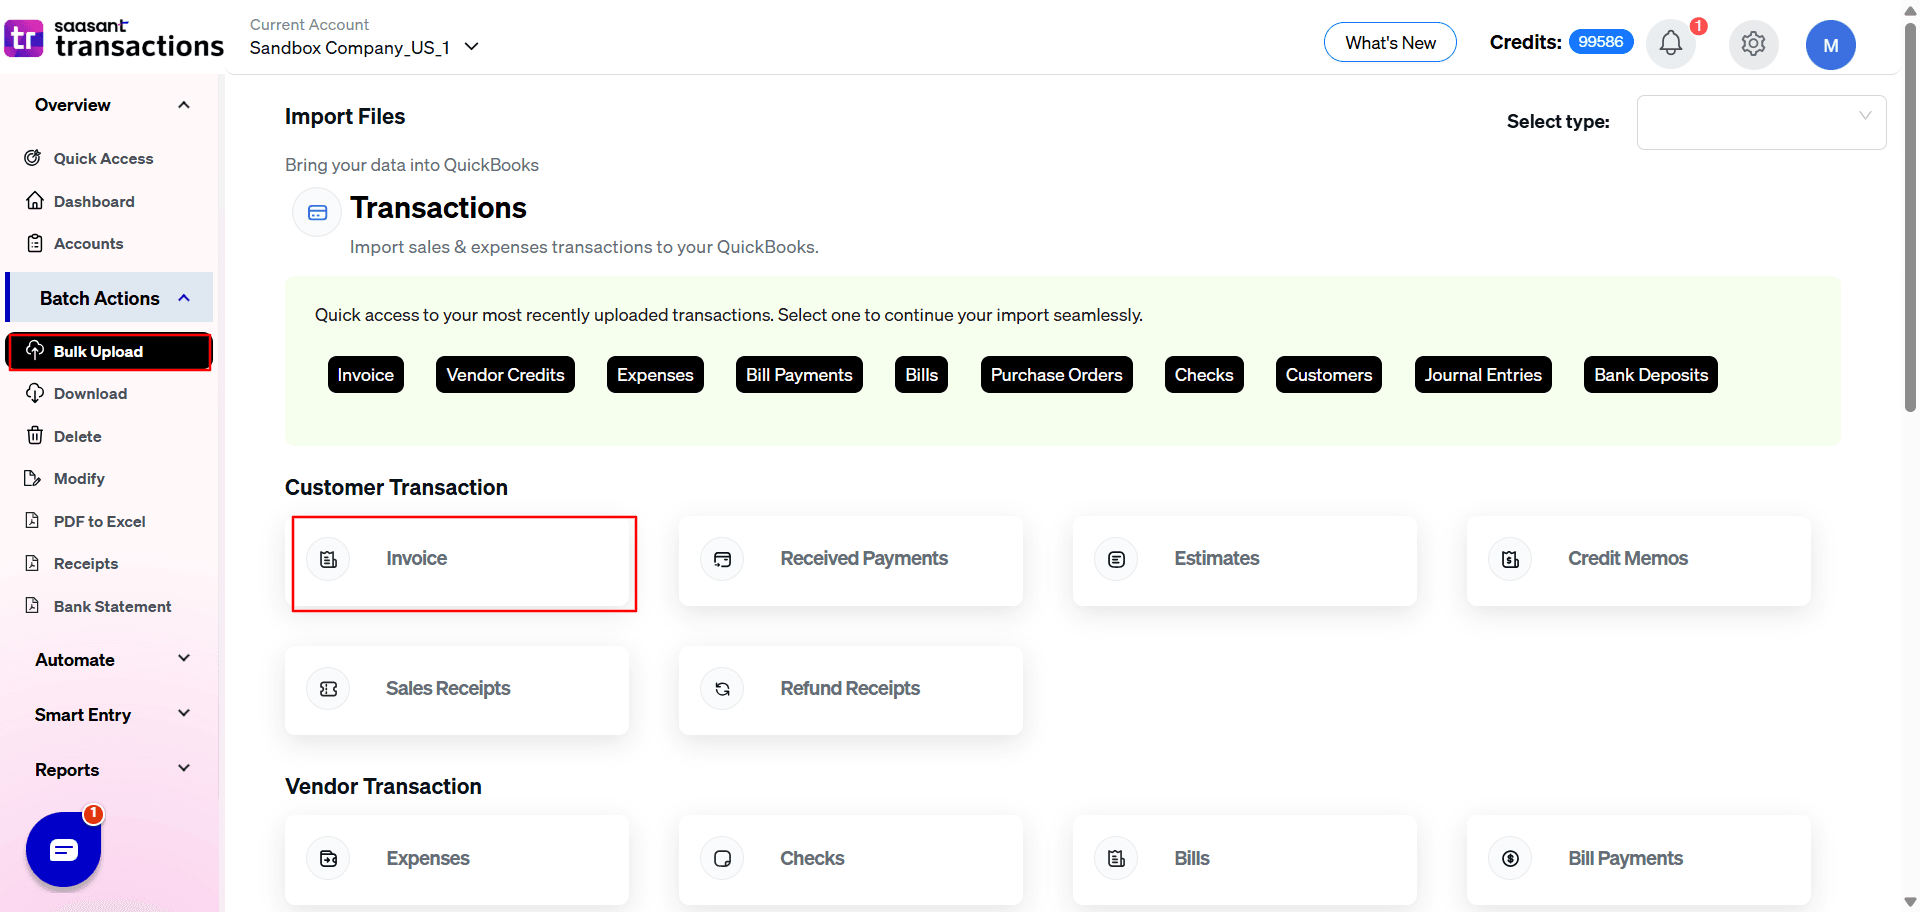
Click on Bulk Upload from the list on the left side of the screen. Select the entity you wish to transfer. You can import any QuickBooks entity, such as invoice, expense, refund receipt, purchase order, etc.
Customer Transactions | Invoice, Credit Memo, Sales Receipt, Refund Receipt, Estimate, Receive Payment |
Vendor Transactions | Check, Bill, Bill Payment, Credit Card Credit, Purchase Order, Expense, Vendor Credit |
Other Transactions | Time Activity, Journal Entry |
Lists | Vendor, Customer, Location, Product/ Service, Employee, Chart of Accounts. |
Now, hit the Browse button and choose the desired file from your computer. You can also drag and drop your file here.
Browse and select the Excel file you want to import into QuickBooks.
Note: You can upload files in various formats, including XLS, XLSX, CSV, and IIF. SaasAnt Transactions also allows you to upload or convert PDF and image files with its receipt management feature. Use the SaasAnt Transactions template on the right side of the screen to make the next step easier.
Step 3: Mapping
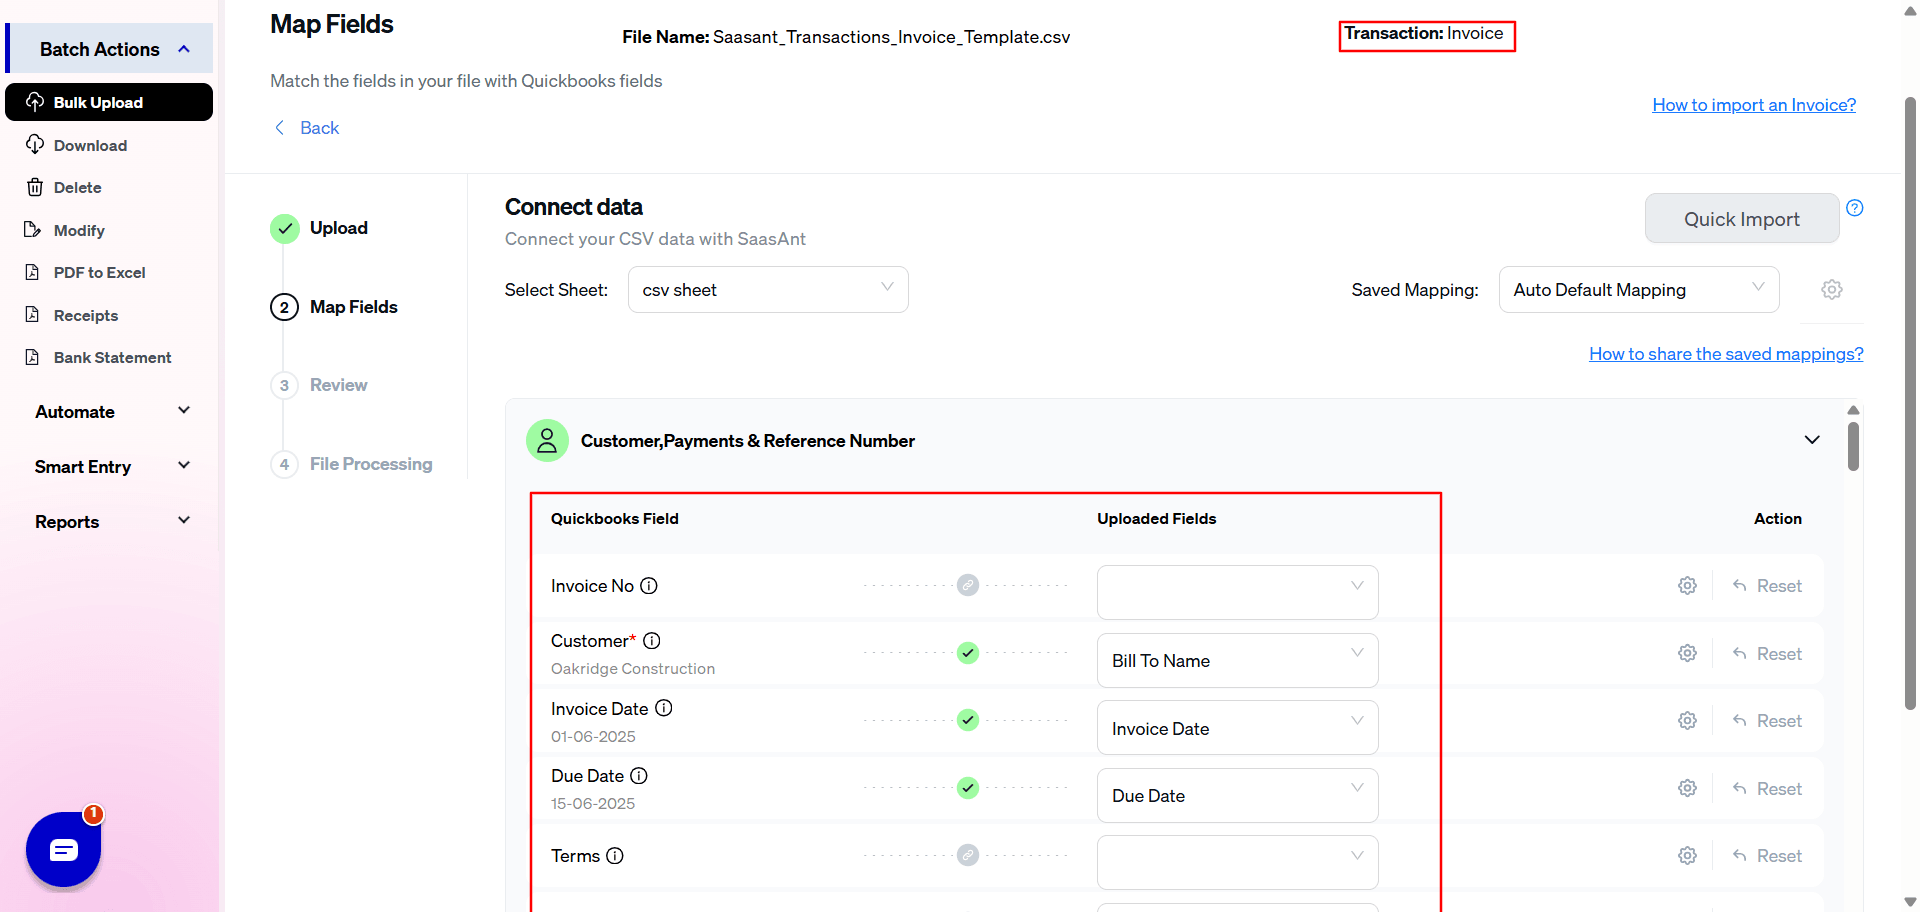
Mapping matches the fields in QuickBooks to those in the imported file. Select a sheet if there are multiple sheets in the same file.
For example, if importing an invoice, you upload the Excel sheet and select Invoice from QuickBooks Entities. QuickBooks invoice attributes, such as invoice number, will appear on the left. If your Excel sheet lists invoice numbers under S.No, you must map them correctly.
The Preview Mapping feature lets you see how the fields in your Excel file will be matched in QuickBooks.
Using the SaasAnt Transactions import template can simplify this process.
Step 4: Review Data Before Import
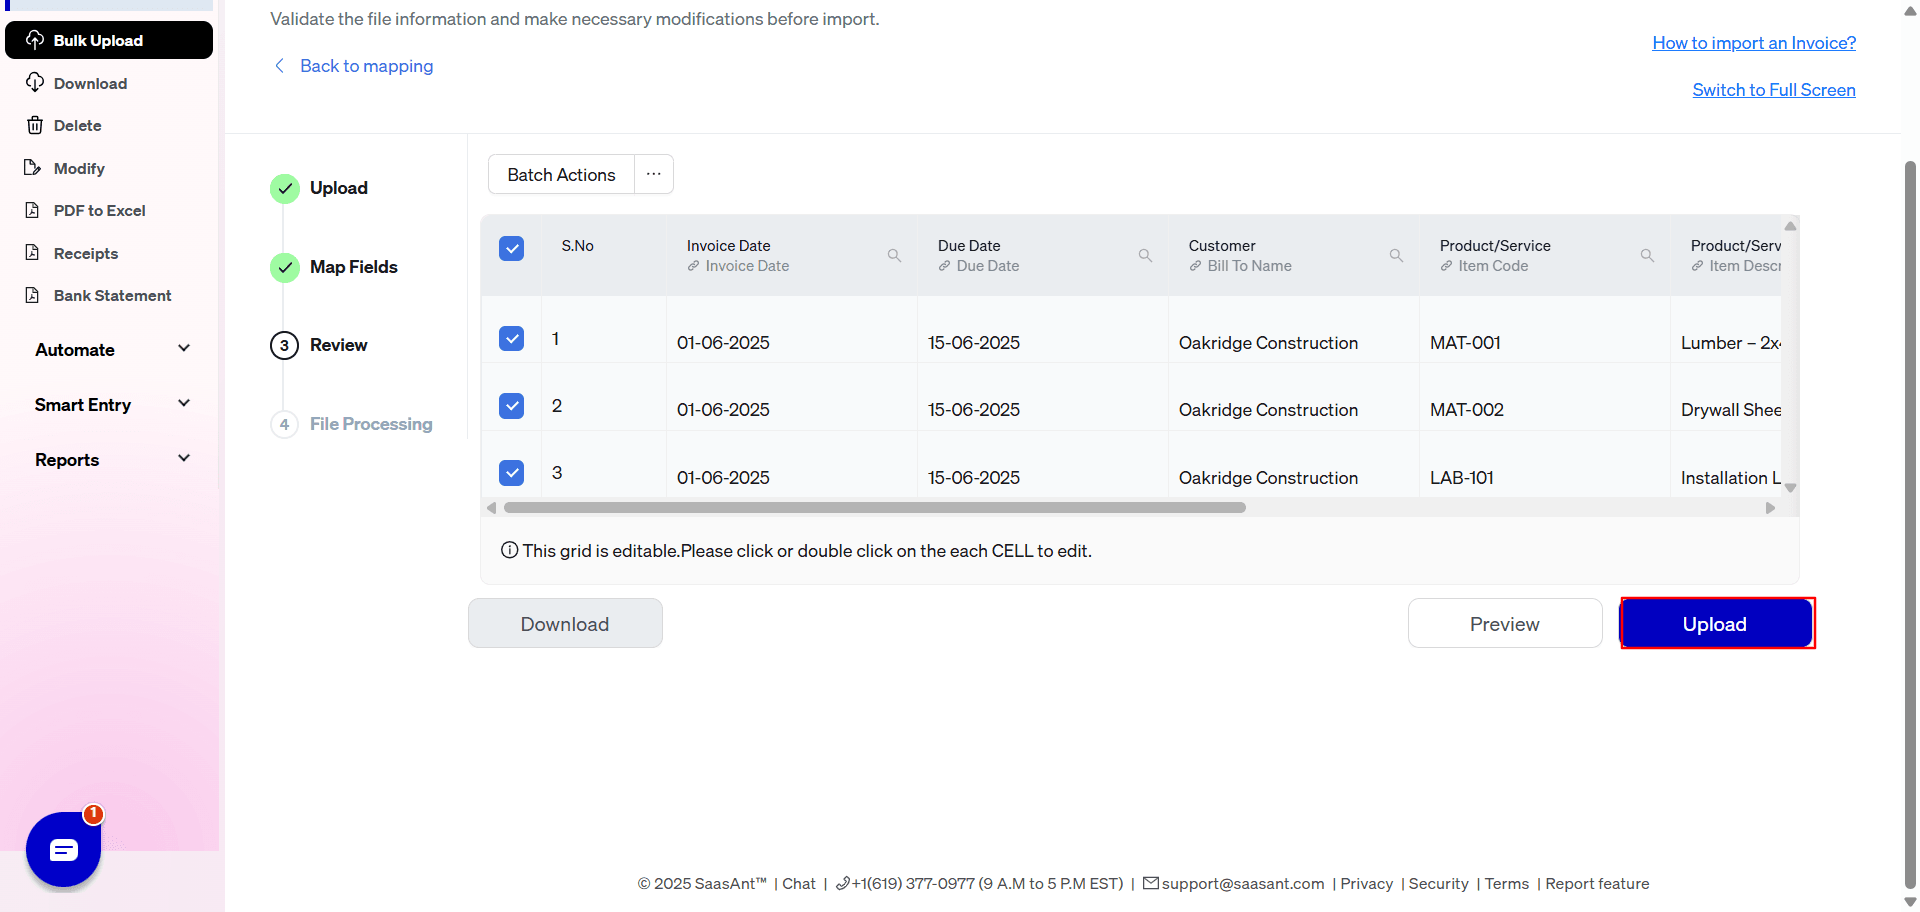
Check the mapped data to avoid errors and ensure all details are correctly aligned.
SaasAnt Transactions helps with easy data review and correction, making spotting and fixing mistakes easier.
Step 5: Import In Process
Upon confirming the data accuracy, click ‘Upload’ to import your Excel file into QuickBooks Online. The import process will be shown.
Step 6: Verifying the Imported Excel File
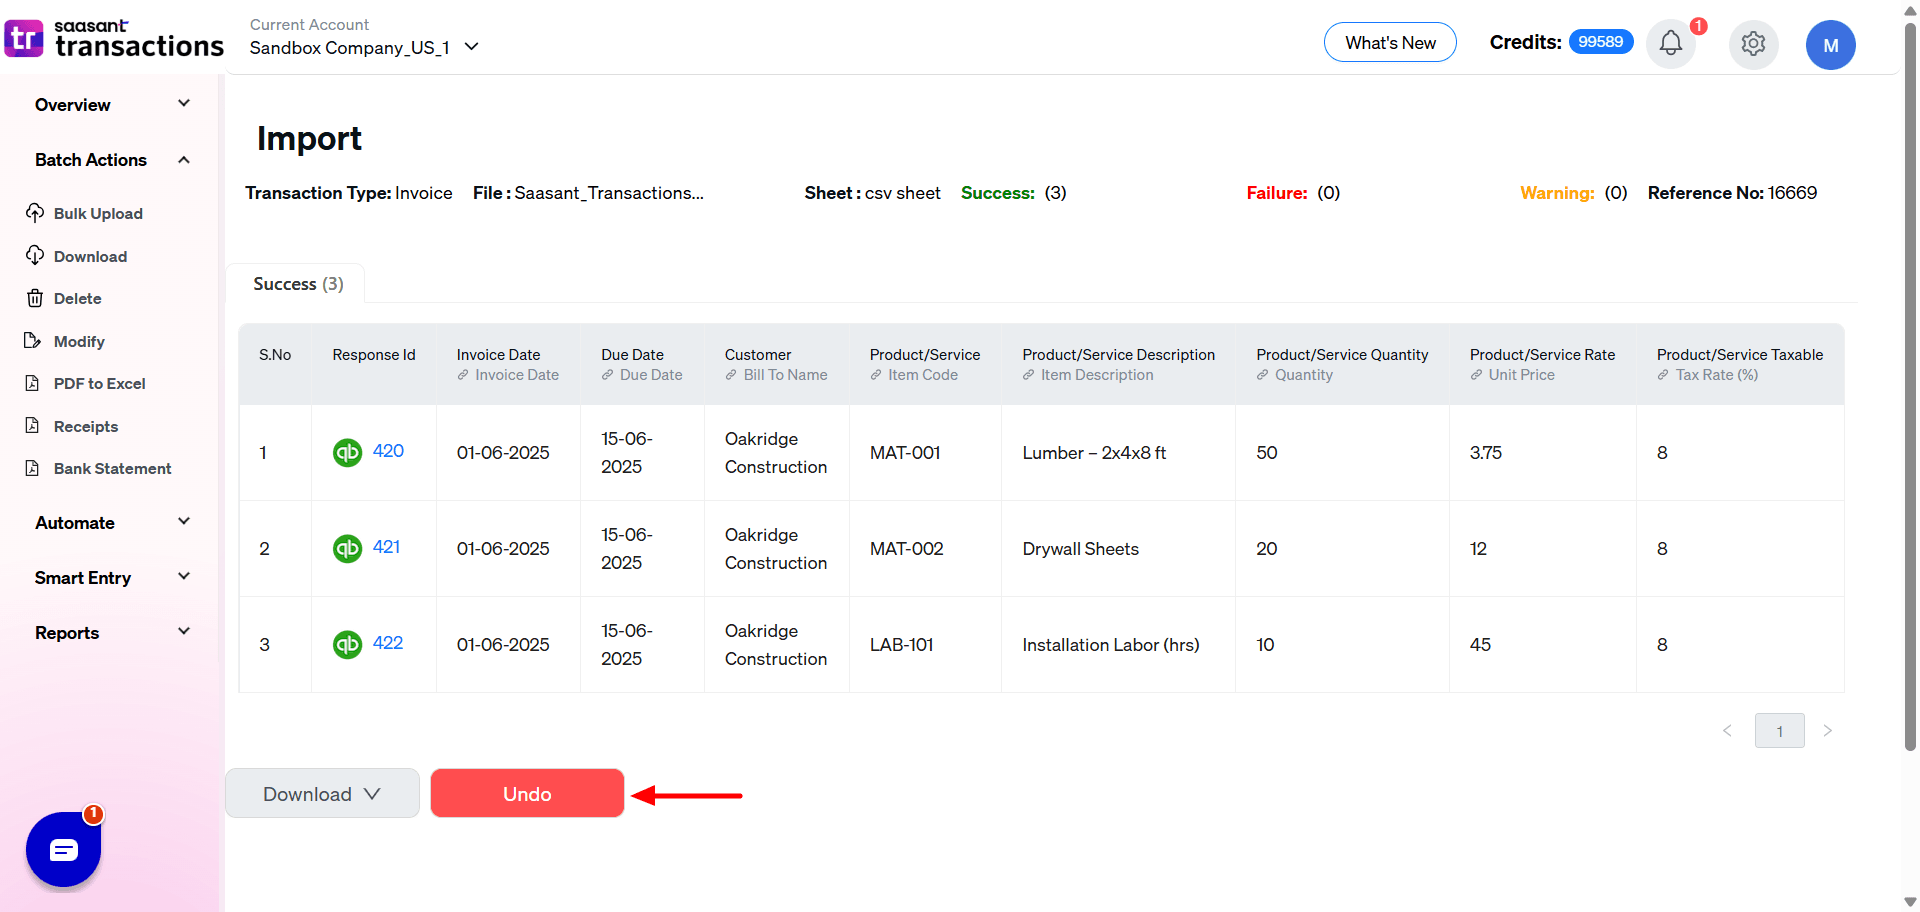
Once the data is uploaded, click on Show Results. Upon successful import, the uploaded data will appear with its reference number. Click on the reference number to verify if that data has been uploaded into QuickBooks.
If there is an import issue, you can undo it with the option right there in the results screen, or get an error report, and SaasAnt Transactions will offer suggestions to resolve the issue.
You can also roll back (undo) the imported data if needed.
A quick note: You can also automate bulk upload of financial statements using email, FTP/SFTP, or Zapier using SaasAnt Transactions.
Watch the video tutorial here:
While QuickBooks is the engine of your accounting, Excel is often the workshop where your data is built, cleaned, and organized. For countless businesses, managing high-volume data in spreadsheets isn't a workaround; it’s a critical part of the workflow before a single transaction hits the general ledger.
This is especially true for:
High-Volume Operations: Restaurants and retailers importing daily sales from a POS system, or service businesses uploading weekly timesheets for their entire crew.
Data Migration & Onboarding: Accountants bringing years of a new client's messy bank statements into the books, or e-commerce businesses migrating a 5,000-item product catalog.
System Integration: Sales teams importing new customer lists from a CRM, or operations teams uploading purchase orders from an external system.
The challenge isn't getting data into Excel; it's getting that clean, organized data out of Excel and into QuickBooks accurately and efficiently. While QuickBooks has basic, native import tools, they are often limited to simple lists and have strict formatting requirements, leaving users unable to import the transactional data that drives their business—like invoices, bills, or journal entries.
This is where dedicated import utilities become essential. A comprehensive tool like SaasAnt Transactions is designed to bridge this gap, transforming a frustrating, manual process into a streamlined, automated workflow.
A dedicated importer like SaasAnt goes far beyond the native QuickBooks capabilities, offering the power and flexibility needed for real-world business scenarios.
1. Import Everything, Not Just Lists
The single biggest limitation of native tools is that they don't handle most transactions. SaasAnt allows you to import virtually every QuickBooks entity from an Excel or CSV file, including:
Customer Transactions: Invoices, Sales Receipts, Credit Memos, Receive Payments, and Estimates.
Vendor Transactions: Bills, Bill Payments, Checks, Expenses, and Purchase Orders.
Accounting & Payroll Data: Journal Entries, Time Activities, budget, and Inventory adjustments from external systems.
Core Lists: Customers, Vendors, Products/Services, Chart of Accounts, and more—ideal for initial setup or bulk updates.
Tip: If you're planning to move to the cloud, check out our QuickBooks Desktop to Online Migration Guide for a complete walkthrough on switching to QuickBooks Online using SaasAnt.
2. Eliminate Guesswork with Smart, User-Friendly Features
Instead of the trial-and-error approach common with basic importers, SaasAnt provides a guided, error-proof experience:
Pre-built Templates: Start with downloadable templates that have the exact headers needed for each transaction type, dramatically reducing setup time.
Live Preview: Before you commit, you see exactly how your spreadsheet columns will align with QuickBooks fields, catching potential mismatches instantly.
Clear Error Reports: If there's an issue (like an incorrect date format or a non-existent customer), the tool gives you a detailed report explaining what's wrong and how to fix it. And fixes it automatically based on settings you predefined to avoid getting the same errors.
3. Work Fearlessly with a Safety Net
One of the biggest fears with bulk operations is making a massive, hard-to-fix mistake. SaasAnt's rollback ("undo") feature is the ultimate safety net. If an import doesn't go as planned, you can revert the entire batch in a single click, completely removing the imported transactions as if they never happened.
4. Put Your Repetitive Tasks on Autopilot
For tasks you do regularly—like importing weekly sales or monthly invoices—SaasAnt's automation and scheduling capabilities are a game-changer. You can set up recurring imports that pull data directly from email attachments, FTP/SFTP servers, or via Zapier integration. As users on G2 and other review sites note, this "complete automation" eliminates repetitive tasks and keeps the books current in real-time without any manual effort.
By bridging the gap between your detailed Excel spreadsheets and your QuickBooks file, SaasAnt transforms a time-consuming, error-prone task into a streamlined, automated, and reliable part of your accounting workflow
We have covered everything you need to know about importing transactions from Excel into QuickBooks using SaasAnt Transactions. This powerful application addresses QuickBooks' limitations in bulk data importing and exporting, offering a fast, error-reducing, and time-saving solution. You can seamlessly import any transactions, such as customer, vendor, items, and the Chart of Accounts, from an Excel spreadsheet into QuickBooks. The best part is that you can get started with a 30-day free trial immediately since no credit card details are required.

Benefits of Importing Excel into QuickBooks using SaasAnt Transactions
With its fast import and export capabilities, SaasAnt Transactions significantly reduces the time spent on manual data entry.
Advanced accounting automation simplifies repetitive tasks, reducing manual errors and saving time. It enables seamless data synchronization through email, FTP, and Zapier integrations, ensuring up-to-date records.
SaasAnt Transactions lets you import all types of transactions and lists supported by QuickBooks. And most importantly, you can import unlimited transactions in just seconds. Bulk imports are popular with SaasAnt Transactions.
In addition to importing and exporting, SaasAnt Transactions lets you delete multiple transactions from your QuickBooks. With a few clicks, you can remove unwanted transactions in bulk.
It lets you review your imports and exports before it does the action. You can preview the transaction, recheck, and change your preferences before importing or exporting.
It integrates smoothly with Email, Zapier, FTP, and SFTP.
FAQ
Can you upload transactions from Excel to QuickBooks Online?
Yes, you can import transactions from Excel to QuickBooks Online. Integrate SaasAnt Transactions with QuickBooks, go to the SaasAnt Transactions Dashboard -> New Import -> Select the entity -> Browse the file and select the Excel file -> Start import.
How do I Import expenses from Excel to QuickBooks Online?
Integrate SaasAnt Transactions with QuickBooks. Go to SaasAnt Transactions Dashboard -> New Import -> Select the expenses from Vendor Transactions tab -> Browse the file and select the Excel file -> Start import.
What are the file formats supported by SaasAnt Transactions?
SaasAnt Transactions supports XLS, XLSX, CSV, and IIF. You can also convert PDF files into the desired format before importing.
Why do you need an addon to import data into QuickBooks?
QuickBooks' native import features is limited and inconvenient, often requiring manual data entry and handling complicated errors. SaasAnt Transactions simplifies this process with its user-friendly interface and robust mapping application, simplifying bulk imports and reducing errors.
What are the benefits of using SaasAnt Transactions?
SaasAnt Transactions lets you easily bulk-upload transactions, automate imports via email, FTP, or Zapier, identify and fix errors, and have advanced features like rules, live edits, batching, reports, etc.
Read also
How To Import Refund Receipts In QuickBooks Online
How to Import Bank Transactions into QuickBooks Online?
How to Import Credit Card Transactions into QuickBooks Online
How to Import Deposits in QuickBooks Online