How to Import Sales Invoices into QuickBooks Online?
This article will guide you through importing your sales invoices into QuickBooks Online.
Contents
Import Sales Invoices into QuickBooks Online: Quick Instructions
Importing Sales Invoices into QuickBooks Online: Detailed Step-by-Step Process
Conclusion
Frequently Asked Questions
Import Sales Invoices into QuickBooks Online: Quick Instructions
For users seeking a quick start, follow these straightforward steps to import your sales invoices into QuickBooks Online:
Log in to your QuickBooks Online account.
Navigate to the 'Apps' tab and find 'SaasAnt Transactions.'
Connect SaasAnt Transactions with your QuickBooks Online account.
Click 'New Import' to start the sales invoice import process.
Upload your sales invoice file (supports various formats, including Excel, CSV, and IIF).
Map the fields in your file to QuickBooks fields on the mapping screen.
Review the mapping and initiate the import.
Validate the imported data in QuickBooks Online to ensure accuracy.
Getting Started with Sales Invoice Imports
Running a business involves various tasks, and managing sales invoices is crucial. Whether transitioning from another system, handling a high volume of invoices, or managing detailed client information with custom fields, manually managing this process can be inefficient and prone to errors. This is where SaasAnt Transactions Online becomes your invaluable partner. It's an application designed to make importing sales invoices into QuickBooks Online a breeze. It eliminates the risk of errors, saves you time, and lets you easily handle invoices in various formats. Whether migrating from another software or starting from scratch, SaasAnt ensures that your sales invoice data moves seamlessly and lands precisely where it should in QuickBooks Online.
This step-by-step guide will demonstrate using SaasAnt Transactions, an Accountant's Favorite and User's choice award-winning app. to simplify importing sales invoices. Let's embark on this journey to make your invoicing process hassle-free so you can focus on growing your business.
Importing Sales Invoices into QuickBooks Online: Detailed Step-by-Step Process
Step 1: Preparing Your Sales Invoice Data for Import
Before you begin, it's essential to have your sales invoice data well-organized and ready in a supported format, such as Excel, CSV, or IIF. Using the SaasAnt Transactions Sample Template ensures your data fields are correctly aligned, minimizing issues during the import process.
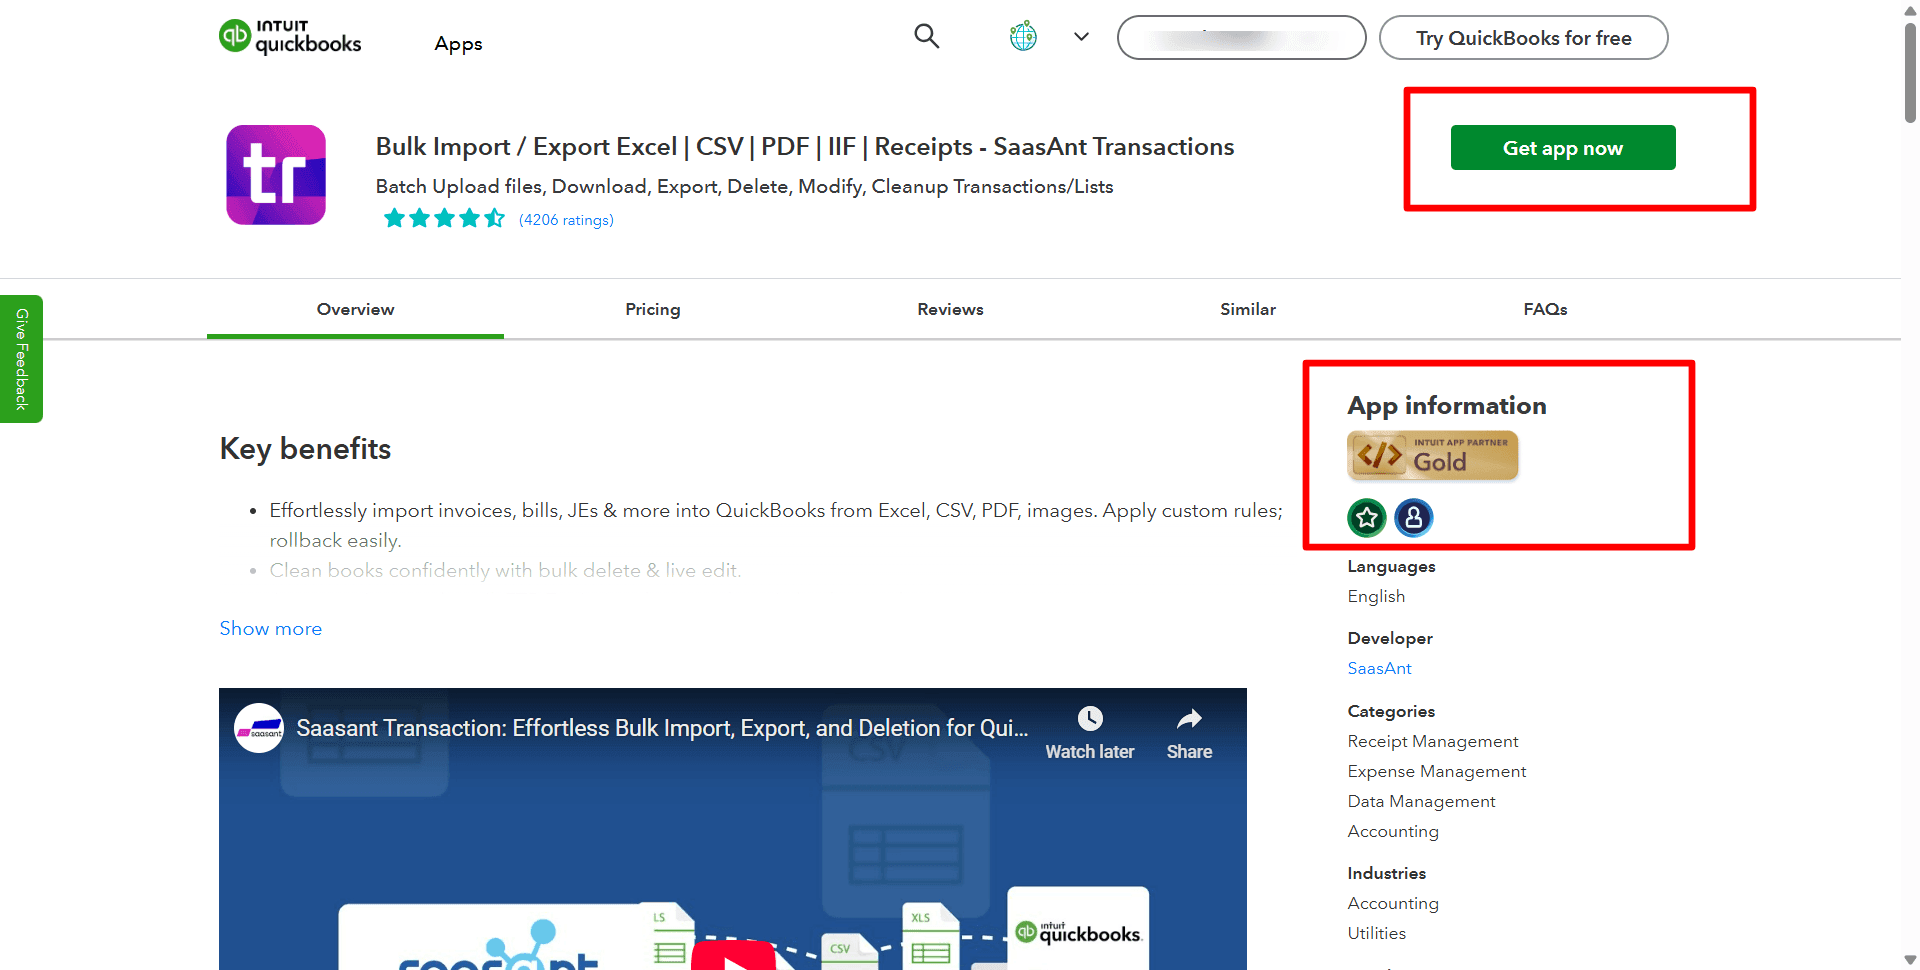
Step 2: Setting Up SaasAnt Transactions via QuickBooks App Store
Open the SaasAnt Transactions application in QuickBooks Online's Appcenter once your data is ready. Log in to QuickBooks, navigate to the 'Apps' tab, and locate SaasAnt Transactions. Click ‘Get app now’ to connect and start the sales invoice import smoothly.
Step 3: Uploading Your Sales Invoice File
Now that you're within the SaasAnt Transactions application, it's time to upload your sales invoice file. Here's how:
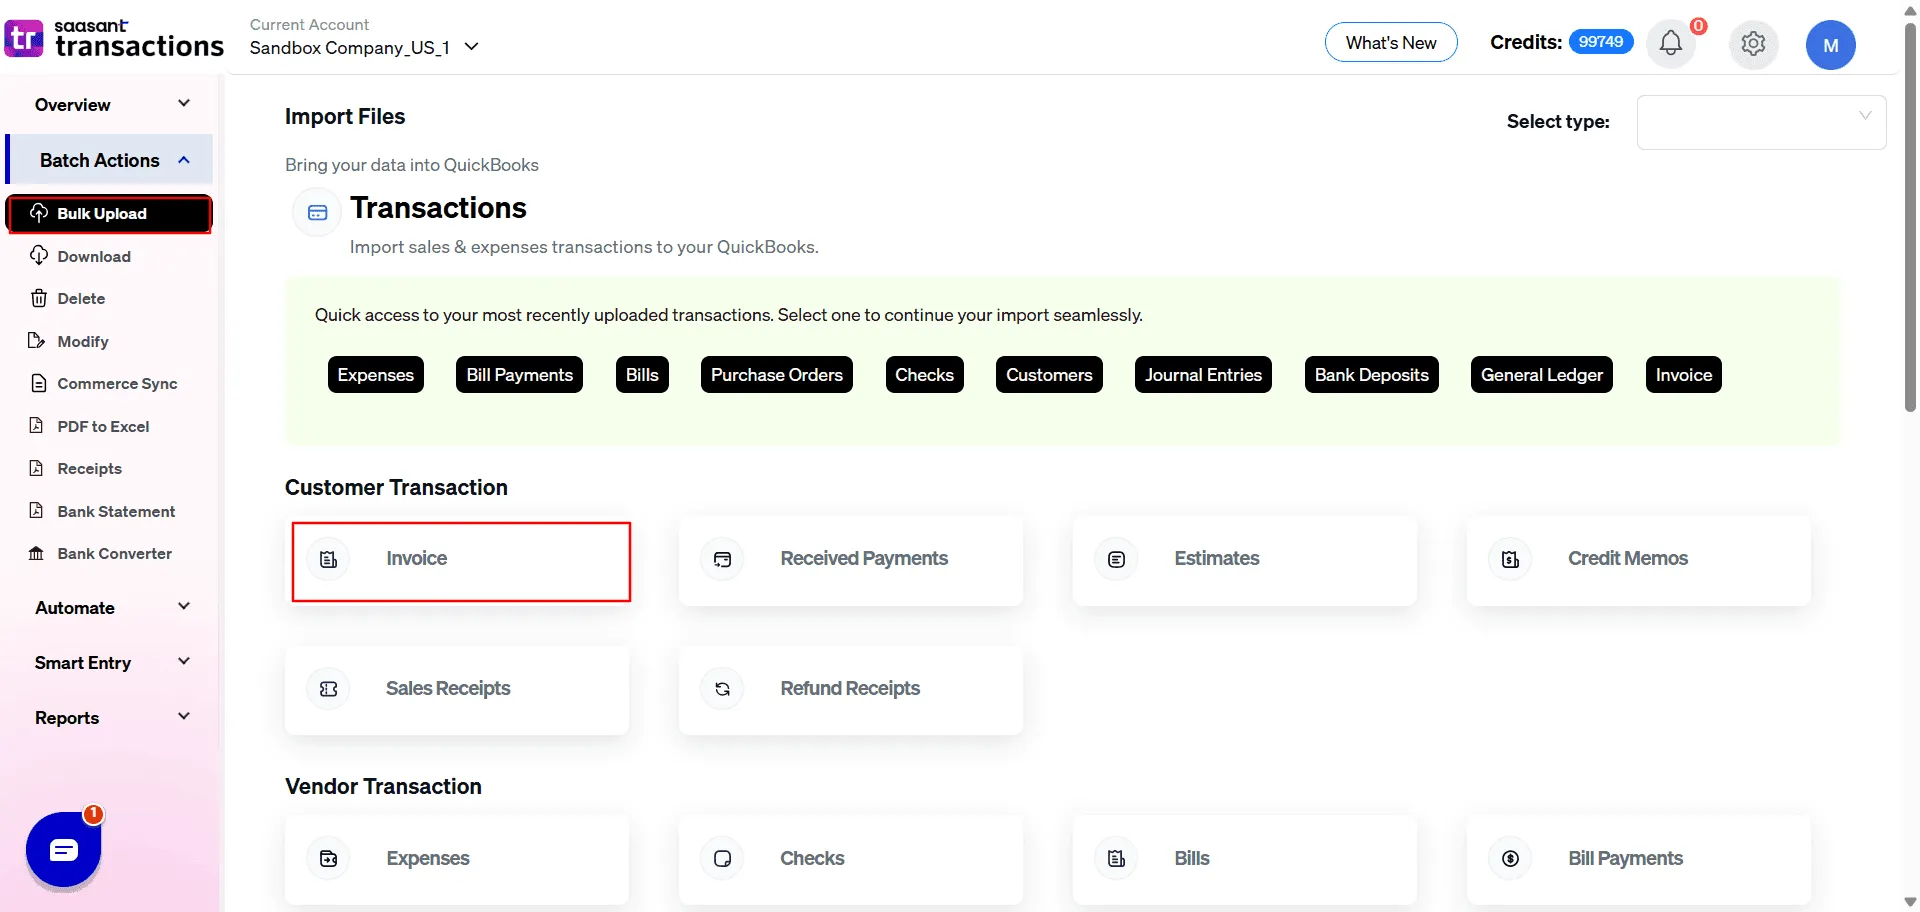
Initiate New Import: Click ‘Bulk Import’ to initiate the sales invoice import.
Selecting the Transaction Type: Choose ‘Sales Invoice’ as the transaction type to proceed.
Uploading the File: Utilize the ‘Browse’ option to upload your specific file. Ensure it's in a supported format (Excel, CSV, or IIF) to ensure a smooth process.
This step is straightforward yet critical, setting the stage for the subsequent data mapping process.
Step 4: Successfully Mapping Your Sales Invoice Data Fields
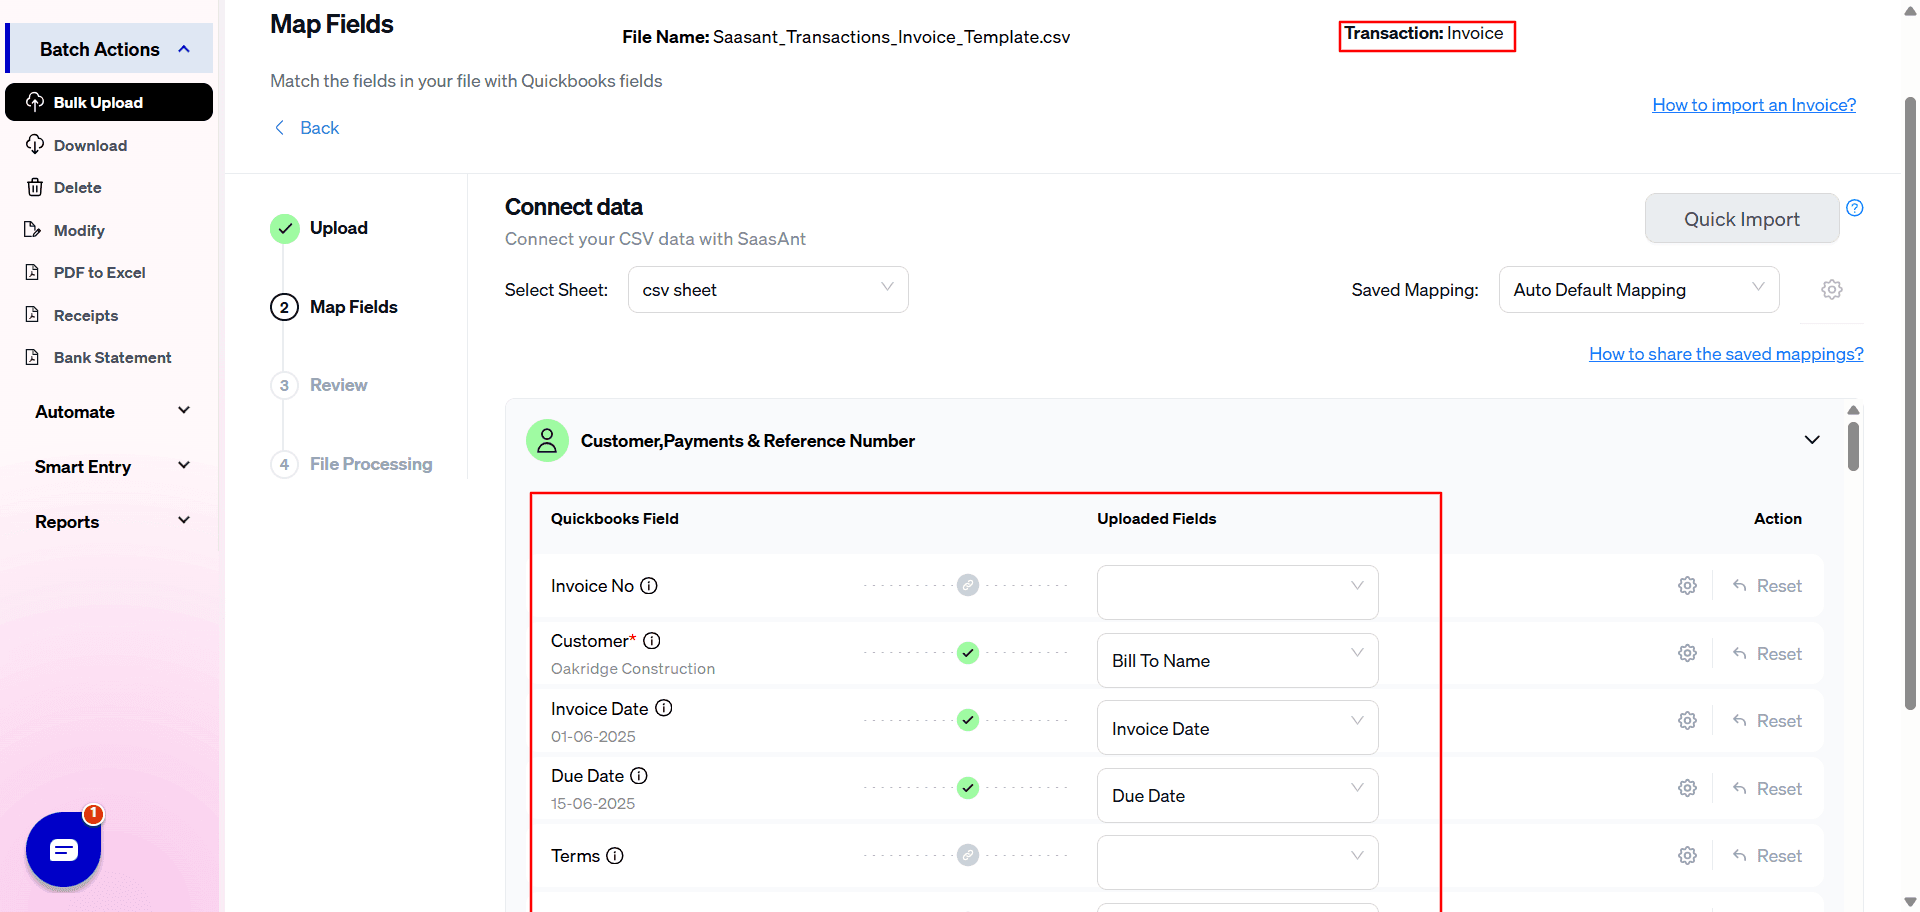
Mapping your data fields is a vital step in the import process. It involves aligning the details from your file, such as invoice numbers and customer details, with the corresponding fields in QuickBooks Online.
SaasAnt Transactions simplifies this process with a user-friendly interface, including a 'Preview Mapping' feature that lets you review how your data aligns before finalizing the import, minimizing the risk of errors.
For additional guidance, the SaasAnt support portal offers detailed guides to help you map your fields correctly and ensure a seamless import process. Remember, this step lays the groundwork for a successful import, so it's worth doing it correctly.
Step 5: Reviewing Your Data Before Final Import
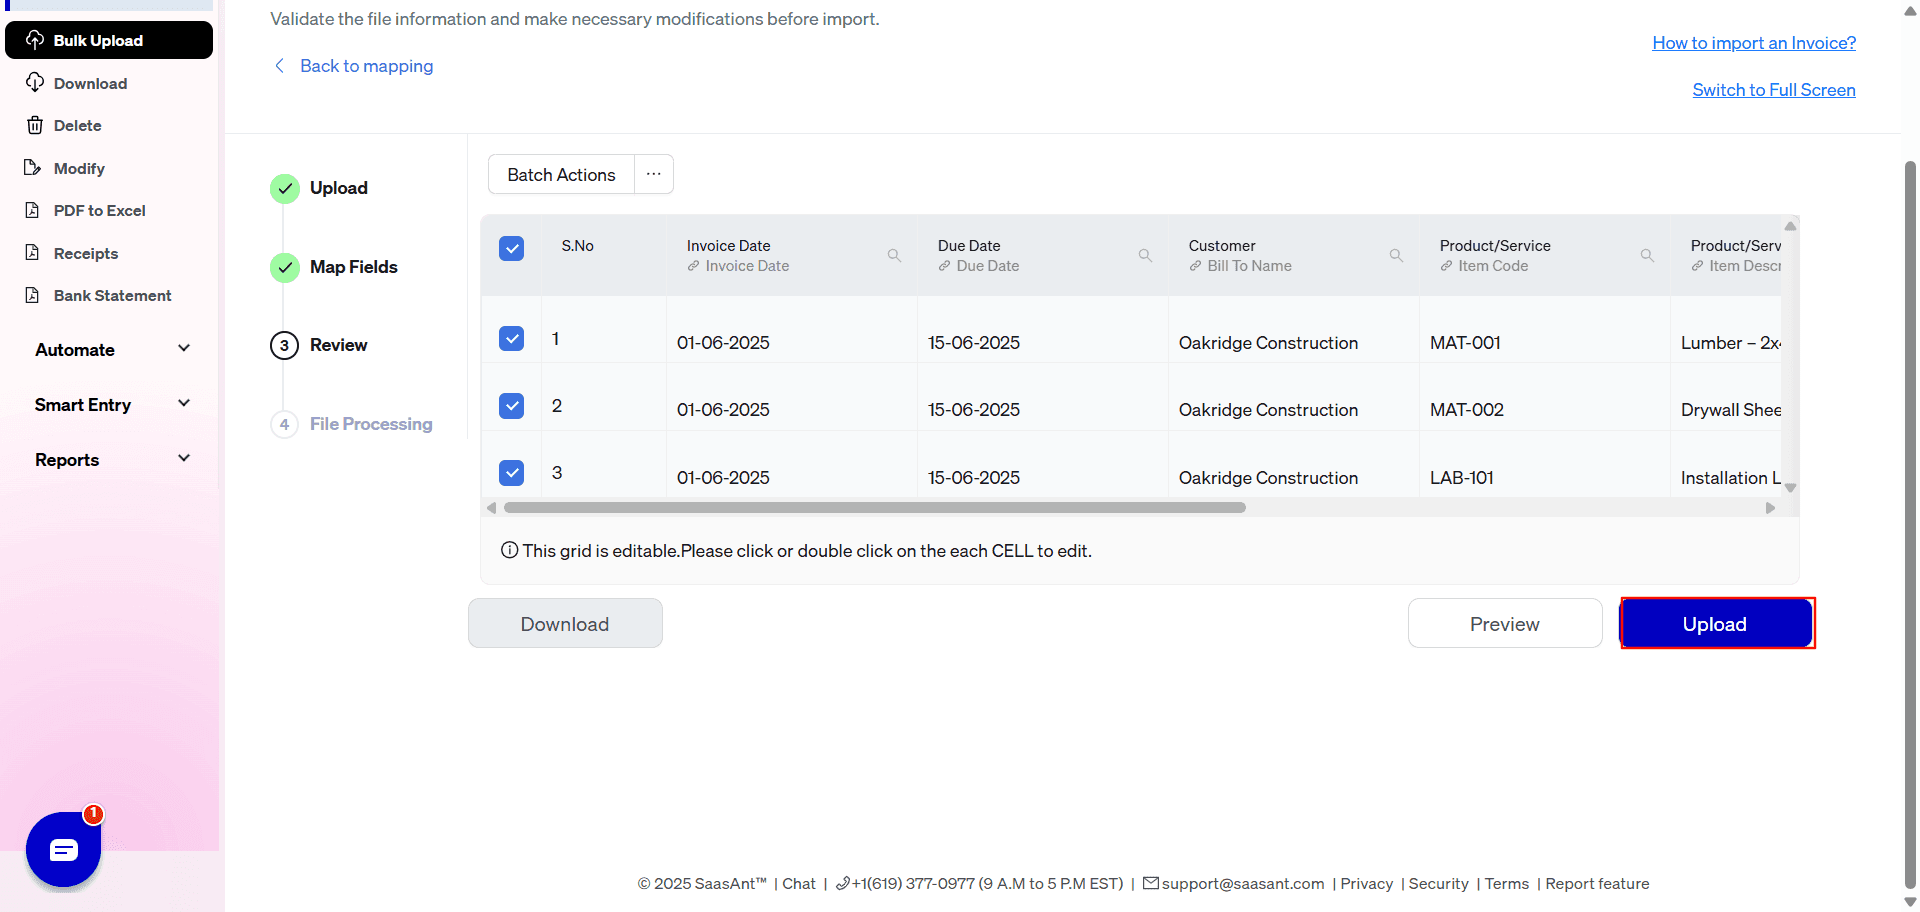
Before proceeding with the import, it's wise to double-check the data you've mapped. It is your opportunity to catch any mapping mistakes and ensure everything aligns perfectly. SaasAnt Transactions simplifies this step, making it easy to review your data and make necessary corrections.
Step 6: Completing the Import Process
Now, you're at the final stretch. After reviewing your data, it's time to complete the import process. Click the ‘Import’ button in the SaasAnt Transactions application. The application will seamlessly import all your sales invoice data into QuickBooks Online. This step is straightforward but significant, bringing you closer to neatly organizing all your sales invoices in one place within QuickBooks Online.
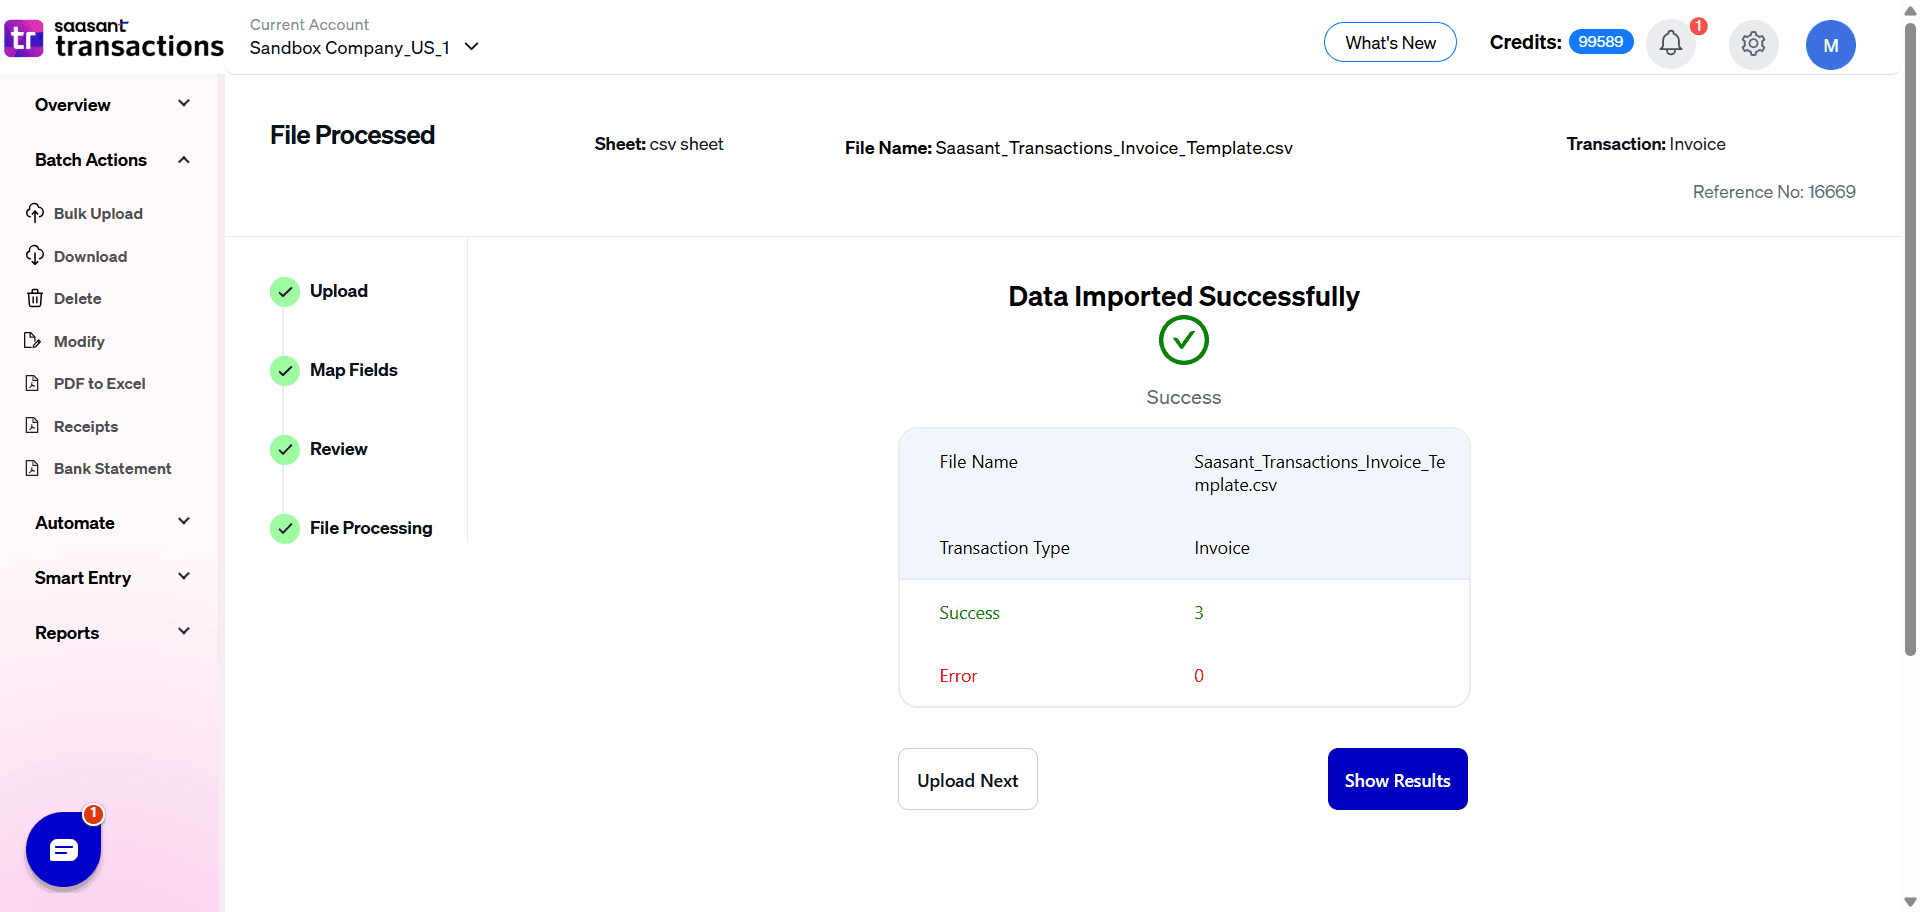
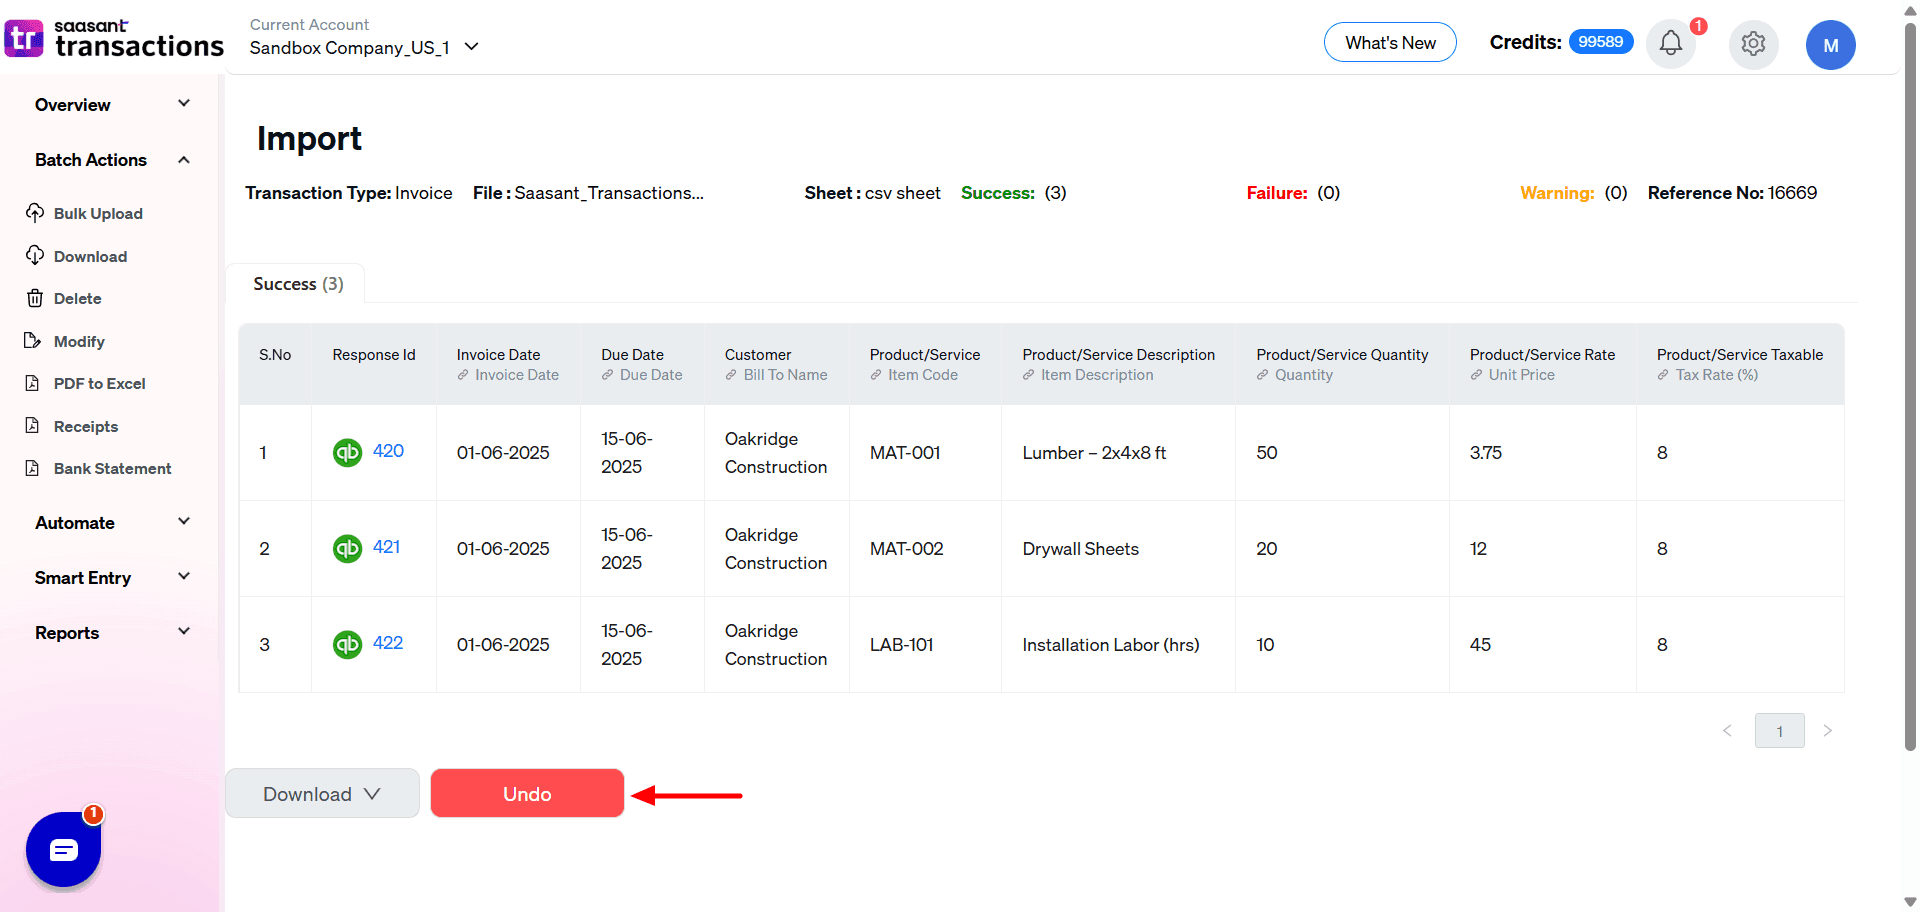
Step 7: Verifying the Imported Sales Invoices
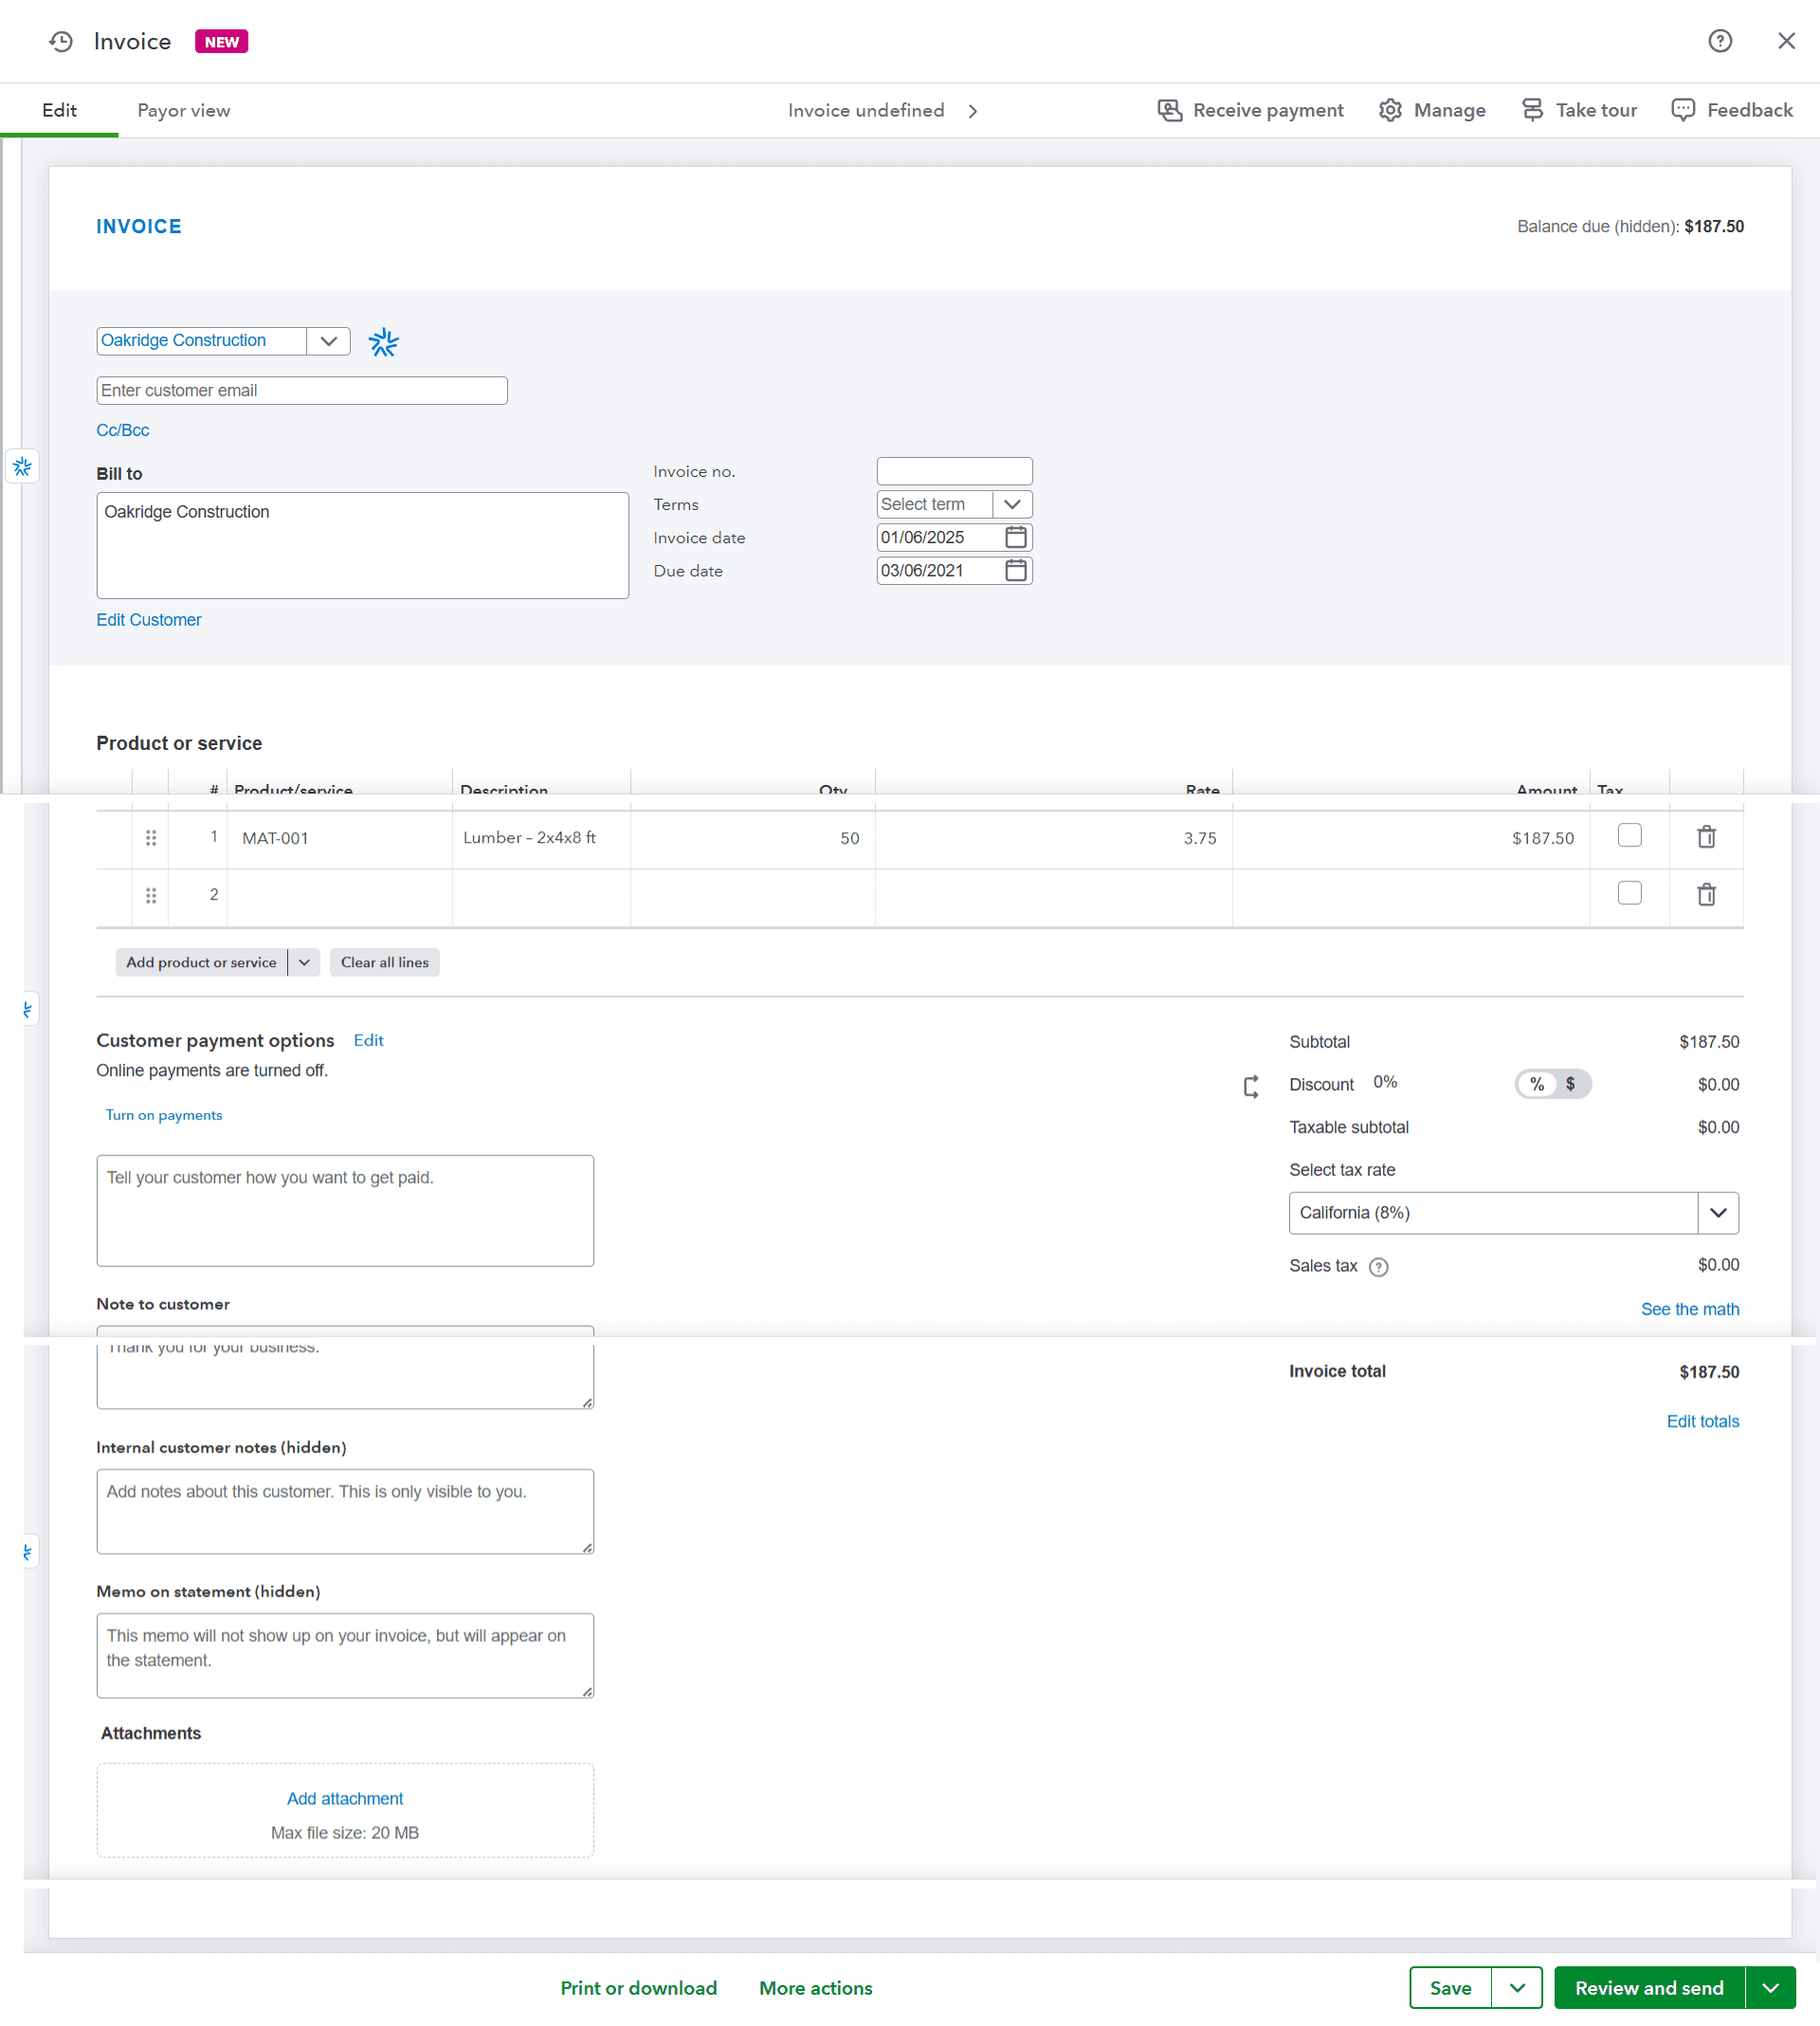
After completing the import, it's crucial to verify that all your sales invoices have been imported correctly into QuickBooks Online. Click on the ‘Number with QuickBooks icon’ to navigate to the imported data in your QuickBooks account. Ensure that everything is in order and accurately displayed. This final check guarantees you can trust your imported data, providing peace of mind as you continue your business operations.
If unsatisfied with the imported invoice data, you can also wholly roll back the import by clicking the ‘undo’ button.
You can check out this guide import invoices into QuickBooks, for a seamless import of bulk invoices into QuickBooks.
To learn more, check out this article on importing PDF invoices into QuickBooks Online.
Conclusion
Importing sales invoices into QuickBooks Online using SaasAnt Transactions is efficient and straightforward. You can even automate the import process with SaasAnt Transactions' automation feature, allowing you to schedule imports via email, Zapier, or FTP.
But the good news doesn't end here; SaasAnt offers white-glove onboarding guided by our support team to help you get started quickly. So why wait? Take a step toward a smoother, more streamlined invoicing process today.
Frequently Asked Questions
Can I import sales invoices into QuickBooks Online?
Yes, importing sales invoices into QuickBooks Online is possible and can be done efficiently using SaasAnt Transactions. This application supports importing various file formats, including Excel, CSV, and IIF, and allows detailed customization to suit your specific invoicing needs.
How can I migrate sales invoice data when switching to a new company set up in QuickBooks?
Transitioning to a new company set up in QuickBooks doesn't have to be a hassle. You can export sales invoices from your existing setup as XLS or CSV files and import them into your new QuickBooks Online account using SaasAnt Transactions. SaasAnt Transactions covers both the export and import processes, ensuring a smooth data migration that helps you set up your new company with all the essential data intact.
Is it possible to import data from other software into QuickBooks Online?
Yes, it is possible to import data from other software into QuickBooks Online. If transitioning from a different invoicing or accounting software to QuickBooks Online, you can leverage applications like SaasAnt Transactions to facilitate a smooth data transfer. It lets you quickly gather your sales invoice data from the existing software and accurately map the data fields during import, ensuring a hassle-free transition to QuickBooks Online. It is designed to make the import process straightforward and error-free, saving you time and effort.
What do I do if I encounter errors while importing multi-currency sales invoices?
Ensure you have activated the multi-currency function in your QuickBooks Online account. If errors persist, cross-check the currency formats in your import file against the supported formats in QuickBooks. If the issue remains unresolved, reach out to SaasAnt's support for assistance.
Can I reverse or correct an import if I have to fix something with my sales invoices?
If you realize an error post-import, you can reverse the import using SaasAnt's rollback (undo) functionality. However, reviewing and verifying all details before finalizing the import is always recommended to minimize such occurrences. If complications arise, consider reaching out to SaasAnt support for guidance.
Recommended reading:
Tags
Read Also
How To Export Invoices from QuickBooks Online
How to Change Invoice Number in QuickBooks Online?
How to Create an Invoice in QuickBooks Online
How to Manage Sales Invoices in QuickBooks?