How to Enter Vendor Credit in QuickBooks Desktop
Learn how to enter vendor credit in QuickBooks Desktop to record a document issued by a supplier that reduces the amount your business owes, typically due to returned goods or billing adjustments.
You can enter vendor credits manually or bulk import vendor credits in QuickBooks Desktop. The problem with manually entering vendor credit is that managing multiple vendor credits and ensuring they are applied to the correct invoices can be challenging, which could easily lead to overpayments or misapplied funds.
This is where you would need a CPA recommended solution like SaasAnt Transactions Desktop to bulk enter vendor credits into QuickBooks Desktop.
This blog will walk you through how to enter vendor credits in QuickBooks Desktop directly and how to enter multiple vendor credits at once using SaasAnt. Let’s get started.
Contents
How to Enter a Vendor Credit in QuickBooks Desktop?
Enter a Vendor Credit in QuickBooks Desktop: Quick Instructions
How to Enter Vendor Credits in QuickBooks Desktop in Bulk?
Benefits of Entering Vendor Credits in Bulk into QuickBooks Desktop
Wrapping Up
FAQs
How to Enter a Vendor Credit in QuickBooks Desktop?
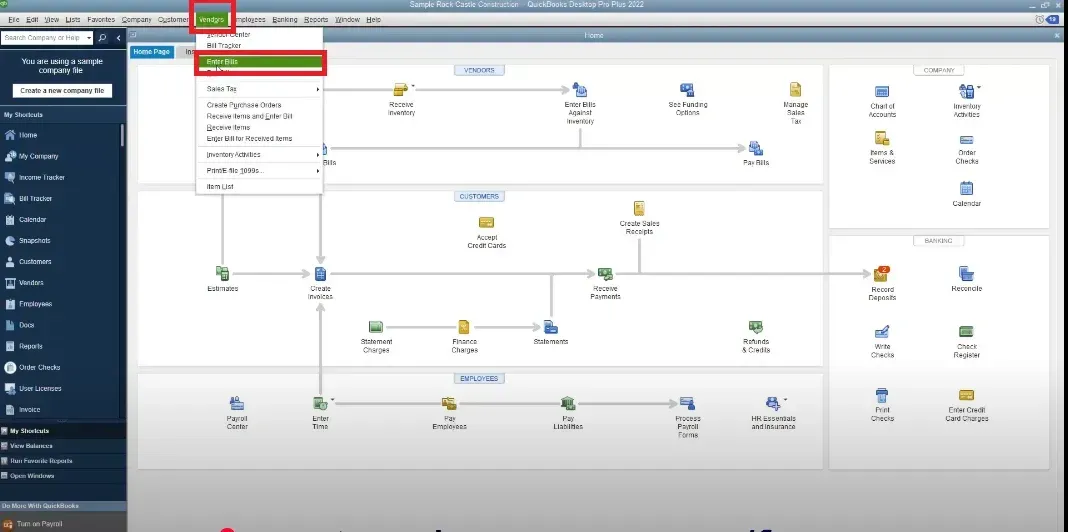
Step 1: Select the vendors menu from the menu bar and select enter bills. Select the radio button for credit at the top of the enter bills window.
Step 2: Select the name of the vendor who issued the credit from the vendor dropdown. Enter the date you received the credit from the calendar.
Step 3: Enter the reference number if a number is associated with the vendor credit. Then enter the amount of the credit into the credit amount field.
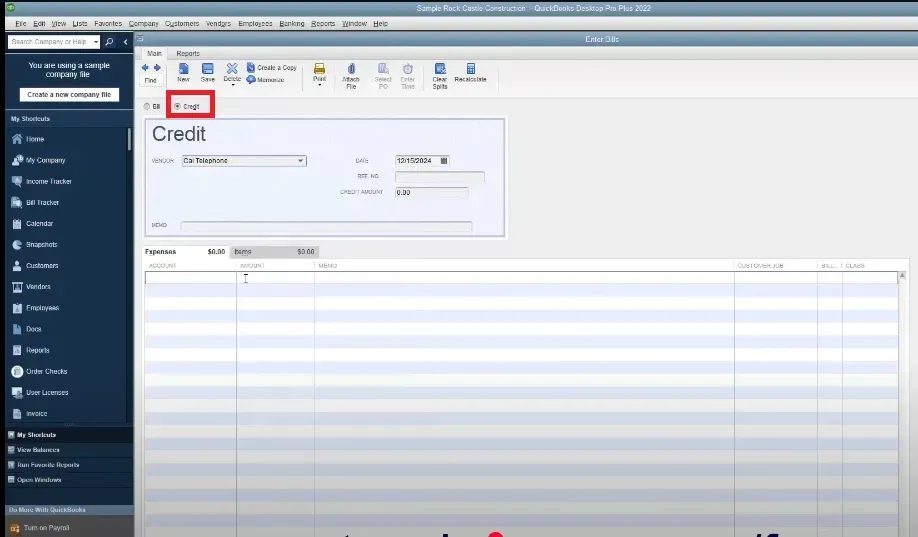
Step 4: Select the accounts or items the credit will affect on the expenses or items tab. Save and Close.
Enter a Vendor Credit in QuickBooks Desktop: Quick Instructions
Download SaasAnt Transactions Desktop and install.
Select vendors from menu bar -> enter bills -> credit
Upload the Excel file.
Review and Import.
How to Enter Vendor Credits in QuickBooks Desktop in Bulk?
Step 1: Connect with SaasAnt Transactions
Download and install SaasAnt Transactions Desktop. You can download the free trial software from the SaasAnt Transactions Desktop.
Step 2: Select Entity
In the 'Import' window, navigate to the 'QuickBooks Transaction Type' section. Choose Vendor Credit from the dropdown menu.
Step 3: Upload File
Browse and select the vendor credits file from your computer and upload.
Step 4: Mapping
Upon successful uploading, map the fields in the file to QuickBooks fields. The mapping happens automatically, but if there’s any misalignment, select the appropriate field from the dropdown menu. Once mapping is complete, click on review and import.
Step 5: Send to QuickBooks
Examine your file data in the Review Grid screen and click "Send to QuickBooks" to upload the data to QuickBooks.
Benefits of Entering Vendor Credits in Bulk into QuickBooks Desktop
Time Efficiency: Importing vendor credits in bulk saves significant time compared to manual entry, allowing users to focus on other essential tasks.
Reduced Errors: Automated imports minimize the risk of human error associated with manual data entry, ensuring that vendor credits are accurately recorded.
Simplified Workflow: Integrating vendor credits into QBD through Saasant Transactions creates a more efficient workflow, facilitating better vendor relationships and financial records management.
Improved Financial Accuracy: By ensuring that all vendor credits are accurately imported, businesses can maintain more precise financial statements and reports, leading to better decision-making.
Enhanced Reporting: Importing vendor credits allows for more comprehensive reporting capabilities within QuickBooks, enabling businesses to track credits and manage cash flow more effectively.
Wrapping Up
We've discussed all the essentials on how to enter vendor credit in QuickBooks Desktop individually and in bulk. The bulk upload method of SaasAnt Transactions Desktop overcomes QuickBooks' challenges with bulk data imports, providing a quick, error-free, and time-saving solution. Plus, you can start immediately with a 30-day free trial. If you are facing any trouble, you can always drop an email at support@saasant.com.
FAQs
How do I enter a vendor credit in QuickBooks Desktop?
Go to the menubar and select vendors -> enter bills -> credit and enter the vendor details, credit amount and date. This is suitable for entering a couple of vendor credits. If you have a list of vendor credits to enter, you can use SaasAnt Transactions to bulk upload using an Excel file.
How to deposit a vendor credit in QuickBooks?
To deposit a vendor credit in QuickBooks Desktop, go to the menu bar and select Vendors -> Enter Bills -> Credit and enter the vendor details, credit amount, and date. This is suitable for entering a couple of vendor credits. If you have a list of vendor credits to join, you can use SaasAnt Transactions to bulk upload using an Excel file.
How to enter a supplier credit note in QuickBooks desktop?
To enter a vendor credit in QuickBooks Desktop, go to the menu bar and select Vendors -> Enter Bills -> Credit and enter the vendor details, credit amount, and date. This is suitable for entering a couple of vendor credits. If you have a list of vendor credits to join, you can use SaasAnt Transactions to bulk upload using an Excel file.
How do I record a supplier credit in QuickBooks?
To record a supplier credit in QuickBooks Desktop, go to the menu bar and select Vendors -> Enter Bills -> Credit and enter the vendor details, credit amount, and date. This is suitable for entering a couple of vendor credits. If you have a list of vendor credits to join, you can use SaasAnt Transactions to bulk upload using an Excel file.
Read also
Create Vendor Credits in QuickBooks Online
How to Apply Vendor Credit in QuickBooks Online: A Complete Guide
How to Delete Vendor Credits in QuickBooks Online?
How to Enter Vendor Credit in QuickBooks Online