How to Create an Invoice in QuickBooks Online
 Invoicing is an integral part of business operations, it’s how you receive payments, keep track of your income, and maintain an organized financial record. Whether you are a small business owner, accountant, or bookkeeper, QuickBooks Online (QBO) makes the process of creating and sending invoices straightforward, precise, and professional.
QuickBooks’ cloud-based invoicing capability allows you to bill clients, send reminders, and record payments, all from one location. Yet, invoicing is more than just issuing a bill. The accuracy of your invoice data affects the efficiency of your cash flow and bookkeeping. This is where tools like SaasAnt Transactions Online prove beneficial, they assist in automating, importing, and managing invoices in bulk, minimizing manual errors.
How to Create an Invoice in QuickBooks Online - Step by Step Guide
How to Create an Invoice in QuickBooks Online: Step-by-Step Guide
Creating an invoice in QuickBooks Online is the first step towards faster payments and accurate sales tracking. Whether you are invoicing a client for services or products, QuickBooks streamlines the process. Follow the steps below to easily create and personalize your invoices.
Step 1: Log in to QuickBooks Online
Access your QuickBooks Online account and log in using your credentials.
Once you are logged in, you will see the dashboard that summarizes your company's financial activities.
Step 2: Navigate to the Invoice Creation Page
There are two methods to create an invoice:
Press the + New button on the left navigation bar, then pick Invoice in the “Customers” section.
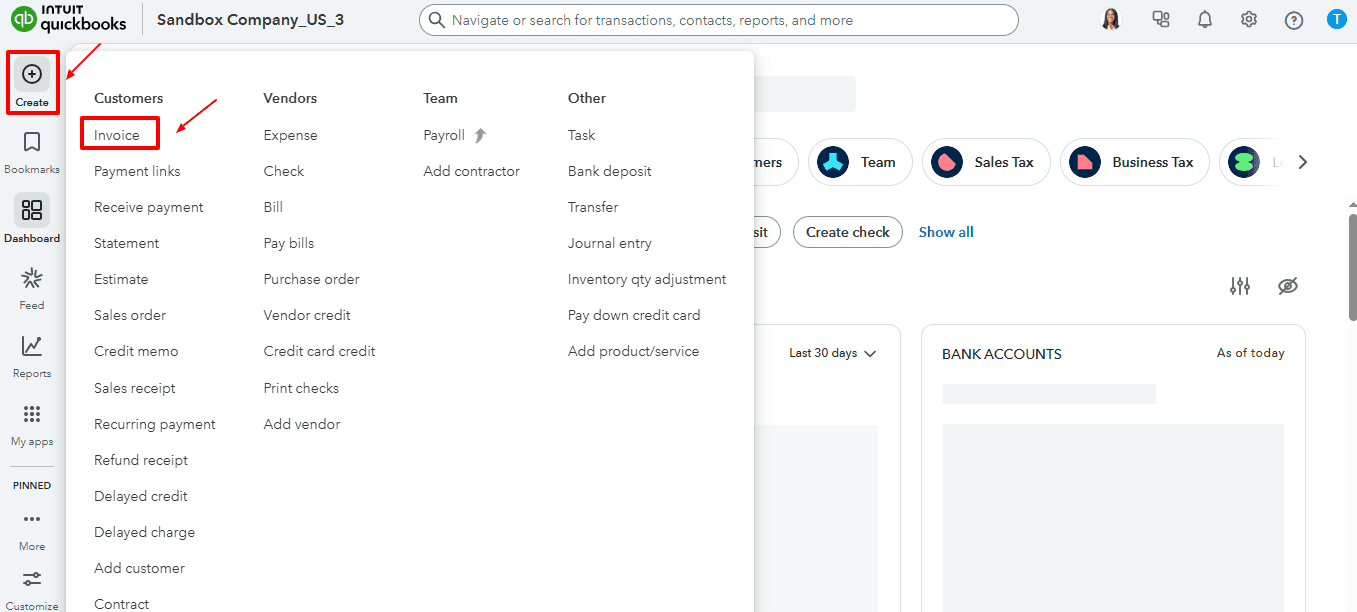
Or navigate to “My Apps” and select “Sales & Get Paid”. In the dropdown, choose “Invoices”
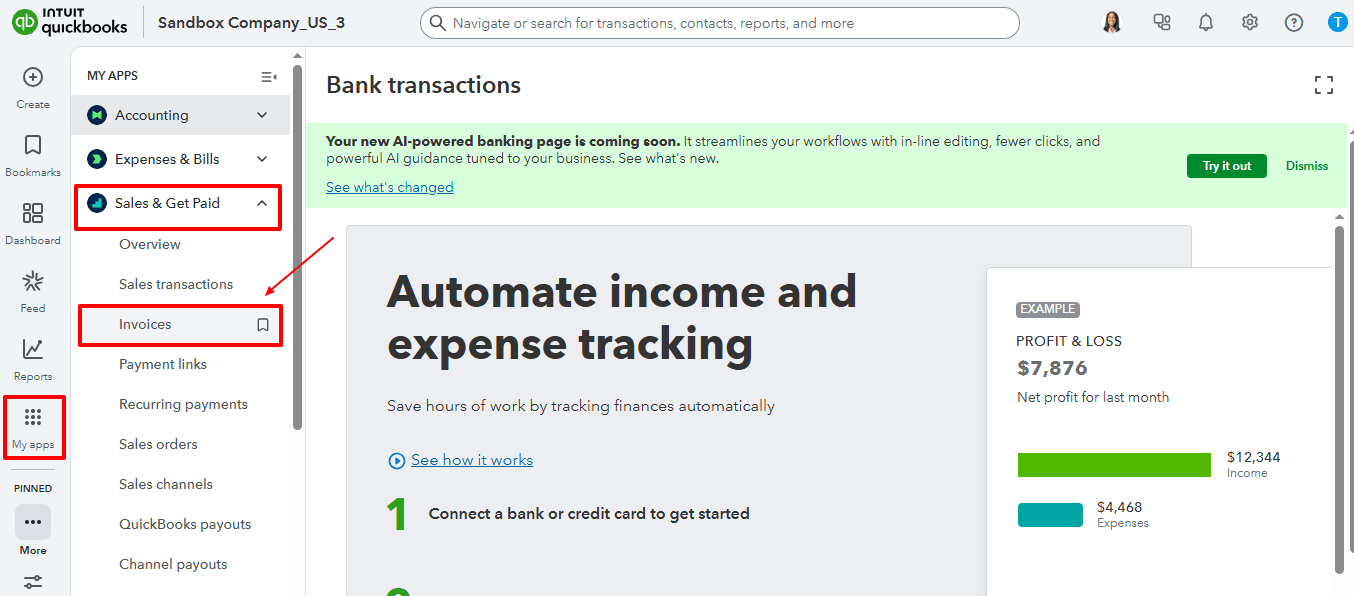
Now select the “Create Invoice” option as shown in the image below.
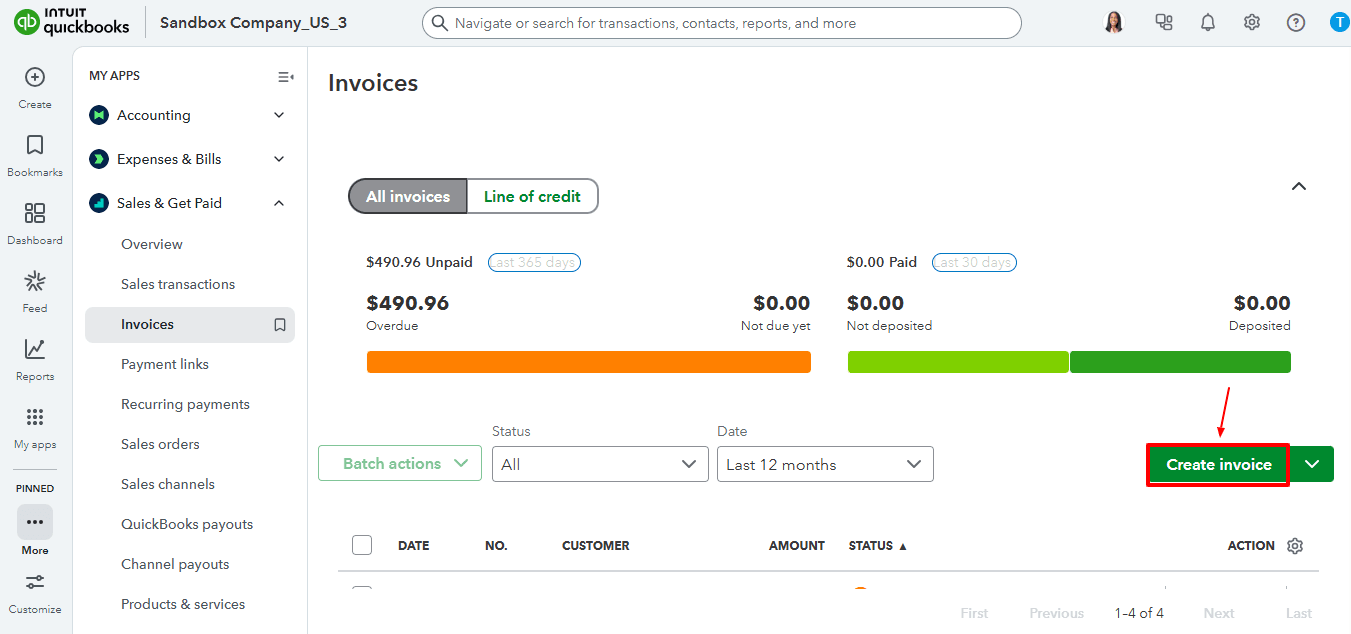
This will open the invoice creation form for you to fill in all required details.
Step 3: Choose or Add a Customer
In the Customer dropdown, select the customer you want to bill.
If the customer is already in the system, pick their name from the list.
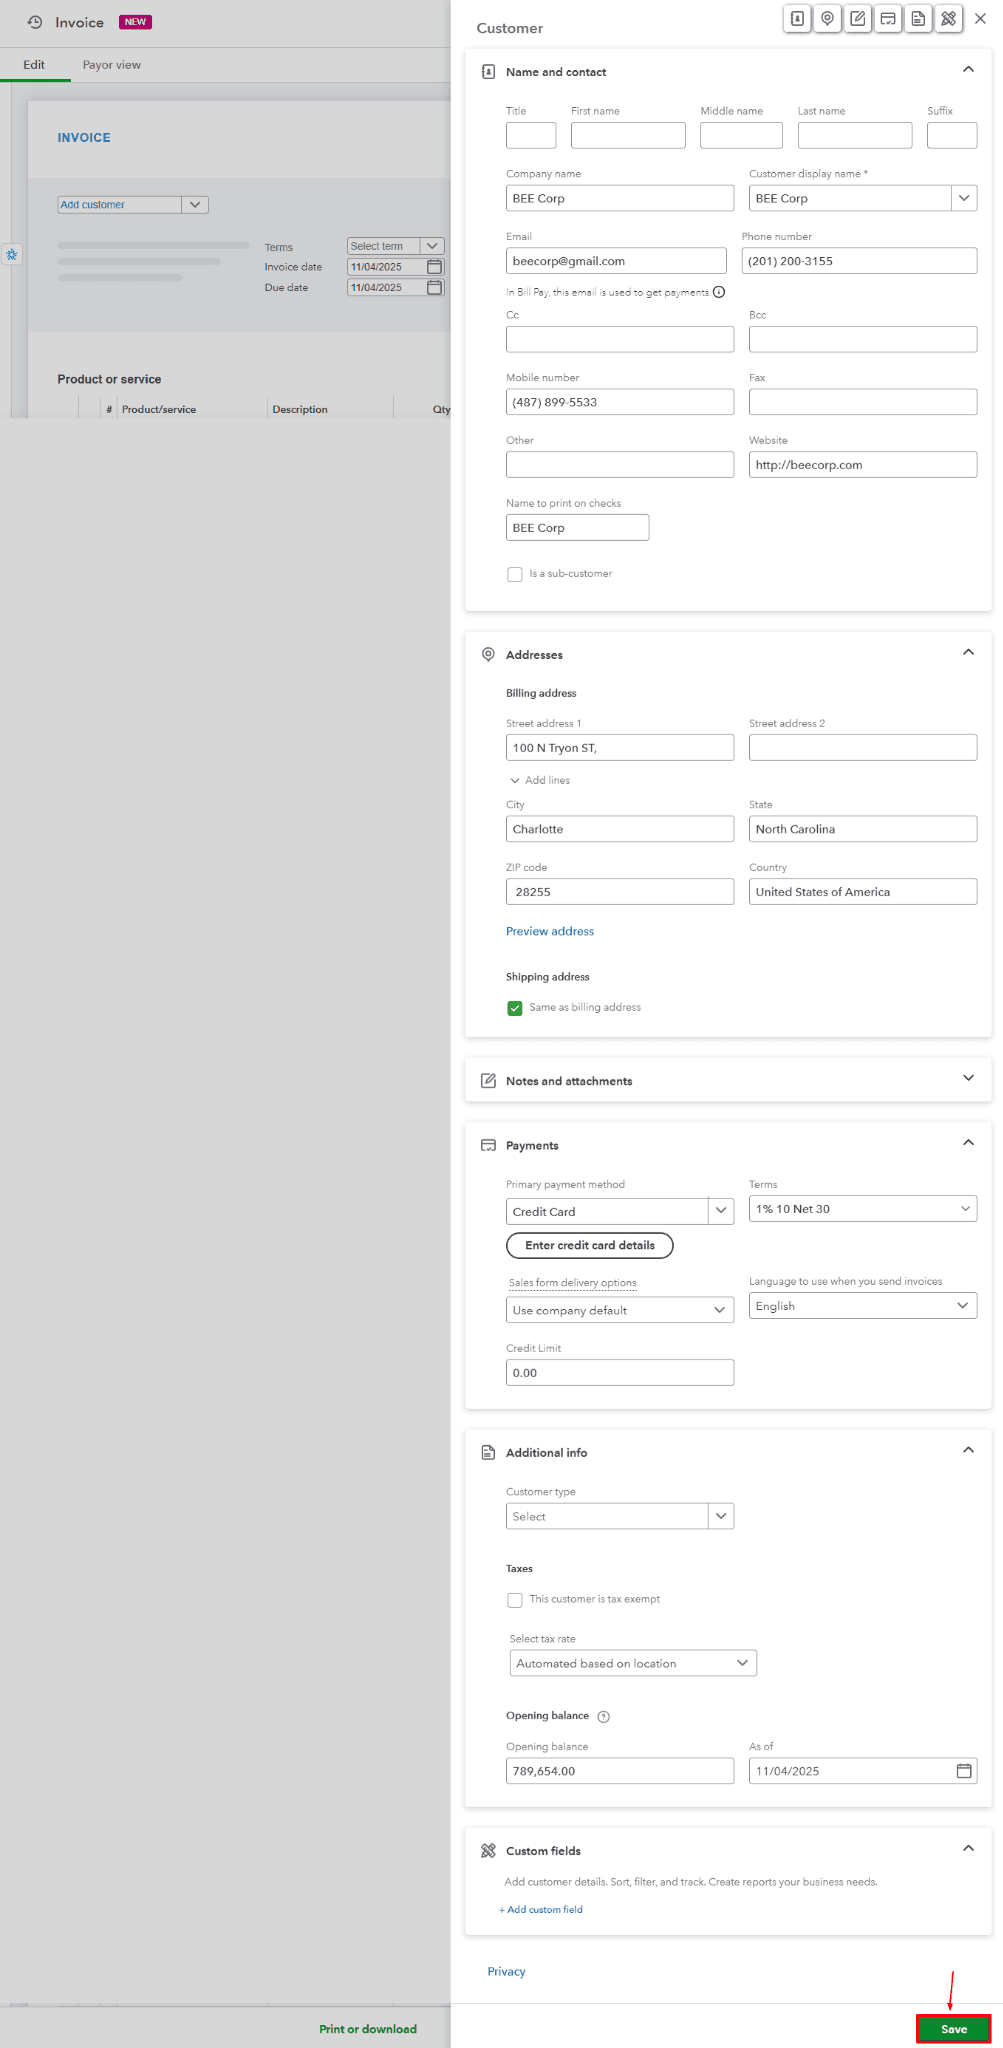
If they are not, click Add new, fill in their details such as name, email address, and billing information, then click Save.
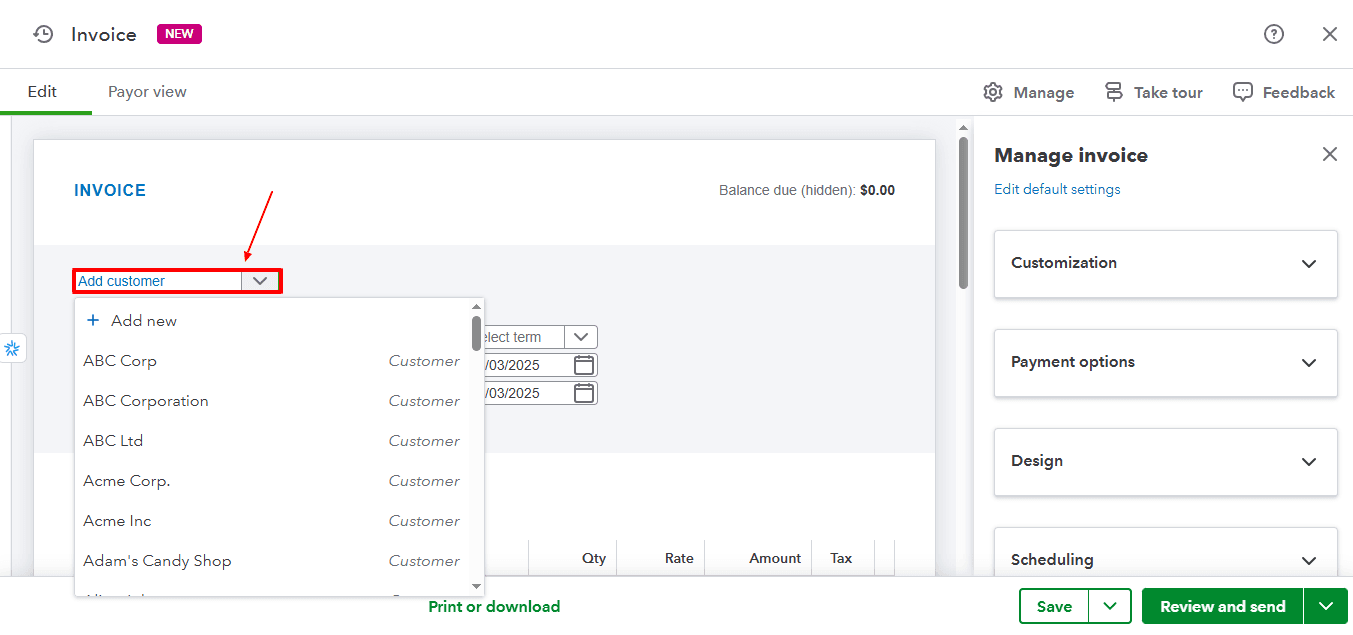
Entering the right email allows QuickBooks to automatically send the invoice to them when you are ready.
Step 4: Enter Invoice Details
Now, enter the important invoice information:
Invoice date: This is the date when the invoice is made.
Terms: Define the payment terms (like Net 15 or Net 30).
Due date: QuickBooks will fill this in automatically according to the chosen terms, but you can adjust it if necessary.
Invoice number: QuickBooks will give you a number automatically, but you can alter it for your tracking needs.

Step 5: Enter Products or Services
In the Product/Service area, choose what you are charging for:
Select an existing item or click Add new to make a new one.
Complete the Description, Quantity, Rate, and Amount fields.
QuickBooks will automatically compute the total amount, including any applicable taxes if they are turned on.
If you apply sales tax, ensure the right tax rate is set in the Tax column.

Upon completion, you have multiple choices:
Save and send: This option sends the invoice straight to the customer's email.
Save and close: This saves the invoice for future reference.
Save and new: This saves the current invoice and opens a new one for the subsequent customer.
Additionally, you can personalize your invoice template by clicking on the gear icon and choosing “Custom Form Styles” for branding and layout preferences.
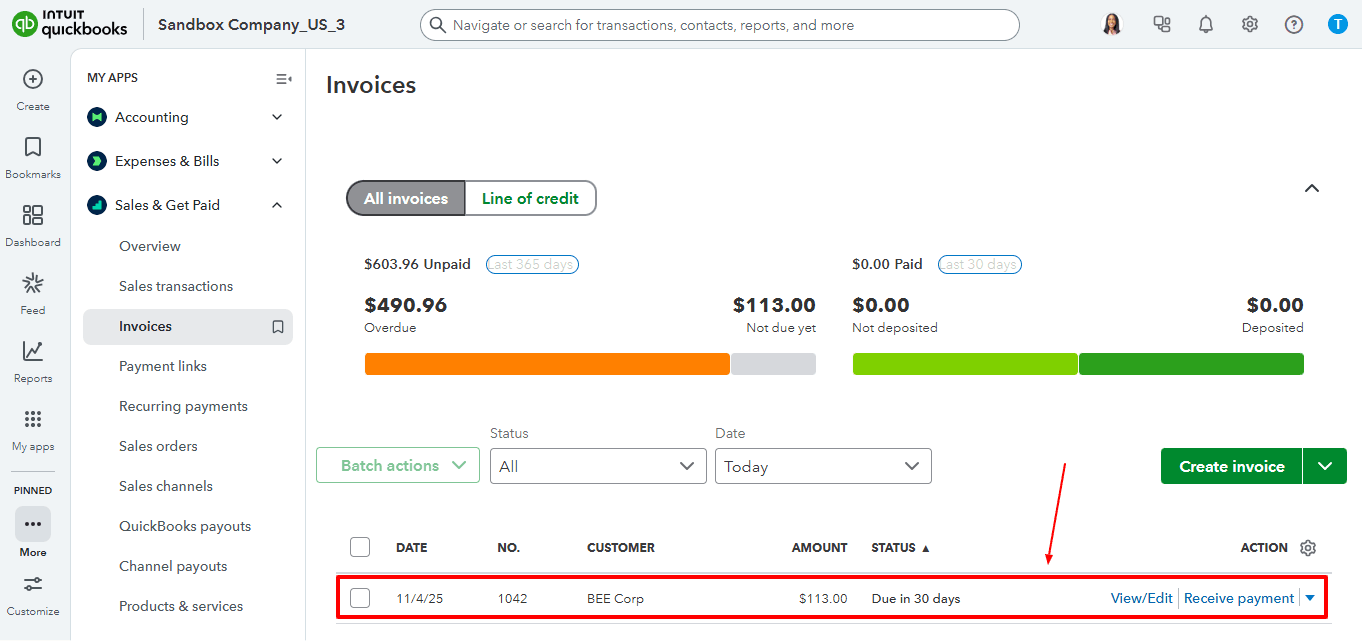
Step 6: Invoice Tracking and Management
Once you send the invoice, navigate to “My Apps” and select “Sales & Get Paid”. In the dropdown, choose “Invoices” to check its status. QuickBooks will indicate if the invoice is:
Sent (email delivered),
Viewed (customer opened it),
Paid, or
Overdue.
From this page, you can send reminders, log payments, or apply credits.
Wrap Up
Creating invoices in QuickBooks Online is not just about filling out a form, it’s about guaranteeing that your records, taxes, and customer details are correct and well-structured.
QuickBooks provides the ability to create, track, and manage invoices smoothly. If your business handles a significant volume of invoices, using automation with SaasAnt Transactions Online can enhance your workflow, saving time, increasing accuracy, and ensuring your books are ready for audits.
If you have inquiries regarding our products, features, trial, or pricing, or if you require a personalised demo, contact our team today. We are ready to help you find the ideal solution for your QuickBooks workflow.
Frequently Asked Questions
1) Can I customize my invoice template in QuickBooks Online?
Yes. Go to Settings > Custom Form Styles, where you can upload your logo, modify fonts, colours, and add custom fields.
2) How do I record a customer payment for an invoice?
Go to the + icon, select “Receive payment”, select the customer and invoice, and provide the payment details like date, amount, and payment method.
3) What happens if I send an incorrect invoice?
You can modify the invoice before making a payment or remove it and generate a new one. Tools such as SaasAnt simplify batch editing if several invoices require changes.
4) Can I attach documents to my invoice?
Yes. At the bottom of your invoice, click Attach file to upload contracts, receipts, or supporting documents.
5) Can I create invoices for multiple customers at once?
While QuickBooks does not natively support batch creation, SaasAnt Transactions Online provides the option to import many invoices at the same time.