How to Add a New Company in QuickBooks Online: Step-by-Step Guide
 As companies expand and diversify, robust accounting solutions become paramount. QuickBooks Online, a leading accounting software, is a versatile tool designed to streamline financial operations for businesses of all sizes. This article aims to guide you through the process of adding a new company to QuickBooks Online and highlight its benefits for managing multiple businesses.
QuickBooks Online is a cloud-based accounting software developed by Intuit, renowned for its user-friendly interface and comprehensive features. It caters to small and medium-sized enterprises (SMEs), offering tools for invoicing, expense tracking, payroll, and financial reporting. QuickBooks Online's accessibility from any internet-connected device makes it a preferred choice for businesses seeking flexibility and real-time financial insights.
QuickBooks Online has earned its reputation as a market leader in accounting software through continuous innovation and customer-centric features. Its intuitive design simplifies complex accounting tasks, allowing business owners and accountants to focus on strategic decision-making. With a strong emphasis on automation and integration, QuickBooks Online enhances productivity and accuracy in financial management.
Contents
Importance of Managing Multiple Companies Efficiently
Benefits of Using QuickBooks Online for Multiple Businesses
Preparing to Add a New Company
Step-by-Step Guide to Adding a New Company in QuickBooks Online
Post-Setup Activities
Wrap Up
FAQs
Importance of Managing Multiple Companies Efficiently
For entrepreneurs managing multiple companies, efficient financial oversight is essential. Keeping separate financial records for each entity ensures compliance with regulatory requirements and provides a clear picture of each company's financial health. QuickBooks Online's multi-company management feature allows users to seamlessly switch between accounts, reducing the risk of errors and improving overall efficiency.
Benefits of Using QuickBooks Online for Multiple Businesses
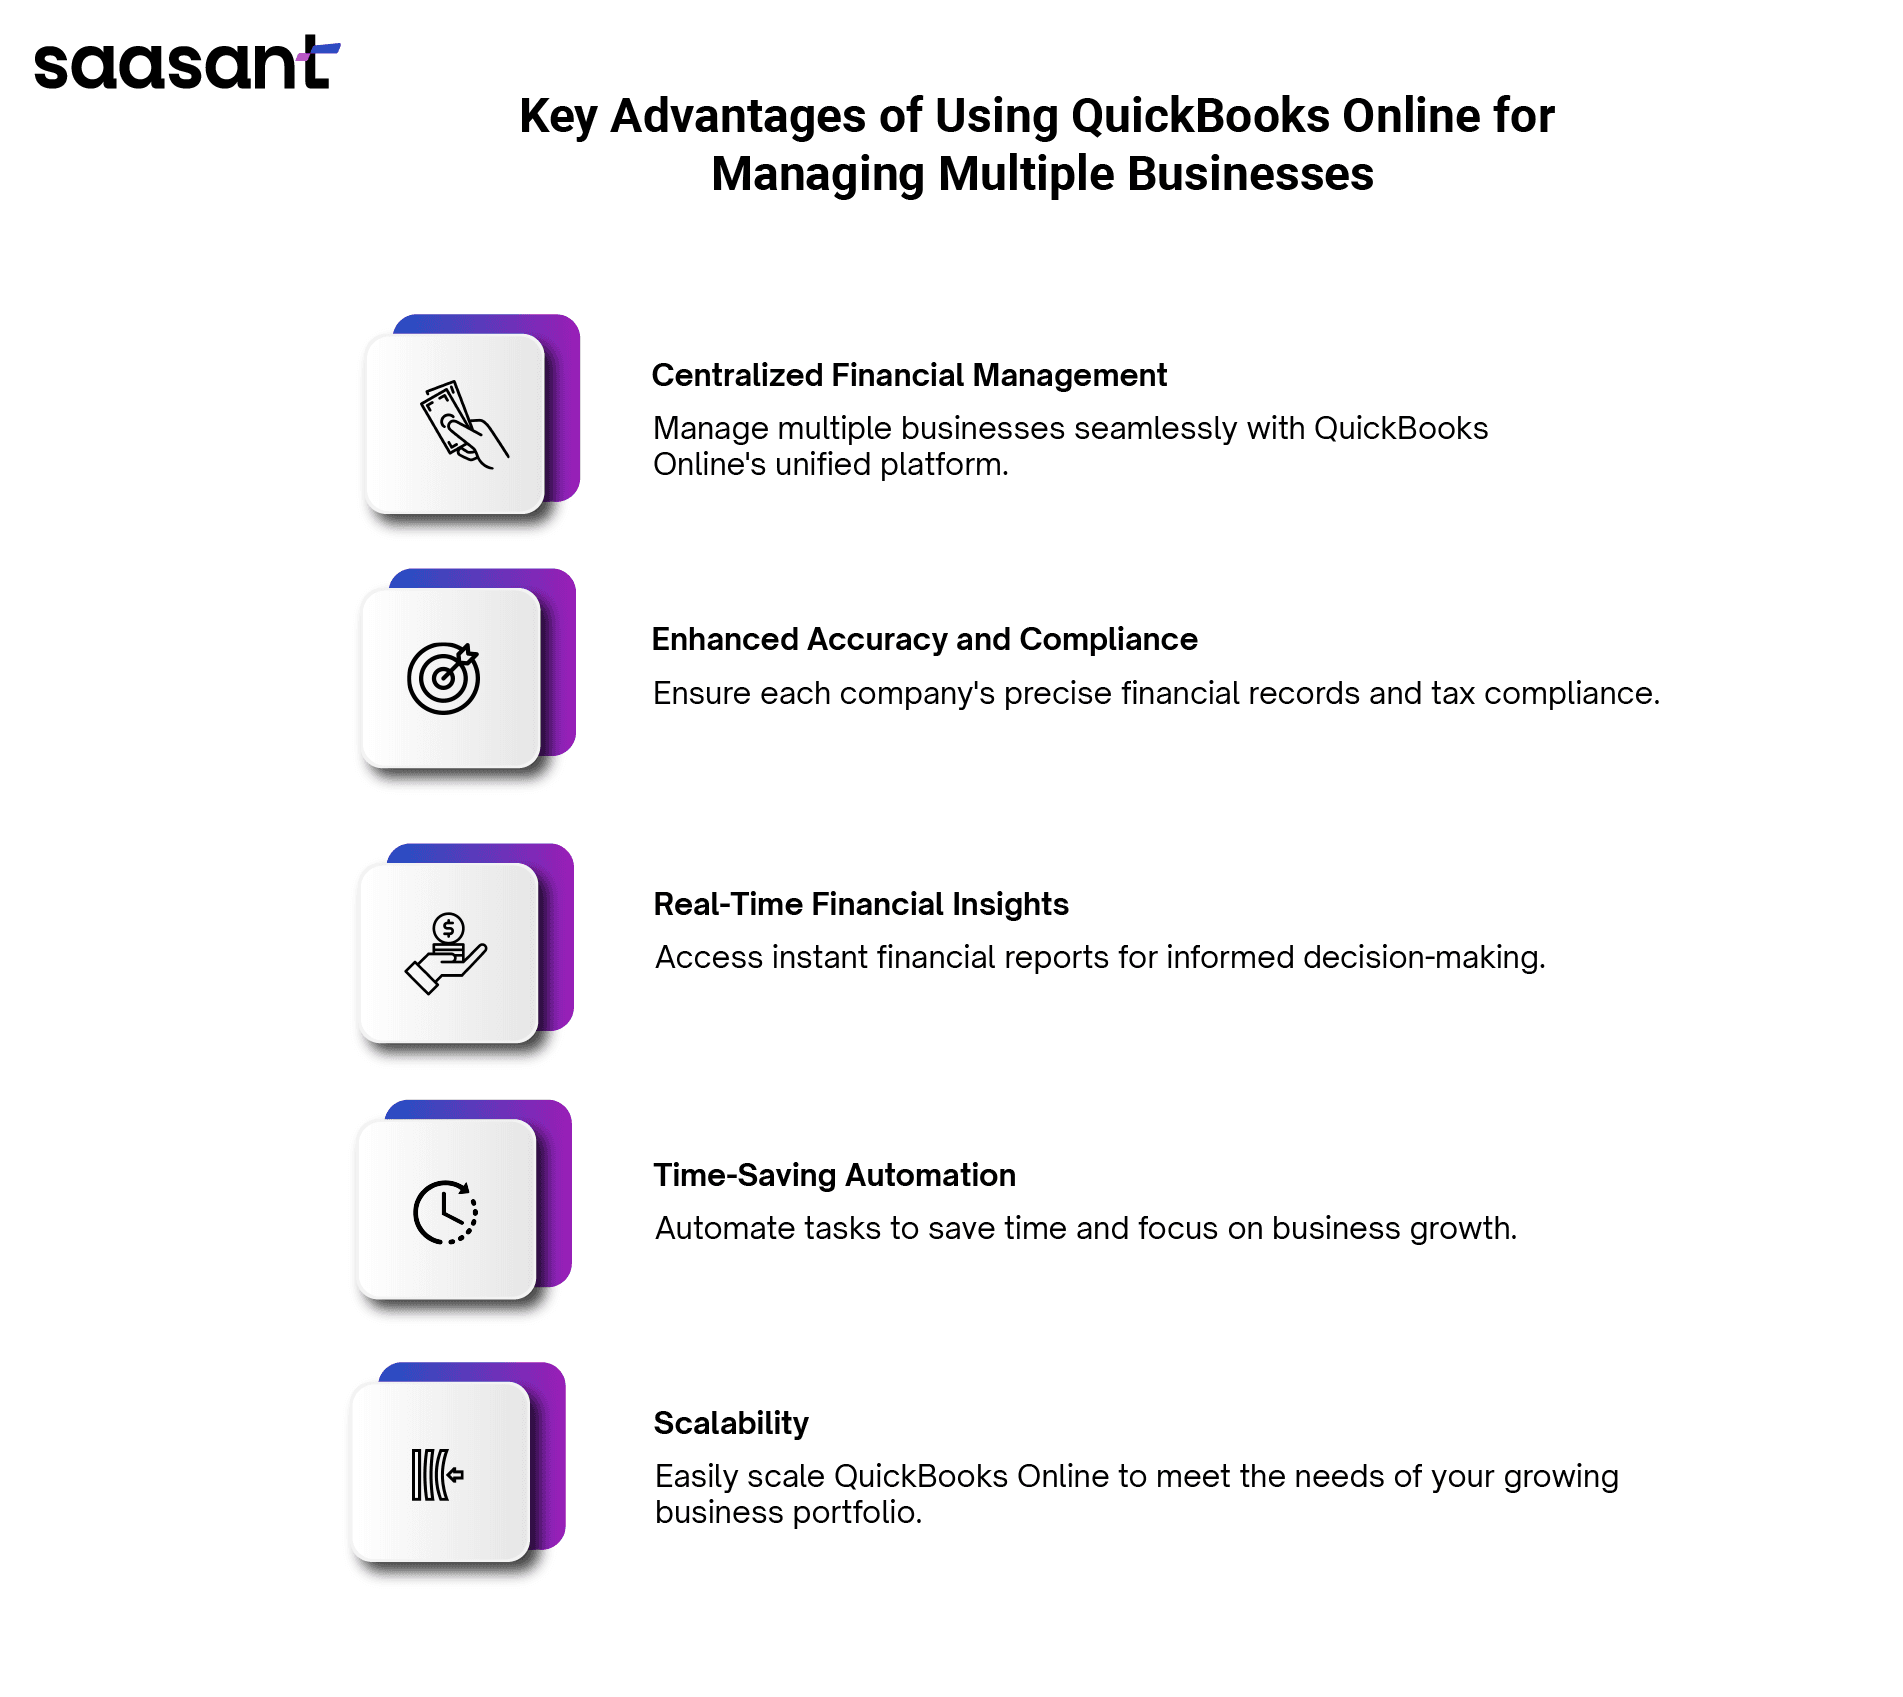
Centralized Financial Management
QuickBooks Online allows you to manage multiple companies from a single platform, providing a centralized view of all financial activities. This feature simplifies the consolidation of financial data and improves overall efficiency.
Enhanced Accuracy and Compliance
By keeping distinct financial records for each company, QuickBooks Online helps ensure compliance with tax regulations and financial reporting standards. This reduces the risk of errors and penalties associated with inaccurate or incomplete financial data.
Real-Time Financial Insights
QuickBooks Online offers real-time financial insights, enabling business owners to make informed decisions. With instant access to financial reports, cash flow statements, and profit and loss summaries, you can proactively manage your businesses' financial health.
Time-Saving Automation
Automation features in QuickBooks Online, such as recurring transactions and bank reconciliations, save time and reduce manual effort. This lets you focus on strategic initiatives and business growth rather than administrative tasks.
Scalability
As your business portfolio grows, QuickBooks Online scales with you. The platform's flexibility and extensive feature set accommodate the needs of multiple businesses, making it an ideal choice for entrepreneurs with diverse ventures.
By leveraging QuickBooks Online's capabilities, you can efficiently manage multiple companies, enhance financial accuracy, and drive business success. Follow the steps outlined in this guide to add a new company to your QuickBooks Online account and unlock the benefits of streamlined financial management.
Preparing to Add a New Company
Gathering all necessary information and documents before adding a new company to QuickBooks Online is essential to ensure a smooth setup process. Additionally, the new company may require setting up a new email account. This section provides a detailed guide on both aspects to help you prepare effectively.
Gathering Necessary Information
Gathering all required information and documents is crucial to streamlining the process of adding a new company to QuickBooks Online. Accurate and complete data not only facilitates a smooth setup but also ensures the accuracy of your financial records.
List of Information and Documents Needed Before Starting
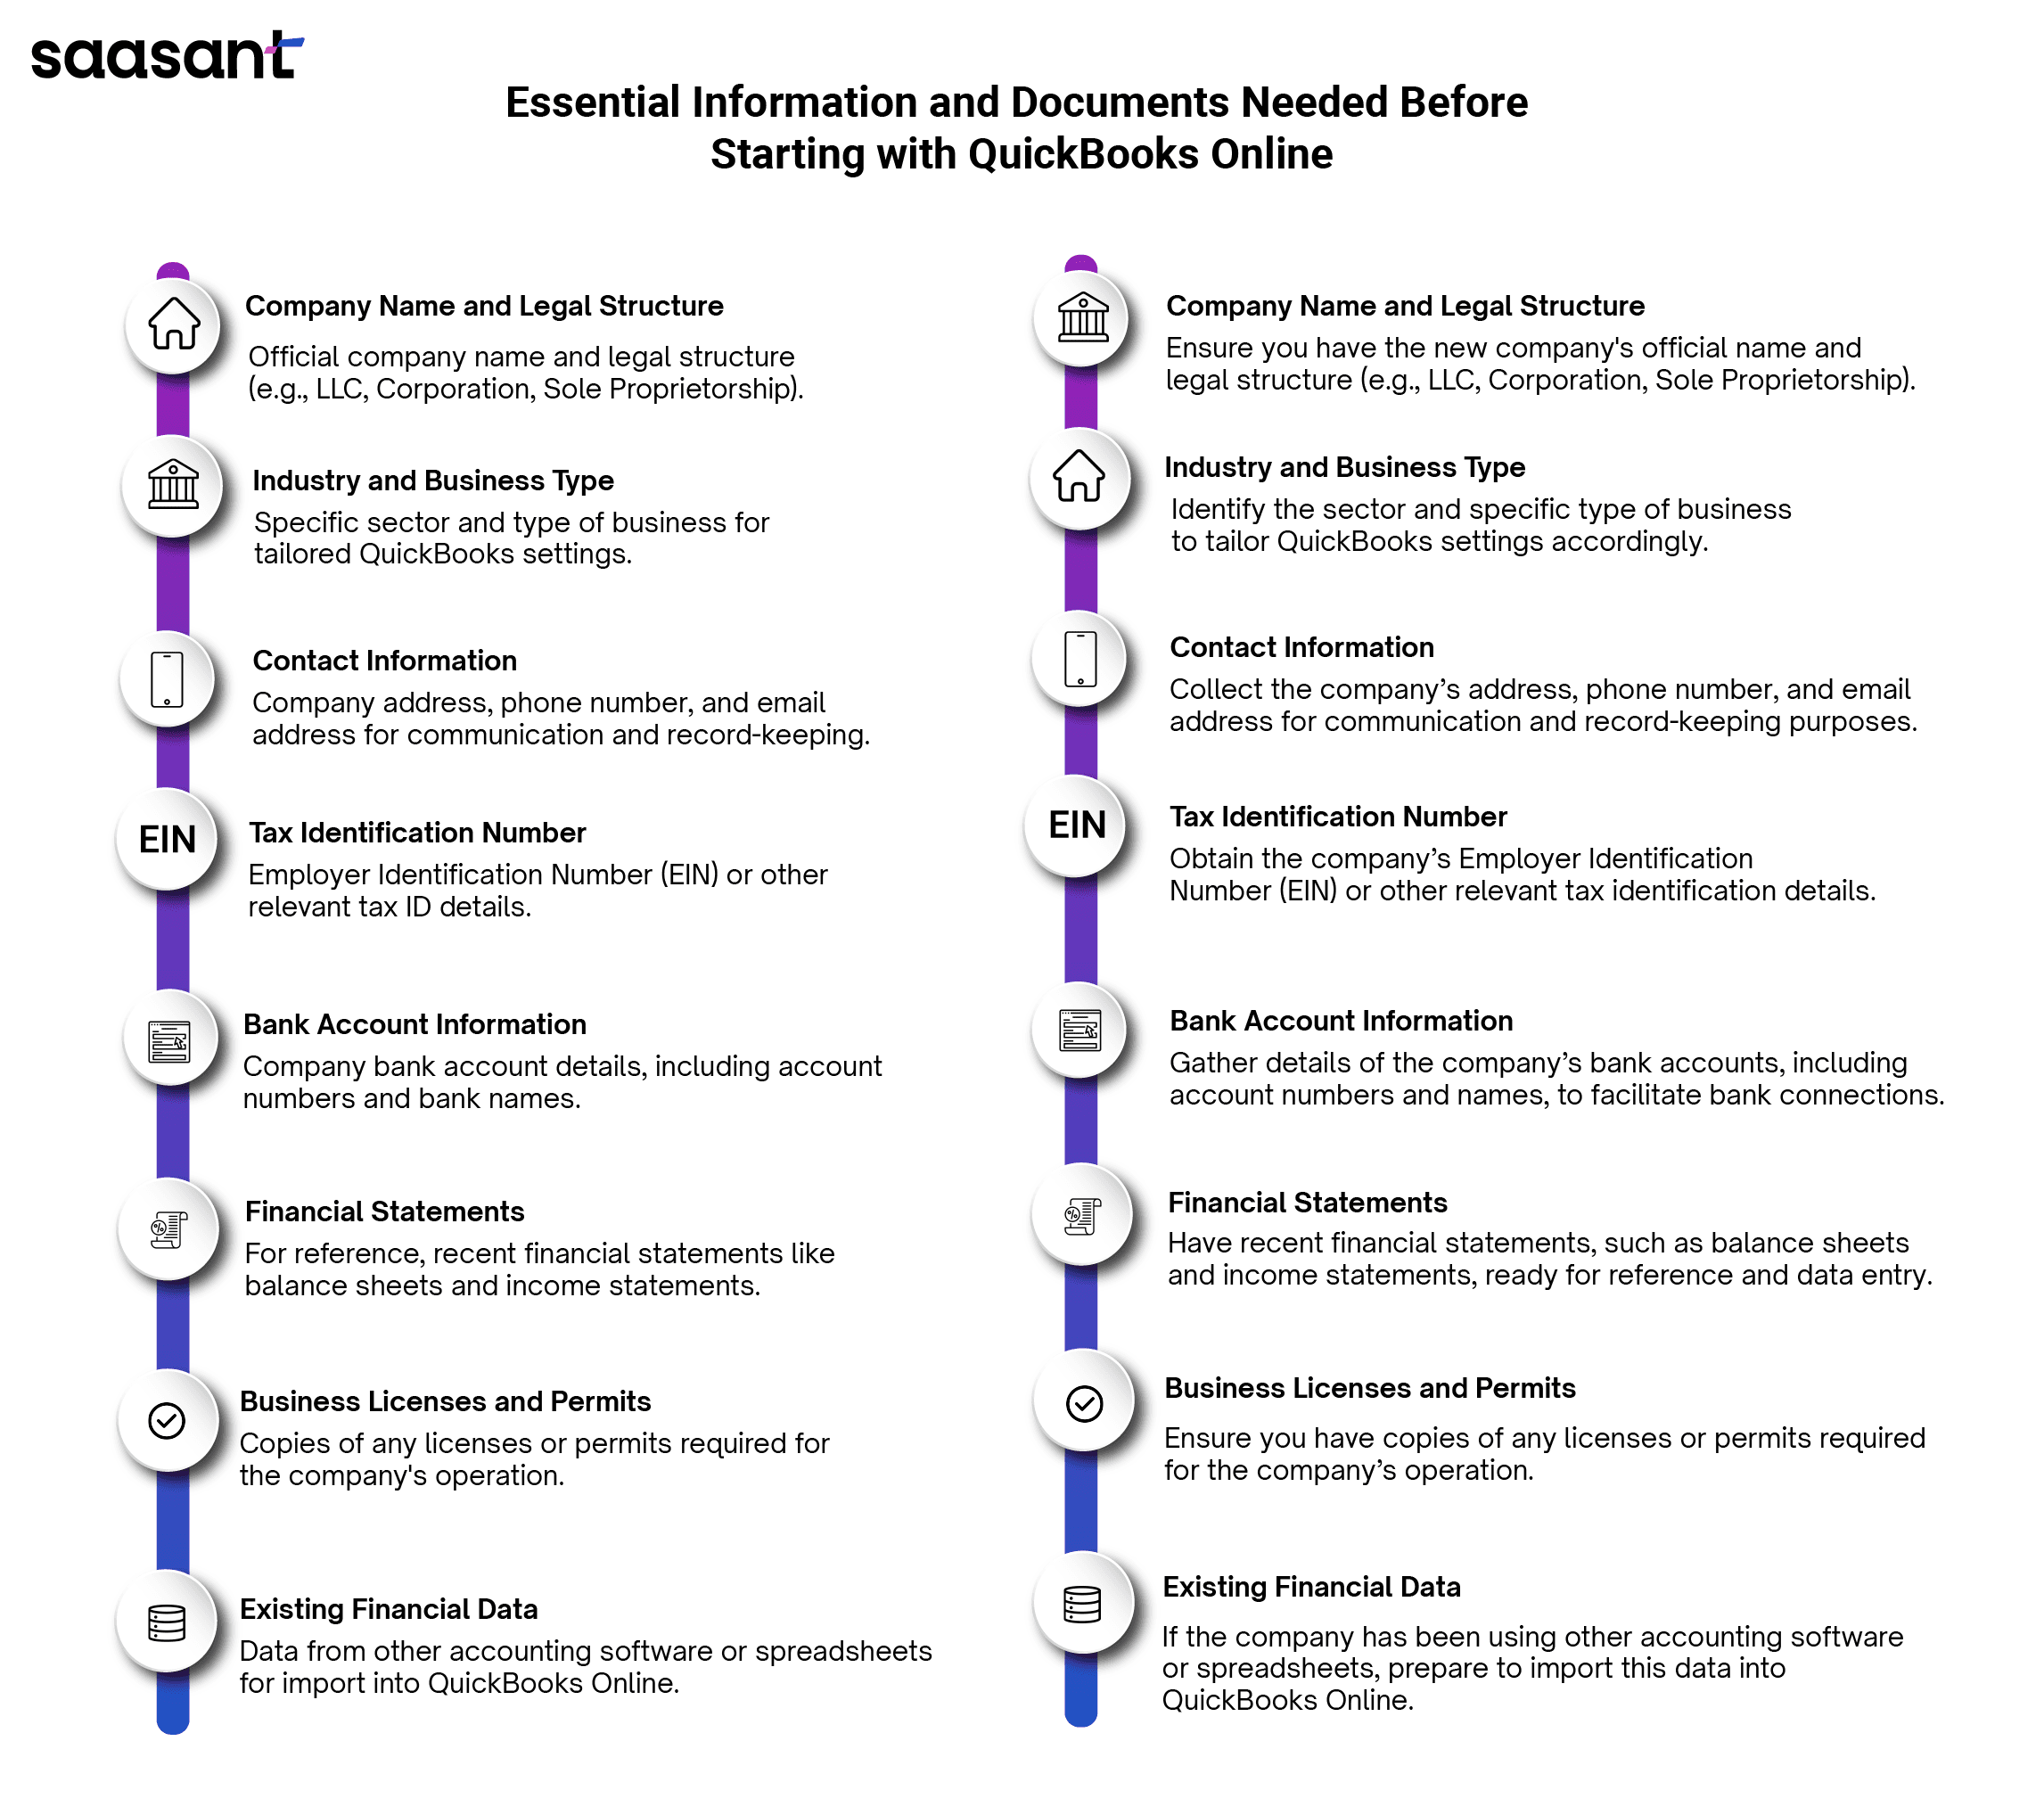
Importance of Having Accurate and Complete Data
Accurate and complete data is fundamental to the effective management of financial records. Only accurate or complete information can lead to errors in financial reporting, tax compliance issues, and potential penalties. Ensuring that all data is up-to-date and correct before starting the setup process will help maintain the integrity of your financial records and streamline the overall management of the new company in QuickBooks Online.
Setting Up a New Email Account (If Required)
Sometimes, you may need to create a new email account for the new company. This email account will be used for communication and linking to QuickBooks Online. Here are the steps to set up a new email account and link it to QuickBooks Online.
Steps to Create a New Email Account for the New Company
Choose an Email Provider: Choose a reputable email service provider, such as Gmail, Outlook, or a business-specific provider.
Visit the Provider’s Website: Navigate to the website of your chosen email provider.
Create a New Account: Click the option to create a new account. You will be prompted to enter personal information such as your name, desired email address, and password.
Verify Your Account: Follow the verification steps provided by the email service to verify your identity and activate the new email account.
Set Up Email Preferences: Configure your email preferences, including security settings and notification preferences, to suit the needs of your new company.
Linking the Email to QuickBooks Online
Log in to QuickBooks Online: Access your QuickBooks Online account using your existing credentials.
Navigate to Company Settings: Click on the ‘gear’ icon in the upper right corner and select ‘Account and Settings’ from the drop-down menu.
Update Contact Information: In the ‘Company’ tab, update the contact information with the new company’s email address.
Verify the Email Address: QuickBooks Online may send a verification email to the new email address. Follow the instructions in the email to complete the verification process.
Assign Roles and Permissions: If multiple users exist, assign roles and permissions for the new email account, ensuring that only authorized personnel can access sensitive financial information.
Following these steps and preparing ensures a seamless process when adding a new company to QuickBooks Online. Accurate data and a dedicated email account will contribute to efficient financial management and enhance the overall functionality of QuickBooks Online for your new business.
Step-by-Step Guide to Adding a New Company in QuickBooks Online
Adding a new company in QuickBooks Online involves several key steps, from selecting the appropriate plan to configuring the company settings. This detailed guide will help you navigate the process efficiently and ensure your new company is set up correctly.
Step 1: Visit the QuickBooks Pricing Page
Begin by visiting the QuickBooks Online pricing page to review the various plans and pricing options available. QuickBooks Online offers multiple plans tailored to business needs, such as Simple Start, Essentials, Plus, and Advanced.
Compare Plans: Carefully compare the features and benefits of each plan to determine which one best suits your new company's requirements. Consider factors such as the number of users, invoicing capabilities, and advanced reporting features.
Select a Plan: Once you have decided on a plan, click the "Choose plan" button associated with your selected option. Select the "Add to plan" option to include payroll services in your subscription if you require payroll services.
Step 2: Sign In or Create a QuickBooks Account
After selecting your plan, you will be prompted to sign in or create a new QuickBooks account.
Sign In: If you already have a QuickBooks account, click the "Sign in" button and enter your login credentials (email and password).
Create an Account: If you do not have an account, follow the on-screen instructions. You must provide your email address, create a password, and verify your identity.
Step 3: Follow the On-Screen Process to Proceed
Once signed in, QuickBooks Online will guide you through the setup process for adding a new company. Follow these steps to ensure a smooth setup:
Enter Company Information: Provide the necessary details about your new company, including the business name, industry, and contact information. Ensure that all information is accurate to avoid issues later on.
Customize Company Settings: Configure your company's settings according to its needs. This includes setting the accounting method (cash or accrual), fiscal year, and currency preferences.
Connect Bank Accounts: Link your company's bank accounts to QuickBooks Online to facilitate seamless transaction tracking and reconciliation. You will need your bank account numbers and login credentials to complete this step.
Import Existing Financial Data: If your company has financial data from other accounting software or spreadsheets, import this data into QuickBooks Online. This will ensure continuity and accuracy in your financial records.
Assign User Roles and Permissions: Determine who will access your company's financial data and assign appropriate roles and permissions. This step is crucial for maintaining data security and ensuring that only authorized personnel can view or modify sensitive information.
Review and Confirm: Review all the information and settings you have entered to ensure accuracy. Once satisfied, confirm the setup to complete the process.
Additional Tips for Efficient Setup
Accurate Data Entry: Ensure all data entered during the setup process is accurate and complete. Inaccurate information can lead to errors in financial reporting and tax compliance. For businesses handling a high volume of transactions, consider using SaasAnt Transactions to streamline data import and export processes. By using SaasAnt Transactions, you can automate the import of bulk transactions, ensuring that data is accurately and consistently entered into QuickBooks Online. For example, if your company has many invoices, SaasAnt Transactions can quickly import all these records, minimizing manual entry errors and saving valuable time.
Regular Updates: To maintain accurate records, keep your QuickBooks Online account updated with the latest financial data and transactions. SaasAnt Transactions can facilitate this by automating the export and import of your financial data. For instance, if you regularly update your sales records in a separate system, you can use SaasAnt Transactions to seamlessly import these updates into QuickBooks Online, ensuring your financial data is always current without manual intervention.
Leverage Automation: Utilize QuickBooks Online's automation features, such as recurring transactions and bank reconciliations, to save time and reduce manual effort. SaasAnt Transactions complements these features by offering advanced data import and export automation. For example, suppose you have recurring transactions like monthly subscriptions or regular supplier payments. In that case, you can use SaasAnt Transactions to automate their import, ensuring they are recorded accurately and on time each month.
Following this step-by-step guide, you can successfully add a new company to QuickBooks Online and use its robust accounting features. This process will help you manage your company's financial data efficiently and effectively, supporting your business growth and success.
Post-Setup Activities
After successfully adding a new company to QuickBooks Online, several post-setup activities will enhance your financial management capabilities and ensure smooth operations. This section provides a detailed guide on connecting bank accounts and credit cards, setting up users and permissions, and integrating additional apps to maximize QuickBooks Online's functionality.
Connecting Bank Accounts and Credit Cards
Linking your financial accounts to your new QuickBooks company is essential for accurate and efficient transaction tracking.
Steps to Link Financial Accounts to the New QuickBooks Company
Log in to QuickBooks Online: Access your QuickBooks Online account using your credentials.
Navigate to the Banking Menu: From the dashboard, select the "Banking" tab on the left-hand menu.
Add Account: Click on the ‘Link Account’ button.
Select Your Bank or Credit Card: Choose your financial institution from the list or search for it using the search bar.
Enter Login Credentials: Provide your online banking credentials to connect QuickBooks Online securely with your bank or credit card account.
Authorize QuickBooks Access: Follow the prompts to authorize QuickBooks Online to access your account data.
Confirm Accounts to Link: Select the specific accounts you want to link and confirm the connection.
Categorize Transactions: Once linked, categorize and review transactions to ensure they are accurately recorded in your QuickBooks account.
Benefits of Automatic Transaction Updates
Linking your financial accounts to QuickBooks Online provides several advantages:
Real-Time Data: Automatically updated transactions offer a real-time view of your financial status, aiding in timely decision-making.
Reduced Manual Entry: Automating transaction updates minimizes the need for manual data entry, reducing the risk of errors and saving time.
Improved Accuracy: Directly importing transaction data from your bank or credit card ensures accurate financial records and streamlined reconciliation processes.
Setting Up Users and Permissions
Managing who can access and modify financial data is crucial for maintaining data security and operational efficiency.
Adding New Users and Assigning Roles
Access the Manage Users Menu: Click on the gear icon in the upper right corner and select ‘Manage Users’ under the ‘Your Company’ section.
Add User: Click on the ‘Add user’ button.
Select User Type: Choose the appropriate user type (e.g., Standard User, Company Admin, Reports Only).
Enter User Information: Provide the user’s name and email address.
Assign Roles: Assign specific roles and permissions based on the user’s responsibilities.
Send Invitation: Invite the user to join your QuickBooks Online account. The user must accept the invitation and set up their login credentials.
Ensuring Data Security Through Proper Permission Settings
Assigning appropriate roles and permissions is vital to protecting sensitive financial information:
Limited Access: Restrict access to financial data based on the user’s role to prevent unauthorized modifications.
Enhanced Security: Implementing role-based permissions ensures that only authorized personnel can view or edit specific data, reducing the risk of data breaches.
Audit Trail: QuickBooks Online maintains an audit trail of user activities, providing visibility into who accessed or modified financial data, thus enhancing accountability.
Overview of Popular Apps That Integrate with QuickBooks Online
SaasAnt Transactions: Facilitates bulk import, export, and deletion of transactions, saving time and reducing manual errors.
Expensify: Automates expense reporting and management, simplifying the tracking and categorization of business expenses.
TSheets by QuickBooks: Provides time tracking and scheduling solutions, ideal for managing employee hours and payroll.
PayTraQer: Seamlessly syncs payment transactions from multiple platforms, such as PayPal, Stripe, and Square, with QuickBooks Online, ensuring accurate and up-to-date financial data.
Bill.com: Streamlines accounts payable and receivable processes, enhancing cash flow management and payment tracking.
Integrating these apps with QuickBooks Online offers numerous benefits:
Streamlined Operations: Automating routine tasks such as expense tracking, time management, and transaction imports reduces administrative burden and increases efficiency.
Improved Accuracy: Direct data synchronization between apps and QuickBooks Online ensures consistent and accurate financial records.
Scalability: As your business grows, integrating additional apps allows you to scale your operations seamlessly, accommodating increased transaction volumes and complex workflows.
By following these post-setup activities and leveraging the benefits of integrated apps, you can optimize your QuickBooks Online experience, ensure efficient financial management, and support the growth of your new company.
Wrap Up
Adding a new company in QuickBooks Online is a straightforward process that offers substantial benefits for efficient financial management. Following the outlined steps ensures that your business's financial records are accurate, compliant, and easily accessible. The preparation phase involves gathering the necessary information and setting up a dedicated email account, which is crucial for a seamless setup.
The step-by-step guide simplifies the process, from selecting the appropriate QuickBooks plan to configuring company settings, linking bank accounts, and assigning user roles and permissions. This meticulous approach not only streamlines your financial operations but also enhances the accuracy and reliability of your financial data.
Post-setup activities like connecting bank accounts and credit cards, setting up users and permissions, and integrating additional apps further optimize your QuickBooks Online experience. Integrations with applications like SaasAnt Transactions and PayTraQer enhance your workflow efficiency by automating the import and export of bulk transactions and synchronizing payment data across various platforms. This reduces manual effort, minimizes errors, and ensures that your financial records remain up-to-date and accurate.
In conclusion, QuickBooks Online simplifies the process of adding a new company and provides a robust foundation for efficient financial management. With the proper preparation and the strategic use of integrated tools, you can ensure your business is well-positioned for growth and success in today's competitive market.
FAQs
How Do I Add a New Company in QuickBooks Online?
Adding a new company in QuickBooks Online involves several steps to ensure proper setup and financial management. Follow these detailed steps to add a new company:
Navigate to the QuickBooks Online pricing page.
Compare the available plans (Simple Start, Essentials, Plus, Advanced) and select the one that fits your new company's needs.
If you already have an account, sign in with your credentials.
If you need to create a new account, provide your email, create a password, and verify your identity.
Input the business name, industry, and contact information.
Customize settings such as accounting method, fiscal year, and currency preferences.
Link your company's bank accounts to facilitate transaction tracking and reconciliation.
If you have existing financial data, import it to ensure continuity and accuracy.
Determine access levels for your team members and assign appropriate roles.
Double-check all entered information and confirm to complete the setup.
Following these steps ensures a smooth setup process, helping you manage your company's finances effectively in QuickBooks Online.
What Information Do I Need Before Adding a New Company to QuickBooks Online?
Before adding a new company to QuickBooks Online, gather the following information and documents to ensure a seamless setup:
Company Name and Legal Structure: Official name and legal structure (LLC, Corporation, Sole Proprietorship).
Industry and Business Type: Specify the sector and type of business for tailored settings.
Contact Information: Company address, phone number, and email address.
Tax Identification Number: Employer Identification Number (EIN) or other tax IDs.
Bank Account Information: Bank account numbers and bank names for linking accounts.
Financial Statements: Recent balance sheets and income statements.
Business Licenses and Permits: Copies of required licenses and permits.
Existing Financial Data: Data from previous accounting software or spreadsheets for import.
Having accurate and complete data ensures the integrity of your financial records and facilitates a smooth setup process in QuickBooks Online.
How Do I Link Bank Accounts and Credit Cards to QuickBooks Online?
Linking bank accounts and credit cards to QuickBooks Online is essential for accurate transaction tracking. Follow these steps to link your accounts:
Access your QuickBooks Online account with your credentials.
From the dashboard, select the ‘Banking’ tab.
Click on the ‘Link Account’ button.
Choose or search for your bank or credit card provider from the list.
Provide your online banking credentials for a secure connection.
Follow the prompts to authorize QuickBooks Online to access your account data.
Select the specific accounts you want to link and confirm.
Review and categorize transactions to ensure accurate recording.
Linking your accounts provides real-time data, reduces manual entry, and ensures accurate financial records, enhancing your overall financial management in QuickBooks Online.
What Are the Steps to Create a New Email Account for a QuickBooks Company?
Creating a new email account for a QuickBooks company involves the following steps:
Select a reputable provider like Gmail, Outlook, or a business-specific service.
Navigate to the website of your chosen email provider.
Click on the option to create a new account and enter your personal information (name, desired email address, password).
Follow the verification steps to confirm your identity and activate the new email account.
Configure security settings and notification preferences according to your needs.
Log in to QuickBooks Online and update the contact information in the ‘Company’ tab with the new email address.
Verify the email address through the verification email sent by QuickBooks Online.
Assign roles and permissions if there are multiple users.
Creating and linking a new email account ensures proper communication and management for your new company in QuickBooks Online.
How Can I Integrate Saasant Transactions With QuickBooks Online?
Integrating SaasAnt Transactions with QuickBooks Online involves a straightforward process. Here's a step-by-step guide:
Visit the SaasAnt Transactions website and sign up for an account.
Log in to your SaasAnt Transactions account.
In your SaasAnt Transactions dashboard, navigate to the ‘Connect to QuickBooks’ option.
Follow the prompts to authorize SaasAnt Transactions to access your QuickBooks Online account.
You will need to log in to QuickBooks Online and grant necessary permissions.
Once connected, you can import data into QuickBooks Online. Select the type of transactions you wish to import (e.g., invoices, expenses).
Upload your data file (CSV, Excel) or manually enter the data.
SaasAnt Transactions allows you to map fields from your data file to QuickBooks Online fields, ensuring an accurate data import.
Review and confirm the mapping to proceed.
Review the data preview to ensure accuracy.
Click ‘Import’ to transfer the data into QuickBooks Online.
Following these steps, you can seamlessly integrate SaasAnt Transactions with QuickBooks Online, facilitating bulk data imports and enhancing your accounting efficiency.
What Are the Benefits of Using Saasant Transactions for QuickBooks Online?
Using SaasAnt Transactions with QuickBooks Online offers numerous advantages, including:
Bulk Data Import: This method imports large transactions in one go, saving time and reducing manual entry errors.
Data Accuracy: Precise field mapping and validation features ensure accurate data import, minimizing discrepancies.
Automation: Automate recurring data import tasks, allowing you to focus on strategic business activities.
Flexibility: Supports various data formats (CSV, Excel) and transaction types (invoices, expenses, payments).
User-Friendly Interface: An intuitive interface simplifies the import process, even for users with limited technical expertise.
Integrating SaasAnt Transactions with QuickBooks Online streamlines your accounting workflow, enhancing productivity and data accuracy.
How Do I Connect Paytraqer to QuickBooks Online?
To connect PayTraQer to QuickBooks Online, follow these detailed steps:
Visit the PayTraQer website and create an account.
Log in to your PayTraQer account.
In the PayTraQer dashboard, select the ‘Connect to QuickBooks’ option.
You will be redirected to QuickBooks Online for authentication.
Log in to your QuickBooks account and grant the necessary permissions.
Choose the payment platform to sync with QuickBooks Online (e.g., PayPal, Stripe, Square).
Log in to your payment platform account to authorize PayTraQer access.
Customize your sync settings in PayTraQer.
Select the data you wish to sync (e.g., transactions, fees, customers).
Set up automatic sync intervals or manually sync as needed.
Once configured, initiate the sync process. PayTraQer will automatically import transaction data into QuickBooks Online.
Following these steps, you can effectively connect PayTraQer to QuickBooks Online, ensuring accurate and real-time transaction syncing.
Can I Use SaasAnt Transactions and PayTraQer Simultaneously With QuickBooks Online?
Yes, you can use both SaasAnt Transactions and PayTraQer simultaneously with QuickBooks Online. Each tool offers unique features that complement each other:
SaasAnt Transactions:
Ideal for bulk importing and exporting various transaction types, including invoices, bills, and expenses.
It is helpful for businesses that need to handle large volumes of data quickly.
PayTraQer:
Perfect for real-time syncing of transactions from multiple payment platforms such as PayPal, Stripe, and Square.
Ensures accurate and up-to-date records of payment transactions and associated fees.
Both tools enhance your financial management capabilities, providing a comprehensive solution for importing bulk data and syncing payment transactions in real-time.