How to Export Data from QuickBooks Desktop to Excel
Alright, let’s talk about getting your QuickBooks Desktop data where it needs to go—without frustration, without wasted hours, and without the risk of errors.
You’re here because you need to export your invoices, customer lists, chart of accounts, or even move your data to QuickBooks Online. Perhaps you’ve tried doing it manually and encountered roadblocks. Maybe you’ve spent too much time dealing with formatting issues in Excel. Or maybe you're just looking for a smarter, faster way to get it done.
Video Tutorial for How to Export Data from QuickBooks Desktop using SaasAnt Transactions Desktop:
That’s where SaasAnt Transactions comes in.
SaasAnt isn’t just another tool—it’s the shortcut you wish QuickBooks had built-in. It’s designed for people like you: accountants, business owners, and finance professionals who don’t have time to wrestle with complicated exports.
Here’s what it does:
Bulk Export – Instead of exporting piece by piece, SaasAnt lets you move large sets of data in one go.
Clean Formatting – Say goodbye to data dumps that look like a mess in Excel. It keeps everything structured.
Smooth Migration to QuickBooks Online – If you’re upgrading from Desktop, this tool makes the switch seamless.
How do you use it?
Install SaasAnt Transactions Desktop and connect it to QuickBooks Desktop.
Choose what you need to export—Invoices, Customers, Chart of Accounts, whatever.
Click Export. You get a clean, ready-to-use file.
No guesswork. No headaches. Just results.
So, if you’ve been struggling with manual exports, it's time to move smarter, not harder. Let’s get your data out of QuickBooks quickly, cleanly, and without the stress.
Step-by-Step Guide to Exporting Data from QuickBooks Desktop to Excel
1. Download and Install SaasAnt Transactions (Desktop)
Begin by downloading and installing SaasAnt Transactions (Desktop) from the official SaasAnt website. Ensure that QuickBooks Desktop is installed and up to date on your system.
2. Launch the SaasAnt Transactions Application
Open SaasAnt Transactions on your computer. Ensure that your QuickBooks Desktop file is open and the correct company file is active.
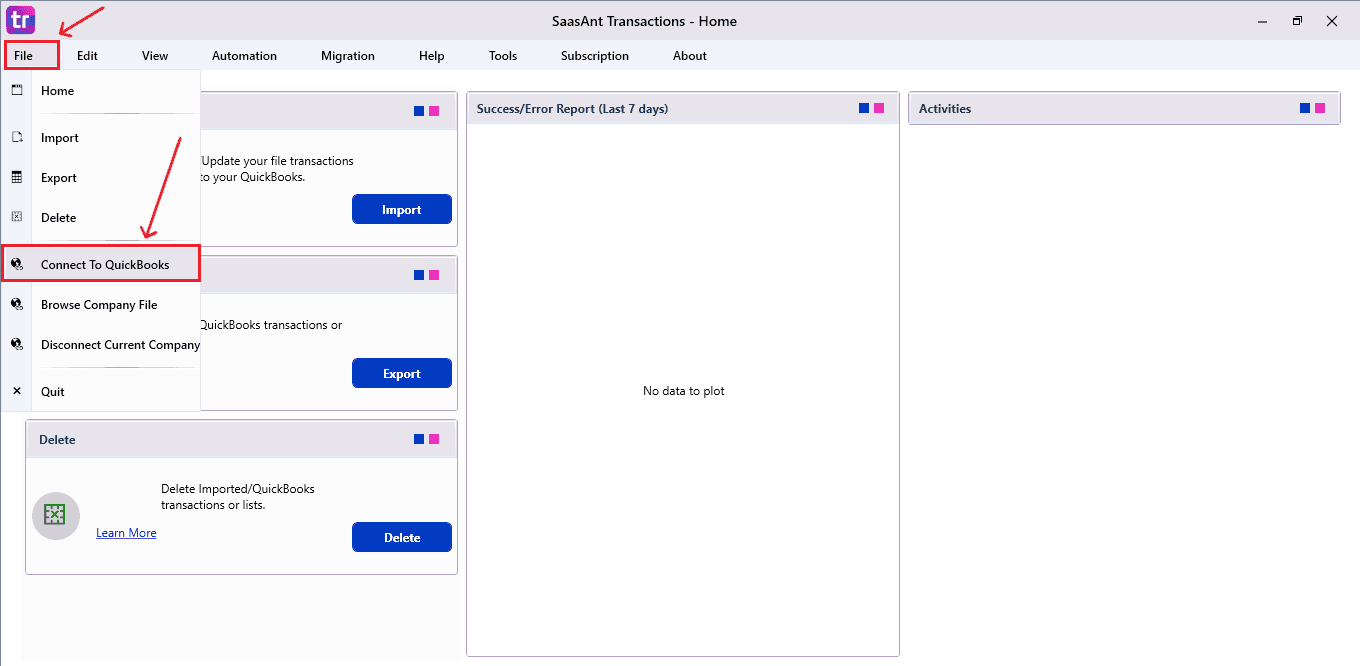
3. Connect to QuickBooks Desktop
When prompted, authorize SaasAnt Transactions to connect with QuickBooks Desktop. This step ensures that the application can access your company data.
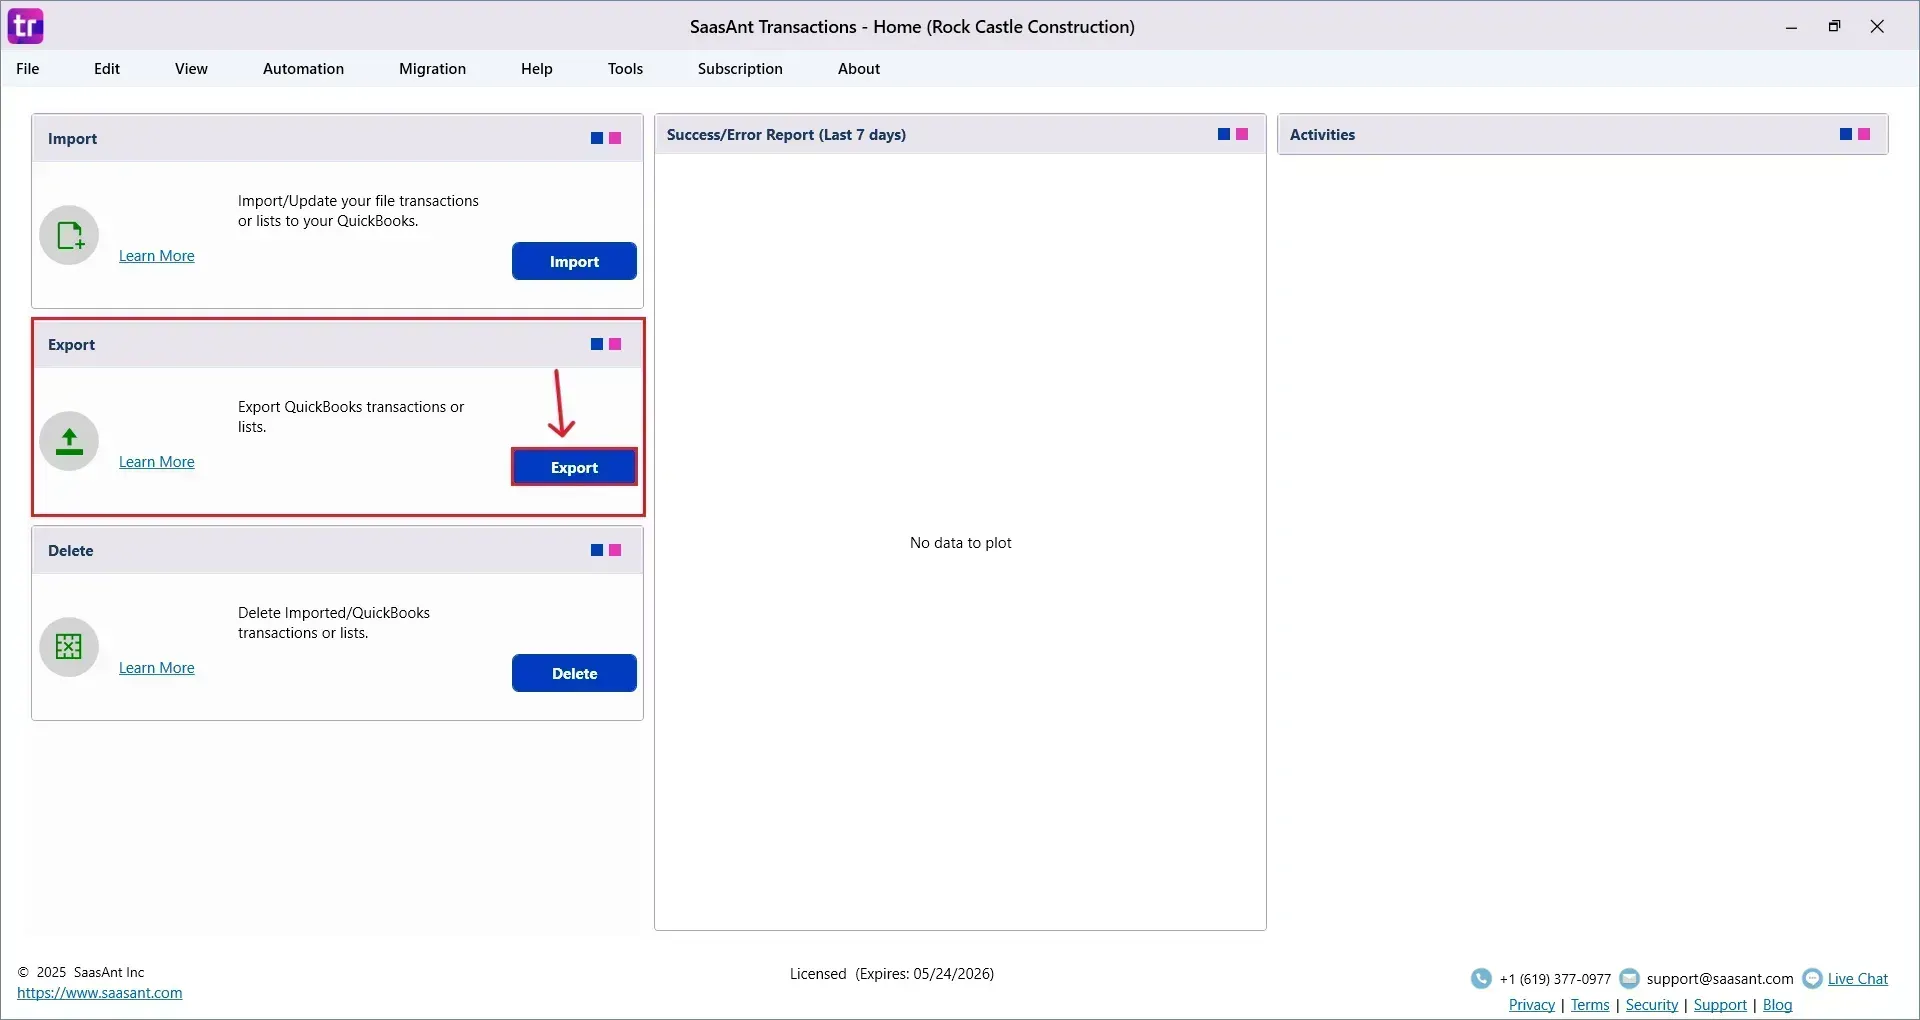
4. Navigate to the 'Export' Tab
Click on the ‘Export’ tab from the top menu bar in the SaasAnt Transactions interface.
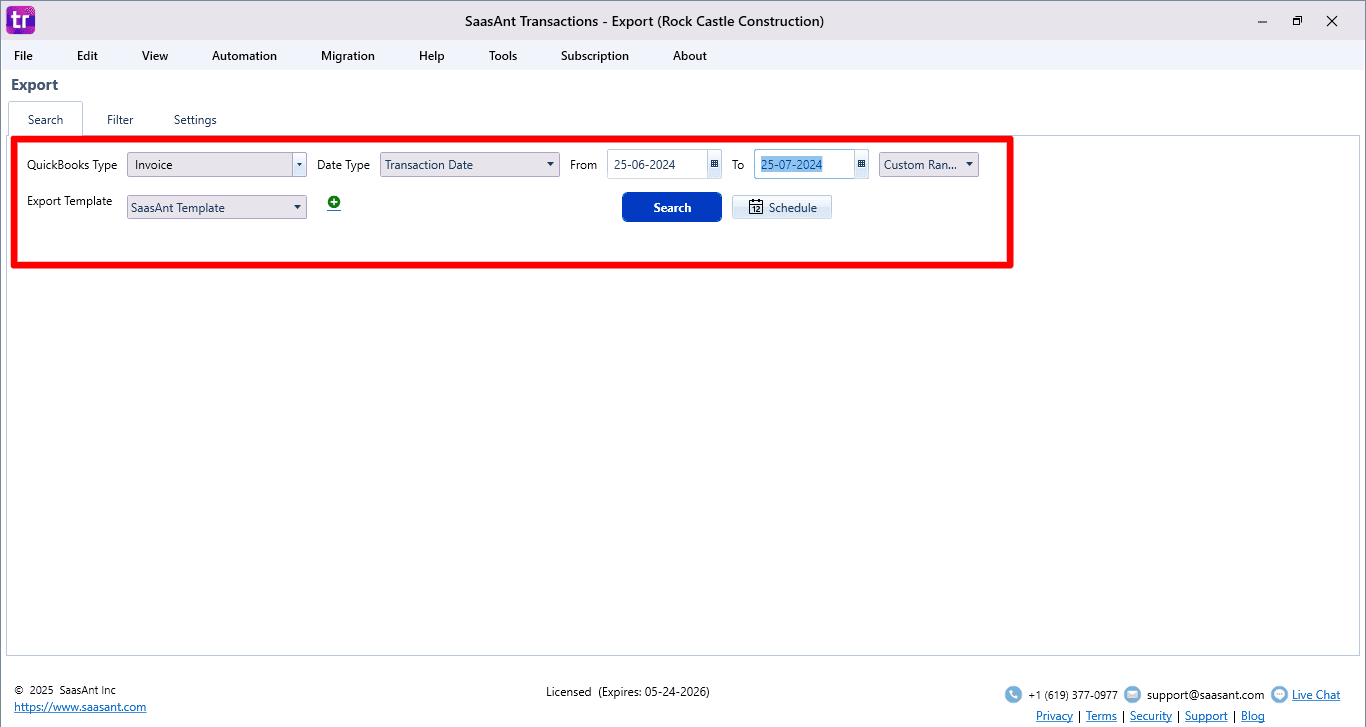
5. Select the Data Type You Want to Export
From the dropdown list, choose the specific data type you wish to export—such as Invoices, Items, Customers, Invoices, or Journal Entries, etc..
6. Set the Date Range
If the selected data type supports date filtering, specify the From Date and To Date to limit the records you want to extract.
7. Click the 'Search' Button
Press ‘Search’ to fetch the relevant records from your QuickBooks Desktop file. The matching data will display in a tabular format within the app.
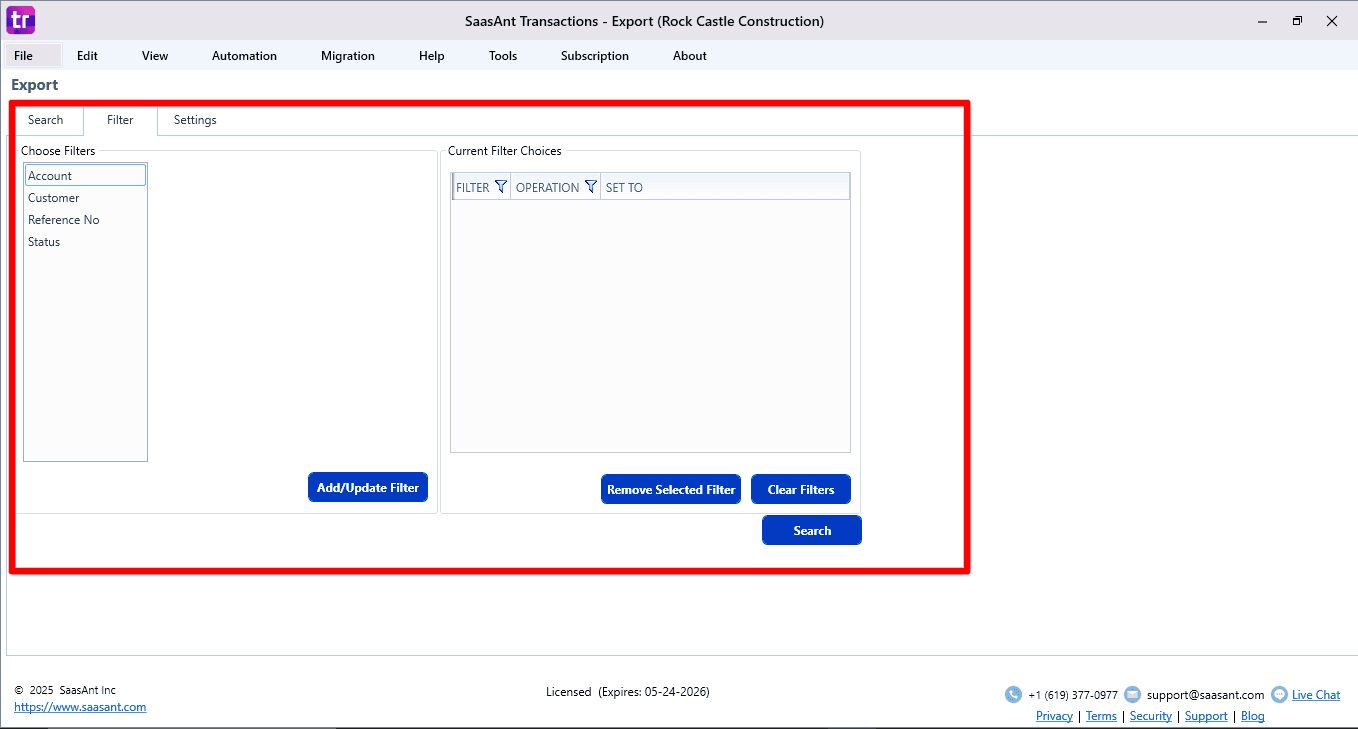
You can also use the filter option to extract the specific data.
8. Choose Export Format (Excel or CSV)
Select your desired output format—Excel (.xlsx) or CSV (.csv)—from the available options.
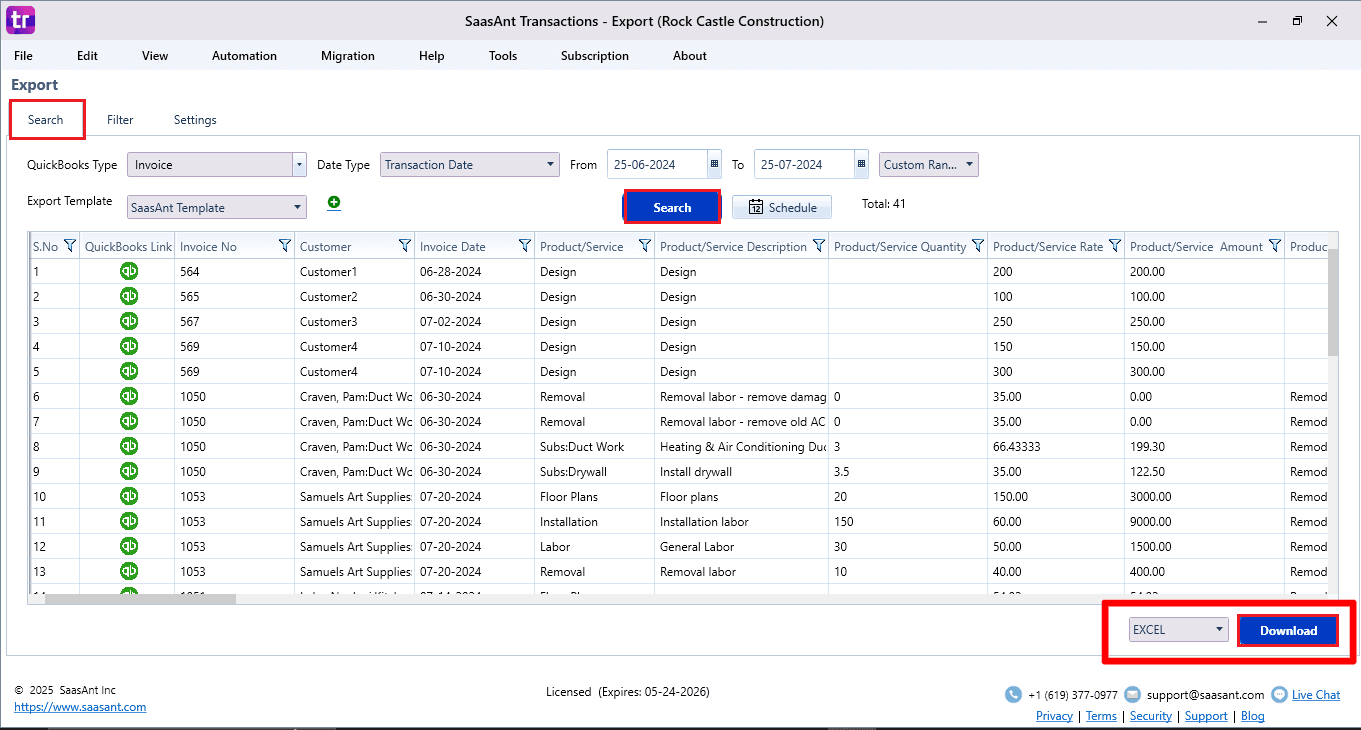
9. Export and Save the File
Click the ‘Export’ or ‘Download’ button to export your data. Choose a folder on your system and save the file for future access.

Addressing Common Problems With QuickBooks Export
Navigating the export process can be challenging, and we understand the frustrations that can arise. Let’s address some of the common issues you might encounter when you try to export from QuickBooks directly:
“Greyed-Out” Export Option
Issue: The “Export to Excel” option is unresponsive.
Solution:
Update your QuickBooks to the latest version. Go to the Help menu in QuickBooks and select “Update QuickBooks.” If you’re on Microsoft Office 365, ensure you’re using the version installed on your computer.
CSV-Only Export Issue
Issue: Your data gets exported only in the CSV format.
Solution:
QuickBooks’ CSV files use commas. If your data also has commas, it can confuse Excel. A workaround is to export as a tab-delimited file.
Number Formatting Problems in Excel After Export
Issue: The numbers in Excel look off after exporting.
Solution:
Check for any unusual characters or date formats in your QuickBooks data. Cleaning up your data before exporting can prevent this issue.
Compatibility Issues
Issue: QuickBooks and Excel need to work better together.
Solution:
Ensure you’re using compatible versions of both QuickBooks and Excel. For instance, QuickBooks works well with Microsoft Excel 2010 SP2, 2013, and 2016.
Data Formatting Issues
Issue: The data columns in Excel need to be aligned.
Solution:
It might be due to the commas in the CSV file from QuickBooks. Exporting as a tab-delimited file or reviewing your data before shipping can help.
Permission Issues
Issue: You need the necessary permissions to export.
Solution:
In QuickBooks, go to the Company menu, select Users, and ensure you have the ‘Can export reports to Excel/CSV’ permission enabled.
Large Data Export Issues
Issue: The report needs to be significant in size to export in one go.
Solution:
QuickBooks has a limit on the size of data you can export. If your report is too extensive, consider exporting in smaller chunks.
SaasAnt as a Solution
Advantage: If you’re still facing issues, consider using SaasAnt Transactions. It can simplify the export process and help you avoid these common challenges.
We’re here to help you navigate these challenges. With these solutions, you can handle any hiccups in the export process. Remember, keeping your software updated can prevent many of these issues.
When and Why Do You Need to Export Data from QuickBooks Desktop?
If you're here, you’re already trying to export data from QuickBooks Desktop—maybe invoices, your chart of accounts, customer lists, or even migrating to QuickBooks Online. But let’s take a step back: why do you need to do this in the first place?
Exporting data isn't just about moving numbers from one place to another. It’s about solving a problem. It’s about making your accounting more flexible, efficient, and future-proof. But depending on your situation, the challenges you face might be different. Let’s break it down.
1. You Need to Move from QuickBooks Desktop to QuickBooks Online
If your company is moving to the cloud or you're ready to eliminate the hassle of desktop updates and restricted access, exporting your QuickBooks Desktop data is the first step. Learn how to complete the full migration in this QuickBooks Desktop to Online Migration Guide.
Challenges:
Data Doesn't Transfer Completely – Some reports, attachments, and custom templates may not carry over.
Chart of Accounts Issues – If your accounts aren’t formatted properly, they might not import cleanly into QuickBooks Online.
Time-Consuming Process – The built-in QuickBooks export tool isn't always smooth, and large data files can slow things down.
How SaasAnt Transactions Helps:
Exports Data in Bulk – Instead of manually exporting different lists, SaasAnt allows you to select all the data you need in one go.
Handles Large Data Files – Avoids performance issues when exporting high volumes of invoices, transactions, and customer lists.
Gives You a Backup – Instead of moving data directly and risking errors, you can keep a structured Excel file before migrating.
2. You Need to Create Custom Reports or Analyze Data in Excel
QuickBooks has built-in reports, but sometimes you need more flexibility. Maybe you want to analyze trends, compare financials over time, or create custom dashboards in Excel.
Challenges:
Exported Data Looks Messy – When you export reports to Excel, the formatting can be difficult to work with.
Limited Filters – QuickBooks reports don’t always let you filter out unnecessary data before exporting.
Manual Adjustments Needed – You might spend hours cleaning up exported data before using it.
How SaasAnt Transactions Helps:
Structured Exports – Provides clean and organized Excel files that are easy to analyze.
Advanced Filters – Lets you choose exactly what you want to export instead of dumping everything.
Bulk Actions – If you need to modify or clean up data, SaasAnt lets you edit and re-import it quickly.
3. You’re Backing Up Your Data for Security or Compliance
Some businesses export QuickBooks data regularly as a precaution. Maybe it��’s for audits, tax filings, or just keeping a secure offline backup.
Challenges:
QuickBooks Backup Files Are Proprietary – The built-in QuickBooks backup option creates a .QBB file, which can’t be opened outside QuickBooks.
Difficult to Restore Specific Data – If you need to restore only customer transactions or invoices, a full backup isn't ideal.
Risk of Data Loss – If something happens to your QuickBooks company file, having exported spreadsheets can be a lifesaver.
How SaasAnt Transactions Helps:
Exports Data to Open Formats (Excel, CSV) – Ensures that your backup data is accessible anytime, even without QuickBooks.
Selective Backups – Instead of saving everything, you can export only what you need, making it easier to restore.
Automated Exports – Set up scheduled exports for added security and compliance peace of mind.
4. You Need to Clean Up Your Data Before Making Bulk Changes
At some point, every business needs to update customer details, fix transaction records, or clean up their chart of accounts. But doing this manually inside QuickBooks is a nightmare.
Challenges:
QuickBooks Doesn't Support Bulk Edits Easily – Editing multiple transactions or customer records requires time-consuming manual entry.
Risk of Messing Up Data – If you make a mistake in QuickBooks, undoing bulk changes isn’t easy.
Duplicate Entries & Inconsistencies – If your data is a mess, cleaning it up one-by-one is not practical.
How SaasAnt Transactions Helps:
Exports Data for Bulk Editing – You can edit thousands of records in Excel and re-import them effortlessly.
Previews Data Before Importing – Lets you review changes before they go live, reducing errors.
Finds and Fixes Duplicates – Helps you spot and remove duplicate records quickly.
5. You Need to Share Data with External Teams or Accountants
Your bookkeeper, accountant, or finance team might not need full access to QuickBooks—just specific data. Exporting reports is the easiest way to collaborate.
Challenges:
QuickBooks Reports Can Be Overwhelming – If you send an unfiltered export, your accountant might have to dig through unnecessary data.
Data Format Issues – Some systems require data in a specific format that QuickBooks doesn't support directly.
Security Concerns – Sharing QuickBooks access with multiple people can create security risks.
How SaasAnt Transactions Helps:
Exports Only What’s Needed – Choose specific transactions, dates, or customer records for sharing.
Formats Data for Easy Processing – Ensures that files are ready for third-party software, tax tools, or external databases.
Keeps Your QuickBooks Secure – Instead of giving multiple users access to QuickBooks, you can share exported files safely.
Video tutorial: How to connect SaasAnt Transactions Desktop with QuickBooks Desktop
In a Nutshell
We’ve walked through the steps of moving data from QuickBooks to Excel. Having your data in Excel can make a big difference, from better analysis to personalized charts. And with tools like SaasAnt Transactions, the whole process becomes smoother. We understand this might be a lot to take in, so if you have questions or thoughts, please share them with us. We’re here to help and learn from each other.
Ready to Dive Deeper?
Thinking of simplifying your QuickBooks experience? Try SaasAnt Transactions. We promise to make the start easy with our hands-on onboarding. Start with SaasAnt Transactions today!
FAQs
Navigating the process of exporting from QuickBooks to Excel can be daunting. We’ve compiled answers to the most searched questions to help you out:
How do I export data from QuickBooks to Excel?
In QuickBooks, navigate to the desired report or data section. Once you’ve selected the data or report, look for the “Export” or “Export to Excel” option, usually represented by an icon with an arrow. Click on it and follow the prompts to export your data to Excel.
How can I export invoices from QuickBooks to Excel?
Go to the “Invoices” section in QuickBooks. Select the invoices you wish to export, then find the “Export” or “Export to Excel” option and click on it to export your invoices to an Excel file.
How do I export the Chart of Accounts from QuickBooks Desktop to Excel?
In QuickBooks Desktop, go to “Lists” and select “Chart of Accounts.” Once there, look for the “Export” option, usually at the top menu. Choose “Export to Excel” and follow the prompts.
Can I export a journal entry from QuickBooks Online to Excel?
Yes, in QuickBooks Online, navigate to the “Journal Entry” you wish to export. Once selected, find the “Export” or “Export to Excel” option and click on it to export the journal entry to Excel.
How do I export the customer list from QuickBooks to Excel?
In QuickBooks, go to the “Customers” section. Select the customers you want to export, then click the “Export” or “Export to Excel” option to export your customer list to Excel.
Why can’t I export to Excel from QuickBooks?
This could be due to compatibility issues between QuickBooks and your Excel version or a glitch in the software. Ensure both QuickBooks and Excel are updated. If the problem persists, consider reaching out to QuickBooks support.
How do I export the item list from QuickBooks Desktop to Excel?
In QuickBooks Desktop, navigate to “Lists” and select “Item List.” Once there, look for the “Export” option at the top menu. Choose “Export to Excel” and follow the on-screen instructions.
How can I export the trial balance from QuickBooks to Excel?
Go to the “Reports” section in QuickBooks. Search for “Trial Balance,” select the desired date range, and run the report. Once generated, find the “Export” or “Export to Excel” option and click on it.
How do I export bank reconciliation from QuickBooks to Excel?
In QuickBooks, navigate to the “Banking” section and select “Reconciliation.” After completing the reconciliation, you’ll find an “Export” or “Export to Excel” option. Click on it to export the reconciliation report to Excel.
How can I export QuickBooks transactions to Excel?
In QuickBooks, go to the “Transactions” section. Select the transactions you wish to export, then click the “Export” or “Export to Excel” option to export your transactions to an Excel file.
How do I export all my invoices from QuickBooks Desktop?
To export invoices from QuickBooks Desktop:
Open QuickBooks Desktop and go to Reports > Sales > Sales by Customer Detail.
Click Excel > Create New Worksheet > Export.
If needed, save it as a CSV file.
Alternative Solution: If you need to export invoices in bulk, with custom filters and better formatting, you can use SaasAnt Transactions to export them directly to Excel or CSV.
Can I export my entire QuickBooks Desktop data to QuickBooks Online?
Yes, QuickBooks has a built-in migration tool, but not all data transfers perfectly. Here’s how to do it:
Go to Company > Export Company File to QuickBooks Online.
Follow the on-screen instructions and log into your QuickBooks Online account.
Wait for the data transfer to complete (can take several hours).
Common Issues:
Missing Attachments & Custom Reports – QuickBooks Online doesn’t support all data types.
Chart of Accounts Differences – Some accounts may not map correctly.
Data Size Limits – Large company files may fail to transfer.
Better Alternative: Use SaasAnt Transactions to export and import transactions separately for better control over your data migration.
How do I export my QuickBooks Desktop Chart of Accounts to Excel?
To export the Chart of Accounts:
Open QuickBooks Desktop and go to Lists > Chart of Accounts.
Click Reports at the bottom and select Account Listing.
Click Excel > Create New Worksheet > Export.
Issue: The default export doesn’t preserve account hierarchy properly in Excel.
Solution: Using SaasAnt Transactions, you can export COA with structured formatting for easier review and migration.
Why is my QuickBooks export to Excel not working?
If QuickBooks won’t export to Excel, try the following:
Ensure Excel is Installed & Updated – QuickBooks requires a compatible Excel version (Microsoft 365, 2019, 2016).
Run QuickBooks as Administrator – Right-click QuickBooks and select Run as Administrator.
Repair QuickBooks & Excel – Use QuickBooks Tool Hub to fix the issue.
If nothing works, you can export to CSV format instead or use SaasAnt Transactions, which allows for Excel exports without QuickBooks limitations.
How do I export my customer list from QuickBooks Desktop?
To export your Customer List from QuickBooks Desktop:
Go to Reports > Customers & Receivables > Customer Contact List.
Click Excel > Export.
Save the file and open it in Excel.
Issues with Default Export:
Formatting is inconsistent – Some fields may be misaligned.
Limited Filtering Options – You may get unwanted extra fields.
Better Option: SaasAnt Transactions lets you export specific customer details (e.g., only active customers, those with overdue balances, or by region).
Can I export QuickBooks Desktop reports automatically on a schedule?
By default, QuickBooks doesn’t support automated exports, but you can:
Use QuickBooks Scheduled Reports for PDF exports only.
Use SaasAnt Transactions to schedule automatic Excel/CSV exports.
How do I bulk export transactions from QuickBooks Desktop?
QuickBooks doesn’t offer a direct bulk export option for all transaction types, but you can:
Use the Transaction List by Date Report and export it manually.
Use SaasAnt Transactions to export thousands of transactions at once without missing data.
Why SaasAnt?
Supports invoices, expenses, bills, payments & more.
Allows date filtering, bulk selection & structured formatting.
No export size limits like QuickBooks default tools.
What’s the best way to back up my QuickBooks data in Excel?
If you need an Excel backup, do this:
Export key reports (Profit & Loss, Balance Sheet, Customer List, COA).
Save them as CSV files for better compatibility.
For automated backups, use SaasAnt Transactions to schedule automatic exports of financial data into Excel.
Read Also
How to Import CSV file into QuickBooks Desktop
How to Import Transactions into QuickBooks Desktop
How to Edit Transactions in QuickBooks Desktop
How to Delete Multiple Transactions in QuickBooks Desktop?