How to Export Item List from QuickBooks Desktop to Excel
Managing your item list in QuickBooks Desktop is essential for inventory tracking, product management, and financial reporting. Whether you're changing systems, reviewing performance, or simply need a backup, it's crucial to export your item list efficiently and accurately.
In this guide, you will learn how to export your item list from QuickBooks Desktop with SaasAnt Transactions Desktop.
Let’s say you're a small business accountant managing monthly inventory reconciliation. Instead of manually copying each item from QuickBooks Desktop, you want a faster and more efficient way to get the item list for analysis, reporting, or uploading into another platform likeneed a faster and more efficient way to obtain the item list for analysis, reporting, or uploading into another platform, such as Excel, ERP, or inventory software. With SaasAnt Transactions Desktop, you can swiftly export the complete item list, adjust filters, and even schedule recurring exports, saving time and minimizing errors.
This blog is ideal for accountants, bookkeepers, and small business owners who need a quick and reliable method to export item lists from QuickBooks Desktop for reporting, audits, inventory tracking, or data migration.
Contents
How to Export Item List from QuickBooks Desktop: Step-By-Step Guide
Wrap Up
Frequently Asked Questions
How to Export Item List from QuickBooks Desktop: Step-By-Step Guide
Follow the steps below to export the item list in QuickBooks Desktop using SaasAnt Transactions Desktop.
Step 1: Install and Connect SaasAnt Transactions
Download the latest SaasAnt Transactions Desktop version.
Run SaasAntTransactions-Setup.exe as an administrator.
Accept the license agreement and complete the installation.
Open the app, go to Subscription > Register.
Enter the license key from your confirmation email.
Keep your internet connection active.
Step 2: Launch SaasAnt Transactions Desktop
Start by opening the SaasAnt Transactions Desktop app on your system.
Ensure that QuickBooks Desktop is open and connected to your company file before proceeding.
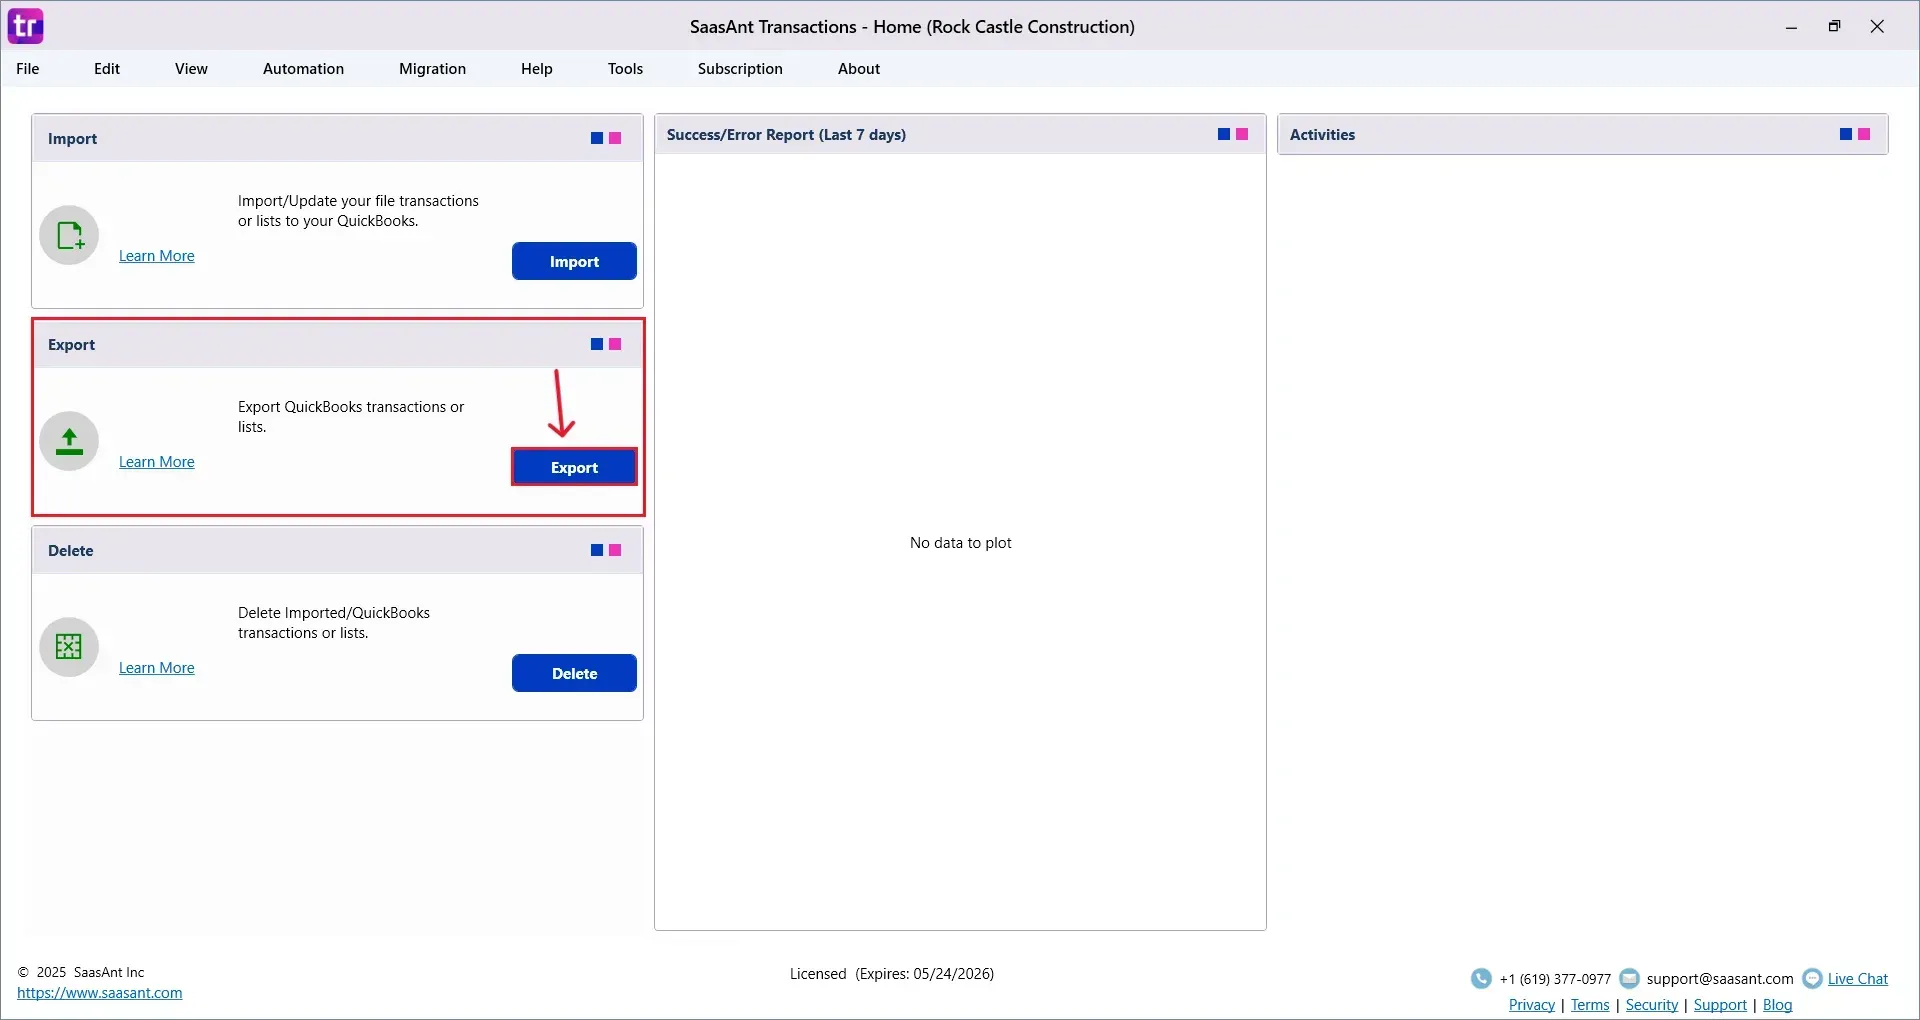
Step 3: Connect to QuickBooks Desktop
To connect SaasAnt Transactions Desktop with QuickBooks Desktop. Here's how:
Go to the ‘File’ menu in the top-left corner of SaasAnt Transactions Desktop.
Click ‘Connect to QuickBooks’ from the dropdown.
Step 4: Open SaasAnt Transactions
On the SaasAnt dashboard:
On the top left side of the SaasAnt Transactions dashboard, you can see the menu bar with various options.
The Dashboard appears as shown in the image below.
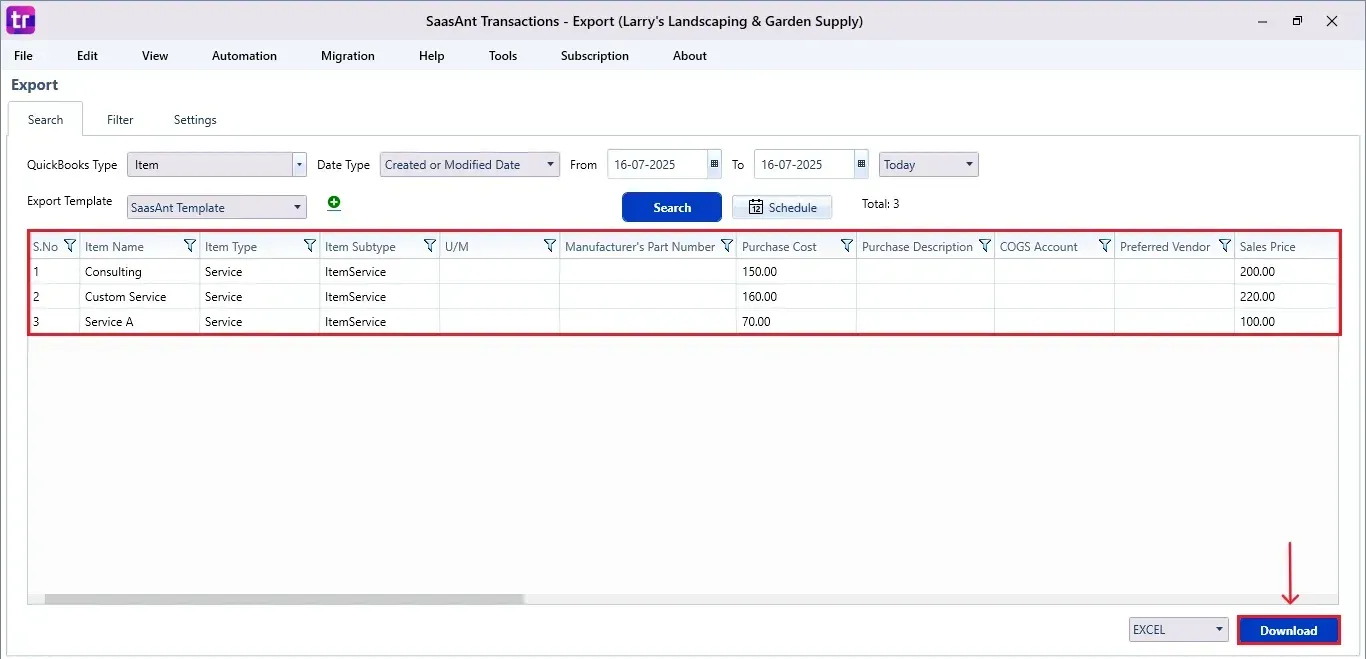
Step 5: Search and Download Item List
Fill in the required fields, such as QuickBooks Type, Date Type, From Date, To Date, and Export Template.
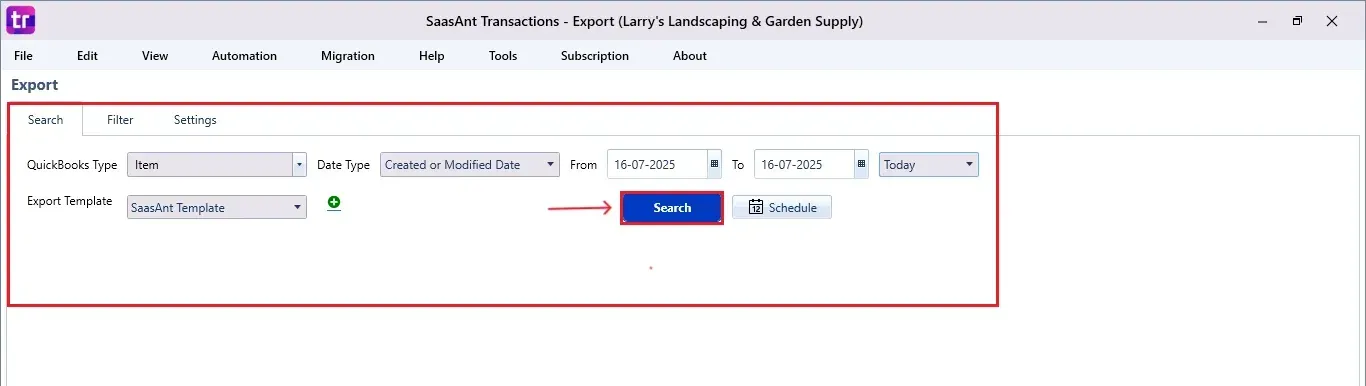
Click “Search” and the item list appears in the dashboard. Now select “Download” in Excel or CSV.
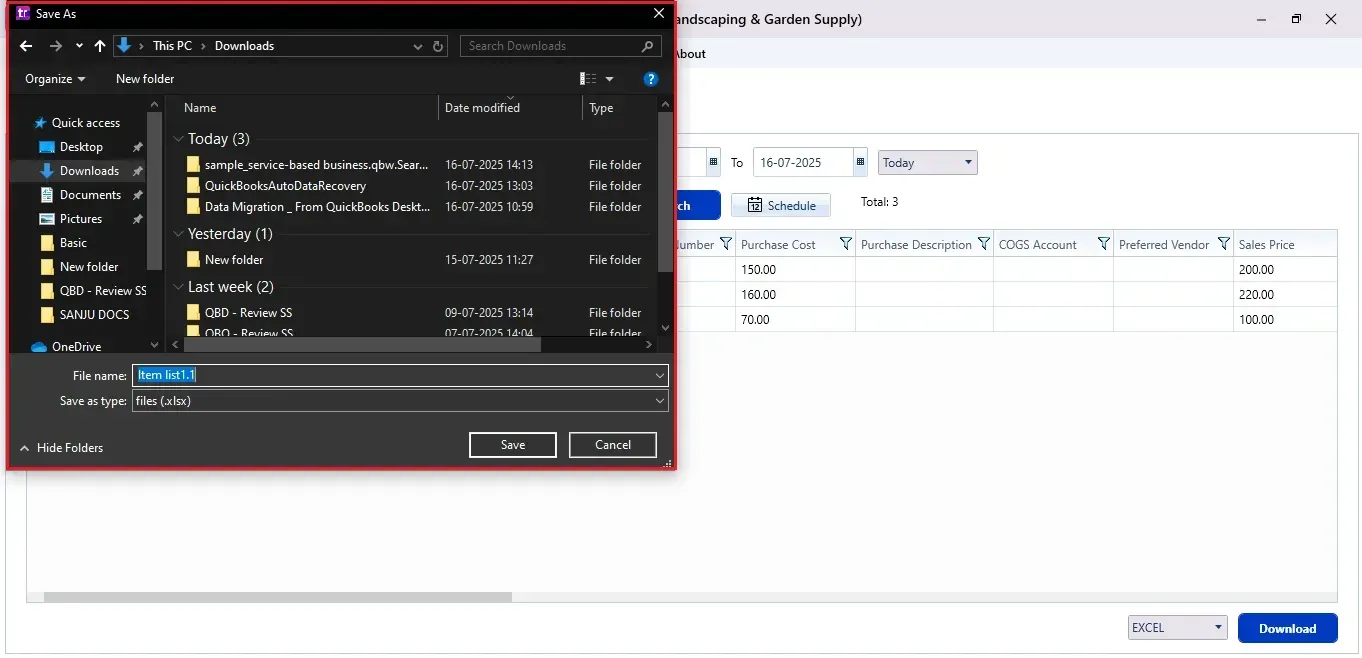
Step 6: Export the Data
Choose the file location when the pop-up appears.
Save the exported item list to your system.
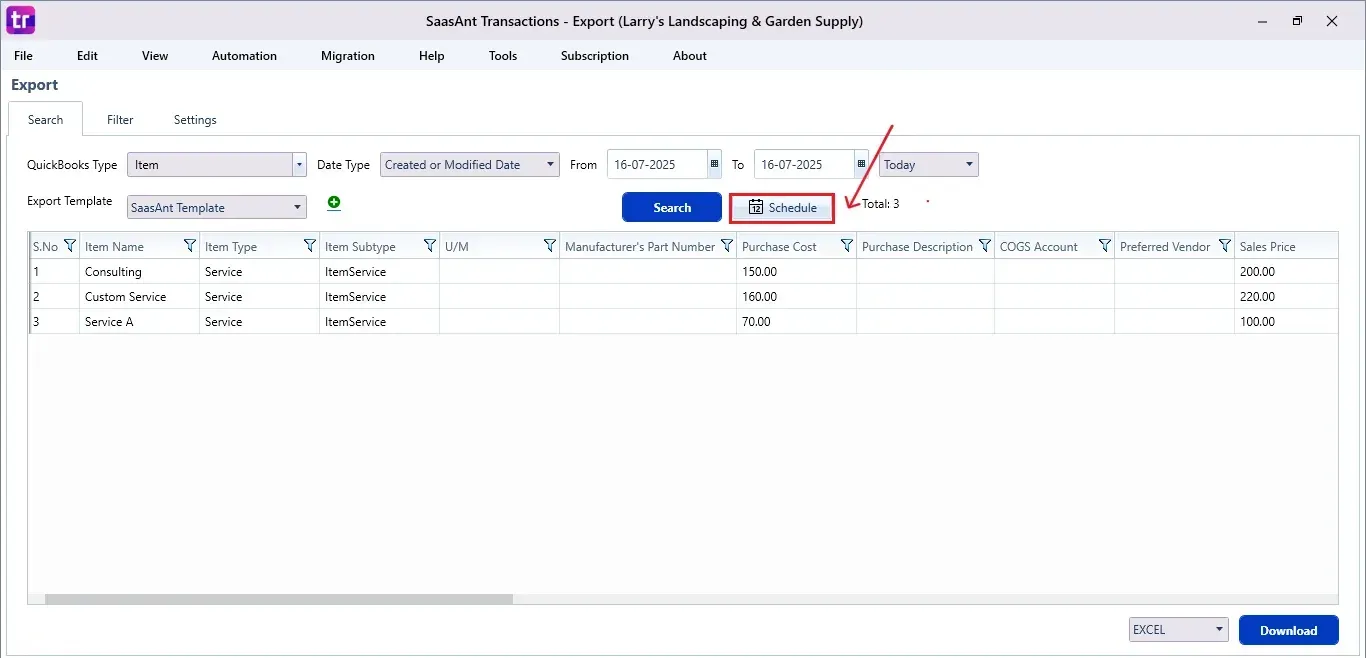
Step 7: Schedule Export (Optional)
There is another option, “Schedule,” where you can schedule exporting your data.
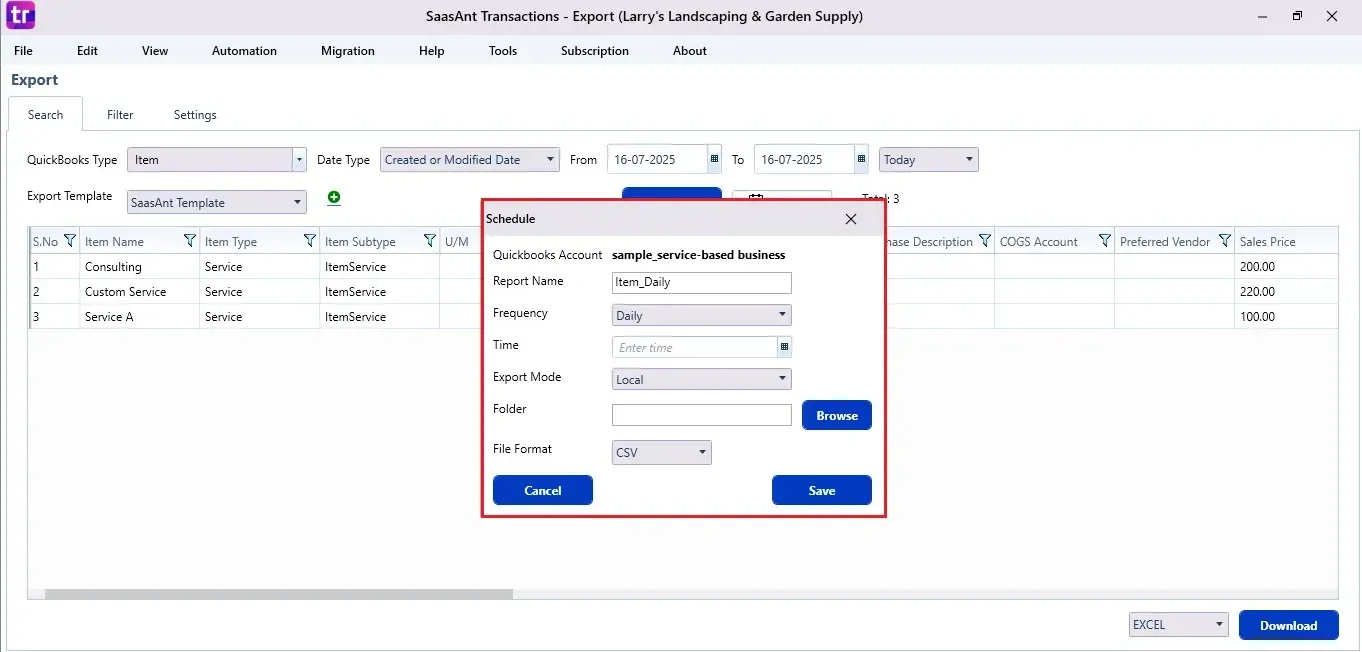
Fill in the required fields like report name, frequency (daily, weekly, or monthly), time, export mode (local, server, or email), folder location, and file format.
Once all fields are filled, click “Save.” Your item list (or any selected data) will now be exported at the scheduled time and location.
Wrap Up
Exporting your item list from QuickBooks Desktop can be simple. With SaasAnt Transactions Desktop, you can make the process easier, reduce manual tasks, and keep your inventory records consistent for management and reporting. Whether you are auditing, migrating, or analyzing, this detailed export guide provides you with complete control over your data when you want it, how you want it.
By leveraging trustworthy platforms like QuickBooks for your accounting processes and SaasAnt for transaction management and automation, you can enhance the overall workflow, minimize errors, save time, and acquire greater financial insight.
If you have inquiries regarding our products, features, trial, or pricing, or if you require a personalized demo, contact our team today. We are ready to help you find the ideal solution for your QuickBooks workflow.
Frequently Asked Questions
1) How often can I export my item list?
You can export your list of items whenever you want. You can also use the Schedule feature to set up automatic exports daily, weekly, or monthly.
2) Can I export service items, inventory parts, and non-inventory items?
Yes, SaasAnt allows you to export all types of items found in your QuickBooks Desktop item list.
3) Will exporting affect my QuickBooks data?
No, exporting is a read-only action and does not modify or delete any data in QuickBooks Desktop.
4) Can I export multiple lists at once, like item lists and vendor lists?
Yes, SaasAnt Transactions lets you export various types of data. You can do the same for other lists like vendors, customers, or invoices.
Read Also
How to Import Transactions into QuickBooks Desktop
How to Import Item List into QuickBooks Desktop
How to Import CSV file into QuickBooks Desktop
How to Export Data from QuickBooks Desktop to Excel