Expensify and QuickBooks: A Seamless Integration Guide
Simplifying Expense Management Across Expensify and QuickBooks
Managing business expenses is a critical financial function, but it often becomes time-consuming as organizations scale. From capturing receipts and tracking mileage to categorizing expenses and reconciling them in accounting systems, manual processes introduce delays and errors. A streamlined expense workflow is essential to maintaining accuracy, controlling costs, and closing the books on time.
Expensify is widely adopted for simplifying expense capture and reporting. With automated receipt scanning, mileage tracking, and employee-friendly expense reporting, Expensify reduces the friction typically associated with expense submissions and approvals. It helps finance teams gain faster visibility into spend while minimizing manual effort.
On the accounting side, QuickBooks remains the system of record for financial reporting, compliance, and reconciliation. Its comprehensive accounting features support invoicing, payroll, tax reporting, and financial statement preparation, making it central to accurate and compliant financial operations.
When businesses rely on both platforms, integrating Expensify with QuickBooks becomes essential. A well-implemented integration bridges expense management and accounting, ensuring expense data flows accurately into the general ledger. However, achieving a truly seamless sync often requires more than basic connectivity.
This guide explains how Expensify and QuickBooks work together, where native integrations succeed, where they fall short, and how tools like SaasAnt Transactions can help organizations overcome common limitations.
Expensify and QuickBooks: A Practical Integration
The integration between Expensify and QuickBooks is designed to reduce manual data entry and improve financial accuracy. When configured correctly, it allows approved expenses to move directly into accounting records, keeping expense reporting and bookkeeping aligned.
Why Integrate Expensify with QuickBooks?
Integrating Expensify with QuickBooks delivers three core benefits:
Automation
Expense data, receipts, and reports can be automatically transferred from Expensify into QuickBooks. This eliminates repetitive data entry and reduces dependency on spreadsheets or manual uploads.
Accuracy
Manual entry increases the risk of duplicate transactions, incorrect categorization, and reconciliation issues. Integration ensures consistent data mapping and preserves financial integrity across systems.
Efficiency
By automating expense synchronization, finance teams save significant time during month-end close and audits, allowing them to focus on review, analysis, and control rather than cleanup.
How the Native Integration Works
Expensify provides native integrations with both QuickBooks Online and QuickBooks Desktop:
QuickBooks Online
Expensify connects directly, enabling synchronization of categories, classes, vendors, and accounts. Approved expense reports can be exported as bills, journal entries, or expenses based on accounting preferences.QuickBooks Desktop
Integration is enabled through the QuickBooks Web Connector. Once configured, Expensify sends expense data directly into the desktop environment, maintaining consistency with on-premise accounting workflows.
For businesses with straightforward expense structures, these native integrations are often sufficient and provide a reliable baseline connection.
Limitations of Native Integrations
Despite their benefits, native integrations may not fully address more complex operational needs:
Bulk Expense Handling
High-volume expense data can be challenging to manage, particularly during historical imports, corrections, or migrations.Customization Constraints
Businesses with a complex chart of accounts, department-level reporting, or unique approval workflows may find native options restrictive.Error Resolution
Mapping errors, duplicate entries, or partial sync failures often require manual fixes within QuickBooks, increasing reconciliation time.
Extending Integration Capabilities
To address these gaps, solutions such as SaasAnt Transactions complement the native Expensify–QuickBooks integration by offering:
Bulk import and export capabilities for expense and accounting data
Advanced field mapping to align with custom accounting structures
Pre-import validation and error handling to reduce reconciliation issues
By layering these capabilities on top of the native integration, businesses can achieve a more controlled, scalable, and audit-ready expense management workflow—without sacrificing accuracy or efficiency.
When the Integration Gets Tricky: Common Challenges
Integrating Expensify with QuickBooks can significantly enhance expense management by automating data entry and ensuring up-to-date financial records. However, users may encounter several challenges during setup and daily operations.
1. Setup Complexity
QuickBooks Online (QBO) and Desktop: Configuring the integration requires meticulous account, category, and user permission mapping. For instance, importing the Chart of Accounts from QuickBooks into Expensify as categories is essential, and any discrepancies can lead to errors. Expensify's QuickBooks Online Configuration Guide provides detailed guidance.
2. Synchronization Errors
Data Mismatches: Inconsistencies in employee information or account names between Expensify and QuickBooks can cause synchronization failures. Ensuring that employee records in QuickBooks match those in Expensify is crucial for seamless data transfer.
3. Multi-Currency Challenges
Currency Configuration: Handling expenses in multiple currencies requires precise configuration in both systems. For example, when exporting a report in a currency other than your home currency, the transaction will be recorded in the vendor’s currency at a 1:1 conversion rate, which can lead to inaccuracies.
4. Corporate Card Reconciliation
Duplicate Entries or Missing Transactions: Improperly configured corporate card feeds can result in duplicate entries or missing transactions. Expensify recommends establishing a direct connection between Expensify and your bank through a Commercial Card Feed to ensure reliability.
5. QuickBooks Online Specific Issues
Duplicate Credit Card Expenses: Users have reported duplicate expenses due to bank feeds importing transactions that have already been recorded. To resolve this, excluding duplicate transactions without deleting them is advisable, as deleting may cause the bank to re-download them.
6. QuickBooks Desktop Specific Issues
"Credit Card Misc." Vendor Problem: If an expense doesn’t match an existing vendor in QuickBooks, it may export to a generic "Credit Card Misc." vendor created by Expensify, leading to categorization issues. Ensuring all vendors are correctly set up in QuickBooks can mitigate this problem.
QuickBooks Web Connector (QWC) Errors: Issues with the QuickBooks Web Connector can disrupt the integration. Regularly updating the Web Connector and following the troubleshooting steps outlined in Expensify's QuickBooks Desktop Troubleshooting Guide can help resolve these issues.
By being aware of these potential challenges and using the provided resources, users can better navigate the integration of Expensify with QuickBooks, leading to more efficient expense management and more accurate financial reporting.
SaaSant Transactions: Your Integration Power Tool
For users encountering challenges with the native integration between Expensify and QuickBooks, SaaSant Transactions offers a robust solution to enhance data management and streamline accounting processes. It serves as a complementary tool, augmenting the capabilities of Expensify and QuickBooks without replacing them.
Key Benefits of SaaSant Transactions:
Reliable Data Transfer: SaaSant Transactions facilitates the bulk import, export, and deletion of transactions and lists in QuickBooks Online from various file formats like Excel, CSV, IIF, Text, and PDF. This functionality ensures that large volumes of data are transferred accurately and efficiently, providing a dependable alternative when direct syncing encounters issues.
Granular Control: The platform lets users map data precisely to QuickBooks accounts, including custom fields. This level of detail ensures that all financial information is categorized correctly, aligning with the company's specific accounting structures and requirements.
Data Cleansing and Transformation: Before importing data into QuickBooks, SaaSant Transactions enables users to rectify errors, add necessary details, and transform data. This process enhances the quality and accuracy of financial records, reducing the likelihood of discrepancies.
Automation: SaaSant Transactions offers advanced features like live editing, batch transactions, customizations, and automation through email, FTP, SFTP, and Zapier integration. These automation capabilities save time and minimize manual effort, allowing more efficient data management.
User Feedback:
Users have reported positive experiences with SaaSant Transactions, highlighting its ease of use and the significant time savings it provides. For instance, a financial controller noted that integrating SaaSant into their workflow transformed their accounting processes, allowing for efficient import of transaction data and substantially reducing time spent on entries.
By integrating SaaSant Transactions into their workflow, businesses can overcome the limitations of native integrations between Expensify and QuickBooks. This integration ensures reliable data transfer, precise control over financial information, and streamlined accounting processes, ultimately enhancing overall efficiency.
Step-by-Step Guide: Importing Expensify Data with SaaSant
Integrating Expensify with QuickBooks through SaaSant Transactions can streamline your expense management process. Here's a step-by-step guide to assist you:
1. Export Expenses from Expensify
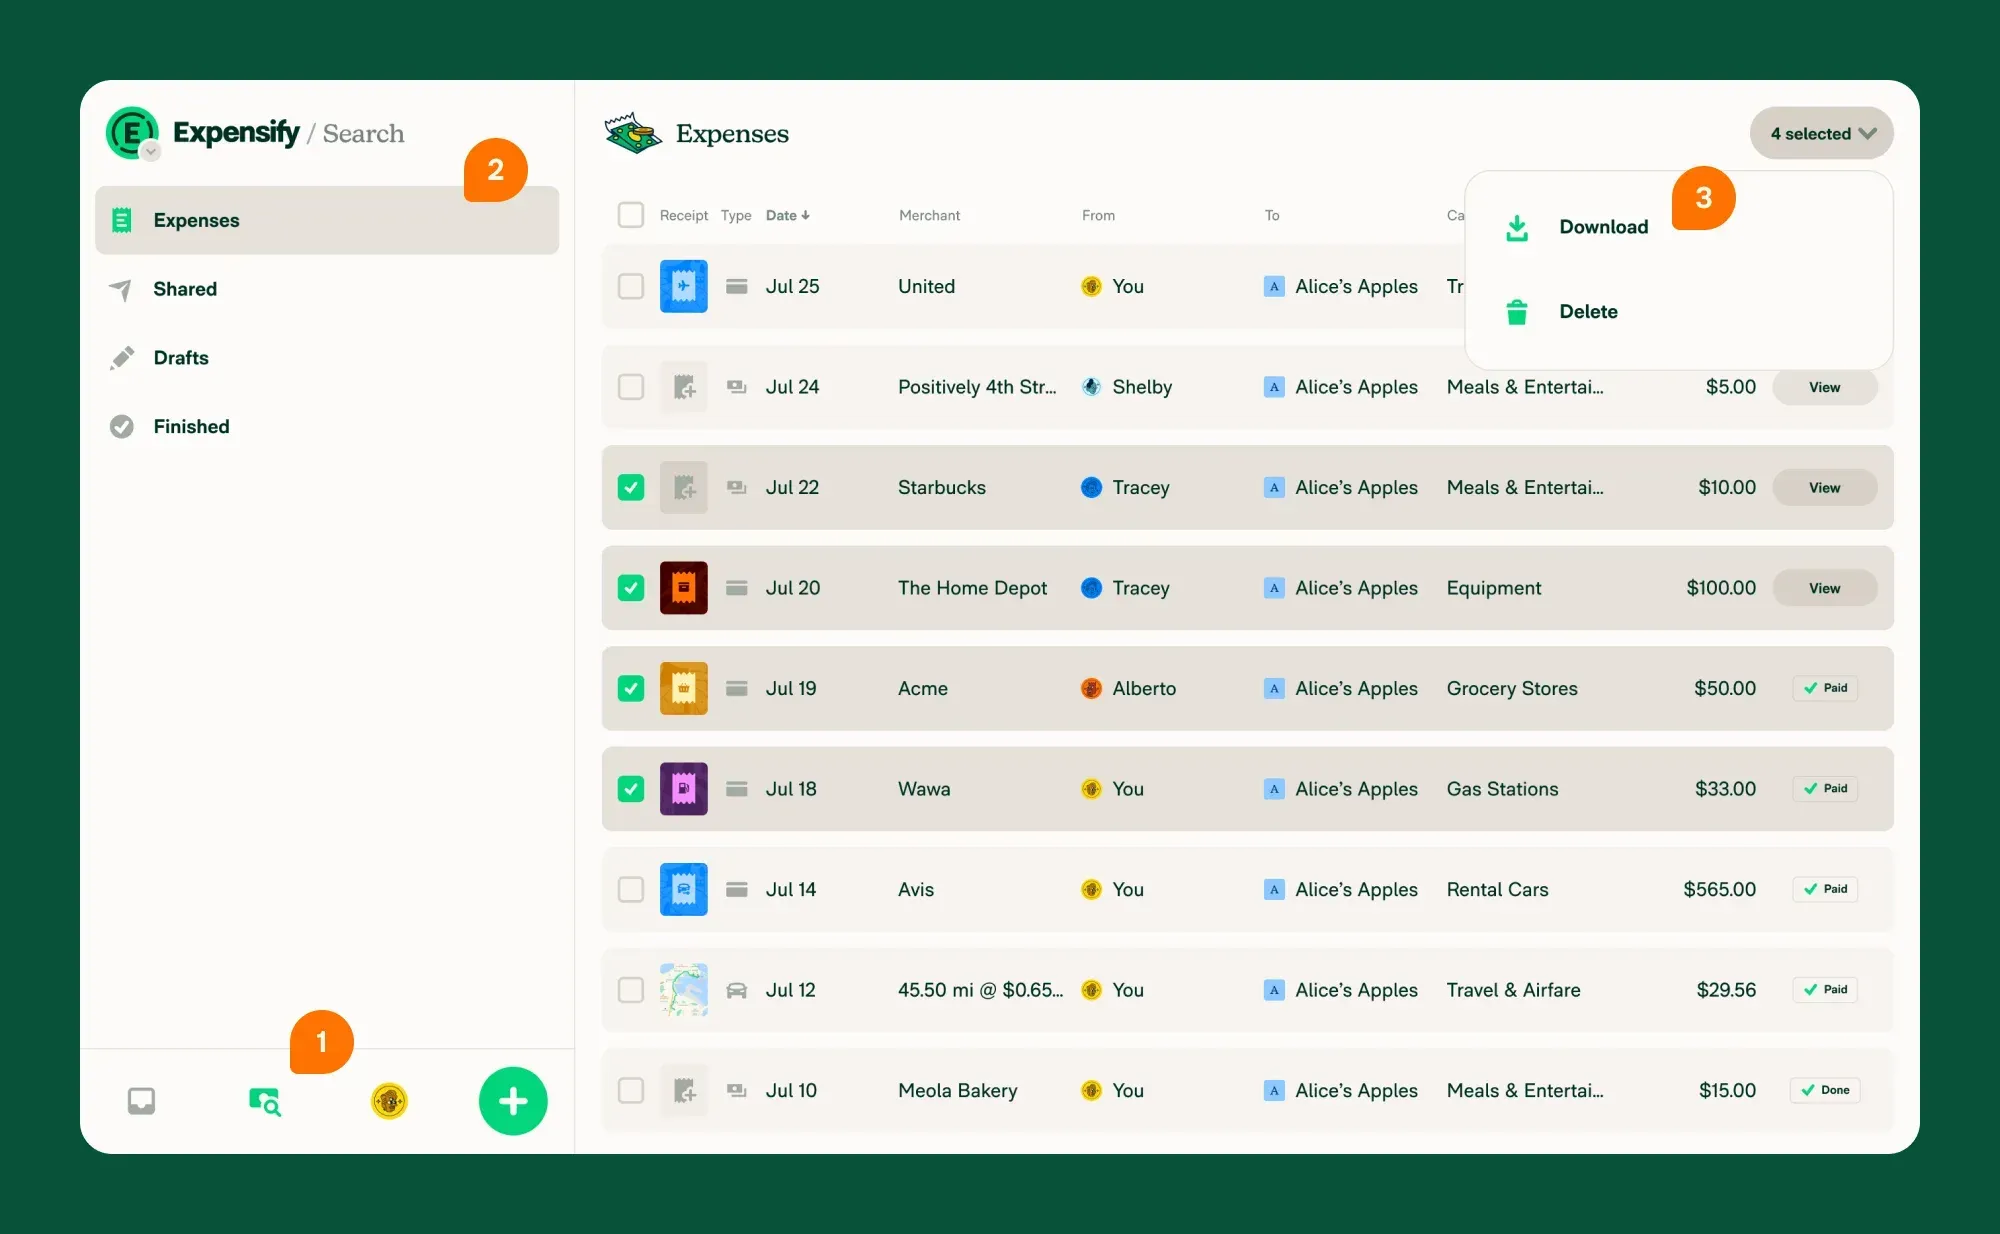
Access Expenses: Log in to your Expensify account and navigate to the Expenses tab.
Select Expenses: Check the boxes following the expenses you wish to export.
Export Data: Click Export To in the upper-right corner and choose Default CSV to download your expenses in CSV format.
2. Prepare the CSV File
Review Data: Open the CSV file to ensure all necessary expense details are present and correctly formatted.
Format Alignment: Ensure that the CSV columns align with QuickBooks' required fields, such as Date, Amount, Vendor, and Category.
3. Import Data into SaaSant Transactions
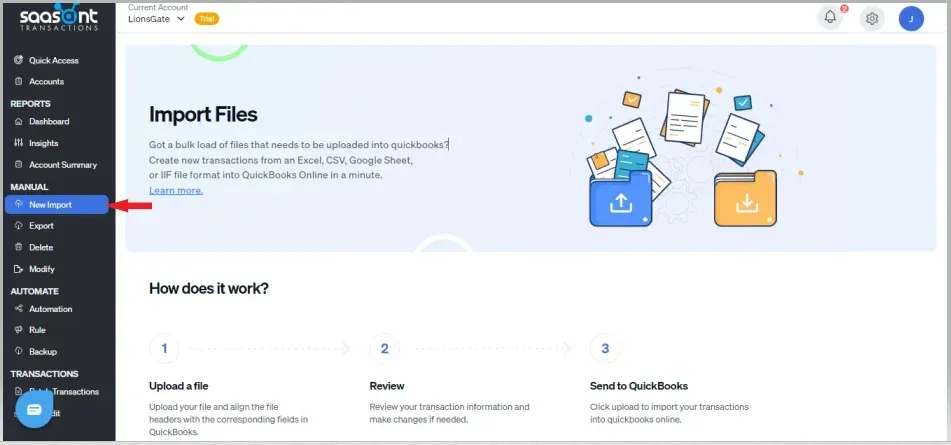
Log In: Access your SaaSant Transactions account.
Initiate Import: Click on the Import button on the dashboard.
Upload File: Select the CSV file exported from Expensify.
4. Map Data Fields
Field Mapping: Match each column from your CSV file to the corresponding QuickBooks fields. SaaSant provides an intuitive interface for this purpose.
Save Mapping: If you plan to perform similar imports in the future, save this mapping configuration for reuse.
5. Validate and Transform Data
Data Validation: Use SaaSant's validation tools to check for errors or inconsistencies in your data.
Data Transformation: If necessary, apply transformations to ensure data aligns with your QuickBooks setup.
6. Import Data into QuickBooks
Start Import: After validation, proceed to import the data into QuickBooks.
Review Imported Data: Once the import is complete, verify that all expenses appear correctly in QuickBooks.
7. Automate Future Imports
Save Templates: Utilize SaaSant's template-saving feature to streamline future imports.
Set Up Automation: Consider scheduling automated imports to keep your QuickBooks data up-to-date with minimal manual intervention.
By following these steps, you can effectively transfer expense data from Expensify to QuickBooks using SaaSant Transactions, ensuring accuracy and efficiency in your financial records.
Choosing the Right Solution: A Tailored Approach
Every business has unique needs for managing expenses and integrating tools like Expensify and QuickBooks. Choosing the right solution depends on your specific workflows and challenges.
When the Native Integration Works
The native Expensify-QuickBooks integration is designed to handle standard workflows. If your business processes are straightforward, and you’re primarily looking to sync expenses, automate reporting, and manage reimbursable costs, this option might be all you need. It’s efficient and widely used for these purposes.
When You Need More
If your business deals with high transaction volumes, complex accounting structures, or recurring issues like sync errors or data mismatches, the native integration may fall short. That’s where SaaSant Transactions becomes essential.
How SaaSant Fits In
SaaSant Transactions provides advanced features that address gaps in the native integration:
Bulk Data Management: Import and process large volumes of expense data quickly and accurately.
Customization: Tailor data mapping to align with your QuickBooks setup, including support for custom fields and unique workflows.
Data Transformation: Fix errors, adjust formats, or add missing details before importing data into QuickBooks.
Automation: Save time with scheduled imports and reusable templates for repetitive tasks.
Which Approach Is Right for You?
Stick with Native Integration if:
You have relatively simple workflows.
Your team is comfortable with Expensify’s default QuickBooks sync.
The volume of expenses is manageable without customization.
Consider SaaSant Transactions if:
You encounter frequent sync issues or errors.
Your business processes require advanced data handling or customization.
Bulk imports or automated workflows are priorities.
One Goal: Better Expense Management
SaaSant Transactions isn’t a replacement for Expensify or QuickBooks—it’s an enhancement. It adds capabilities where needed most, ensuring your tools work harder for your business. Evaluate your needs, choose the best approach, and focus on running a more efficient, accurate, and scalable expense management process.
Conclusion: Streamlining Your Expenses
Effective expense management is not just about capturing receipts or syncing transactions—it is about ensuring accuracy, control, and reliability across financial systems. While the native integration between Expensify and QuickBooks meets the needs of many organizations, growing businesses often encounter limitations related to volume, customization, and error resolution.
As expense data becomes more complex, finance teams need greater visibility and control over how transactions enter QuickBooks. This is where SaasAnt Transactions adds strategic value. By enabling bulk data handling, precise mapping, data validation, and automation, it strengthens the Expensify–QuickBooks workflow without disrupting existing systems.
Whether you rely on the native integration or extend it with SaasAnt Transactions, the objective remains the same: a streamlined, accurate, and audit-ready expense management process. By choosing the right integration approach for your business complexity, you can reduce manual effort, eliminate reconciliation friction, and allow your finance team to focus on analysis and decision-making rather than data cleanup.
Frequently Answered Questions
1. Can Expensify sync expenses directly with QuickBooks?
Yes. Expensify offers native integrations with both QuickBooks Online and QuickBooks Desktop, allowing approved expenses to sync automatically as bills, expenses, or journal entries based on your accounting setup.
2. Why do expense sync errors occur between Expensify and QuickBooks?
Sync errors usually occur due to account mismatches, missing vendors, inconsistent employee records, or currency configuration issues between the two systems. These often require manual correction in QuickBooks.
3. When is the native Expensify–QuickBooks integration not enough?
The native integration may fall short for businesses with high transaction volumes, complex charts of accounts, multi-currency expenses, or frequent historical corrections and bulk imports.
4. How does SaasAnt Transactions improve the Expensify–QuickBooks workflow?
SaasAnt Transactions adds bulk import capabilities, advanced field mapping, data validation, and automation, giving finance teams greater control over how expense data is imported into QuickBooks.
5. Do I need to replace Expensify or QuickBooks to use SaasAnt Transactions?
No. SaasAnt Transactions complements Expensify and QuickBooks by enhancing data handling and automation. It does not replace either platform and works alongside existing integrations.