How To Edit A Class In QuickBooks Desktop
In QuickBooks Desktop, classes are essential for organizing transactions to enhance financial reporting, whether for expenses by department or sales by location. However, as business requirements change, the need to adjust or update class data also arises. Editing this data manually in large quantities can be time-consuming and may lead to errors. This is where SaasAnt Transactions Desktop is helpful.
This guide provides you with the steps to effectively edit classes in QuickBooks Desktop using SaasAnt, ensuring your financial records remain clean, precise, and up-to-date.
Also Read: How to Import Classes into QuickBooks Desktop?
A company reorganizes its departments halfway through the year and must change class names in numerous transactions in QuickBooks Desktop. The team efficiently modifies and imports the new class data using SaasAnt Transactions Desktop, guaranteeing reliable and precise financial tracking.
This blog is ideal for accountants, bookkeepers, and small businesses who need to update class data in bulk within QuickBooks Desktop, ensuring accuracy, saving time, and streamlining workflows using SaasAnt Transactions Desktop.
Contents
How to Edit Class in QuickBooks Desktop: Step-By-Step Guide
Wrap Up
Frequently Asked Questions
How to Edit Class in QuickBooks Desktop: Step-By-Step Guide
Follow the steps below to edit a class in QuickBooks Desktop using SaasAnt Transactions Desktop.
Step 1: Install and Connect SaasAnt Transactions
Download the latest SaaSAnt Transactions Desktop version.
Run SaasAntTransactions-Setup.exe as an administrator.
Accept the license agreement and complete the installation.
Open the app, go to Subscription > Register.
Enter the license key from your confirmation email.
Keep your internet connection active.
Step 2: Launch SaasAnt Transactions Desktop
Start by opening the SaasAnt Transactions Desktop app on your system.
Ensure that QuickBooks Desktop is open and connected to your company file before proceeding.
Step 3: Connect to QuickBooks Desktop
To access the class, you need to connect the SaasAnt Transactions Desktop with QuickBooks Desktop. Here's how:
Go to the ‘File’ menu in the top-left corner of SaasAnt Transactions Desktop.
Click ‘Connect to QuickBooks’ from the dropdown.
Step 4: Open SaasAnt Transactions
On the SaasAnt dashboard:
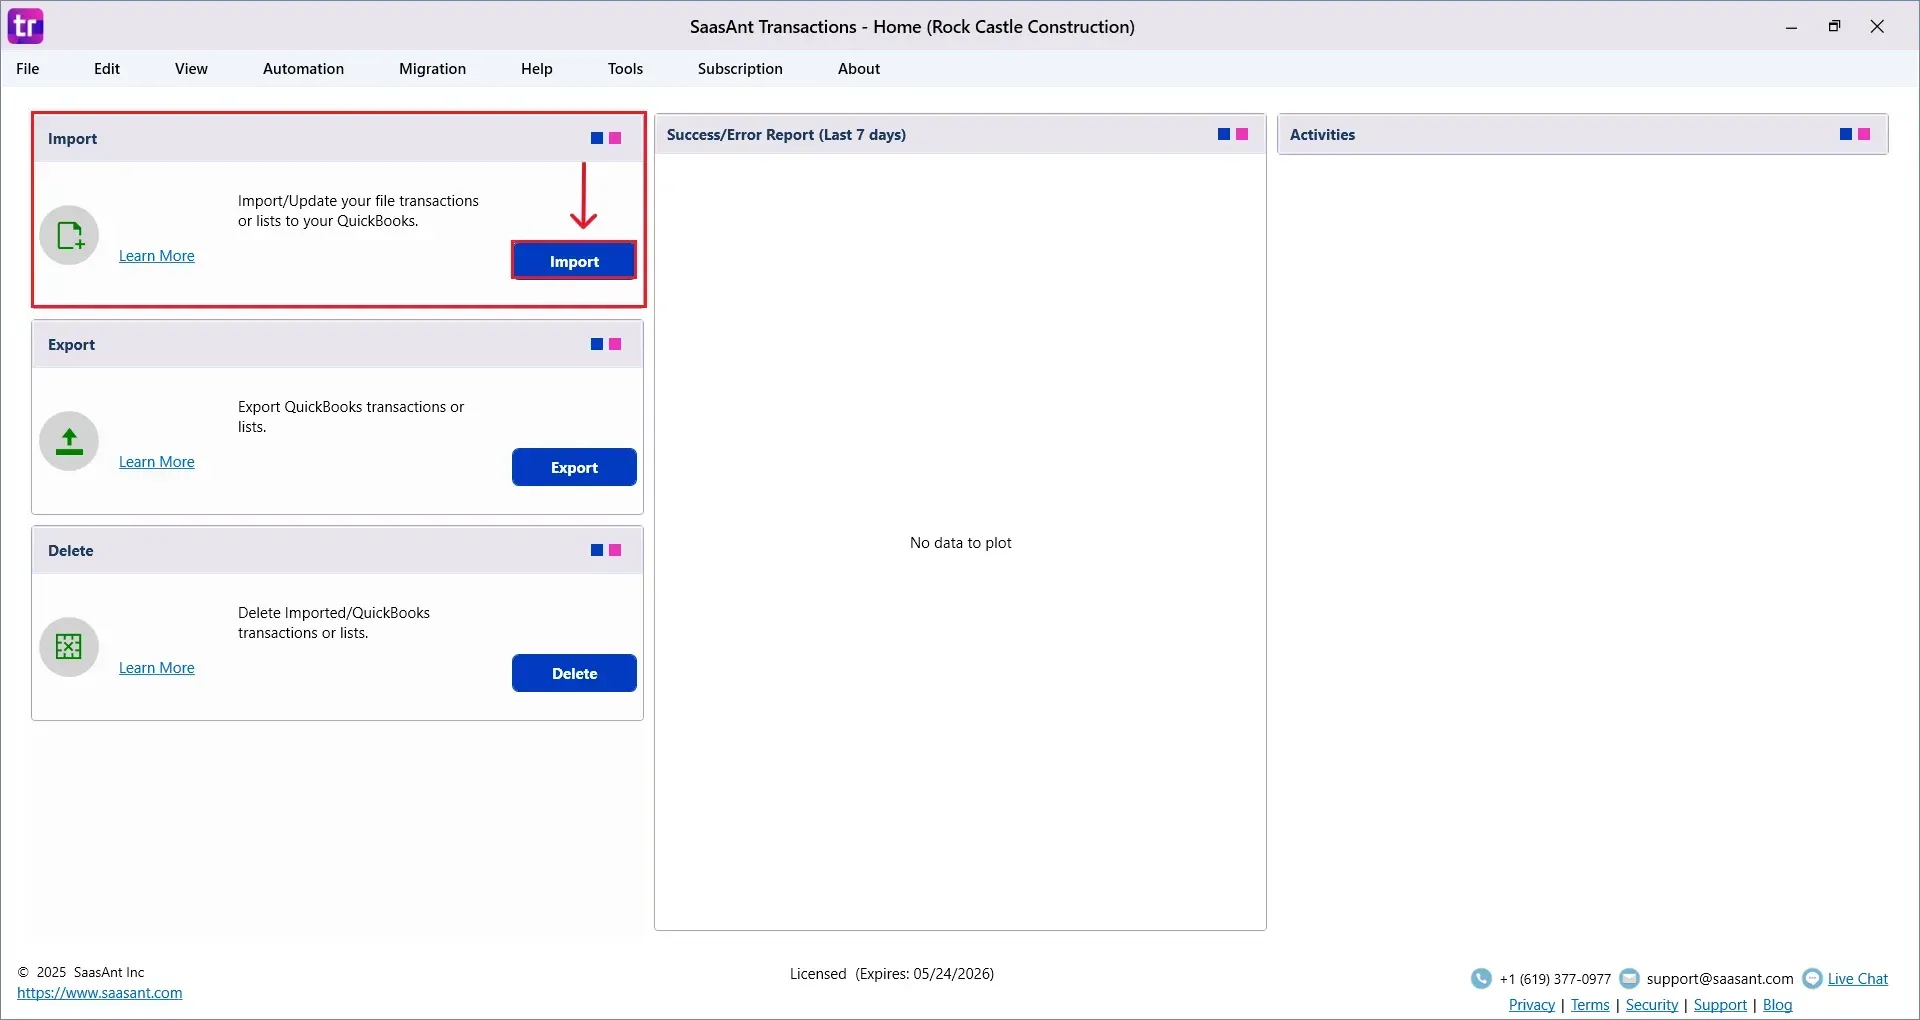
On the top left side of the SaasAnt Transactions dashboard, you can see the menu bar with various options.
Select “Edit,” and select “Import” under the edit dropdown.
The Dashboard appears as shown in the image below.
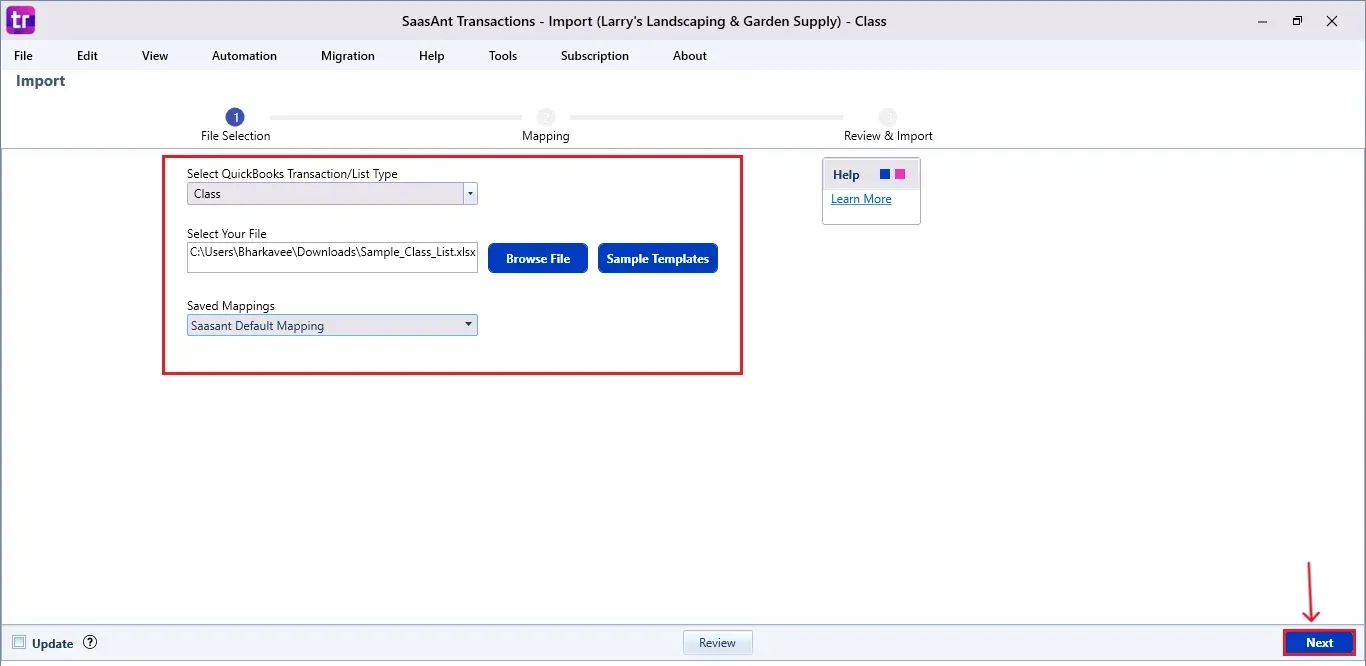
Select “class ” from the SaasAnt Transaction Type dropdown and upload your Excel or CSV file.
Select “SaasAnt Default Mapping” under the Saved Mapping dropdown.
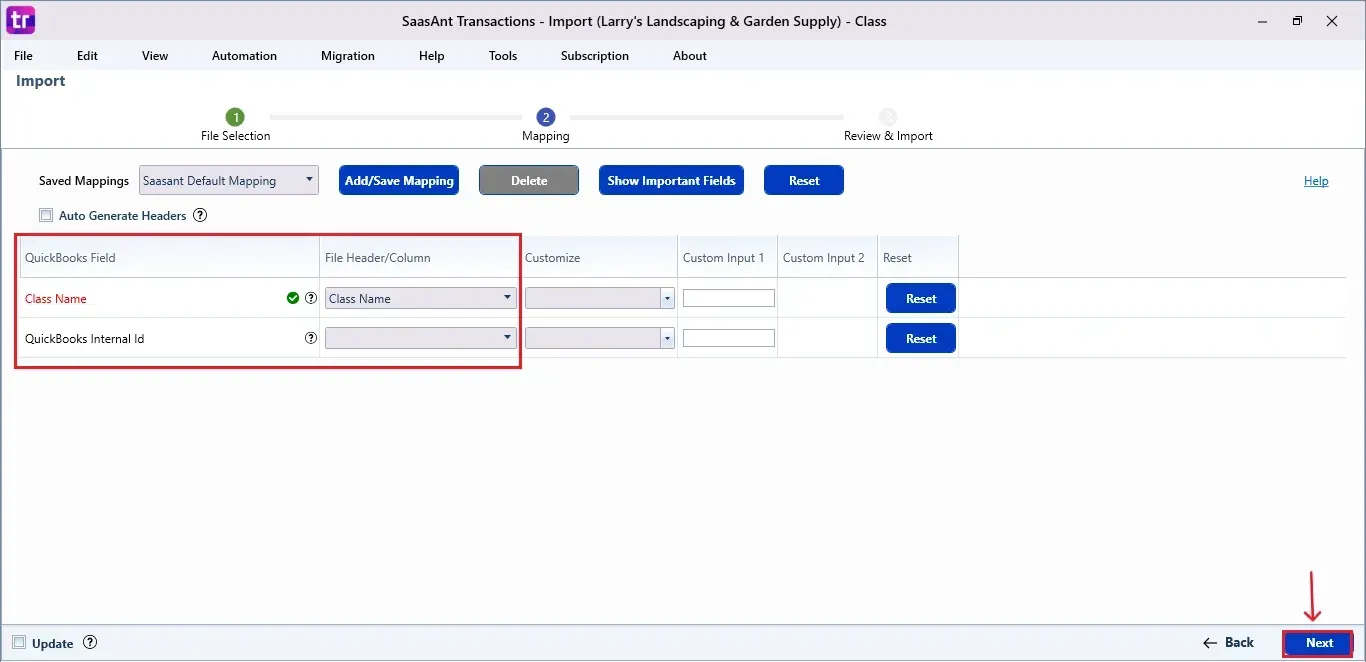
Step 5: Mapping Fields
Ensures the mapping of essential fields, including class name, QuickBooks referral ID, etc.
Select “Next” at the bottom right of the dashboard.
This step ensures that your data is aligned with QuickBooks’ fields, such as class name.
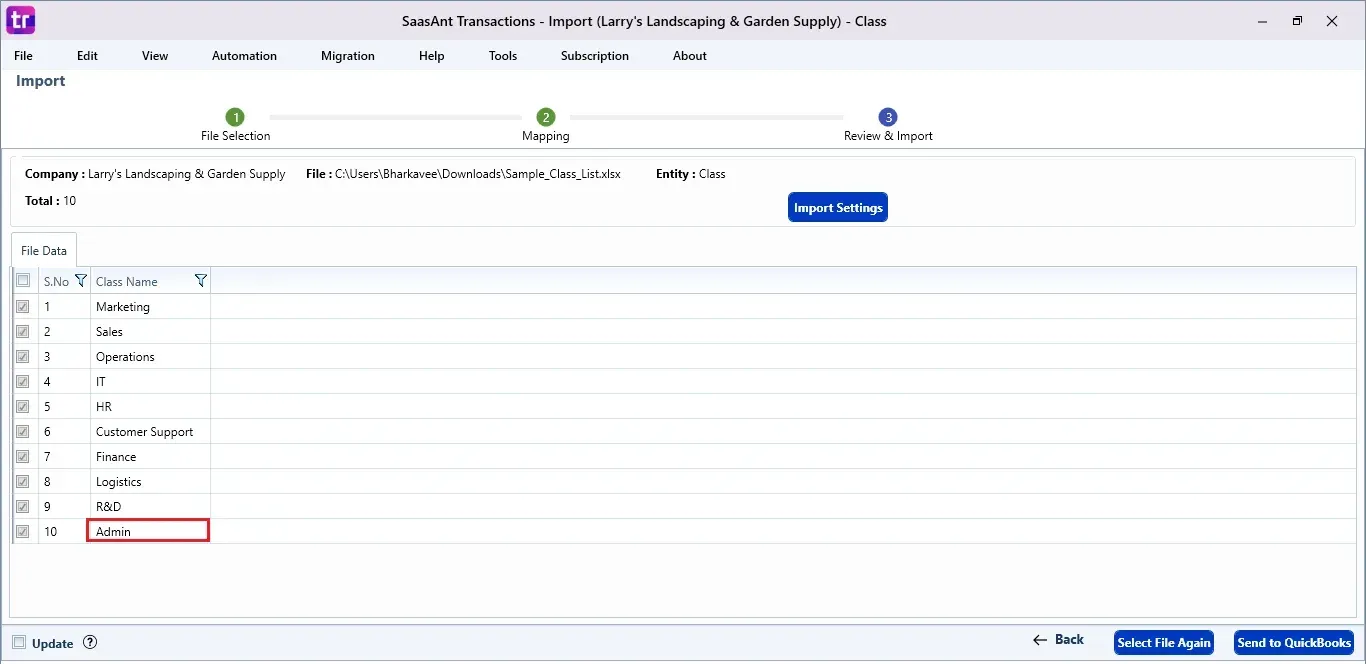
Step 6: Review & Pre-Edit the Data
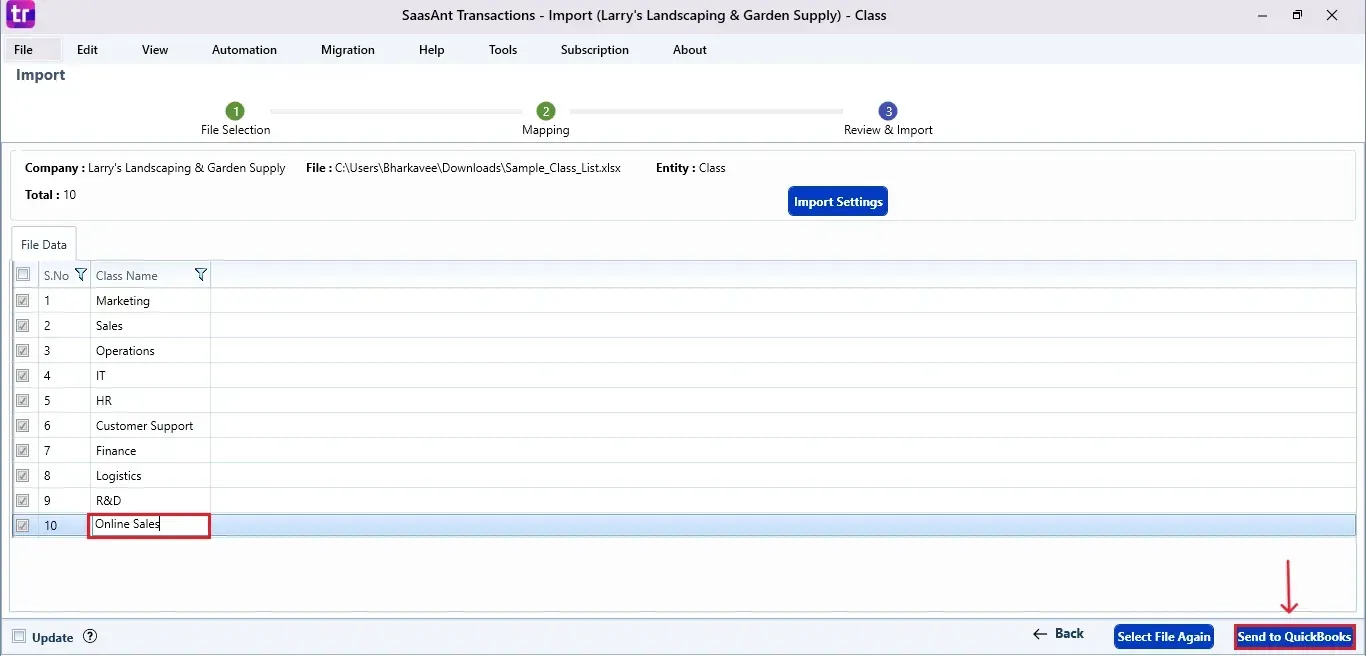
Before importing, SaasAnt allows you to preview and edit the class directly within the interface.
The image below shows the class to be edited.
Step 7: Edit and Send to QuickBooks
Now, select and edit the class and click the “Send to QuickBooks” option at the bottom right of the dashboard, as shown in the image below.
SaasAnt will now push the edited class into your connected QuickBooks Desktop account.
Step 8: Import the Data
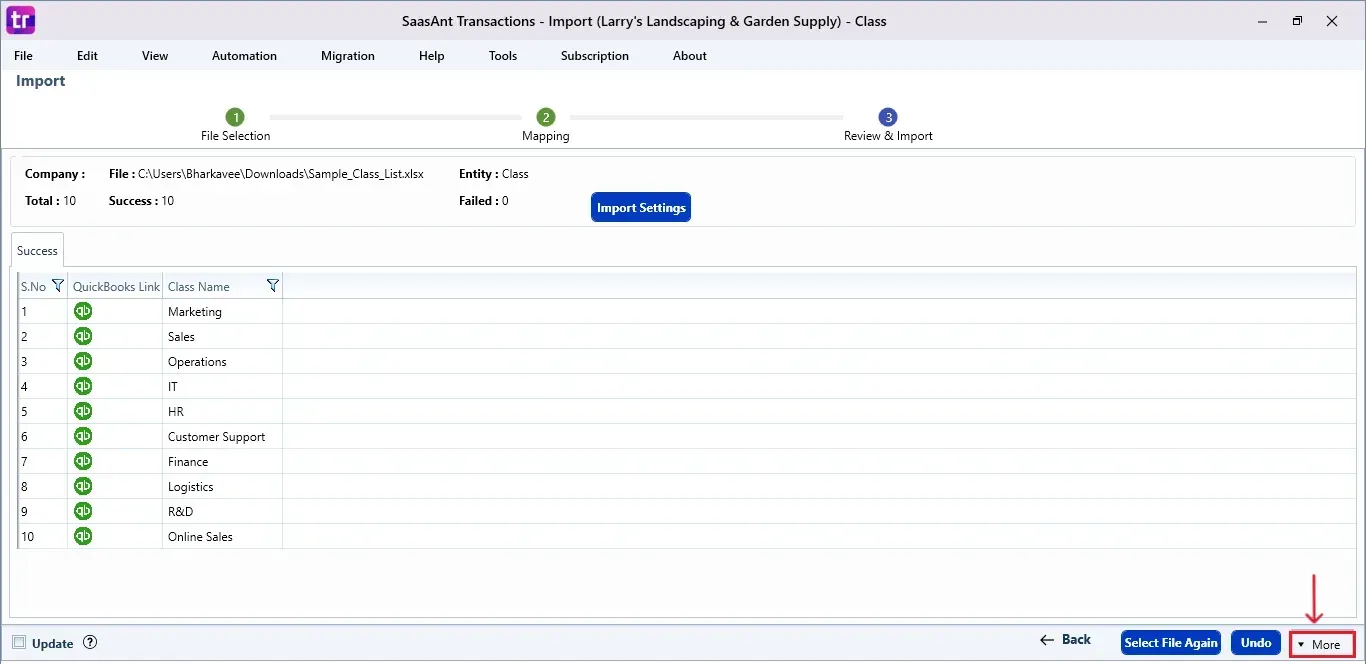
The edited class is reflected in the dashboard.
At the bottom right, click the “More” dropdown and select the option to download your edited class for reference.
Download the mapping file separately (optional but recommended).
Additionally, next to the download option, you can see “Undo”, which allows you to roll back your “Class” data.
Step 9: Verify in QuickBooks Desktop
Open QuickBooks Desktop, go to the “Lists” menu, and select “Class”.
You can view the updated Class with the changes.
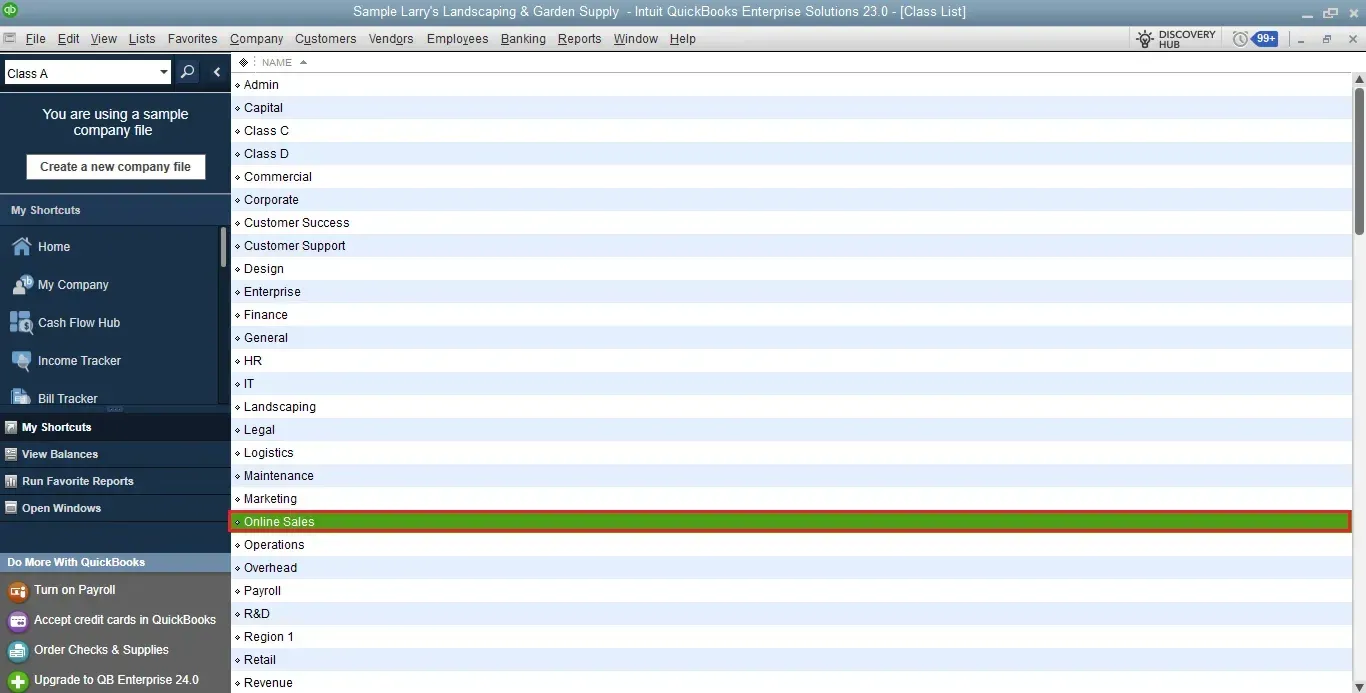
This final step ensures that your data is accurate and reconciled properly within QuickBooks.
CTA-Banner-1
Also Read: How to Create Class in QuickBooks Online
Wrap Up
Editing class data in QuickBooks Desktop doesn't have to be a complex or repetitive task. With SaasAnt Transactions Desktop, you can quickly import, edit, and sync your updated class list in just a few clicks, ensuring accuracy. This automation saves time and maintains clean, audit-ready records. For expanding businesses handling detailed transactions, it’s an efficient method to optimize your accounting processes.
By leveraging trustworthy platforms like QuickBooks for your accounting processes and SaasAnt for transaction management and automation, you can enhance the overall workflow, minimize errors, save time, and acquire greater financial insight.
Want to optimize your editing workflow? Try SaasAnt Transactions Desktop today and experience the difference.
If you have inquiries regarding our products, features, trial, or pricing, or if you require a personalized demo, contact our team today. We are ready to help you find the ideal solution for your QuickBooks workflow.
Frequently Asked Questions
1) Can I undo a class edit if I made a mistake?
Absolutely. SaasAnt Transactions Desktop includes an “Undo” feature to roll back any changes made to class data.
2) Do I need to map fields manually each time?
You can either use the 'SaasAnt Default Mapping' or save a custom mapping template for repeated use.
3) How do I verify if the class edit was successful in QuickBooks Desktop?
Open the 'Lists' menu in QuickBooks Desktop and select 'Class' to view the updated information.
4) Can I download a copy of the edited class list for my records?
Yes, you can download the edited data and mapping file directly from the SaasAnt dashboard.
Read Also
How To Edit A Bill In QuickBooks Desktop
How To Edit An Invoice In QuickBooks Desktop
How to Edit a Journal Entry in QuickBooks Desktop
How to Import Credit Card Transactions into QuickBooks Desktop