How to Create a Manual General Ledger with Excel?

Keeping track of all financial activities is crucial for small business owners. A general ledger is one of the vital financial records that enables business owners to stay on top of their financials. The general ledger records all financial transactions in a business. Keeping accurate and up-to-date financial records is critical to make informed business decisions. A manual general ledger can be quickly created using Microsoft Excel.
As a company grows, it requires a foolproof system to monitor its financial transactions. A general ledger is one such system that helps to keep track of all financial transactions and assists the company in monitoring its financial health. While many organizations use specialized accounting software to manage their general ledger, some prefer to develop and maintain a manual general ledger using Excel spreadsheets. This blog post will provide a step-by-step tutorial on creating a manual general ledger in Excel.
Contents
What Is a General Ledger?
Benefits of Manual General Ledgers Created in Excel for Businesses
Step-By-Step Tutorial for Using Excel to Create a Manual General Ledger
Importance of Each Column in the Manual General Ledger
How Should Transactions Be Properly Entered, Updating the Balance Column?
Importing Data from Excel to Microsoft’s Dynamics Nav (Navision) General Ledger
How to divide data from a General Journal to a General Ledger In Excel?
How Do You Reconcile Inventory to General Ledger in Excel?
Annual General Ledger Export Excel QuickBooks Online
FAQs
What Is a General Ledger?
A general ledger is vital to a business's financial management system. It serves as a record of all monetary exchanges that take place within a company, including payments, sales, and purchases. An organization's general ledger delivers the financial data required for efficient administration and decision-making.
A general ledger is a comprehensive record of all financial transactions of a business. It helps track revenue and expenses, monitor cash flow, and create financial statements. It enables a firm to keep track of its assets, liabilities, income, and costs, and it provides the data required to create financial reports and make justifiable decisions about the company's direction.
Benefits of Manual General Ledgers Created in Excel for Businesses
Businesses use manual general ledgers created in Excel for many reasons. Here are some of the most important ones:
Flexibility: Excel provides a lot of flexibility concerning organizing and analyzing data. Companies can create custom templates and structures with a manual general ledger in Excel to fit their unique needs.
Familiarity: Many people are already familiar with Excel, so there may be less of a learning curve when setting up and using a manual general ledger. Additionally, Excel is a widely used tool in the business world, so it is easy to share and collaborate on data with other users.
Control: With a manual general ledger in Excel, companies have complete control over their data and how it is entered, organized, and analyzed. They don't have to worry about relying on a third-party software provider or dealing with updates and maintenance.
Integration: Excel can be easily integrated with other software and tools, which can be helpful for companies that use various systems for accounting, inventory management, and other functions. By using Excel as a central hub, companies can more easily bring together data from different sources for a complete view of their finances.
Step-By-Step Tutorial for Using Excel to Create a Manual General Ledger
To provide a thorough overview of a company's financial situation, categorizing and classifying financial transactions into relevant accounts is required when creating a manual general ledger in Excel. To make a manual general ledger in Excel, adhere to these steps:
Open Excel and create a new worksheet: Open a new Excel worksheet by clicking 'File' and selecting 'New.' Choose 'Blank workbook' and click 'Create.'
Set up the headers: Set up the headers of your manual general ledger by creating columns for 'Date,' 'Transaction Description,' 'Account,' 'Debit,' 'Credit,' and 'Balance.'
Enter account information: Enter the account information for your company, such as 'Cash,' 'Accounts Receivable,' 'Supplies,' 'Equipment,' 'Accounts Payable,' and 'Owner's Equity.'
Enter transaction information: Enter the transaction information for your company, such as the date of the transaction, the description of the transaction, the account affected by the transaction, the debit amount, and the credit amount.
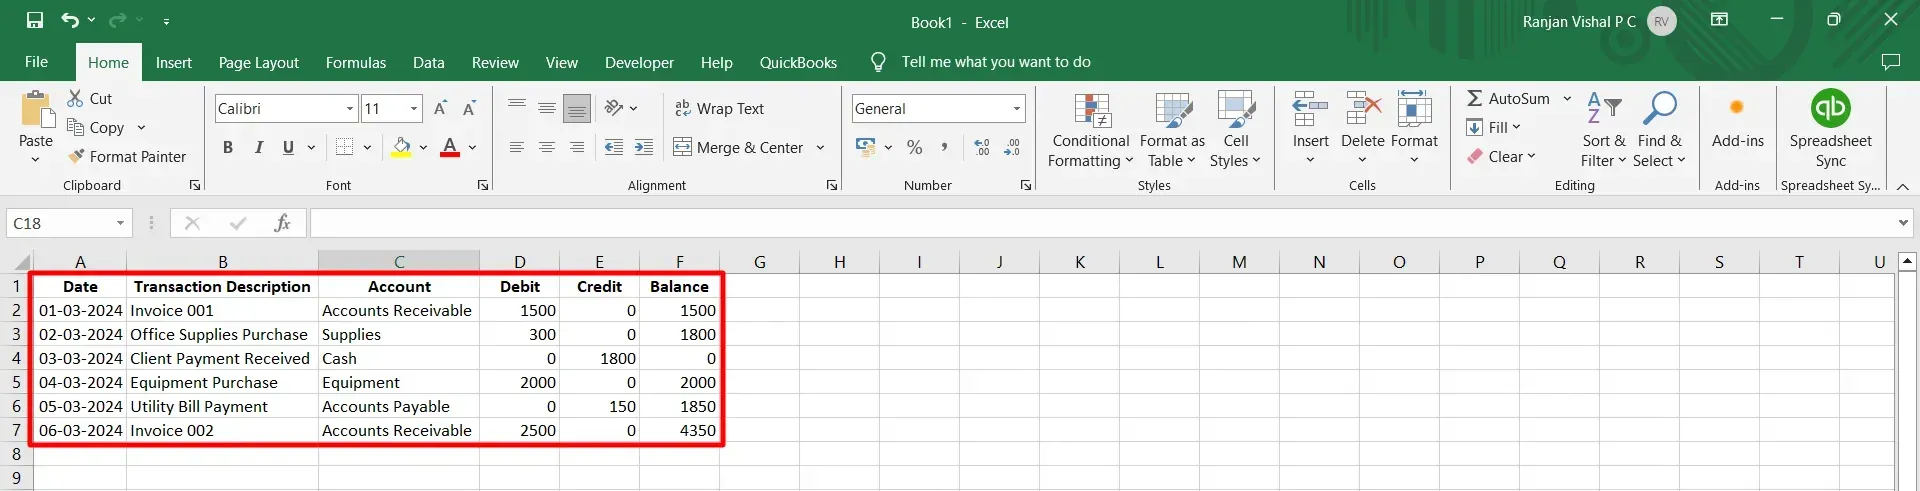
Create a formula to calculate the balance: In the 'Balance' column, create a formula to calculate the balance for each transaction. The formula should add the current balance to the debit amount and subtract the credit amount.
Group transactions into accounts: Group transactions into appropriate accounts by sorting the data by account. It will give you a detailed view of the transactions that affect each account.
Summarize data: Summarize the data by creating a separate worksheet summarizing each account. This summary should include the total debits, credits, and ending balance.
Add formatting: Format the manual general ledger to make it easy to read and understand. It could include adding borders, shading, and font styles.
Save and update: Save the manual general ledger and update it regularly to provide an accurate view of your company's financial health.
With the help of these, you can make an Excel manual general ledger that offers a thorough overview of your business's financial activities and accounts.
Importance of Each Column in the Manual General Ledger
Here is a detailed explanation of the columns typically included in a manual general ledger:
Date: You can use the date column to record the transaction date. It is essential to accurately record the date of each transaction in the ledger to ensure that the financial records are correct and up-to-date.
Description: The description column records a brief description of the transaction. The description should be clear and concise to make it easy to understand the purpose of the transaction.
Debit: The debit column is used to record the amount of money that was debited from an account. A debit entry is made when there is an increase in assets or a decrease in liabilities or equity. In other words, when the company receives money, it is recorded as a debit. For example, when a company receives payment from a customer, the cash account is debited.
Credit: The credit column is used to record the amount of money that was credited to an account. A credit entry is made when there is a decrease in assets or an increase in liabilities or equity. In other words, when the company spends money, it is recorded as a credit. For example, when a company pays a supplier for goods received, the accounts payable account is credited.
Balance: The balance column records each account's running balance after each transaction. It is calculated by subtracting the credit amount from the current balance to the debit amount. The balance column is critical because it allows the user to see the balance of each account at any point in time.
Account Code: The account code column records the account code for each transaction. The account codes should be consistent with the company's chart of accounts, which lists all the accounts used in the ledger. The account code is vital because it allows the user to group transactions by account, which makes it easier to create reports and analyze financial information. For example, all transactions related to the 'Cash' account will have the same account code.
How Should Transactions Be Properly Entered, Updating the Balance Column?
To appropriately enter transactions and update the balance column in a manual general ledger, follow these steps:
Record the transaction: Record the date, description, debit amount, and credit amount of the transaction in the appropriate columns. The debit amount should be recorded in the debit column, and the credit amount should be recorded in the credit column. The total debits and credits in the transaction should be equal.
Calculate the balance: To update the balance column, add the debit amount to the previous balance and subtract the credit amount from the prior balance. The resulting number should be entered in the balance column for the transaction.
Double-check your work: Double-check your calculations to ensure the balance is accurate. If there is an error in the balance column, review the previous entries to find and correct the error.
Group transactions by account: Group transactions by account to easily see the transactions that impact each account. You can do this by sorting the data by account code. It will give you a detailed view of the transactions that affect each account.
Reconcile the ledger: Reconcile the ledger regularly to ensure the balances match the actual account balances. It can be done by comparing the balances in the ledger to the account balances on the financial statements. If there are any discrepancies, investigate them and correct them as needed.
These methods will help you correctly enter transactions and update the balance column in a manual general ledger, enabling you to maintain precise and current financial records for your business.
How Do You Separate Cross-Out Entries in Excel General Ledger?
In accounting, cross-out entries mean making a journal entry in more than one account name to record a financial transaction in the general ledger.
You can separate cross-out entries in an Excel general ledger by following these steps:
Open the Excel general ledger and go to the column where the entries are recorded.
Look for entries that have been crossed out or marked in some way. Usually, these entries have a strikethrough or a different color.
Filter the column to show only the entries that have been crossed out. To do this, click the drop-down arrow on the column header and select 'Filter.' Then, select the option to filter by color or font and choose the strikethrough or the color that marks the crossed-out entries.
Once you have filtered the column, you can copy and paste the filtered entries into a separate sheet or table. It will give you a separate list of all the entries that have been crossed out, which you can analyze and reconcile as needed.
You can also add a column to the original ledger to indicate that an entry has been crossed out. It can help you track which entries have been reconciled and which need to be reviewed.
Importing Data from Excel to Microsoft’s Dynamics Nav (Navision) General Ledger
Dynamics NAV is an enterprise resource planning (ERP) app that assists with finance, customer relationship management (CRM), supply chains, manufacturing analytics, and electronic commerce for small and medium-sized companies.
To prevent mistakes while importing the Excel sheets, ensuring that the data in your sheet is formatted appropriately and adheres to Navision's requirements is crucial.
Use the steps below to import data from Excel into Dynamic’s general ledger:
Click 'Functions' in the top menu bar of Dyanamic Nav’s General Journal, then select 'Open.'
Choose the location of your Excel sheet's file and choose 'Import' from the drop-down menu.
To the equivalent fields in Dynamics, map the fields in your Excel file. For instance, map the first column of your Excel sheet to the 'Account' field in Navision if it contains account numbers.
To import the data into Dynamic after mapping all the fields, click 'Import.'
Check the imported data in Dynamic and make any necessary modifications or edits.
To General Ledger in Dynamic, post the imported data.
How to divide data from a General Journal to a General Ledger In Excel?
Use the steps below to convert Excel general journal data to a ledger:
Make a new worksheet for the ledger in the same workbook as the general journal.
Create column headers for account name, debit, and credit in the ledger worksheet.
Choose the first transaction in the general journal worksheet.
Enter the account name for the transaction in the account name column of the ledger worksheet.
Enter the amount in the debit column if the transaction is a debit. Enter the amount in the credit column if it is a credit.
For all transactions in the general journal, repeat steps 3-6, pasting each transaction into the following row.
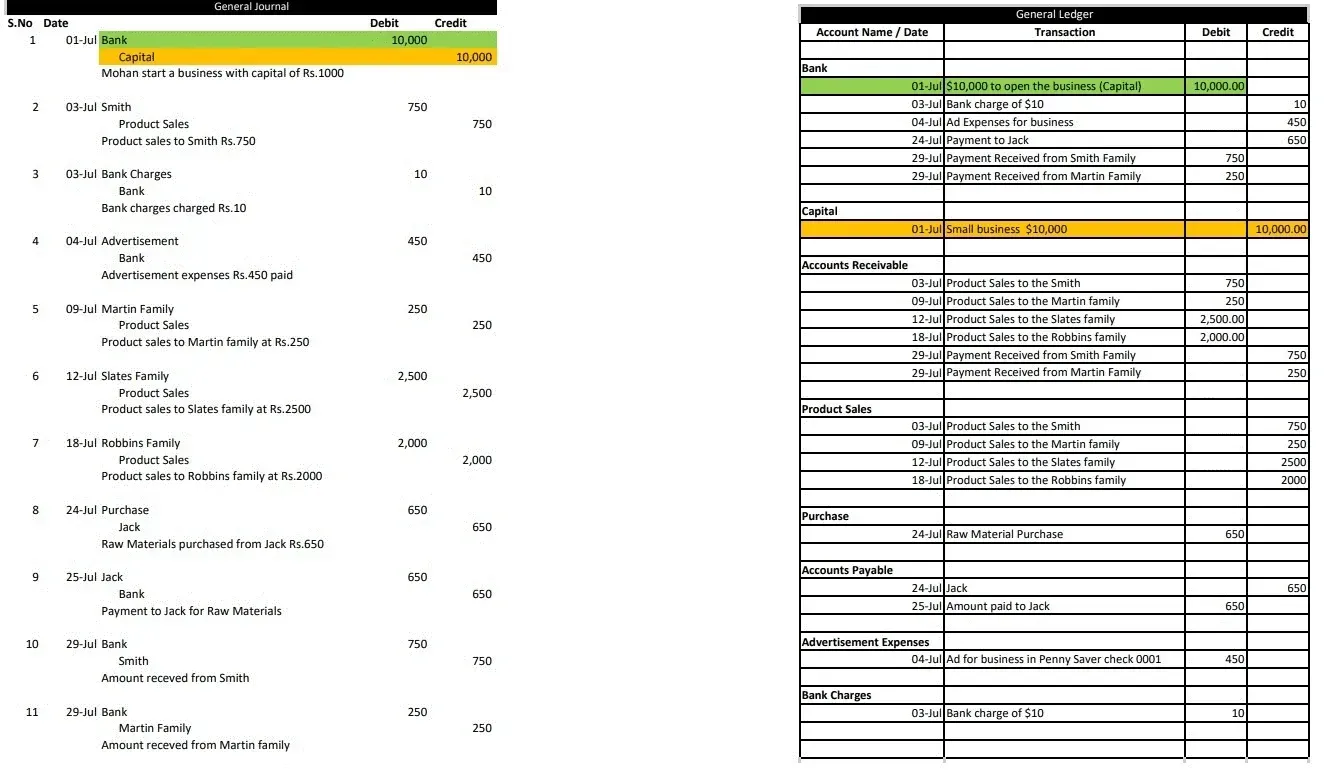
Maintain a running sum of the account balance in a separate column as you add transactions to the ledger.
Till all transactions from the general journal have been added, keep adding transactions to the ledger.
Financial statements, such as a balance sheet or income statement, can be made using the ledger.
How Do You Reconcile Inventory to General Ledger in Excel?
Excel's general ledger inventory reconciliation includes contrasting the ledger's inventory balances with the actual physical inventory counts. To reconcile inventory to the general ledger, follow these steps:
Create a new worksheet in Excel for your inventory reconciliation.
Enter your inventory items and their current balances from the general ledger in one column.
In another column, enter the physical inventory counts for each item.
Calculate the difference between the general ledger balance and the physical inventory count for each item in a third column.
Use a formula, to sum up the differences to get the total discrepancy between the general ledger and physical inventory count.
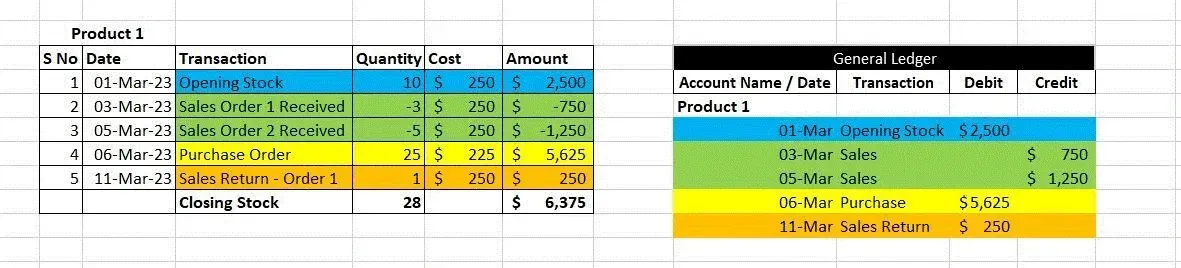
Once you have created it, keep the things below in mind to maintain the accuracy of the data.
Investigate any discrepancies to identify the cause and make any necessary adjustments to the general ledger.
Document any adjustments made, including the reason and supporting documentation.
Once all discrepancies have been identified and corrected, update the general ledger balances with the adjusted balances.
Reconcile the inventory again to ensure that the balances now match.
Once the balances have been reconciled, save the inventory reconciliation worksheet for future reference.
By reconciling inventory to the general ledger, you can ensure that your financial statements accurately reflect the company's assets and liabilities.
Annual General Ledger Export Excel QuickBooks Online
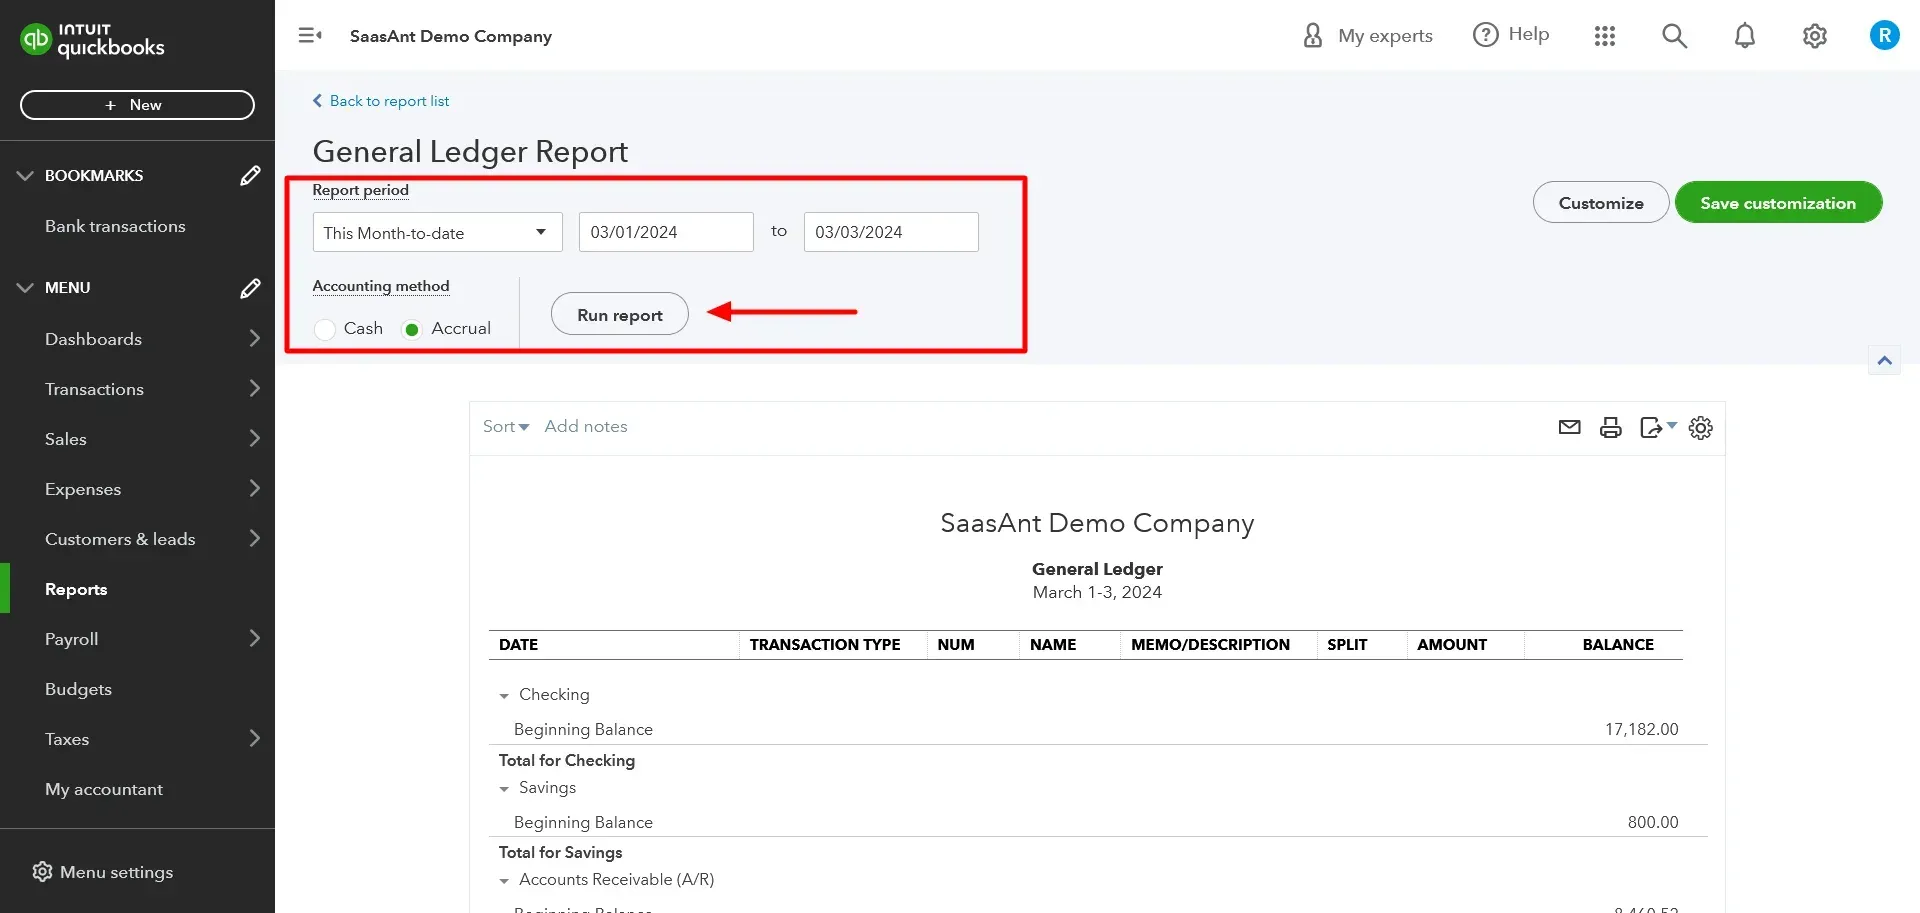
With QuickBooks Online, you can export your annual general ledger to Excel by doing the following steps:
Enter your QuickBooks Online username and password.
Log in to your QuickBooks Online account.
Click on the 'Reports' tab in the left-hand menu.
In the 'All Reports' tab, type 'General Ledger' in the search bar and select 'General Ledger' from the results list.
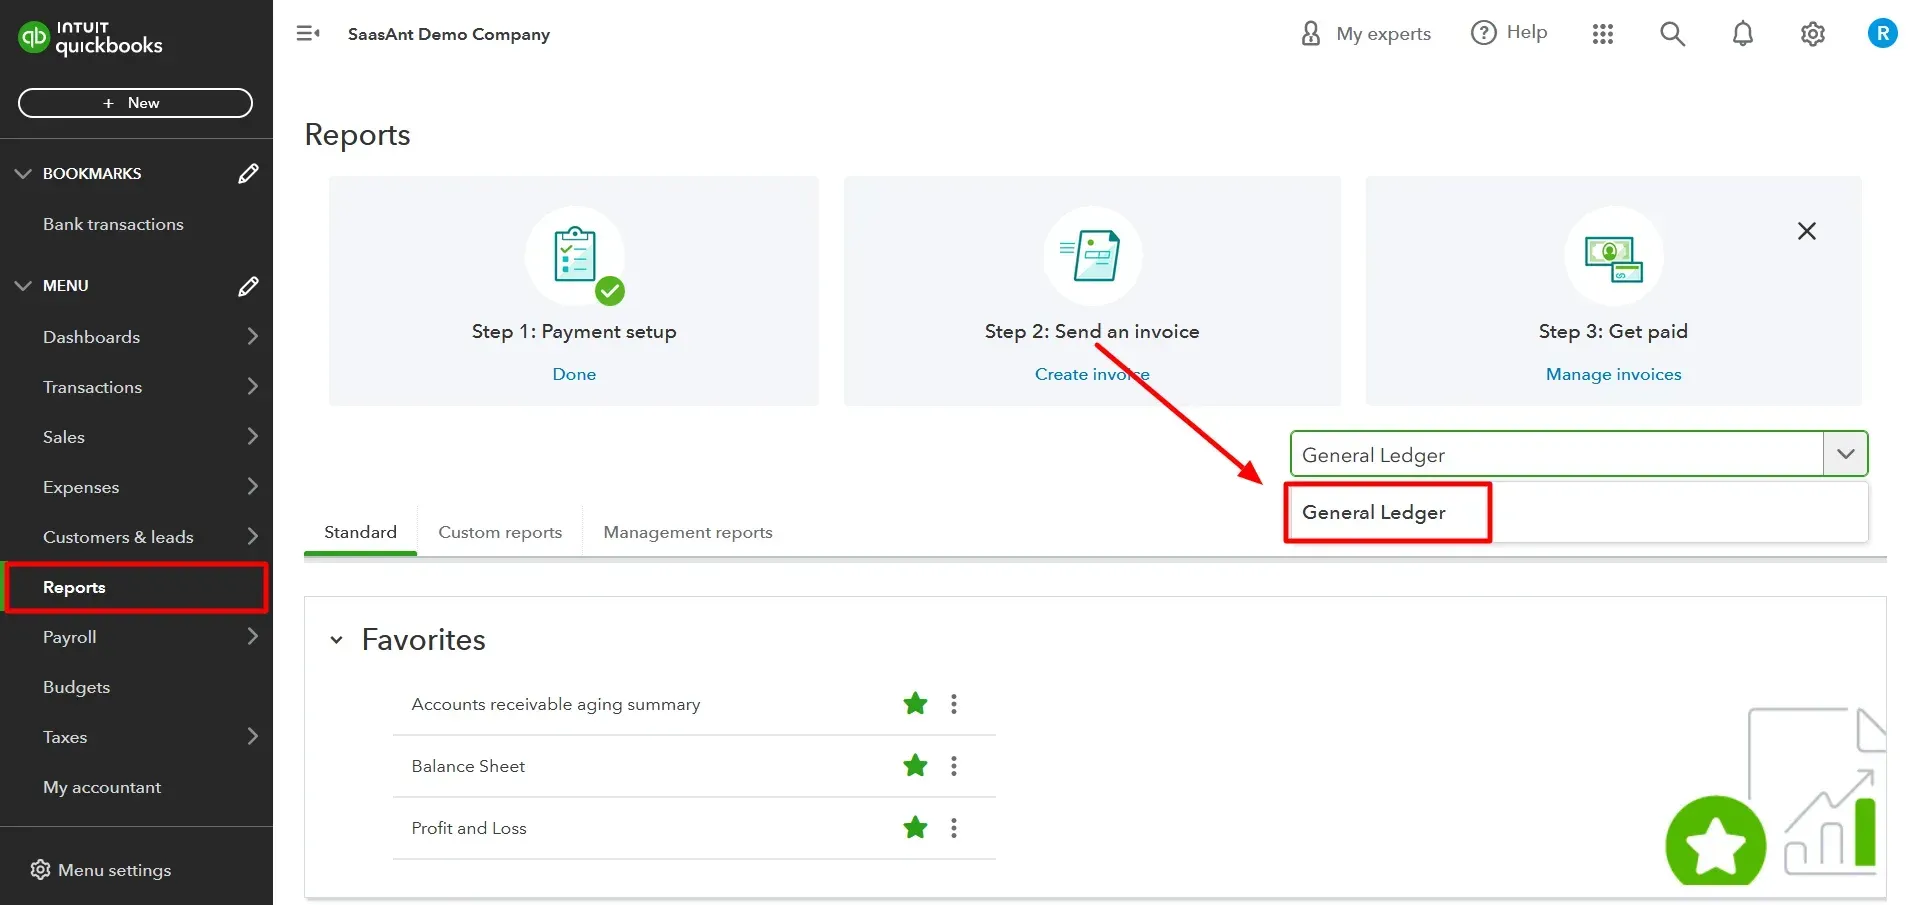
Customize the report to include the date range for your annual period and any other relevant filters.
Click 'Run Report' to generate the report.
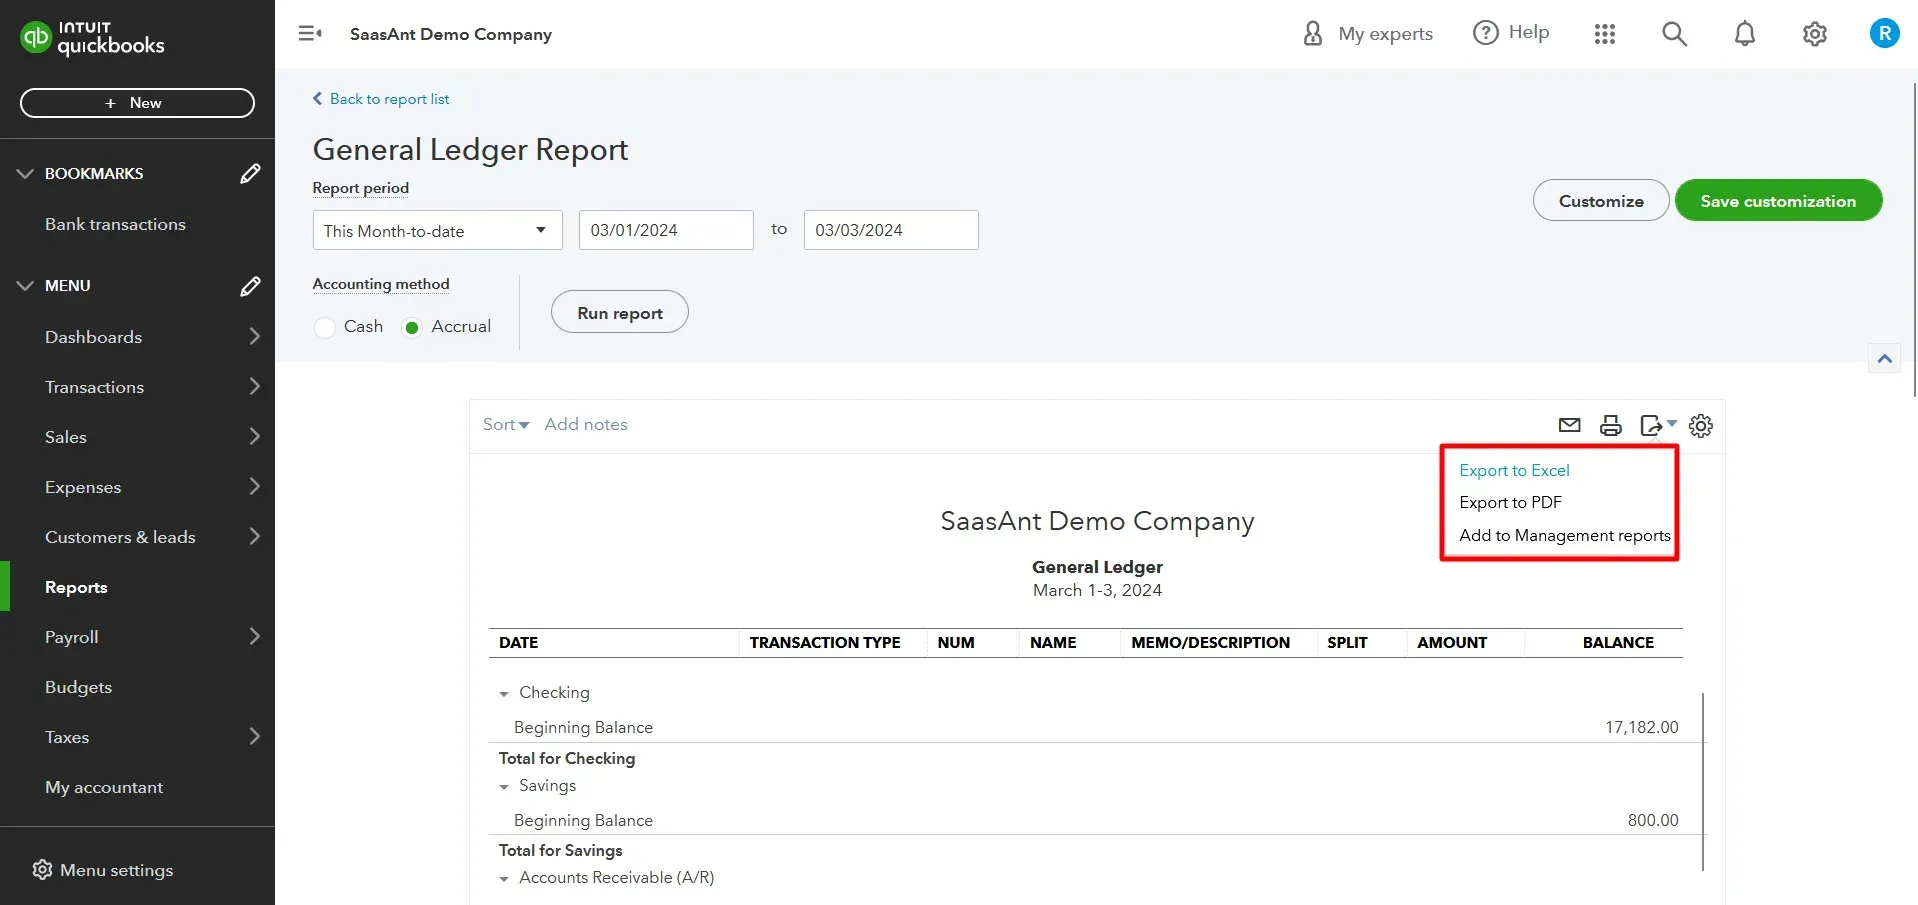
Once the report has been generated, click the 'export' button and select 'export to Excel.'
Save the Excel file to your computer.
That's it! You should now have a copy of your QuickBooks Online general ledger in Excel format for your chosen annual period. While keeping the general ledger is essential, you need to focus on the data's accuracy and a flawless accounting system. You can achieve all this by using SaasAnt Transactions, thus saving you a lot of time.
FAQs
What is a General Ledger, and Why is it Important for Small Business Owners?
A general ledger is a vital financial record that tracks all financial transactions within a business, including payments, sales, and purchases. It provides a comprehensive overview of a business's financial health and is crucial for making informed business decisions.
What are the Benefits of Using a Manual General Ledger in Excel for Businesses? Manual general ledgers created in Excel offer several benefits for businesses, including flexibility, familiarity, control, and integration with other software and tools. Excel allows businesses to create custom templates and structures, share and collaborate on data easily, maintain complete control over their data, and integrate with other systems for a complete view of their finances.
What Columns are Typically Included in a Manual General Ledger, and Why Are They Important?
A manual general ledger typically includes date, description, debit, credit, balance, and account code columns. These columns are essential for recording transaction details, calculating balances, grouping transactions by account, and creating reports and financial statements.
How Can I Import Data from Excel to Microsoft Dynamics Nav (Navision) General Ledger?
To import data from Excel to Microsoft Dynamics Nav (Navision) General Ledger, open the General Journal in Dynamics Nav, click 'Functions' and select 'Open,' choose the location of your Excel file, map the fields in your Excel file to the equivalent fields in Dynamics Nav, import the data, check and modify the imported data as needed, and post the imported data to the General Ledger.
How Can I Divide Data from a General Journal to a General Ledger in Excel?
To divide data from a General Journal to a General Ledger in Excel, create a new worksheet, enter the account name, debit, and credit for each transaction, maintain a running sum of the account balance, and create financial statements using the ledger.
How Can I Reconcile Inventory to General Ledger in Excel?
To reconcile inventory to the general ledger in Excel, create a new worksheet for the reconciliation, enter the inventory items and their balances from the general ledger, enter the physical inventory counts, calculate the difference between the balances and counts, investigate and correct any discrepancies, and save the reconciliation worksheet for future reference.
How Can I Ensure the Accuracy of My General Ledger and Accounting System?
To ensure the accuracy of your general ledger and accounting system, maintain accurate and up-to-date financial records, reconcile the ledger regularly, investigate and correct any discrepancies, document any adjustments made, and use reliable accounting software like SaasAnt Transactions.
Read also
What is a General Ledger? A Complete Guide for Businesses
Importing Excel into QuickBooks : Detailed Guide
How to Export General Ledger in QuickBooks Online
How to Import General Ledger into QuickBooks Online