Create Vendor Credits in QuickBooks Online
When you create vendor credits in QuickBooks Online, you can defer payments and help businesses create a positive credit history.
The trouble with manually creating vendor credits in QuickBooks Online is that managing multiple vendor credits and ensuring they are applied to the correct invoices can be challenging, which could easily lead to overpayments or misapplied funds.
This blog will walk you through how to manually create vendor credits in QuickBooks Online and import in bulk using an application like SaasAnt Transactions, which is CPA recommended and has a 4.9 rating in the QuickBooks app store.
Let’s get started.
Contents
How to Create Vendor Credits in QuickBooks Online?
Create Vendor Credits in QuickBooks Online in Bulk: Quick Instructions
How to Create Vendor Credits in QuickBooks Online in Bulk?
Wrapping Up
FAQ
How to Create Vendor Credits in QuickBooks Online?
This section walks you through the direct method of manually creating vendor credits.
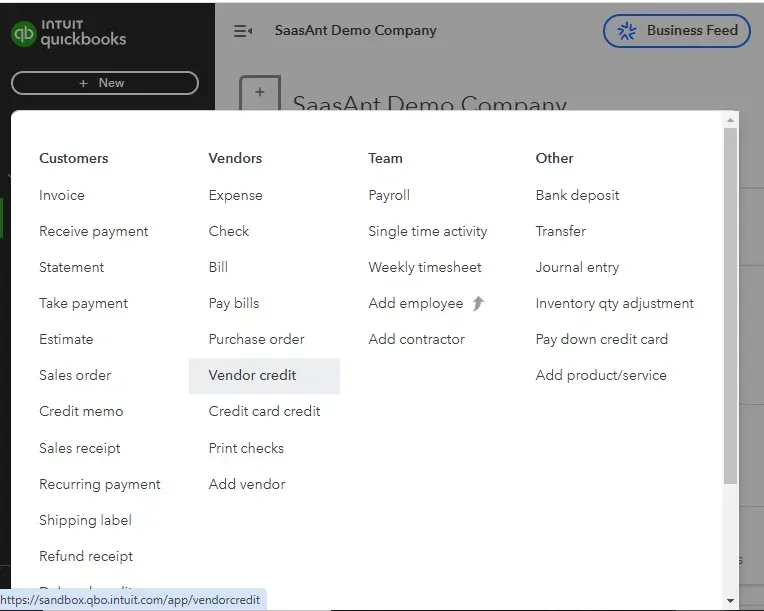
Step 1: Log in to your QuickBooks account -> go to dashboard -> +New -> select vendor credit under vendor section.
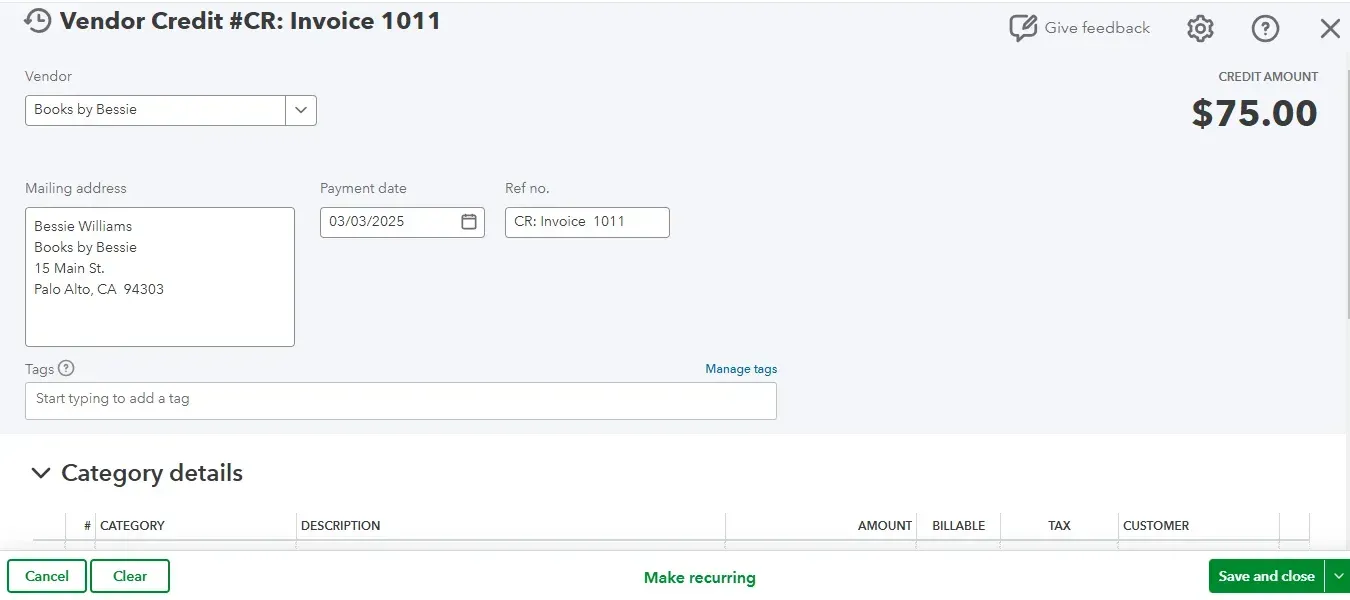
Step 2: Select the vendor’s name from the drop-down and enter the payment date. You can enter the reference number as the invoice you paid for easy reference. Enter the category and item details. You can also add attachments if any. Save and close.
Create Vendor Credits in QuickBooks Online in Bulk: Quick Instructions
You can get started with a 30-day free trial immediately.
Integrate SaasAnt Transactions from the QuickBooks app store.
Select the entity as Vendor Credits
Upload the file (XLS, XLSX, CSV, IIF, or PDF)
Review and Import.
Rollback (undo) if needed.
How to Create Vendor Credits in QuickBooks Online in Bulk?
Step 1: Connect with SaasAnt Transactions
Find SaasAnt Transactions in the QuickBooks App Store and connect it to your QuickBooks account. This certified, secure app keeps your data safe and well-managed.
Step 2: Access the SaasAnt Transactions Dashboard
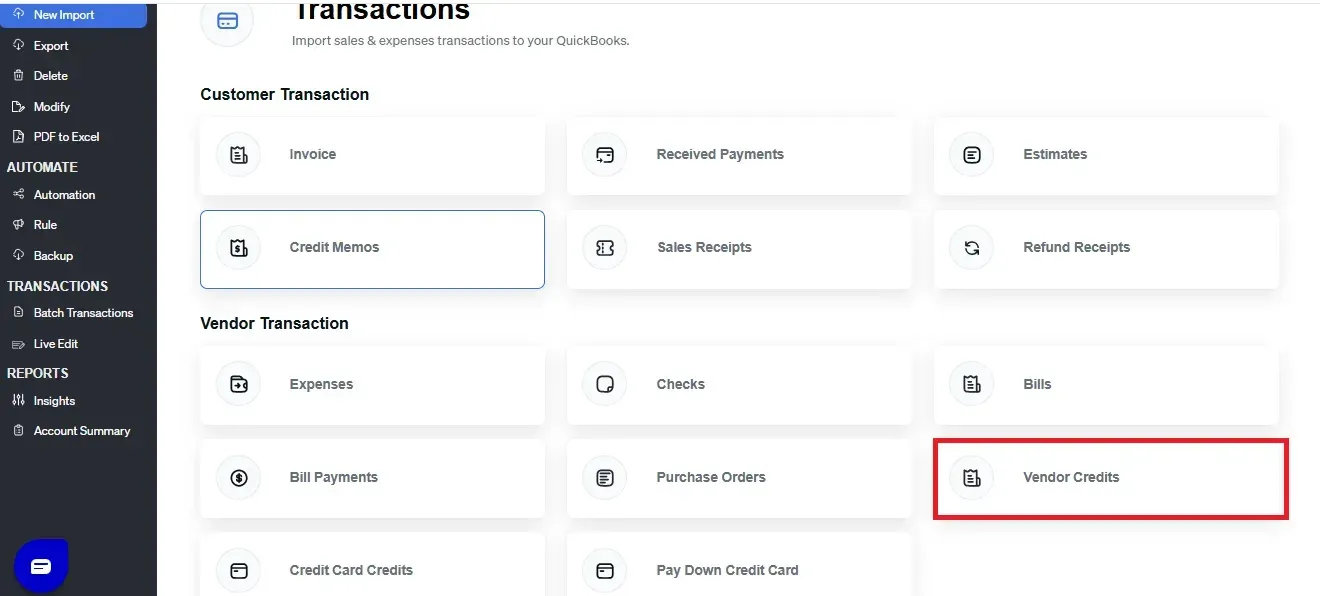
SaasAnt Transactions Dashboard -> “New Import” -> "Vendor Credit." This will direct you to the Upload Files page, where you can download the sample file template.
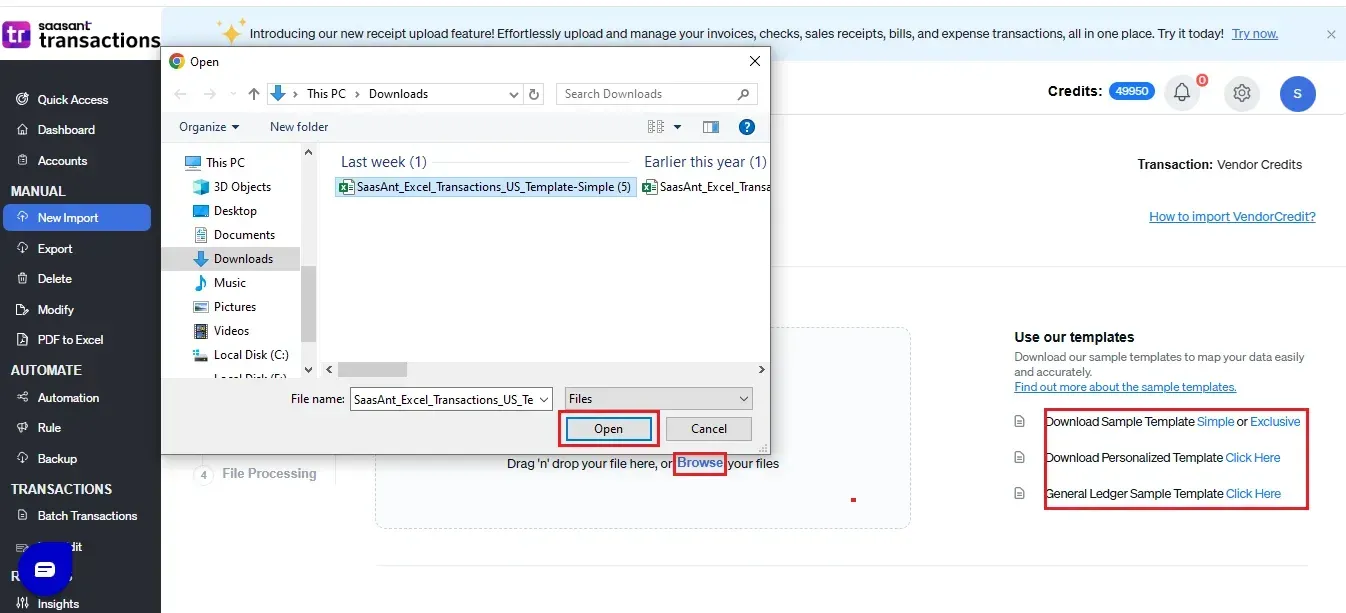
Step 3: Upload the File
Upload the vendor credit file. You can upload any file format, such as XLS, XLSX, CSV, IIF or PDF. You can also enter the Google Sheet link.
Note: To make this step more manageable, you can download the SaasAnt Transactions template from the right side of the screen.
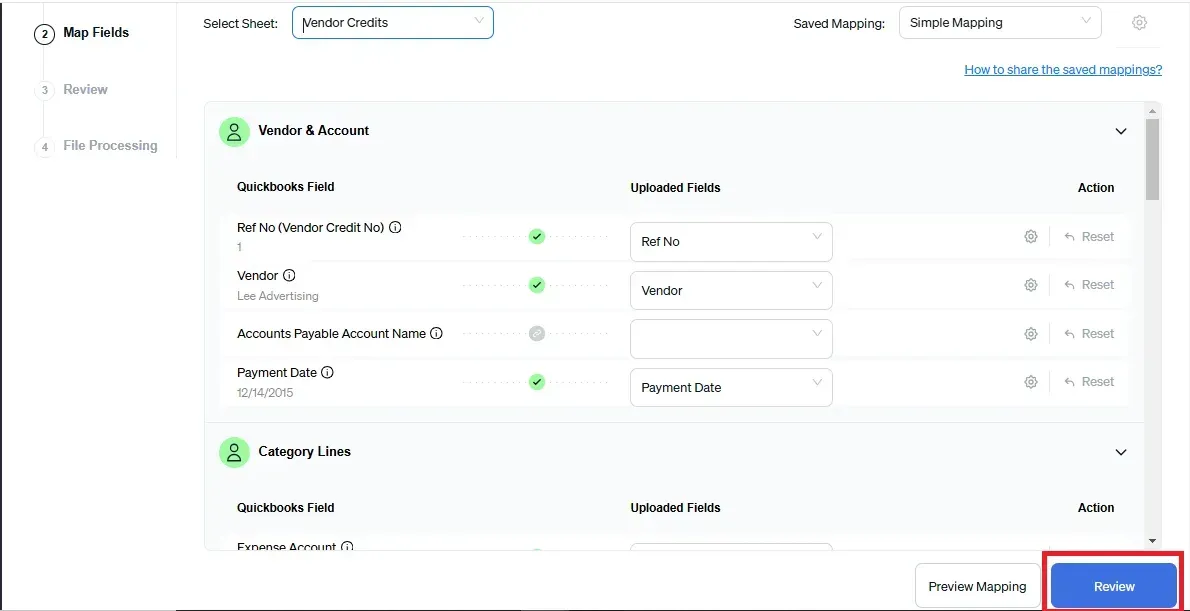
Step 4: Mapping
Mapping matches the file headers to the QuickBooks fields. SaasAnt maps the fields for you, just ensure there’s no misalignment with mapping. If any, just pick the right field from the dropdown menu.
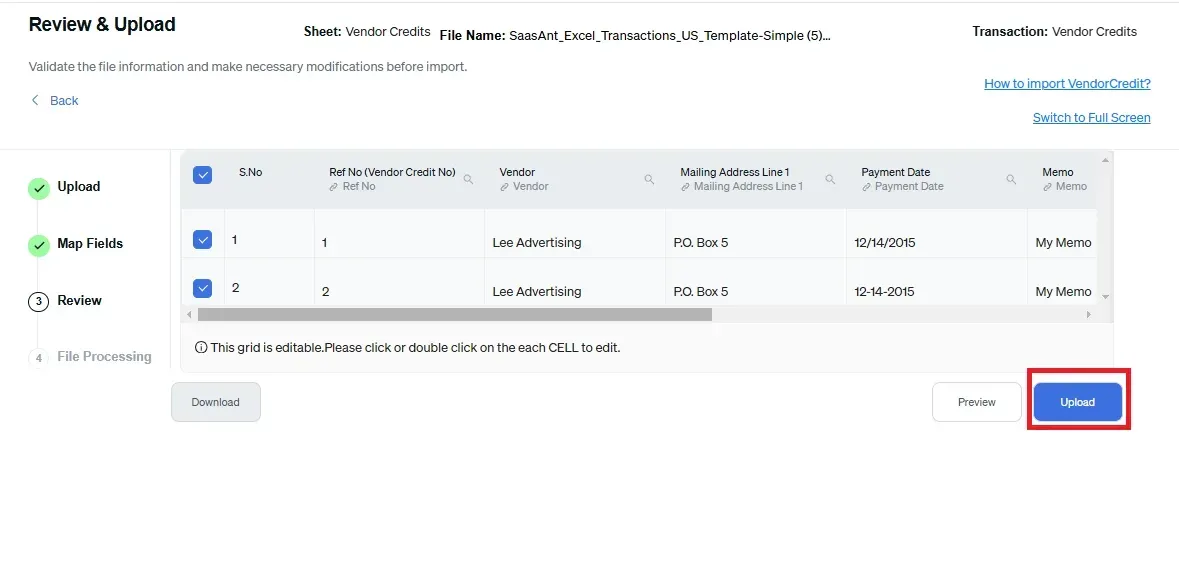
Step 5: Reviewing Your Data Before Final Import
Review the data mapped to avoid mistakes and ensure the accurate alignment of all details. SaasAnt Transactions facilitates data review and corrections, helping you identify and resolve errors. Upon confirming the data accuracy, click ‘Upload’ to import your file into QuickBooks Online.
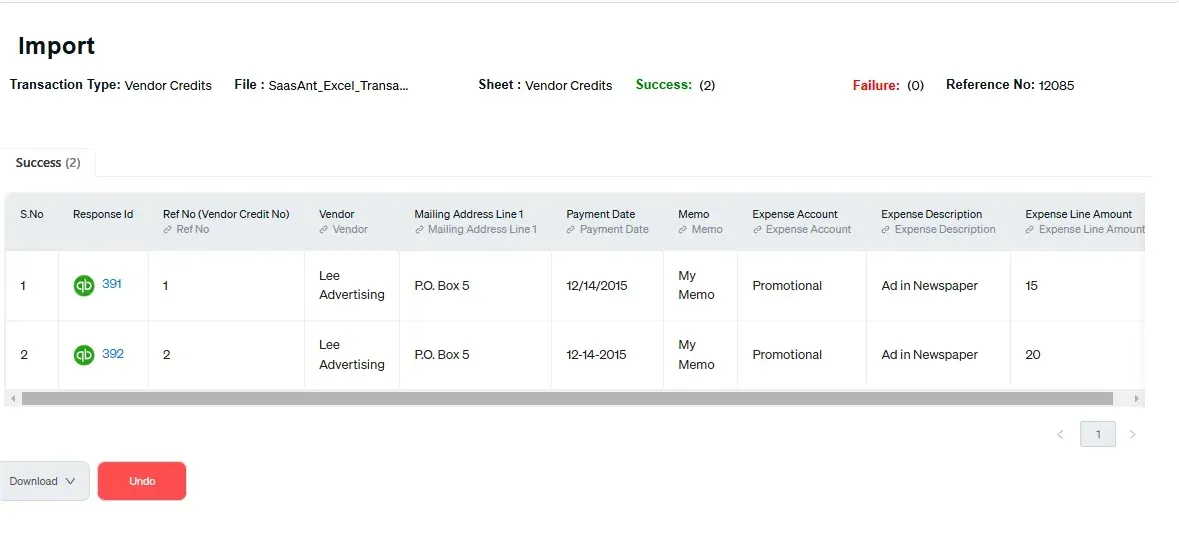
Step 6: Verifying the Imported Transactions
Upon successful import, the uploaded vendor credit will appear with their reference number. Click on the reference number to verify whether that transaction has been uploaded into QuickBooks. You can also roll back (undo) the imported data if needed.
SaasAnt Transactions comes with innovative error resolution tools that help you if you encounter any issues. If there are errors, it’ll suggest ways to fix them, making the whole process effortless.
Make It Even Easier with Automation
If you want to simplify the import process even further, consider automating the bulk upload of your financial statements. With SaasAnt Transactions, you can automate this task using Email, FTP/SFTP, or Zapier. This approach can save time and reduce manual effort, making your workflow more efficient.
Related Reading: Here’s a detailed article on Email, FTP/SFTP, or Zapier automation.
Wrapping Up
We've discussed all the essentials on how to create vendor credit in QuickBooks Online individually and in bulk. The bulk upload method of SaasAnt overcomes QuickBooks' challenges with bulk data imports, providing a quick, error-free, and time-saving solution. Plus, you can start immediately with a 30-day free trial, and there's no need to enter credit card information. If you are facing any trouble, you can always drop an email at support@saasant.com.
FAQ
How to create a credit from a vendor in QuickBooks Online?
To create a credit from a vendor in QuickBooks Online, go to the QuickBooks dashboard, select +new -> vendor credit under vendor category -> enter vendor’s name, category, item details, and reference number. Attach the relevant documents if any.
How to deposit a vendor credit in QuickBooks Online?
To deposit a credit from a vendor in QuickBooks Online, go to the QuickBooks dashboard, select +new -> vendor credit under vendor category -> enter vendor’s name, category, item details, and reference number. Attach the relevant documents if any.
How to add a supplier credit in QuickBooks Online?
To add supplier credit from a vendor in QuickBooks Online, go to the QuickBooks dashboard, select +new -> vendor credit under vendor category -> enter vendor’s name, category, item details, and reference number. Attach the relevant documents if any.
How to apply a vendor credit to a check in QuickBooks Online?
To apply a vendor credit to a check in QuickBooks Online, create the vendor credit by navigating to the "+ New" button and selecting "Vendor Credit." After saving the credit, go to the "Expenses" tab, find the check to which you want to apply the credit, and select the available credit in the "Credits" section before saving your changes.
Read also
Create and Use Vendor Records in QuickBooks Online
How to Enter Vendor Credit in QuickBooks Online
How to Apply Vendor Credit in QuickBooks Online: A Complete Guide
How to Delete a Vendor in QuickBooks Online?