How to Create Chart of Accounts in QuickBooks: Step-by-Step Guide

Understanding and Setting Up the Chart of Accounts in QuickBooks
The Chart of Accounts (COA) is the structural foundation of your financial ledger in QuickBooks. It organizes all financial data into distinct categories, allowing you to track assets, liabilities, equity, revenue, and expenses. A well-organized COA ensures that financial statements—such as Balance Sheets and Profit and Loss statements—accurately reflect your business's financial health.
This guide details how to create, edit, and manage accounts in both QuickBooks Online and QuickBooks Desktop, and outlines how to handle bulk updates efficiently.
The Five Main Account Types
Every account in your ledger falls into one of five primary categories. The category determines where the account appears on your financial statements:
Balance Sheet Accounts
Assets: Resources your business owns (e.g., bank accounts, accounts receivable, equipment).
Liabilities: Money your business owes to external parties (e.g., credit cards, loans, accounts payable).
Equity: The net worth of the business belonging to the owners or shareholders (e.g., retained earnings, owner's investment).
Income Statement (Profit & Loss) Accounts
Income/Revenue: Money generated from regular business operations, such as sales or services rendered.
Expenses: The costs incurred during daily operations to generate revenue (e.g., rent, utilities, payroll).
Understanding and Setting Up the Chart of Accounts in QuickBooks
The Chart of Accounts (COA) is the structural foundation of your financial ledger in QuickBooks. It organizes all financial data into distinct categories, allowing you to track assets, liabilities, equity, revenue, and expenses. A well-organized COA ensures that financial statements—such as Balance Sheets and Profit and Loss statements—accurately reflect your business's financial health.
This guide details how to create, edit, and manage accounts in both QuickBooks Online and QuickBooks Desktop, and outlines how to handle bulk updates efficiently.
The Five Main Account Types
Every account in your ledger falls into one of five primary categories. The category determines where the account appears on your financial statements:
Balance Sheet Accounts
Assets: Resources your business owns (e.g., bank accounts, accounts receivable, equipment).
Liabilities: Money your business owes to external parties (e.g., credit cards, loans, accounts payable).
Equity: The net worth of the business belonging to the owners or shareholders (e.g., retained earnings, owner's investment).
Income Statement (Profit & Loss) Accounts
Income/Revenue: Money generated from regular business operations, such as sales or services rendered.
Expenses: The costs incurred during daily operations to generate revenue (e.g., rent, utilities, payroll).
How to Create an Account in QuickBooks Online
QuickBooks Online populates a default list of accounts based on your industry during initial setup. Follow these steps to add custom accounts to that list:
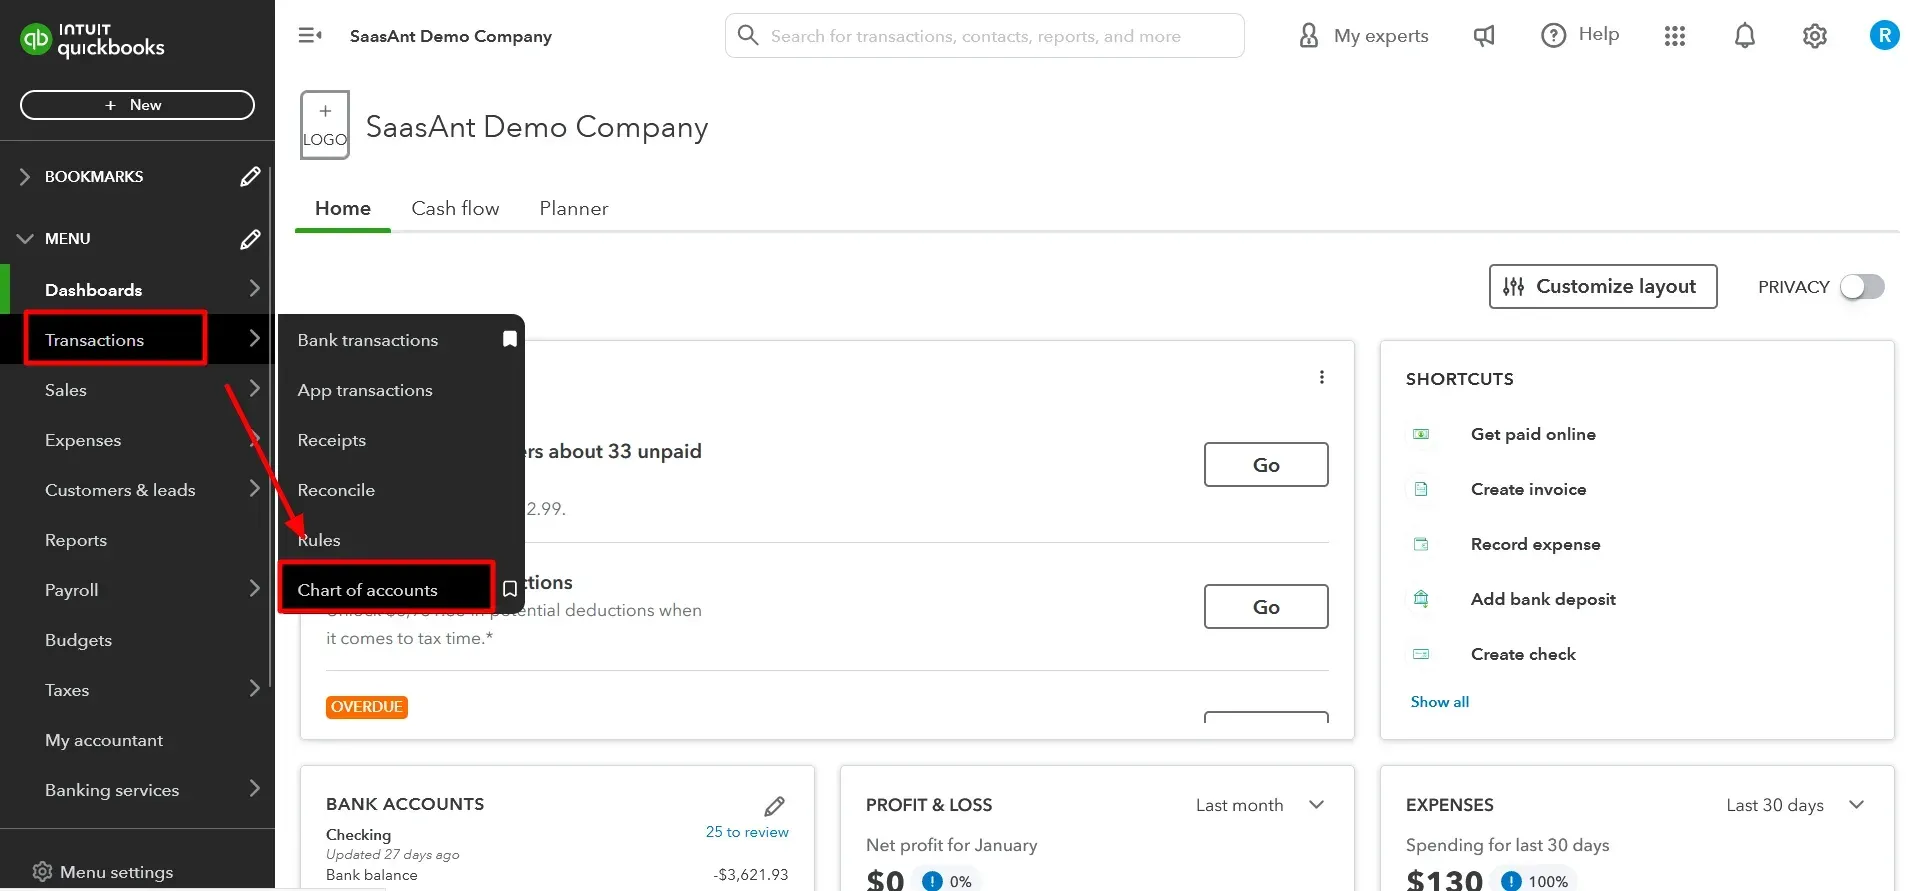
Step 1: Open the Chart of Accounts
Log in to QuickBooks Online. Depending on your current dashboard interface, navigate using one of these options:
Go to the left-hand navigation menu, select Transactions, and click Chart of Accounts.
Click the Gear icon (⚙️) in the top right corner and select Chart of Accounts under the Lists column.
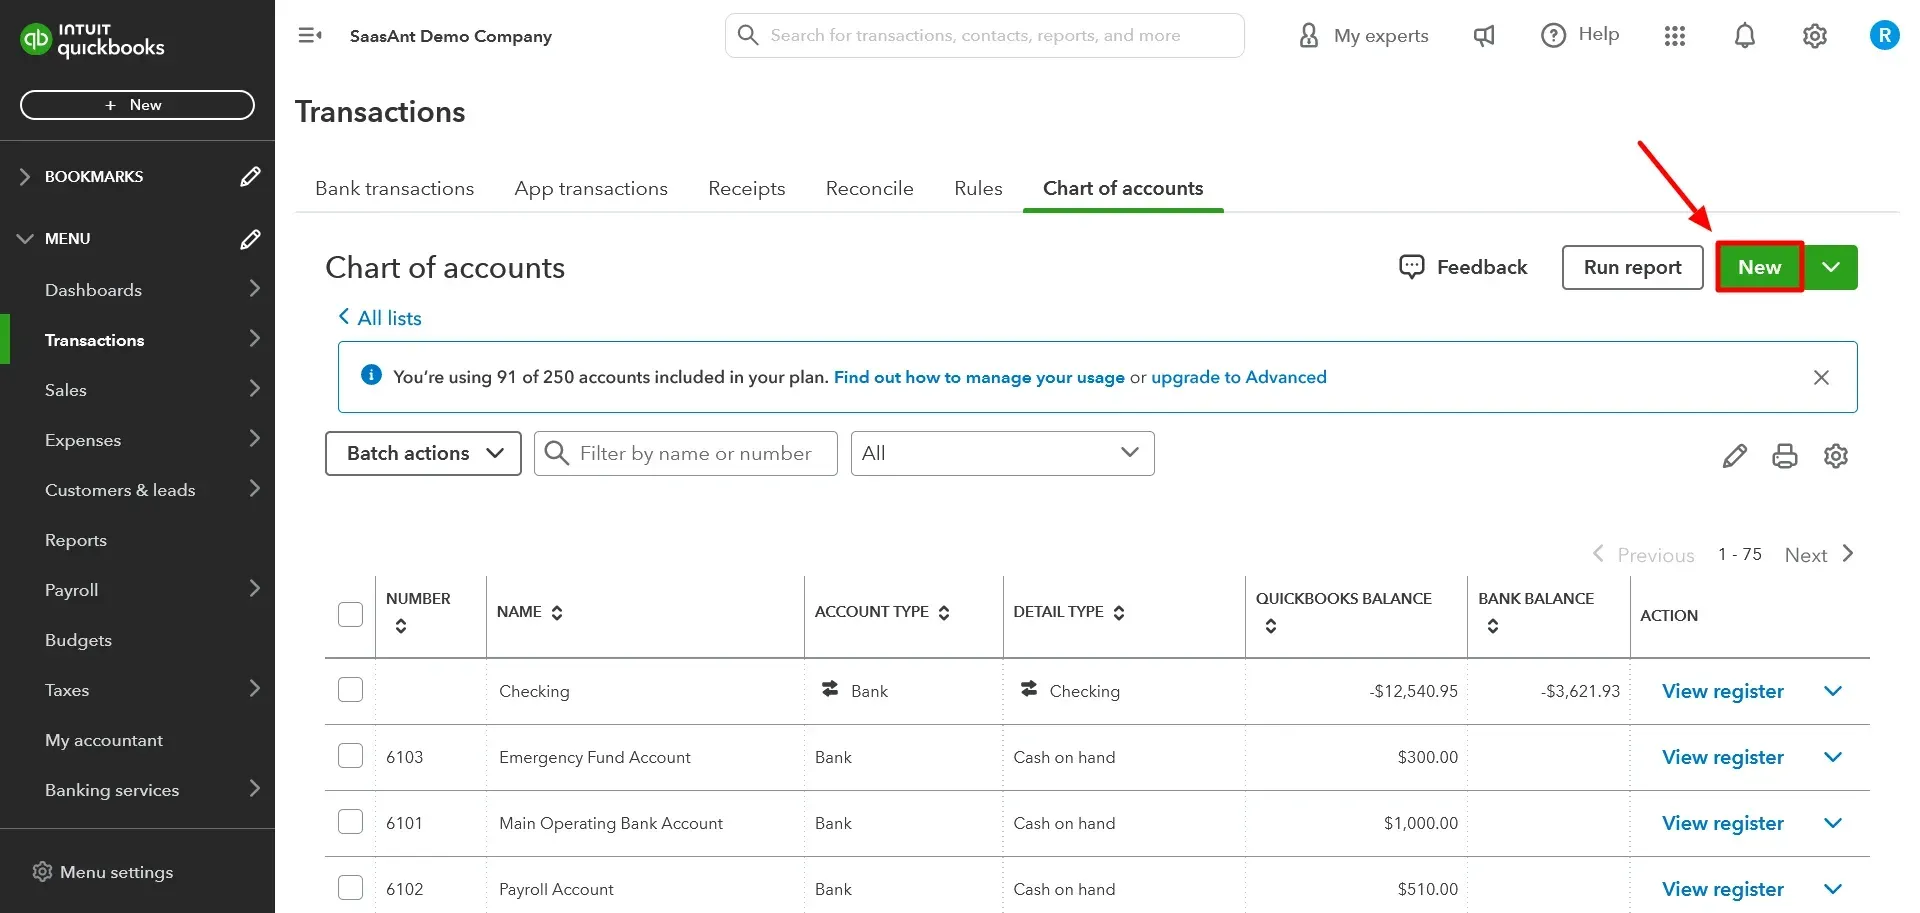
Step 2: Open the New Account Window
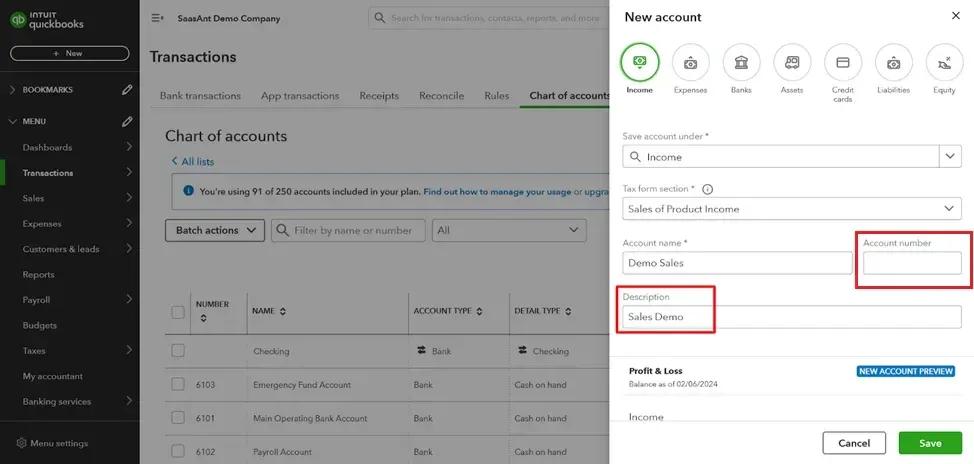
Click the New button in the upper-right corner of the screen. A slide-out panel will open on the right side of your page.
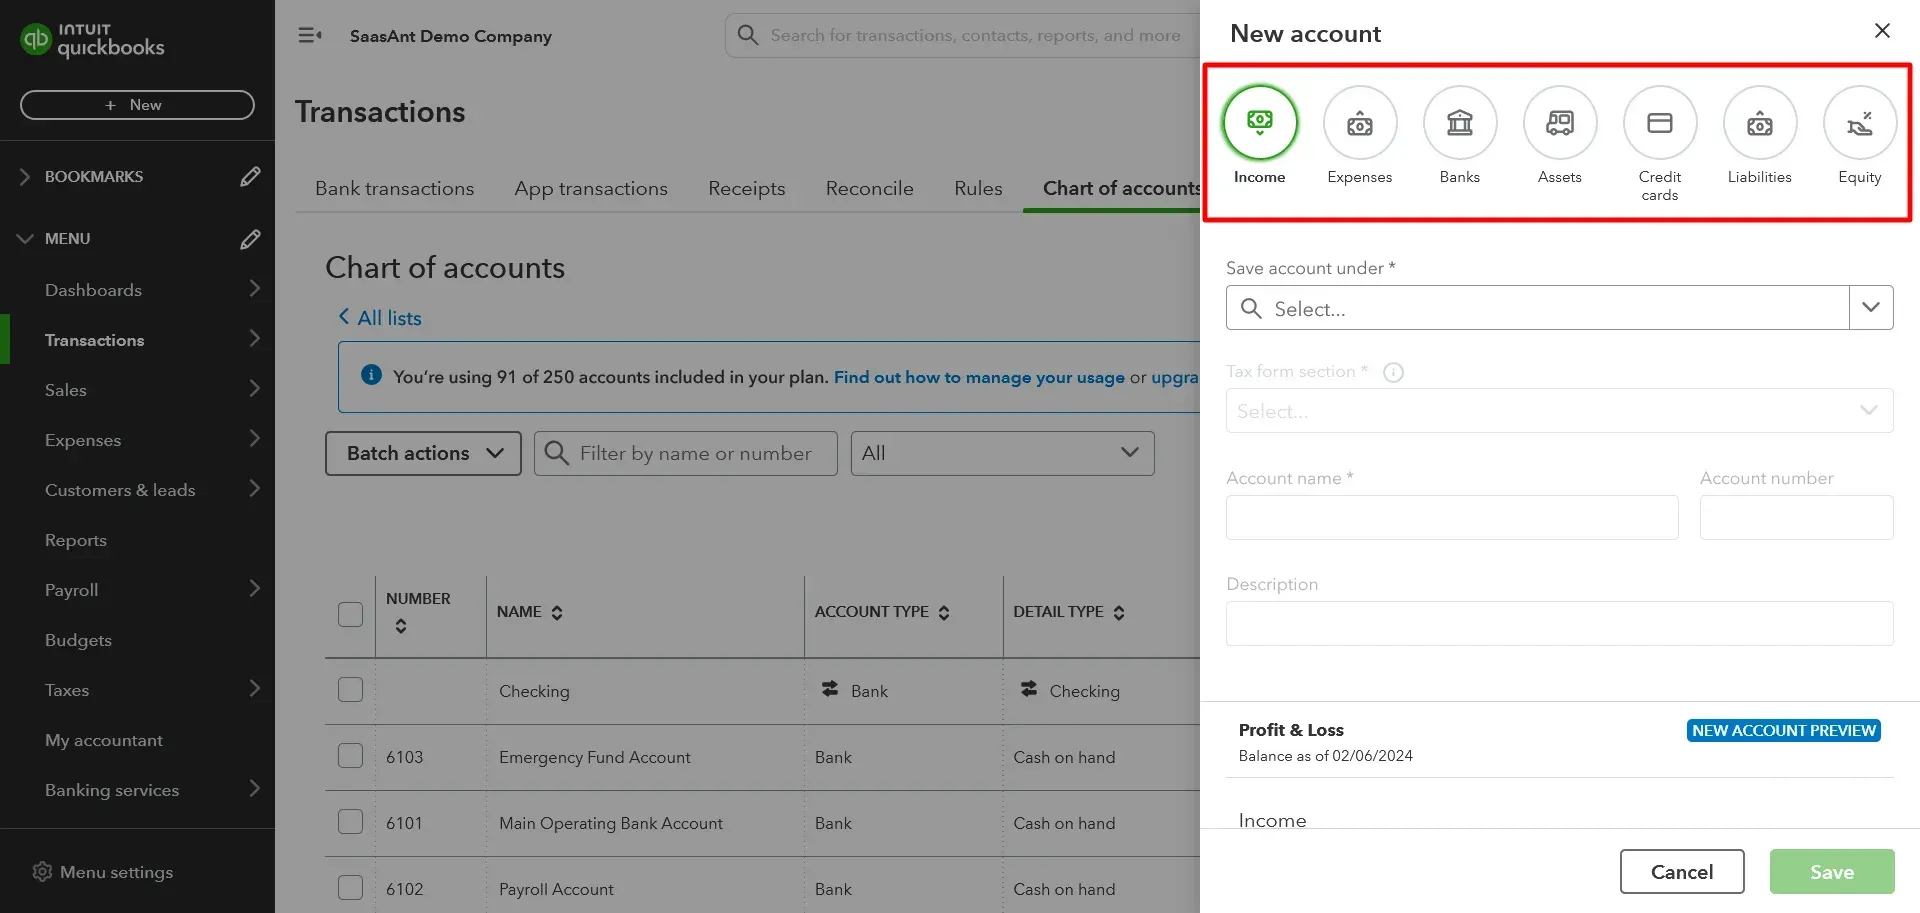
Step 3: Choose the Account Category and Detail Type
Save account under: Choose the main classification (e.g., Bank, Expenses, Fixed Assets) to determine its structural position.
Tax form section (Detail Type): Select the sub-category that most closely matches the specific tax reporting purpose of the account.
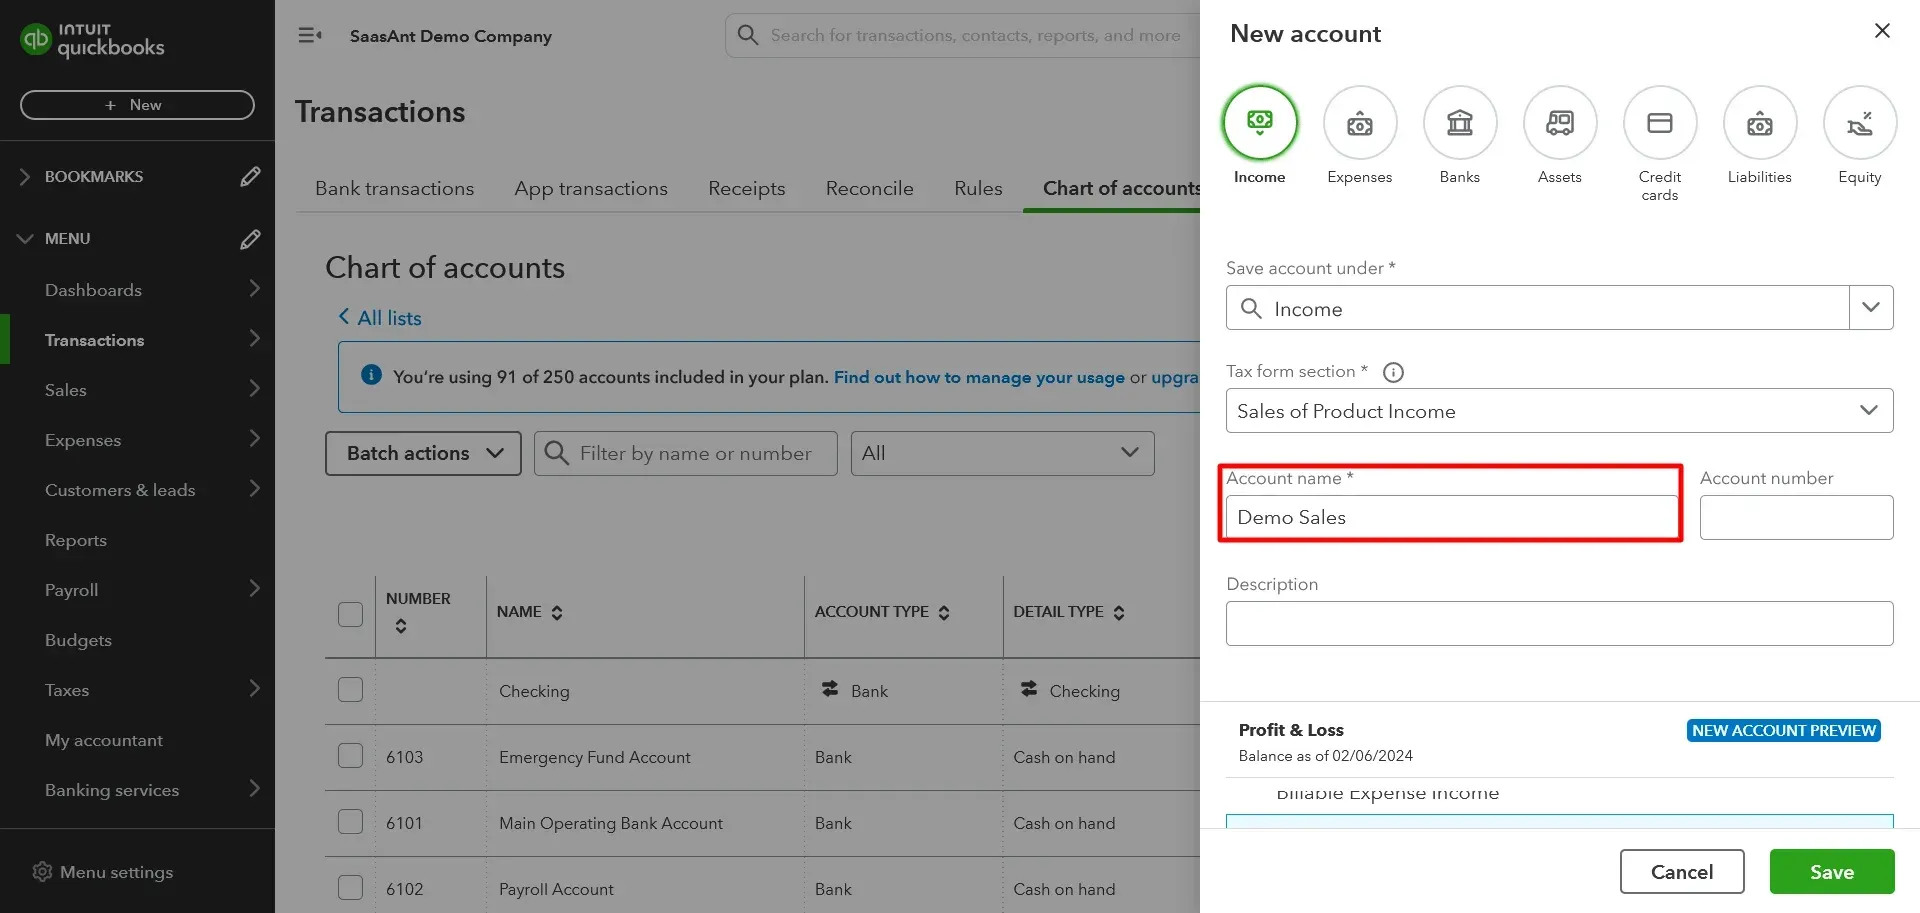
Step 4: Name and Describe the Account
Account Name: Enter a clear, descriptive name (e.g., "Regional Office Rent" rather than just "Rent").
Description: (Optional) Add context or usage notes for anyone performing data entry.
Step 5: Save the Changes
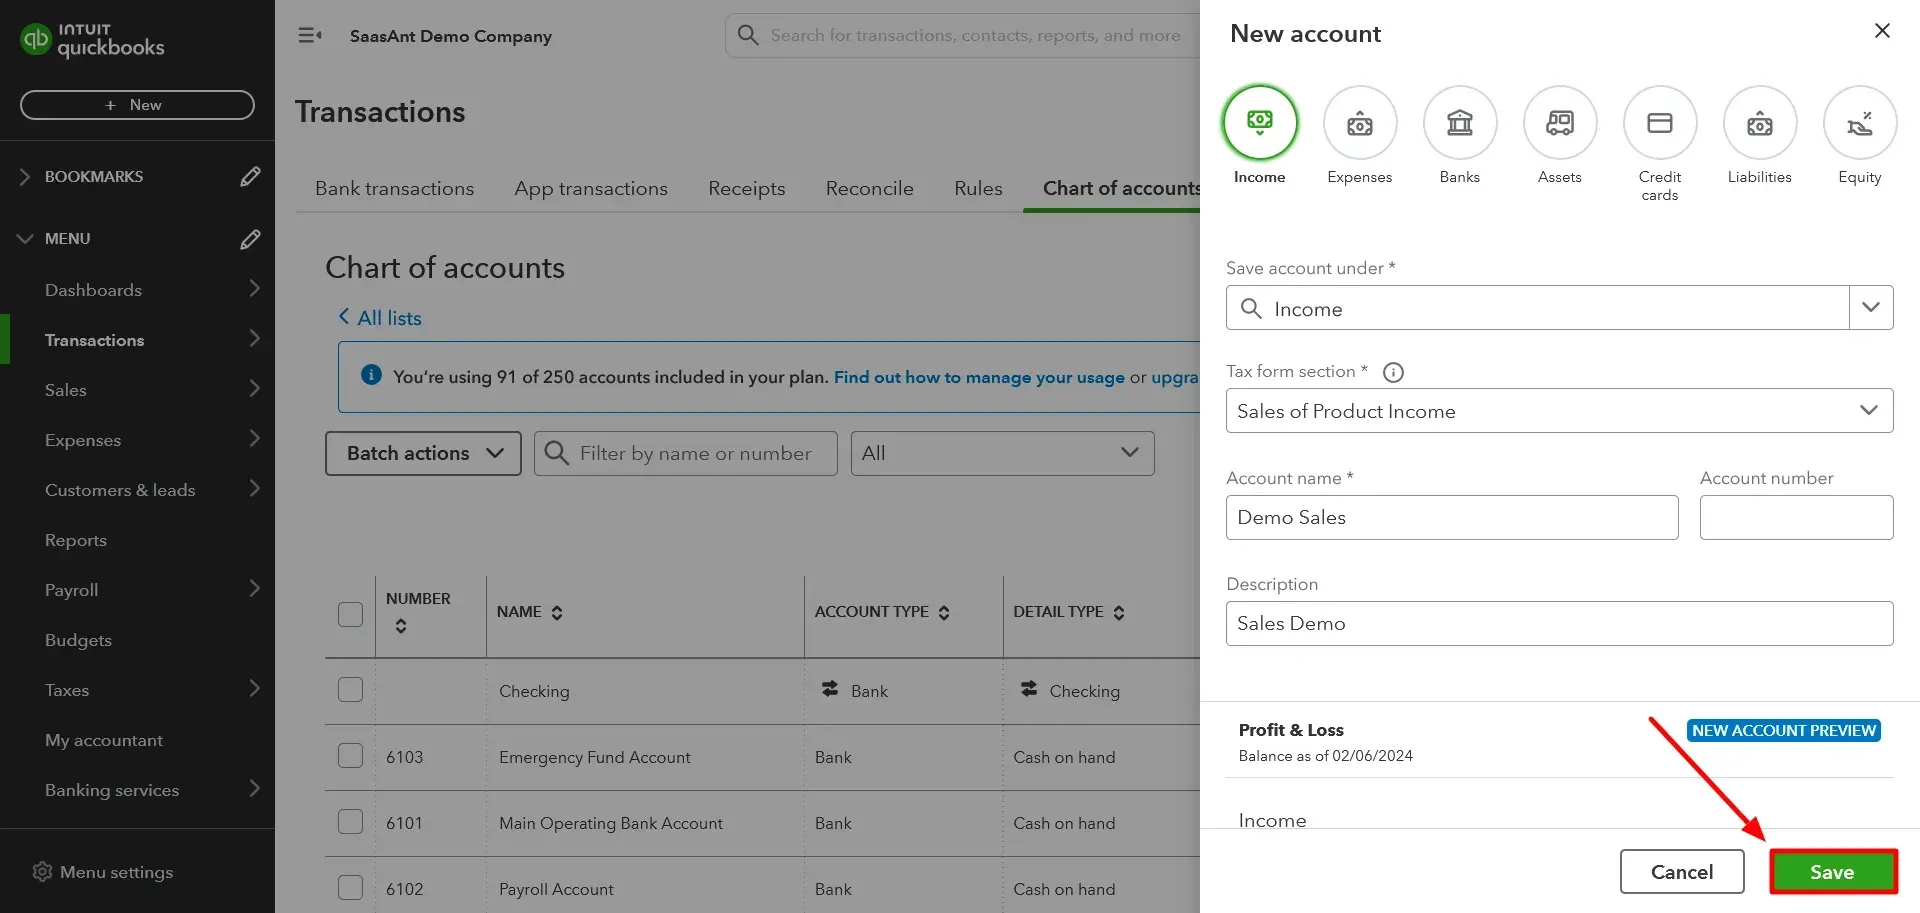
Click Save at the bottom of the panel. The account is now live and ready to capture transactions.
Step 7: Edit or Inactive an Account
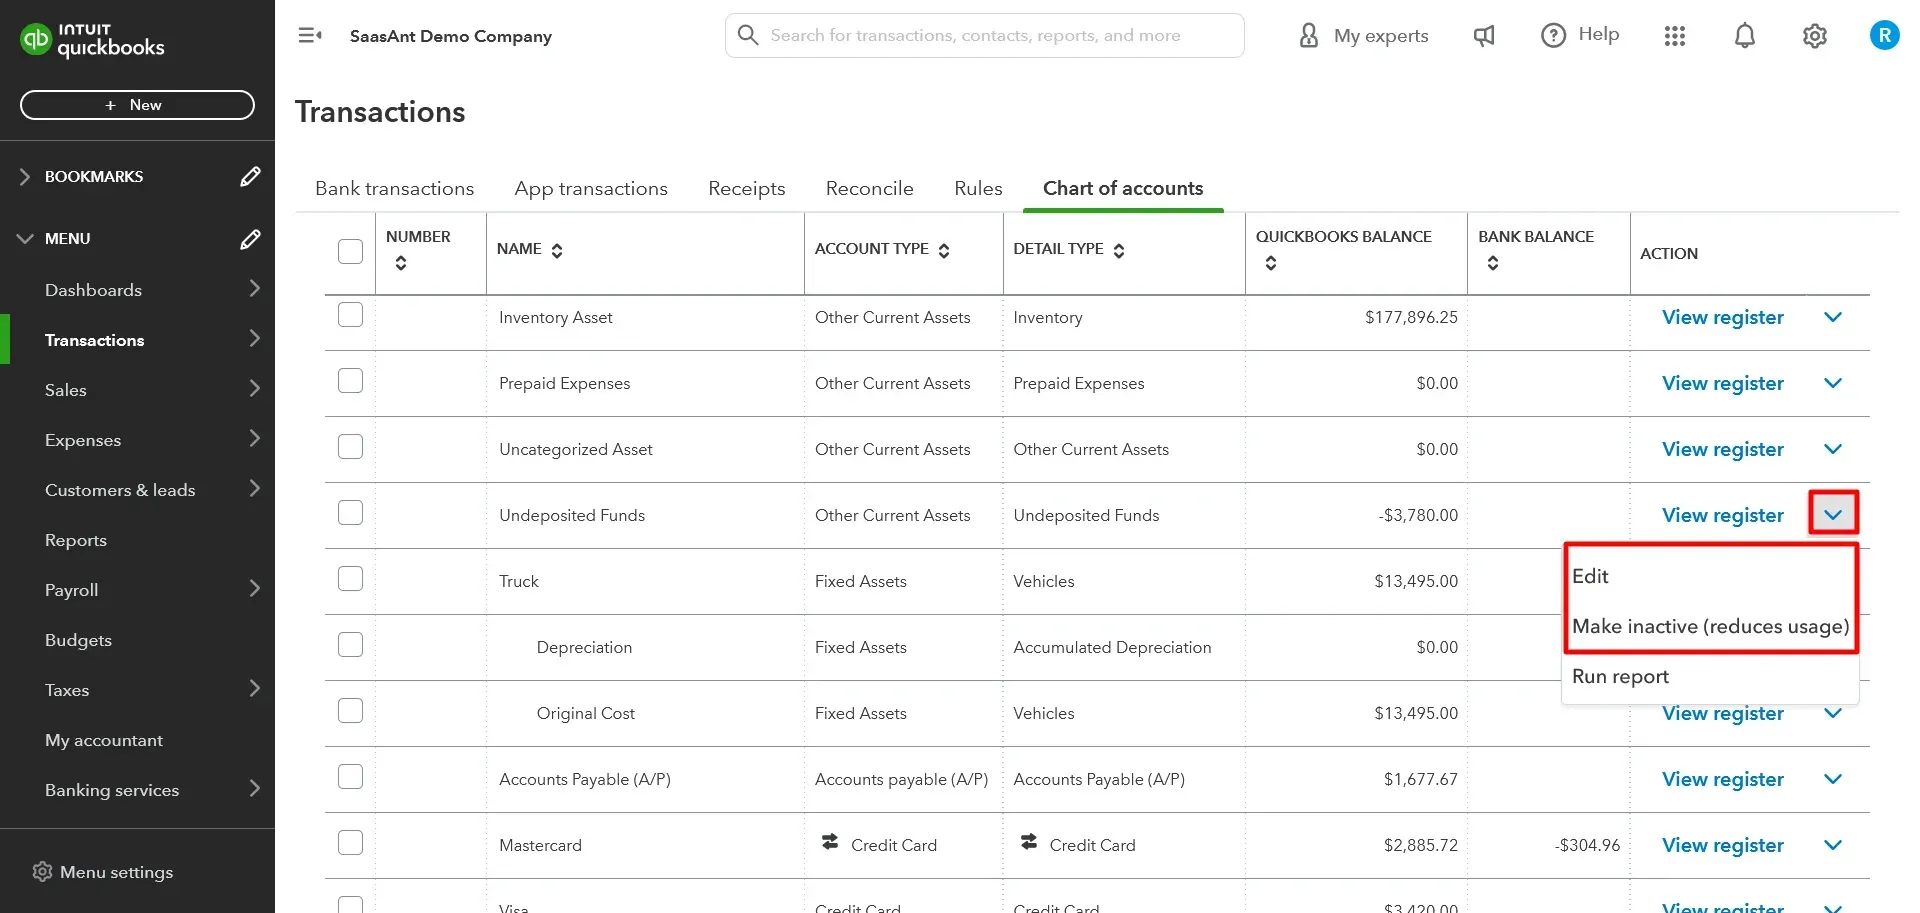
If you need to edit or make an account inactive in the Chart of Accounts, click on the account's name in the list. It will take you to the account details page, where you can make the necessary changes. To inactivate an account, click the 'Make inactive' button and click the 'Edit' button to edit.
Also read:
How to download Chart of Accounts from QuickBooks
How to Create an Account in QuickBooks Desktop
QuickBooks Desktop handles ledger setup through localized program menus.
Step 1: Access the Chart of Accounts
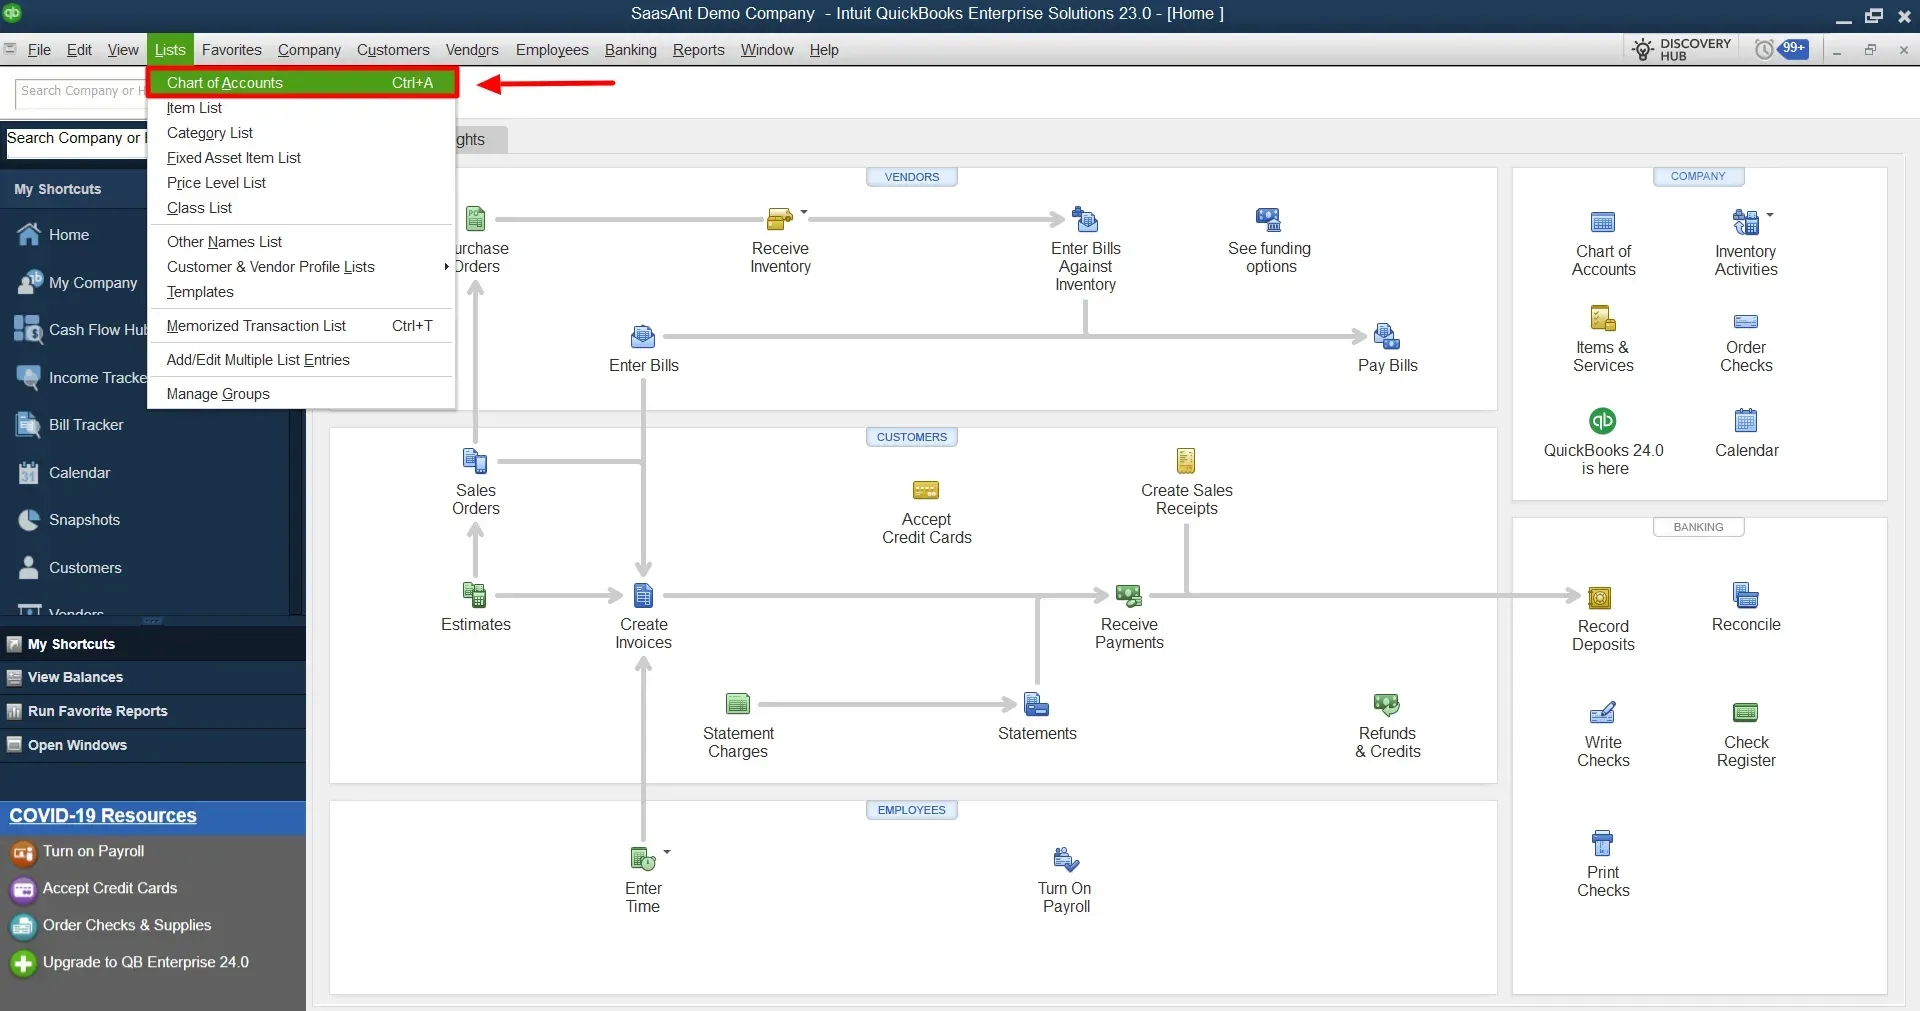
Open QuickBooks Desktop. Click the Lists menu from the top menu bar and select Chart of Accounts (or press Ctrl + A).
Step 2: Open the New Account Form
Click the Account button located at the bottom-left corner of the Chart of Accounts window, then select New (or press Ctrl + N).
Step 3: Select the Account Type
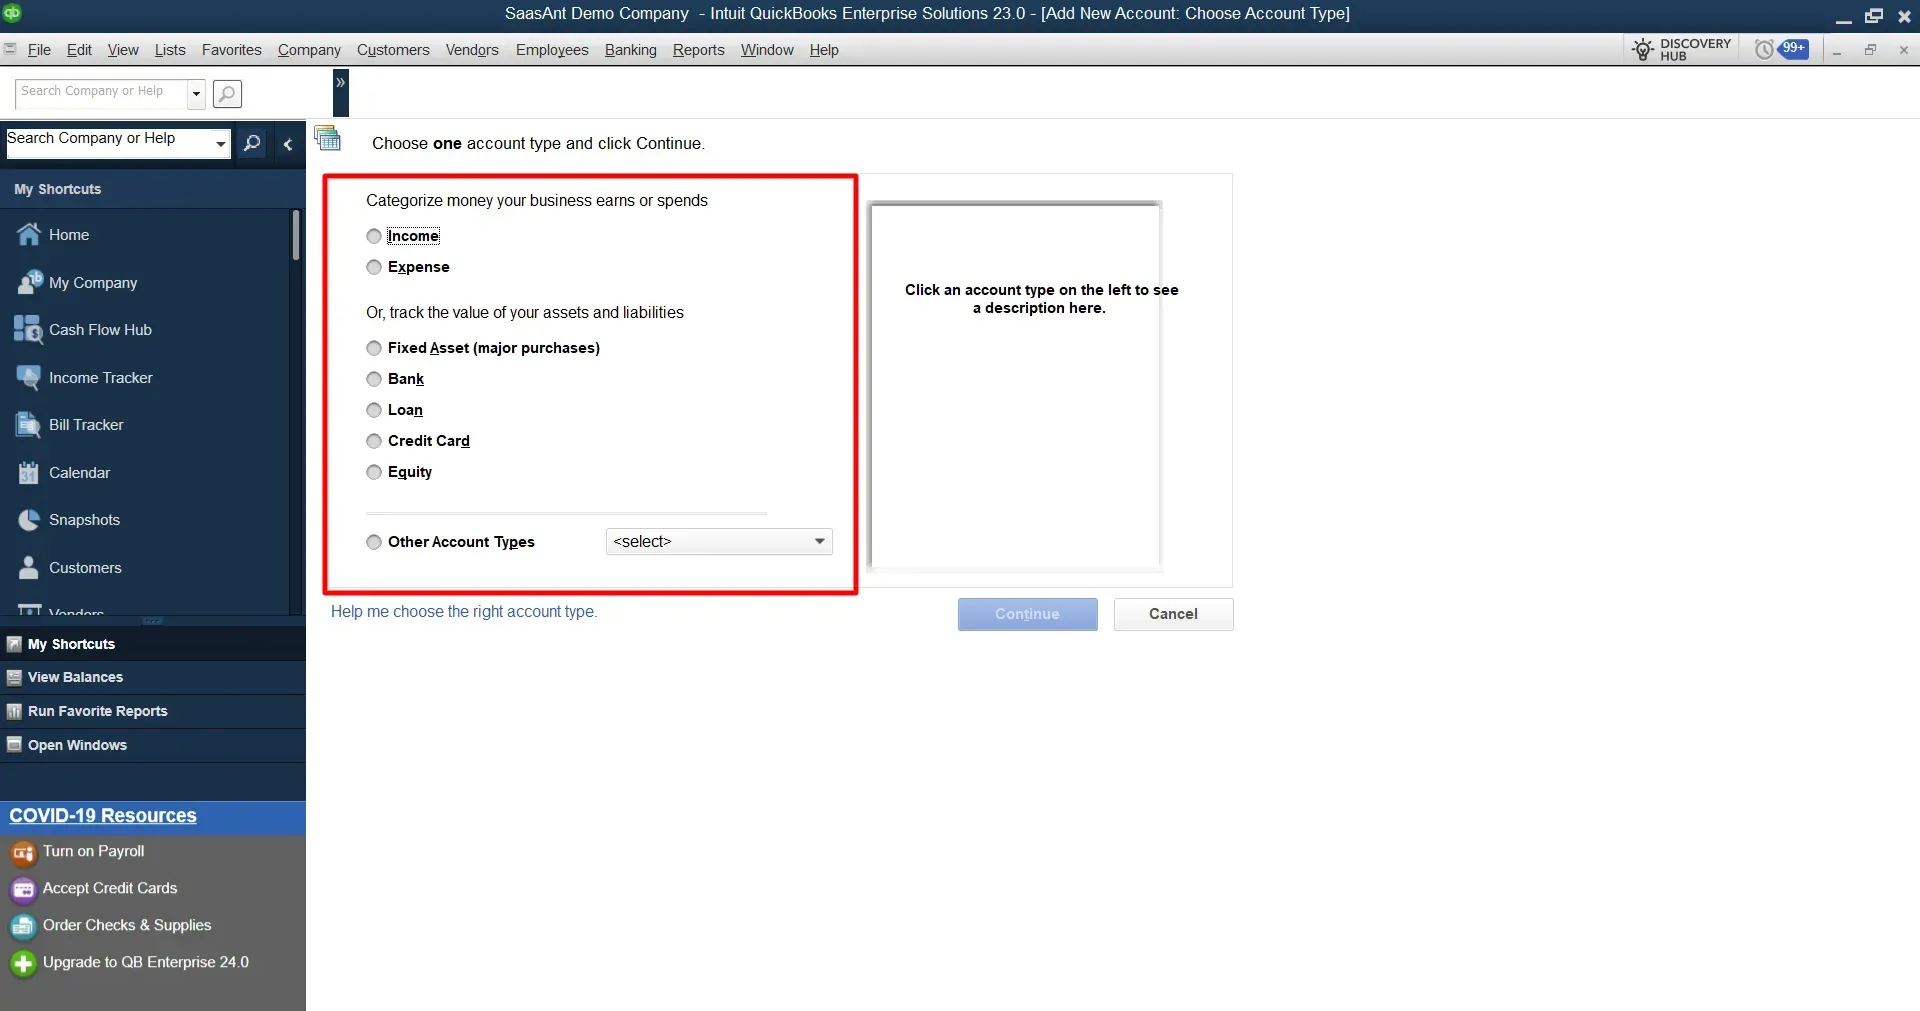
Choose the primary category for the account (e.g., Income, Expense, Bank) and click Continue.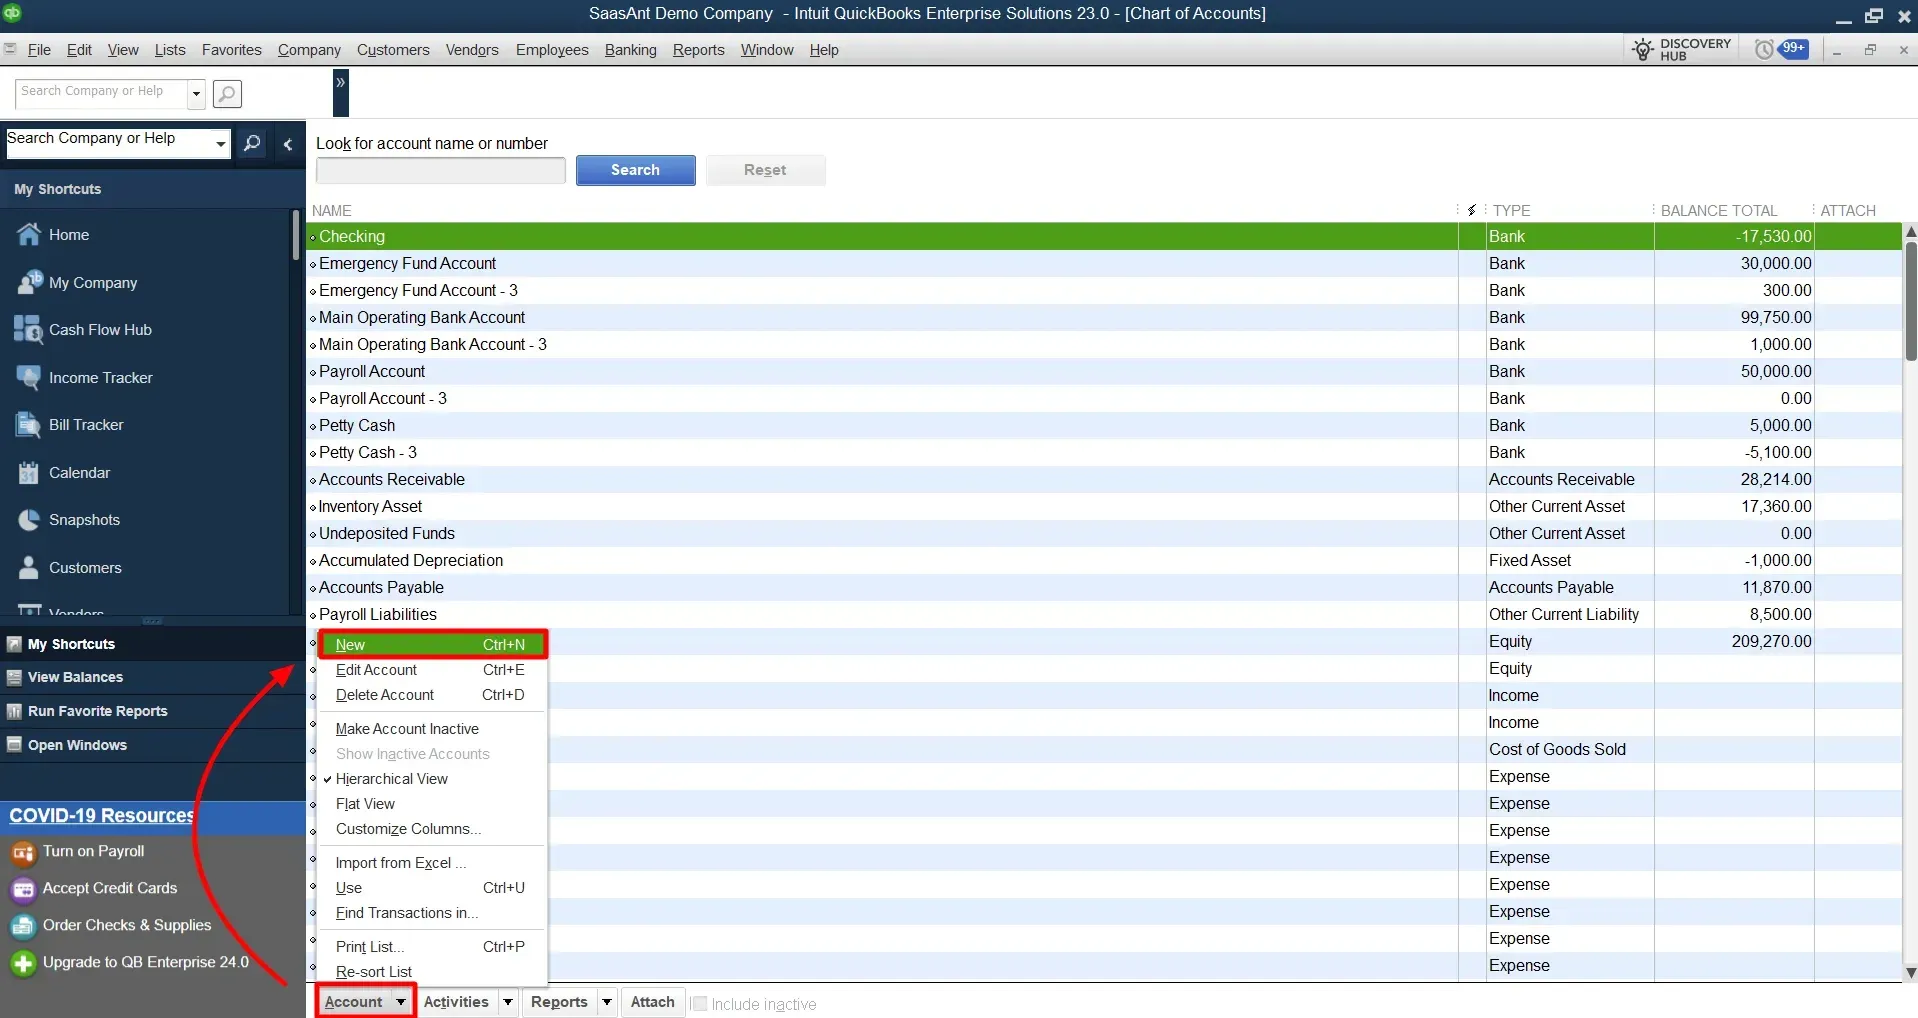
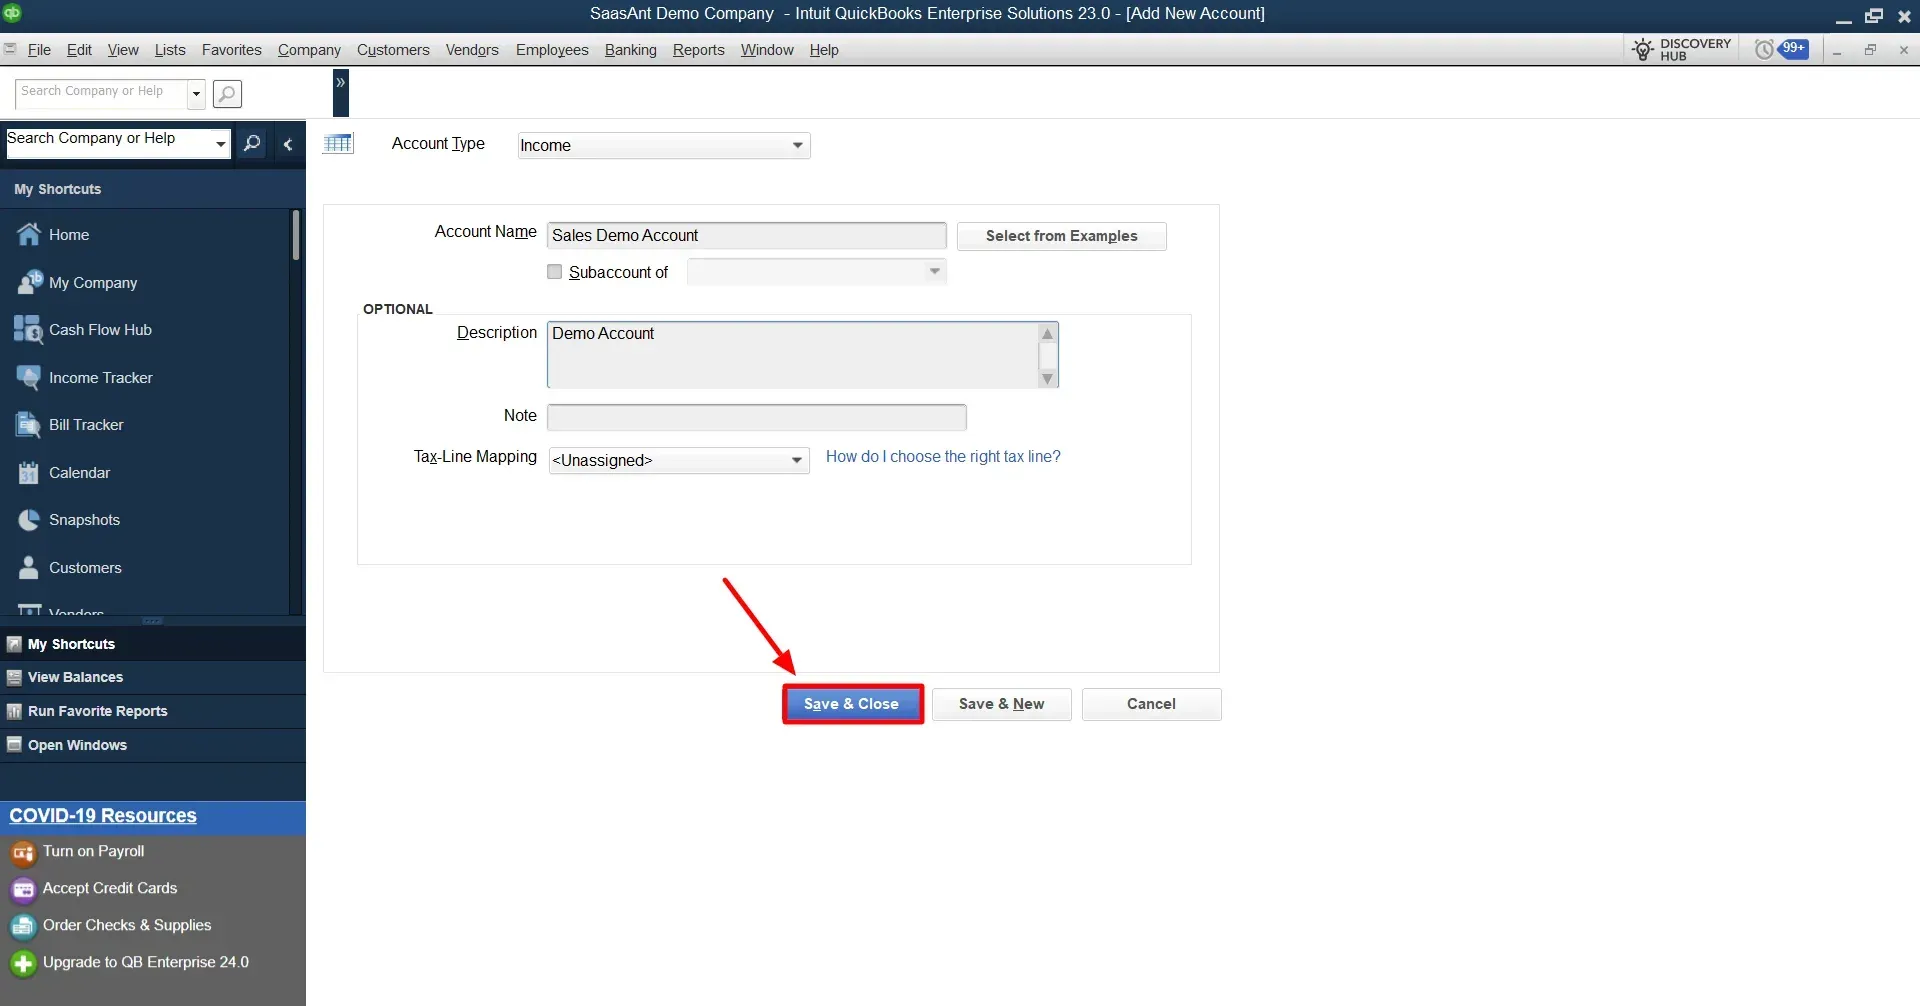
Step 4: Enter Account Details
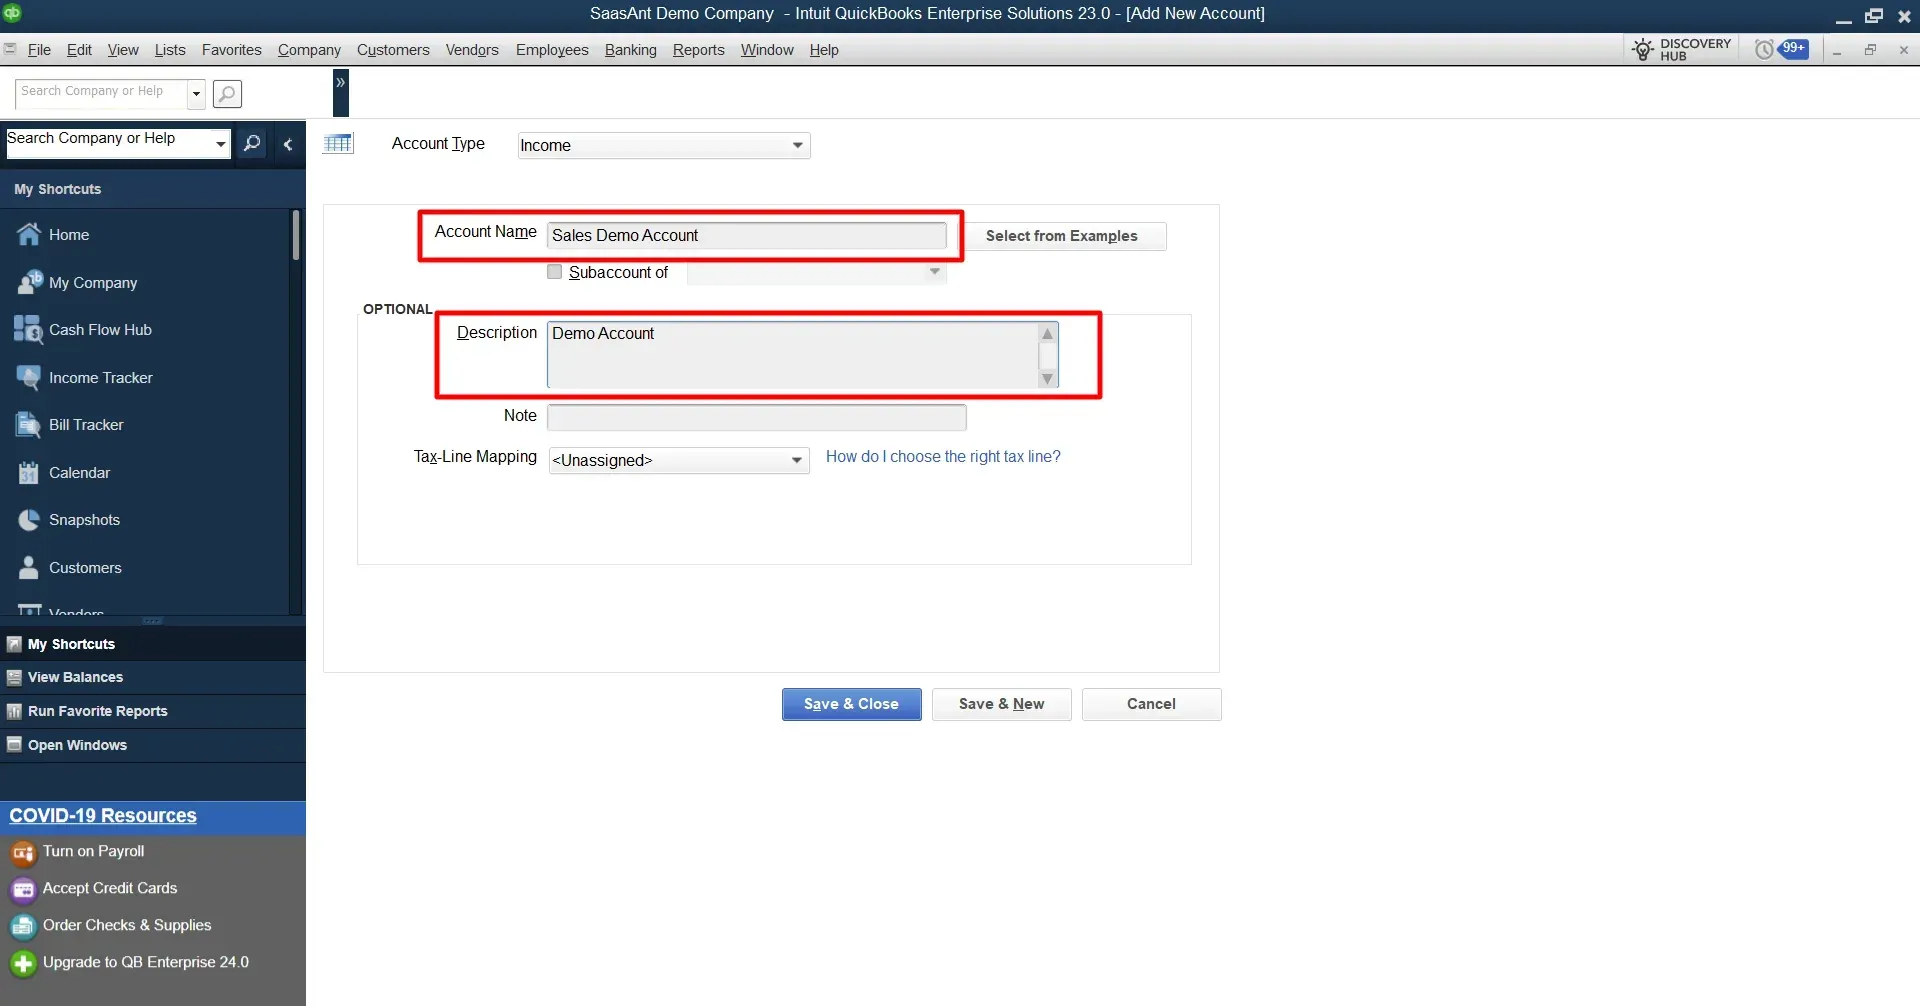
Account Name: Input the specific name for the ledger category.
Subaccount of: Check this box if you want to nest this account under a parent category for cleaner grouping on reports.
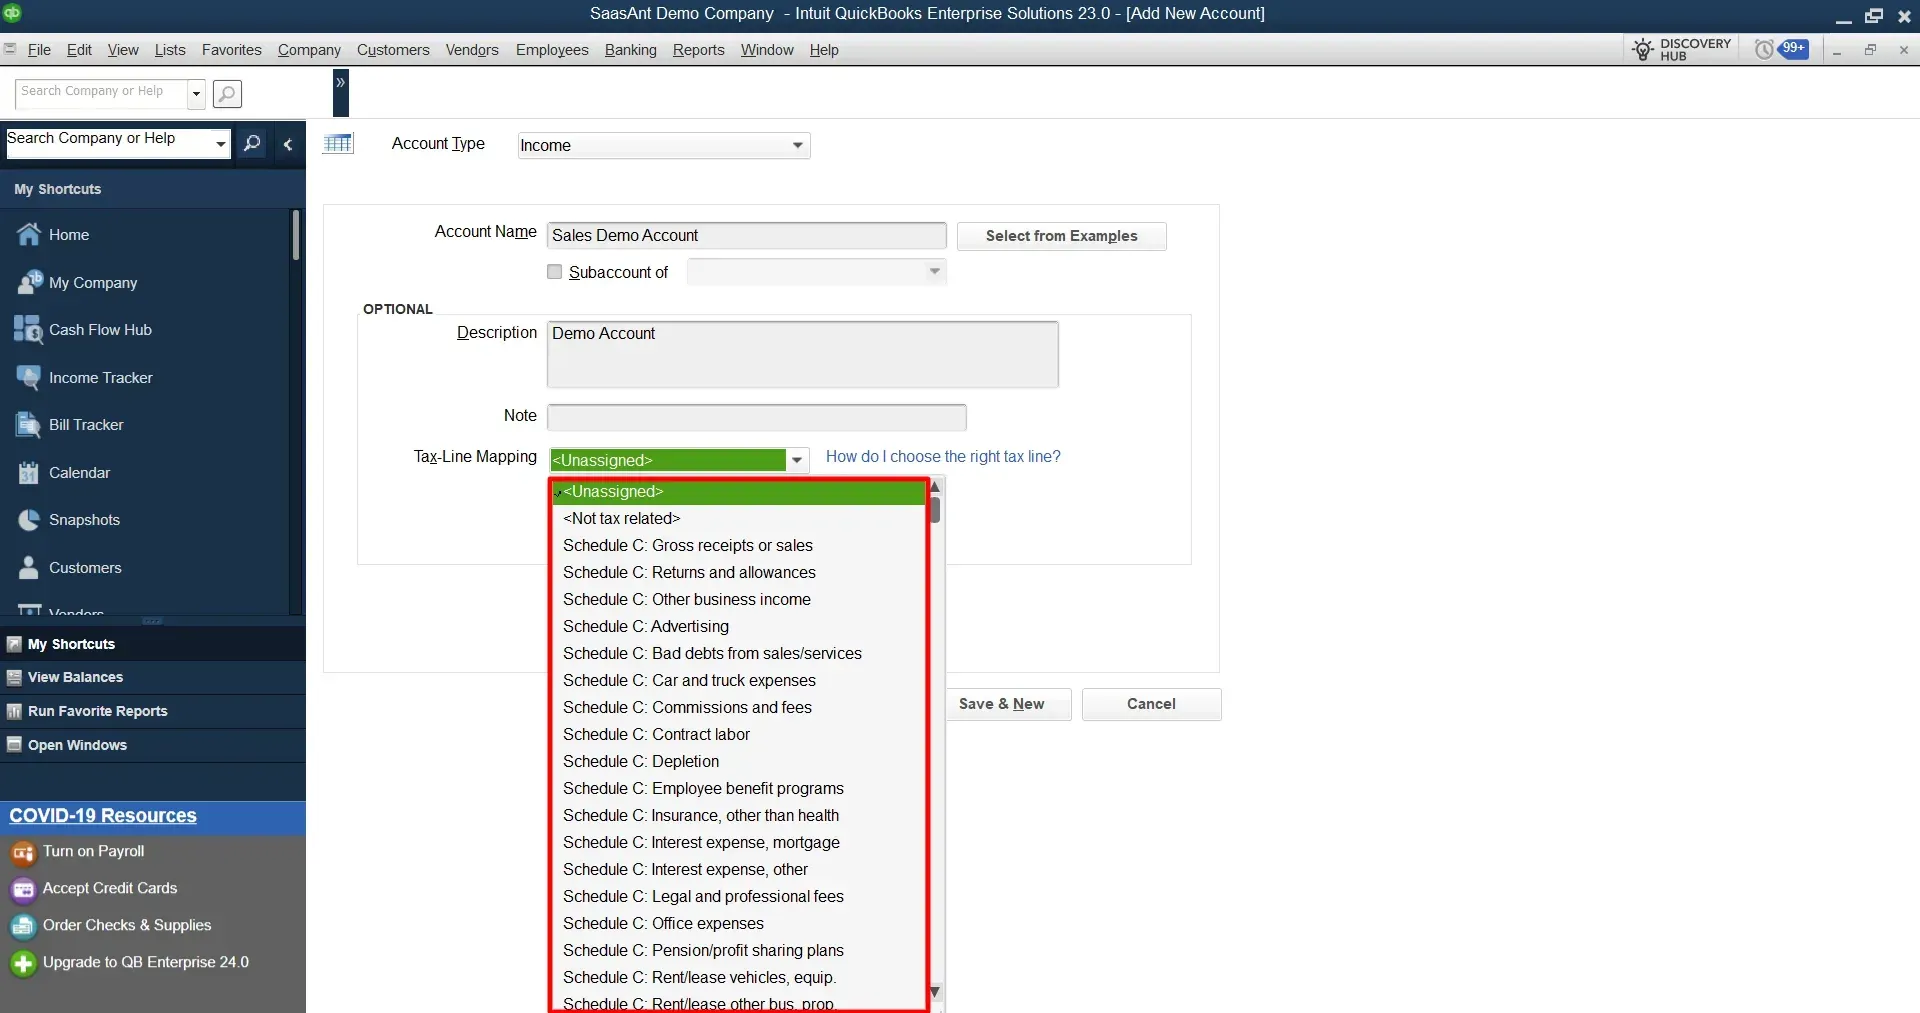
Tax Line Mapping: Select the appropriate tax line classification to streamline annual tax filings.
Step 5: Finalize and Close
Click Save and Close to return to your ledger list, or Save and New to create additional entries.
Once you have created your accounts, you can customize them by adding sub-accounts, merging accounts, or changing the account type or detail type.
Note: QuickBooks Desktop offers more advanced features and customization options than QuickBooks Online but requires higher technical expertise.
How does QuickBooks Chart of Accounts work?
The QuickBooks Chart of Accounts lists a business's accounts to record financial transactions. It serves as the foundation for recording all financial activity and helps provide a clear and organized structure for the business's financial information.
Each account in the Chart of Accounts is assigned a unique account number and name and is categorized based on its type and function. There are five main types of accounts: assets, liabilities, equity, income, and expenses. Within each type, there can be subcategories to further classify accounts based on their specific function.
For example, cash, accounts receivable, and inventory subcategories may be under the assets category. Under the expenses category, there may be subcategories for rent, utilities, and office supplies. By organizing accounts in this way, businesses can easily track their financial activity and generate reports that provide insights into their financial health.
QuickBooks allows users to easily add, edit, and delete accounts in the Chart of Accounts. It also offers customization options, such as adding account descriptions, subaccounts, and account numbers.
Users can select the appropriate account from the Chart of Accounts when recording financial transactions to ensure the transaction is correctly categorized. It helps to ensure that financial statements are accurate and provide a clear picture of the business's financial performance.
Managing and Editing Existing Accounts
Ledgers require regular maintenance as a business grows. You can edit configurations or deactivate accounts that are no longer in use.
In QuickBooks Online
To modify an entry, find the account in the list, click the dropdown arrow in the Action column, and select Edit. To remove an obsolete account without deleting historical transaction data, select Make Inactive.
In QuickBooks Desktop
Right-click any account in your list and select Edit Account to adjust mapping or names. To hide it from daily use, check the Account is inactive box within the edit window.
Conclusion
Mastering the creation and management of a Chart of Accounts is crucial for business owners and accountants who rely on QuickBooks. A well-structured Chart of Accounts enables accurate financial data tracking, analysis, and reporting, laying the foundation for informed decision-making.
When it comes to managing QuickBooks data efficiently, SaasAnt Transactions is your go-to solution. Whether your business is undergoing significant restructuring or simply needs to update its account structure, SaasAnt Transactions simplifies the process. Its advanced features allow you to seamlessly import, export, modify, or delete bulk transactions in QuickBooks, supporting multiple file formats like Excel, CSV, TXT, PDF, and IIF.
SaasAnt Transactions stands out because of its automatic mapping feature, which effortlessly aligns your file columns with QuickBooks fields. This includes vital details such as account names, types, descriptions, and balances. Additionally, the platform ensures data accuracy by providing a preview and review process before the final import.
FAQs
Do I need a Chart of Accounts in QuickBooks?
Yes, a Chart of Accounts is essential in QuickBooks for organizing financial transactions, tracking income and expenses, and generating accurate financial statements. It categorizes transactions by account type, helping you analyze your business’s financial performance effectively. While QuickBooks offers a default Chart of Accounts, customizing it to suit your business needs is highly recommended.
How is a Chart of Accounts arranged?
A Chart of Accounts is typically grouped by account types: assets, liabilities, equity, income, and expenses. Subcategories are added based on specific business needs to ensure clarity and consistency, which is vital for accurate financial reporting.
How do I organize the Chart of Accounts in QuickBooks Online?
To organize your Chart of Accounts in QuickBooks Online:
Go to Transactions > Chart of Accounts.
Select "Edit" in the Action column for the account you want to adjust.
Modify the Detail Type if needed.
Drag and drop the account to rearrange it.
Click Save to confirm changes.
What are the five main account types in QuickBooks' Chart of Accounts?
The five main account types in QuickBooks are:
Assets: Resources owned by the business (e.g., cash, inventory).
Liabilities: Debts owed (e.g., loans, accounts payable).
Equity: Net worth of the business (e.g., retained earnings).
Income: Revenue from sales or services.
Expenses: Costs incurred to generate income (e.g., rent, utilities).
Tags
Read also
Batch Transactions in QuickBooks Online - Detailed Guide
Import Journal Entries into QuickBooks Online: Step by Step Guide
How to Edit Multiple Transactions in QuickBooks Online
How to Export Transactions from QuickBooks Online