How to Setup Chart of Accounts in QuickBooks: A Step-by-Step Guide for Small Business Owners and Accountants

February 12, 2024

How to Setup Chart of Accounts in QuickBooks: A Step-by-Step Guide for Small Business Owners and Accountants

Do you need help managing your small business finances efficiently? Then, you need to learn about QuickBooks' Chart of Accounts. QuickBooks is a popular accounting software used by many small businesses and accountants, and its Chart of Accounts feature can help you keep your finances in order.

A Chart of Accounts is a critical element of financial management that enables you to keep track of your business's income, expenses, assets, and liabilities accurately. This article will look at creating a Chart of Accounts in QuickBooks.

Whether using QuickBooks Online or QuickBooks Desktop, we've got you covered. We'll show you how to create and customize Chart of Accounts to suit your business needs. Additionally, we'll help you understand the basics of the Chart of Accounts, including the different account types and their functions.

Contents

Creating Chart of Accounts in QuickBooks

QuickBooks Online

QuickBooks Desktop

Understanding Chart of Accounts in QuickBooks

How does QuickBooks Chart of Accounts work?

How Many Chart of Accounts Are There in QuickBooks Online?

How to Create General Journal Entry in Chart of Accounts QuickBooks

Summing it Up

FAQs

Do I need a Chart of Accounts in QuickBooks?

How do you arrange a Chart of Accounts?

How to Organize Chart of Accounts in QuickBooks Online

What Are the 5 Main Account Types in the Chart of Accounts QuickBooks?

Creating Chart of Accounts in QuickBooks

QuickBooks Online

How to Create Chart of Accounts in QuickBooks Online

Creating Chart of Accounts is essential in setting up your accounting system in QuickBooks Online. The Chart of Accounts is a list of all accounts used by a company to record financial transactions. 

Creating an accurate and comprehensive Chart of Accounts is crucial for maintaining reliable and up-to-date financial records. This guide will take you through the step-by-step process of establishing a Chart of Accounts in QuickBooks Online, ensuring clarity and ease of understanding.

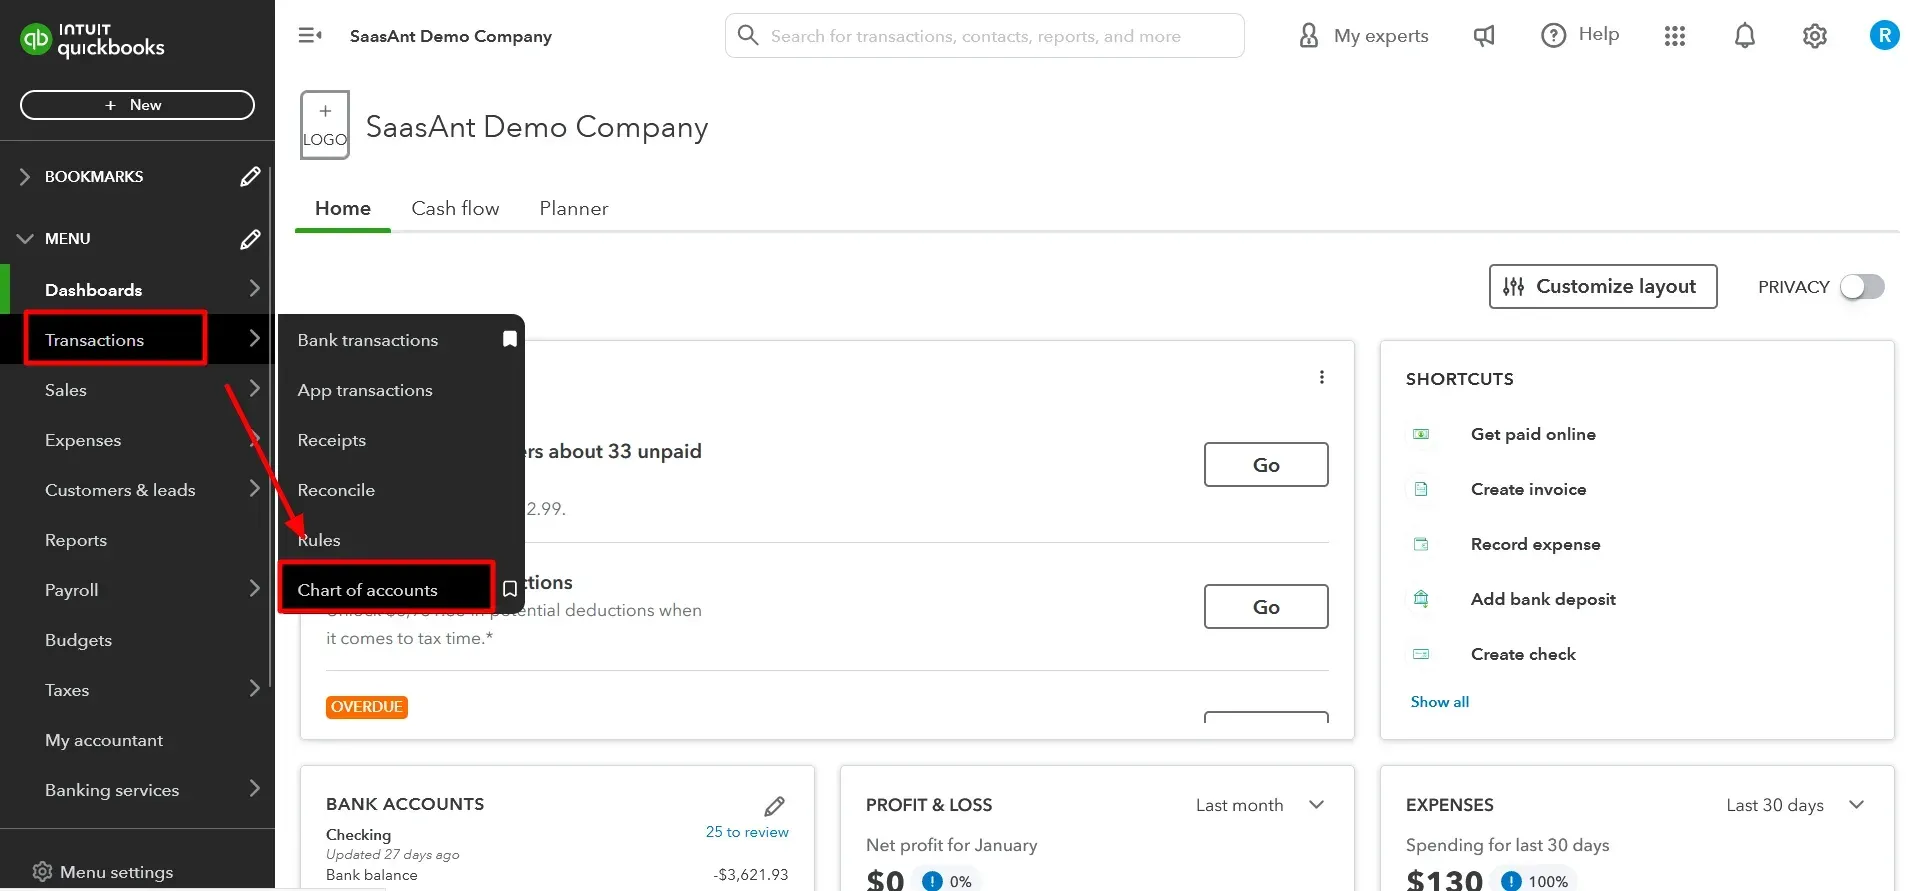
Step 1: Access the Chart of Accounts

The first step is to access the Chart of Accounts. To do this, log in to your QuickBooks Online account and select the “Transactions” option from the left-hand menu. Then click on the ‘Chart of Accounts’ tab.

Select Chart of Accounts - QuickBooks

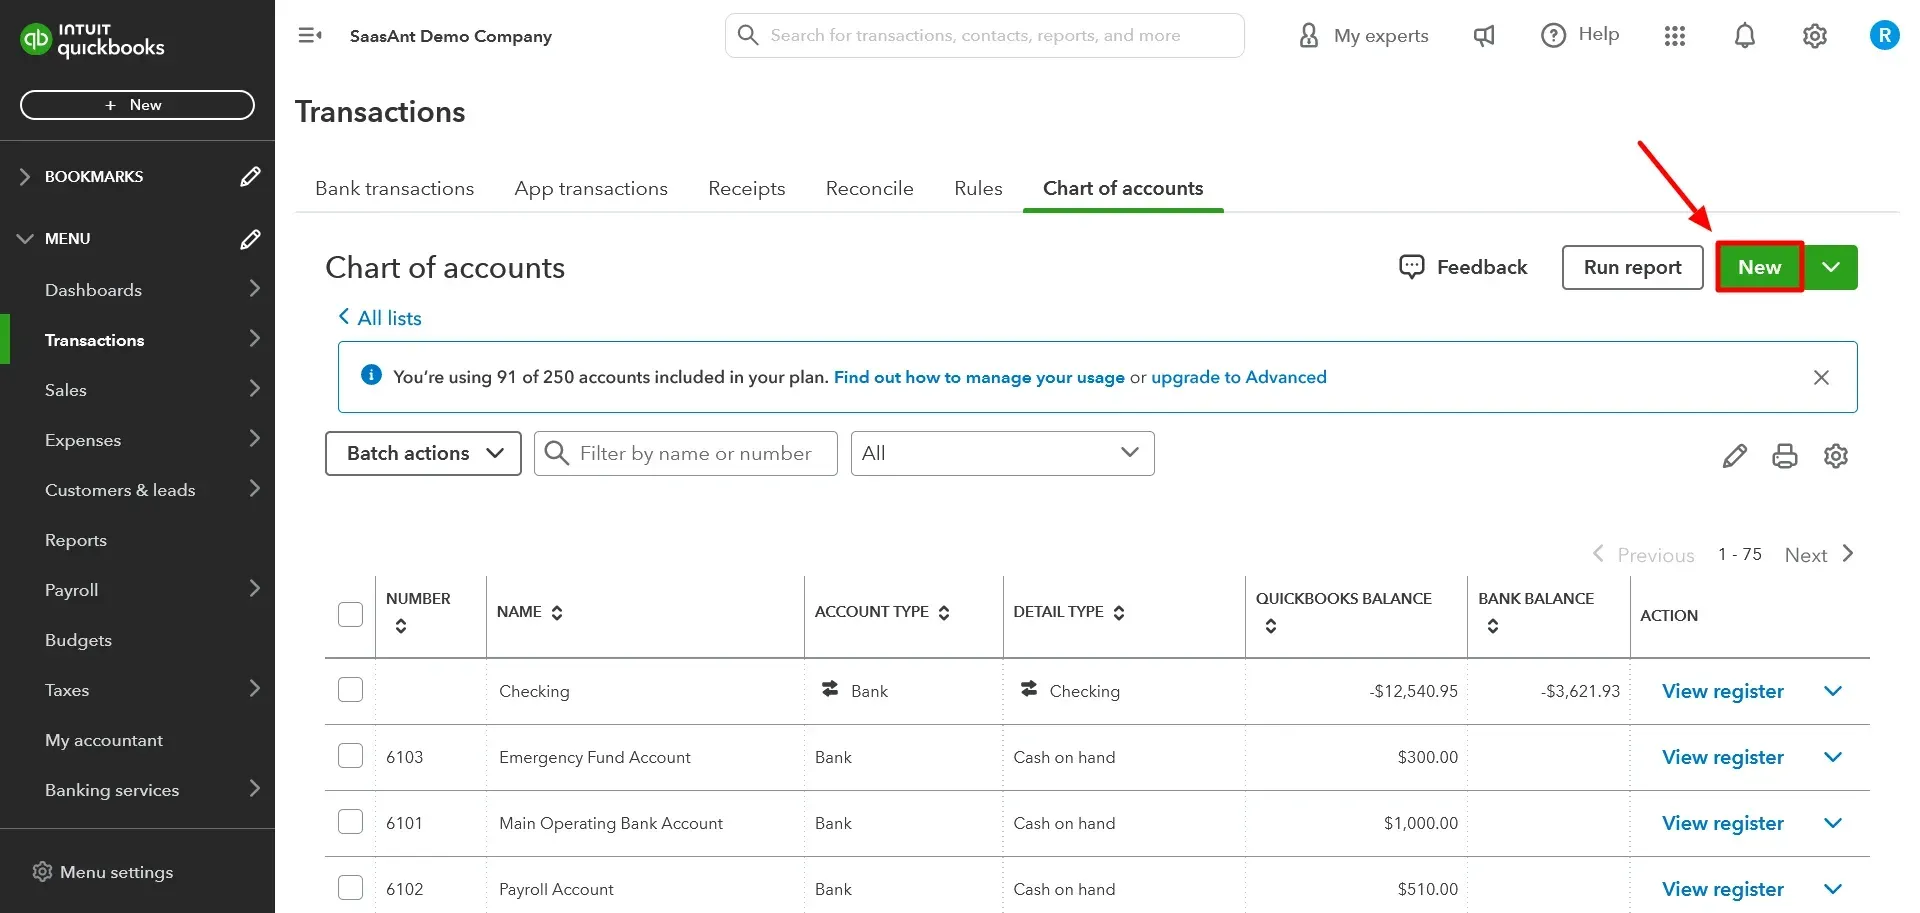
Step 2: Add a New Account

To add a new account to the Chart of Accounts, click on the “New” button in the upper right-hand corner of the screen. You then select the type of account you wish to add.

chartaccount15.webp

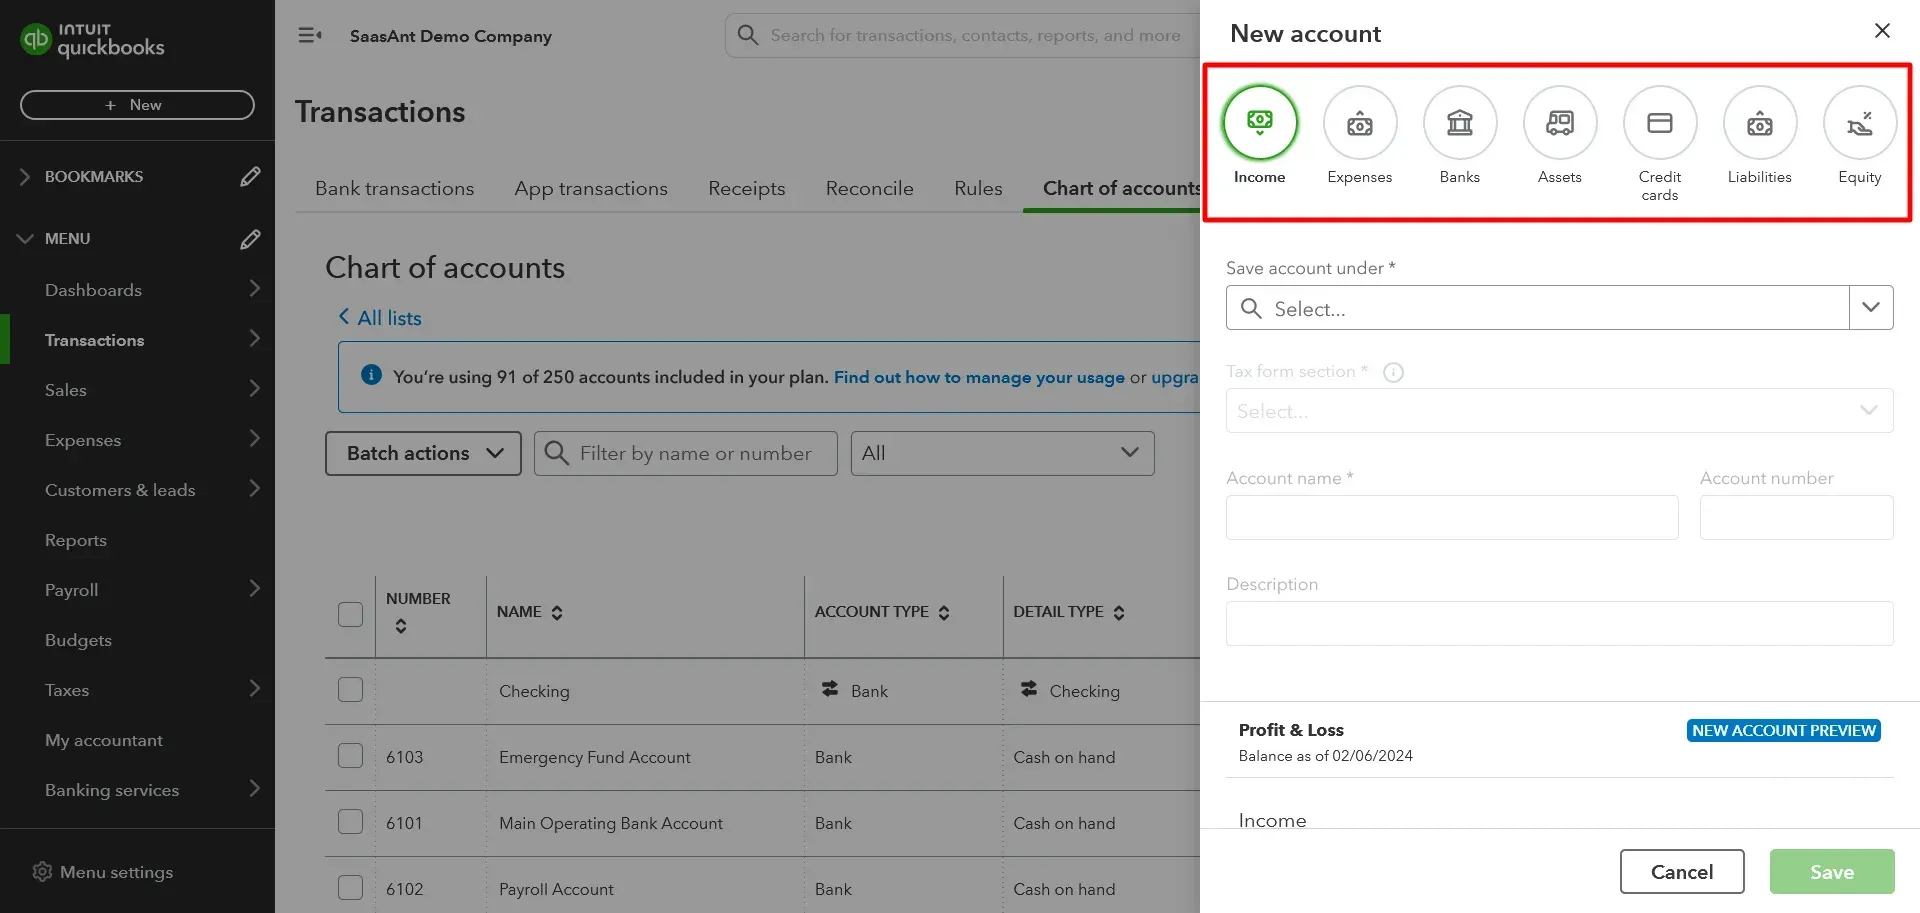
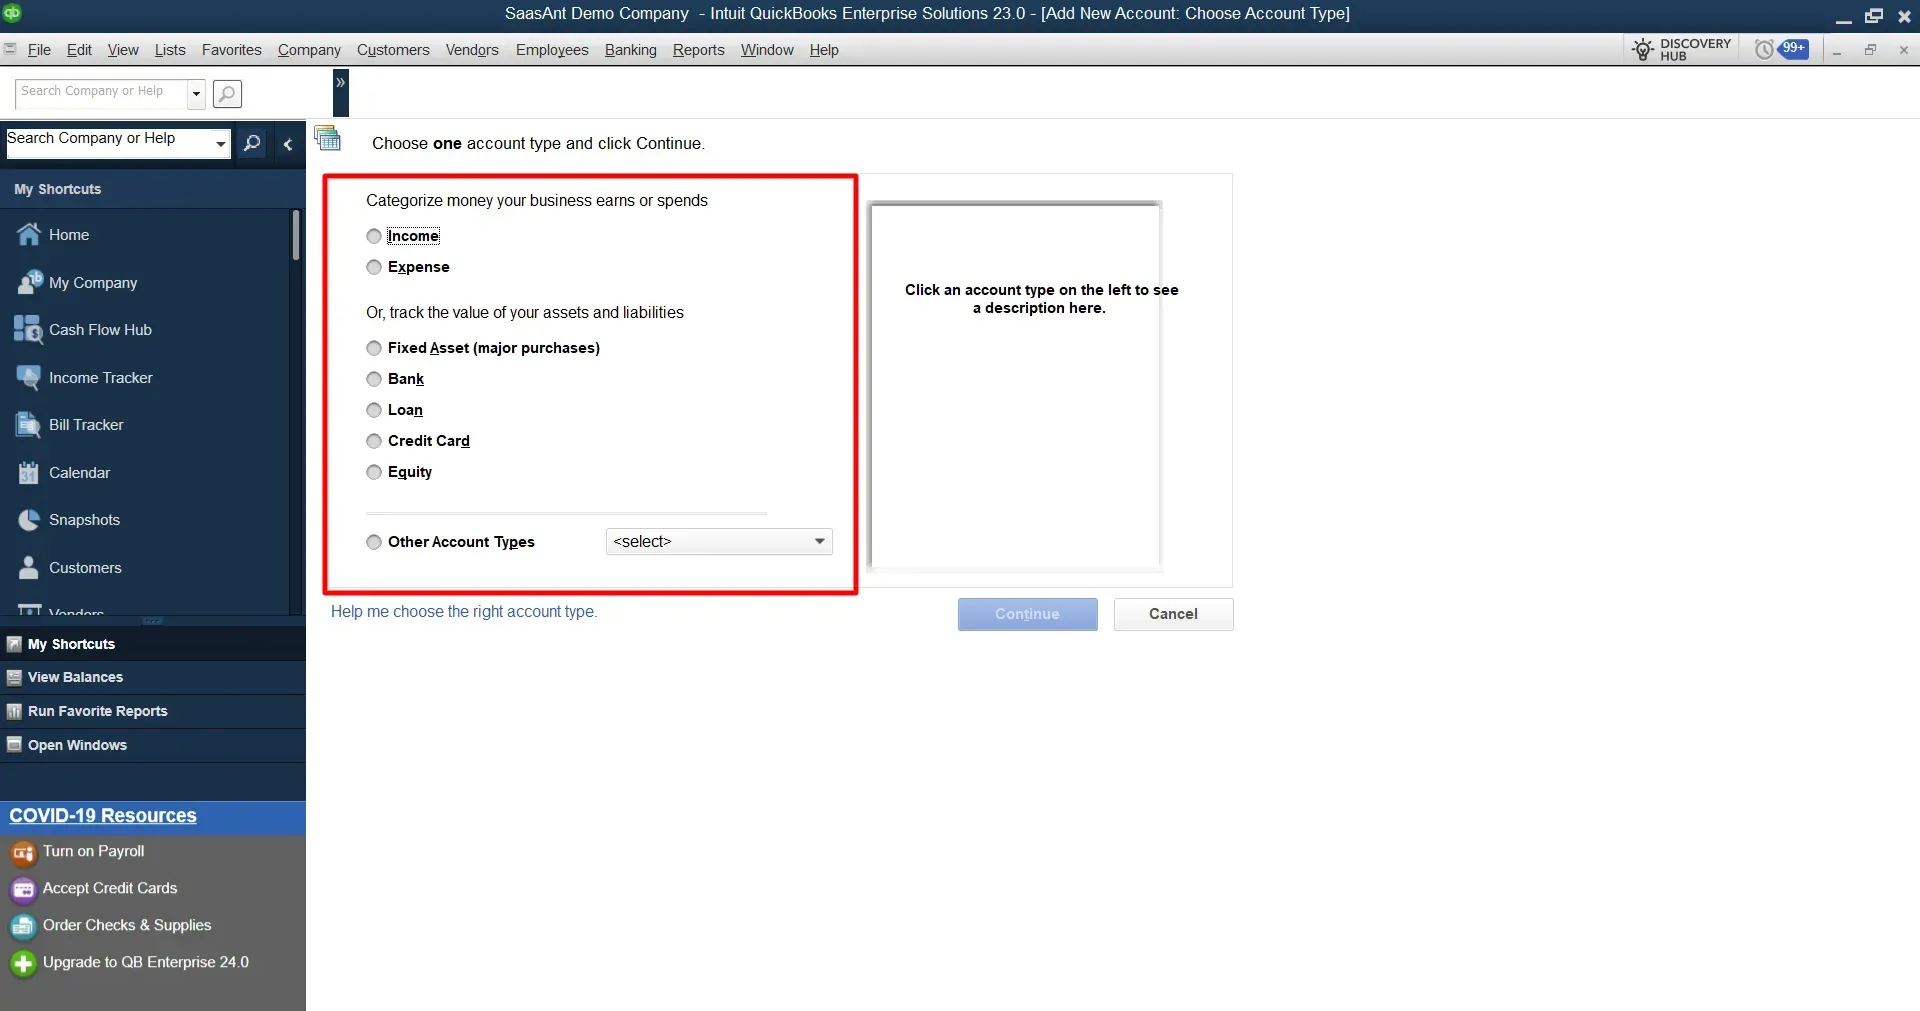
Step 3: Choose Account Type

Select the account type that best fits the account you want to create. The account types available in QuickBooks Online are:

  • Banks

  • Credit Cards

  • Income

  • Expenses

  • Assets

  • Liabilities

  • Equity

chartaccount2.webp

Step 4: Name the Account

Give your account a name that accurately reflects the purpose of the account. Be sure to choose a name that is descriptive and easy to understand.

chartaccount3.webp

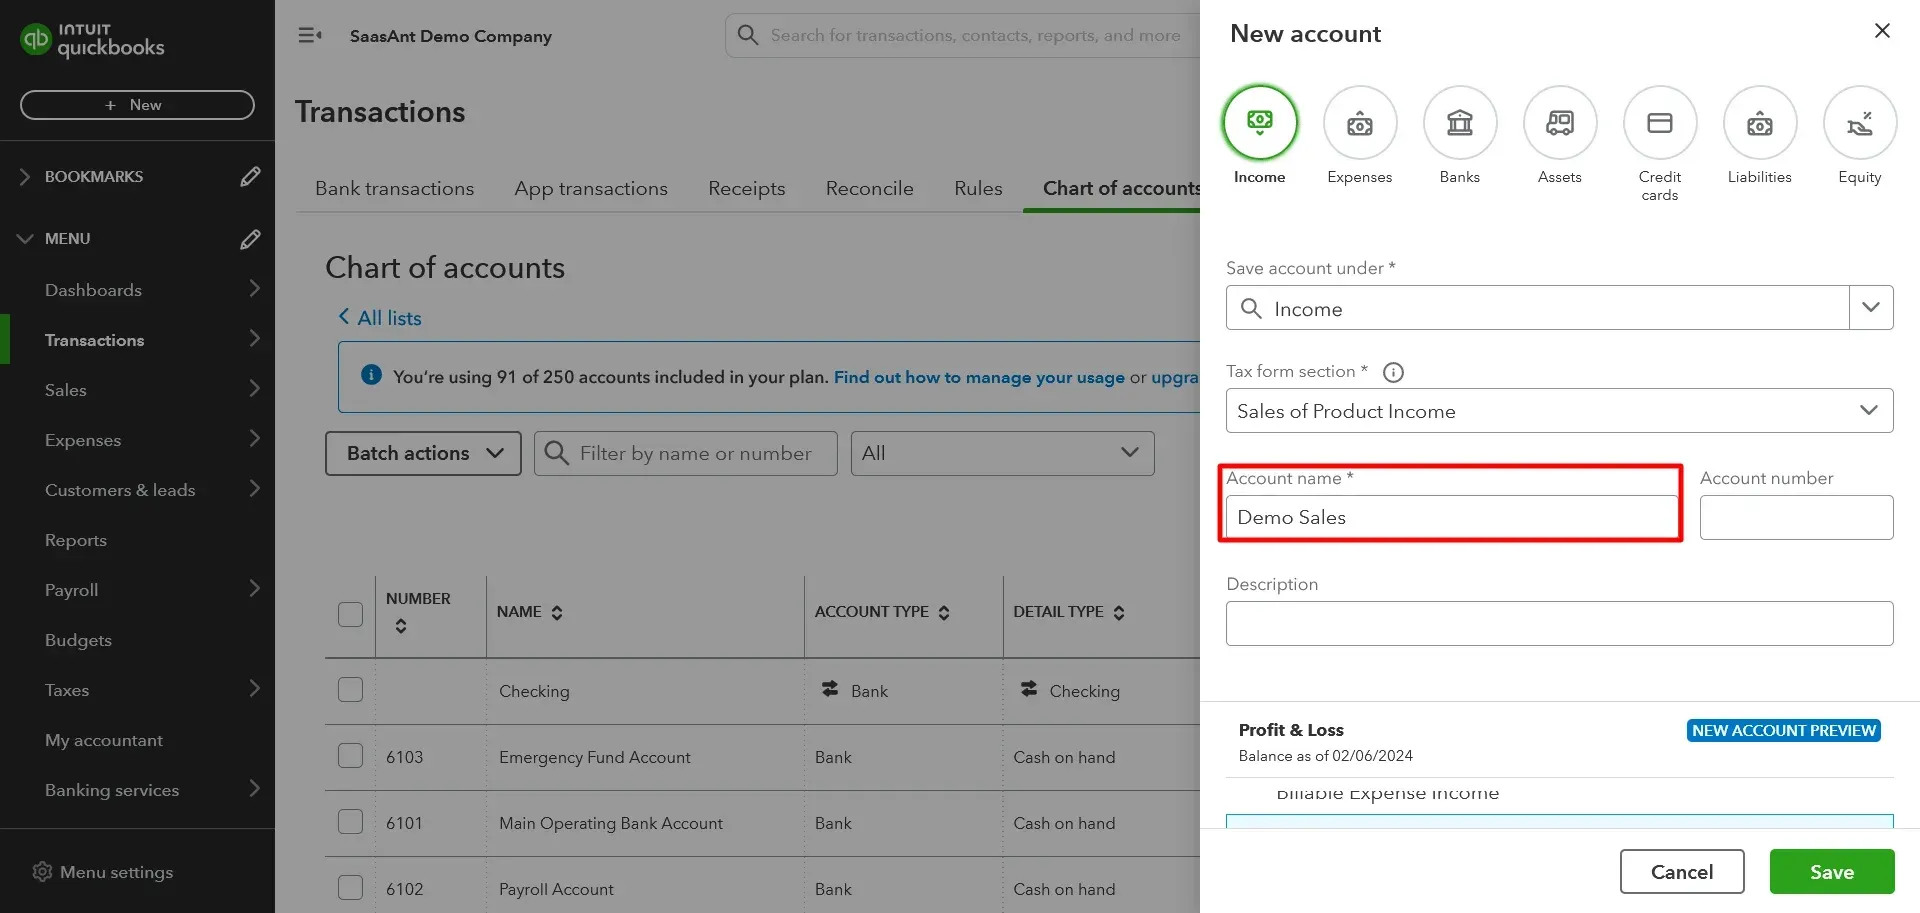
Step 5: Add Additional Information

If applicable, you can add additional information to the account, such as the account number or a description of the account.

chartaccount4.webp

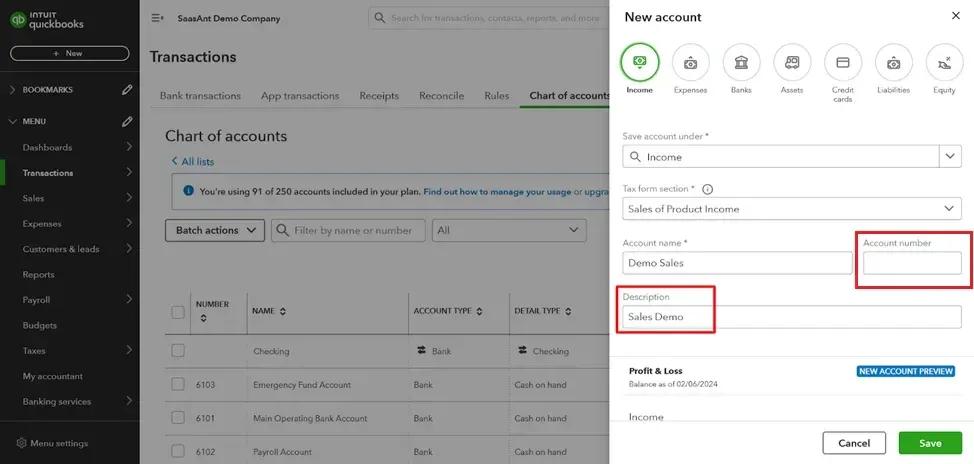
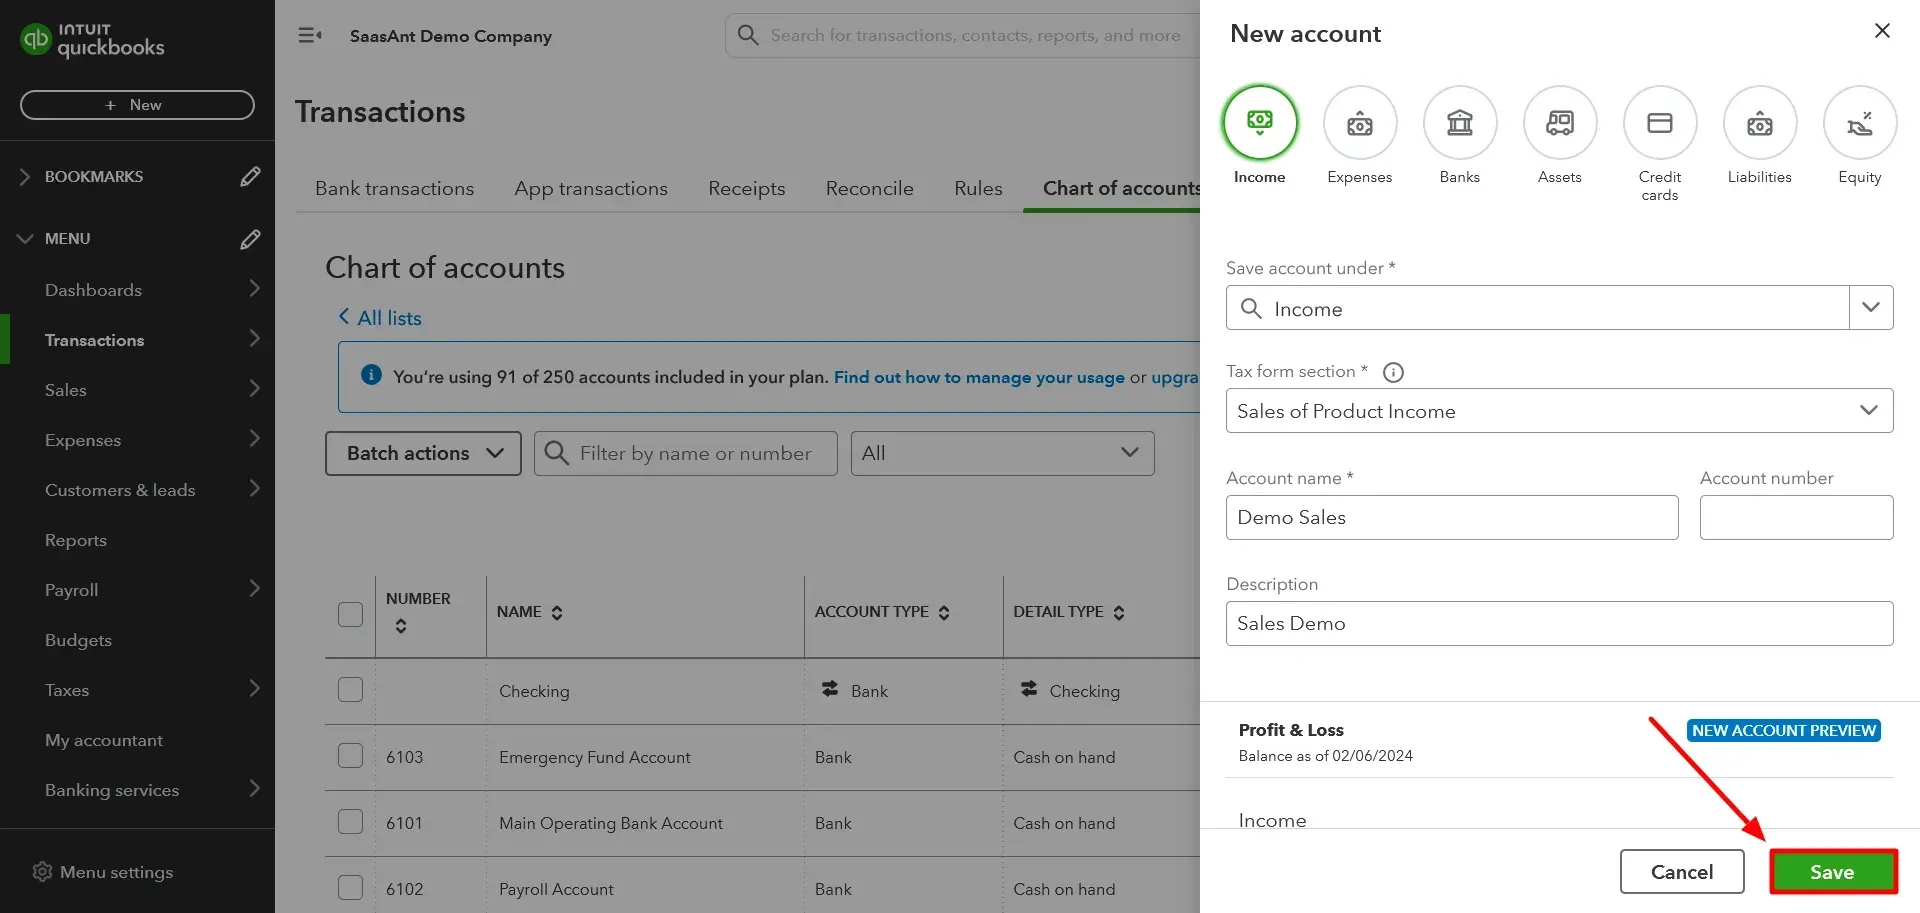
Step 6: Save the Account

Once you have entered all the necessary information, click the “Save” button.

chartaccount5.webp

Step 7: Edit or Inactive an Account

If you need to edit or make an account inactive in the Chart of Accounts, click on the account's name in the list. It will take you to the account details page, where you can make the necessary changes. To inactivate an account, click the “Make inactive” button and click the “Edit” button to edit.

chartaccount6.webp

How to Create Chart of Accounts for Licenses in QuickBooks

Licenses are legal documents that give the holder the right to use a particular software, product, or service. In accounting, licenses are considered intangible assets typically recorded under a separate account in the Chart of Accounts titled "Intangible Assets."

However, the specific account for licenses may vary depending on the company's accounting practices and the nature of the license.

For example, suppose the license is related to software. In that case, it may be recorded under "Computer Software - Intangible Assets," or if it is associated with a patent, it may be recorded under "Patents - Intangible Assets." It is essential to consult with an accountant or financial professional to determine the appropriate account for licenses in your company's Chart of Accounts.

When tracking license-related expenses, having a specific Chart of Accounts is crucial. It helps ensure accurate financial reporting and budgeting for these expenses. Here's how to create a Chart of Accounts for licenses in QuickBooks:

Step 1: Open QuickBooks and click the ‘Settings’ (Gear icon) in the upper right corner.

Step 2: Choose "Chart of Accounts" from the dropdown.

chartaccount14.webp

Step 3: Click the "New Account" button to create a new account.

New Chart of Accounts QuickBooks Desktop

Step 4: Select "Expense" as the account type.

chartaccount9.webp

Step 5: In the "Detail Type" dropdown, choose "Legal and Professional Fees."

chartaccount10.webp

Step 6: Assign a name to the account that reflects the type of licenses you are tracking.

chartaccount11.webp

Step 7: Assign a number or code to the account for easy reference.

chartaccount12.webp

Step 8: Click "Save" to save the new account.

Save Expense Chart of Accounts QuickBooks

Once you've created the new account, you can use it to track license-related expenses. For example, if you purchase a software license for your business, you would record the expense in this account. You can also use the account to track renewal fees or other costs associated with maintaining licenses.

A separate account for licenses lets you easily track the total amount spent on these expenses and compare them to your budget. It can help you make more informed financial decisions and stay within budget.

How to Create a Category Type in the Chart of Accounts in QuickBooks Online

In QuickBooks, a category type is a classification system that organizes accounts within the Chart of Accounts. Each account is assigned a category type, which helps categorize and group similar accounts.

Several category types are available in QuickBooks: expense, income, asset, liability, and equity. Each category type is associated with a specific type of account. For example, businesses employ expense and income accounts to record revenue.

Category types are essential in QuickBooks because they help ensure accounts are properly categorized and organized. It makes generating accurate financial reports and analyzing the business's financial health easier.

When creating or editing accounts in QuickBooks, choosing the correct category type for each account is essential. It ensures that the account is correctly classified and grouped with other accounts of the same type.

To create a category type in the Chart of Accounts in QuickBooks Online, follow the steps below:

Step 1: Log in to your QuickBooks Online account and navigate to the Gear icon in the upper right corner.

Step 2: Click "Chart of Accounts" from the dropdown menu.

chartaccount14.webp

Step 3: Click on "New" to create a new account.


New Chart of Accounts QuickBooks Desktop

Step 4: Select the account type you wish to create, such as "Expense" or "Income."

chartaccount16.webp

Step 5: In the "Tax Form Section" dropdown menu, select “Other Primary Expense” or Other Primary Income,” depending on the account type you selected.

Primary Income Tax Chart of Accounts QuickBooks Online

Step 6: In the "Account Name" field, enter the name of the category type. For example, "Sales Income."

Name the account Chart of Accounts QuickBooks online

Step 7: Fill in additional fields, such as the account number, description, and tax-line mapping.

chartaccount19.webp

Step 8: Click "Save" to create the new category type in the Chart of Accounts.

How to Edit Chart of Accounts in QuickBooks Online

To edit a Chart of Accounts in QuickBooks Online, follow these steps:

Step 1: Log in to your QuickBooks Online account and go to the "Accounting" menu.

Step 2: Select "Chart of Accounts."

chartaccount21.webp

Step 3: Find the account you want to edit and click on the drop-down arrow on the far right of the account name.

Step 4: Select "Edit" from the drop-down menu.

chartaccount22.webp

Step 5: Make the necessary changes to the account information, such as account name, type, or description.

chartaccount23.webp

Step 6: Click "Save" after editing.

Note: Additionally, it is essential to note that specific changes to your Chart of Accounts, such as editing account types or making your accounts inactive, may impact your financial statements. Therefore, you should consult a financial professional before making significant changes to your Chart of Accounts.

How to Change the Tax Form section in QuickBooks Chart of Accounts 

You can easily change the detail type in QuickBooks Chart of Accounts with just a few simple steps. The detail type refers to the level of detail that you want to track for each account in your Chart of Accounts. 

QuickBooks has several predefined detail types that you can choose from, such as Bank, Credit Card, and Income, but you can also create your custom detail types to suit your specific needs.

Step 1: To change the detail type of an account in the QuickBooks Chart of Accounts, follow these steps:

Step 2: Log in to your QuickBooks Online account and navigate to the Chart of Accounts.

Step 3: Find the account you want to edit and click on it to open the Account Information page.

Step 4: Click on the Edit button at the top right corner of the page.

Step 5: In the Edit Account window, locate the “Tax form section” and click the drop-down arrow to see the list of available sections.

Step 6: Select the new tax form section you want to assign to the account and click “Save.” 

Step 7: QuickBooks may prompt you to update the account name and account number to match the new tax form section. If this happens, make the necessary changes and click “Save.”

Step 8: The account will now be assigned the new tax form section and displayed in the appropriate section of your Chart of Accounts.

QuickBooks Desktop

How to Create Chart of Accounts in QuickBooks Desktop?

The basic steps for creating a Chart of Accounts in QuickBooks Desktop are similar to those for QuickBooks Online, but the specific process may differ slightly. Here are the general steps for creating a Chart of Accounts in QuickBooks Desktop:

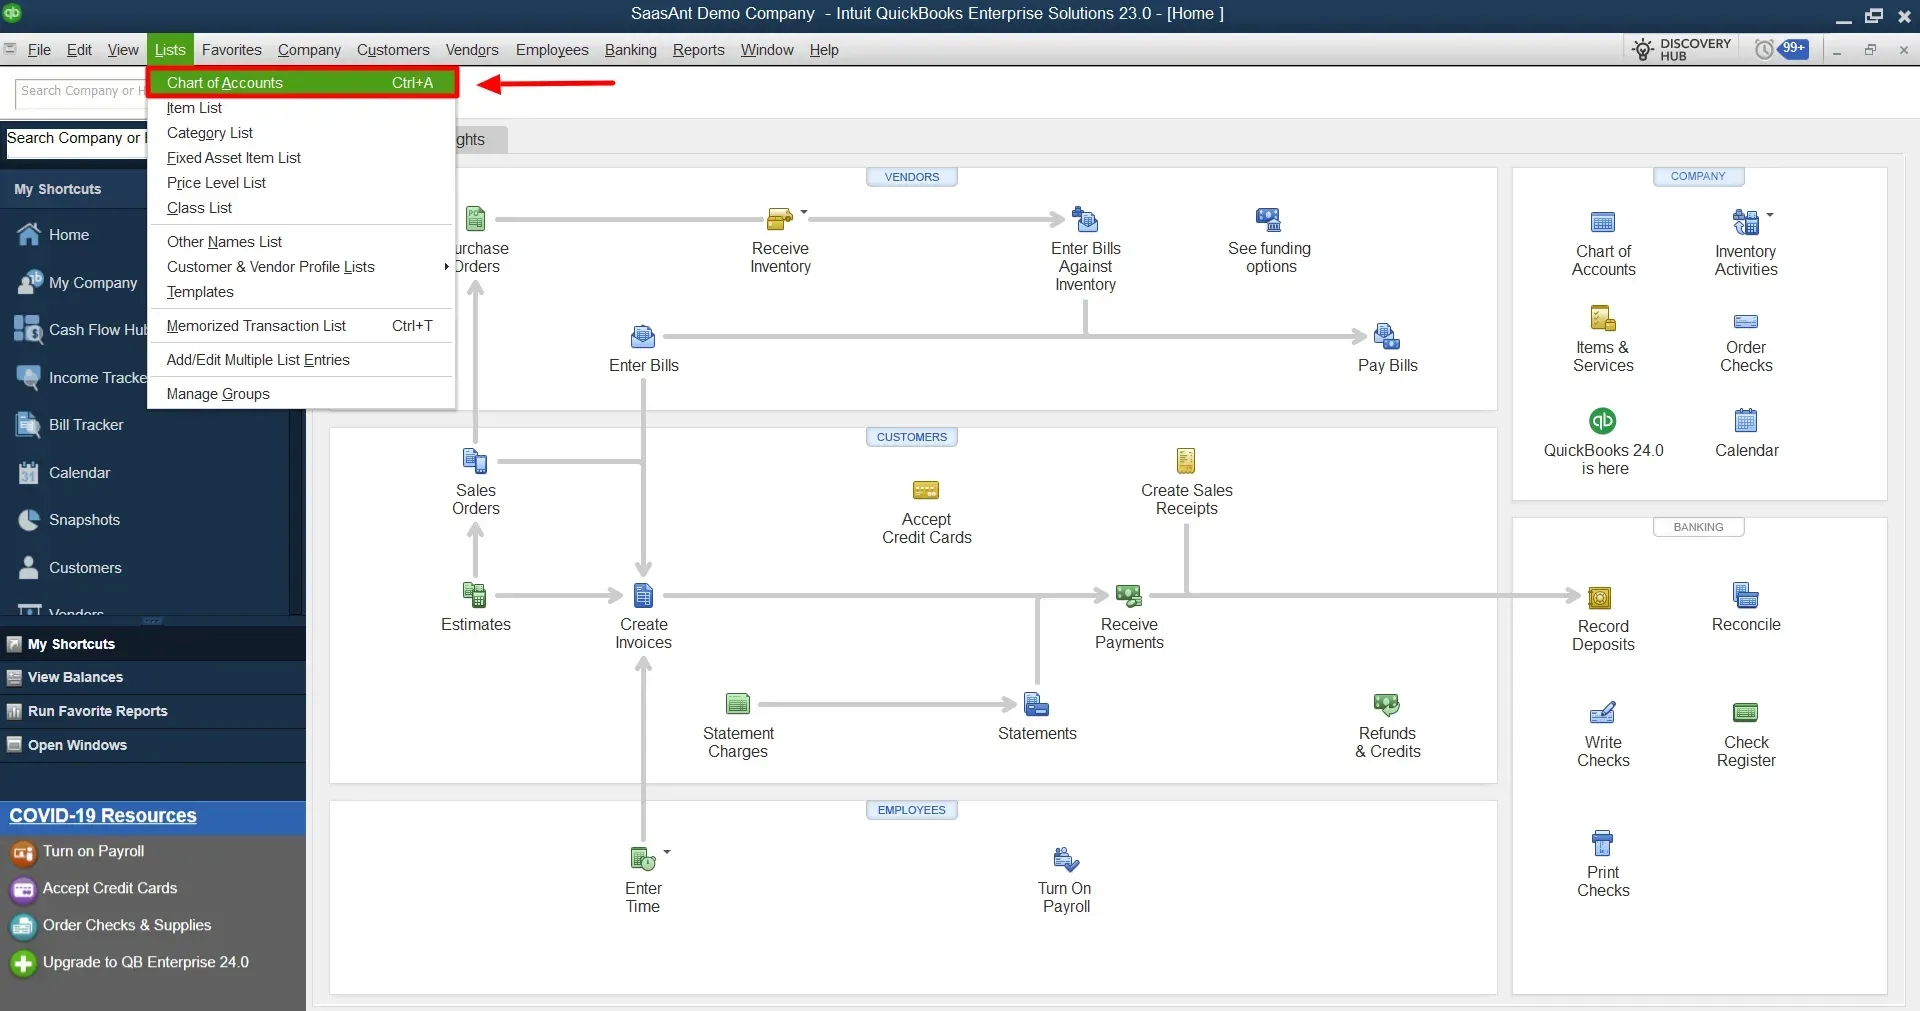
Step 1: Open QuickBooks Desktop and click on the "Lists" menu.

Step 2: Select "Chart of Accounts" from the dropdown list.

How to Create a Custom Chart of Accounts in QuickBooks Desktop

Step 3: Click the "Account" button and select "New" to create a new account.

New Account Chart of Accounts QuickBooks Desktop

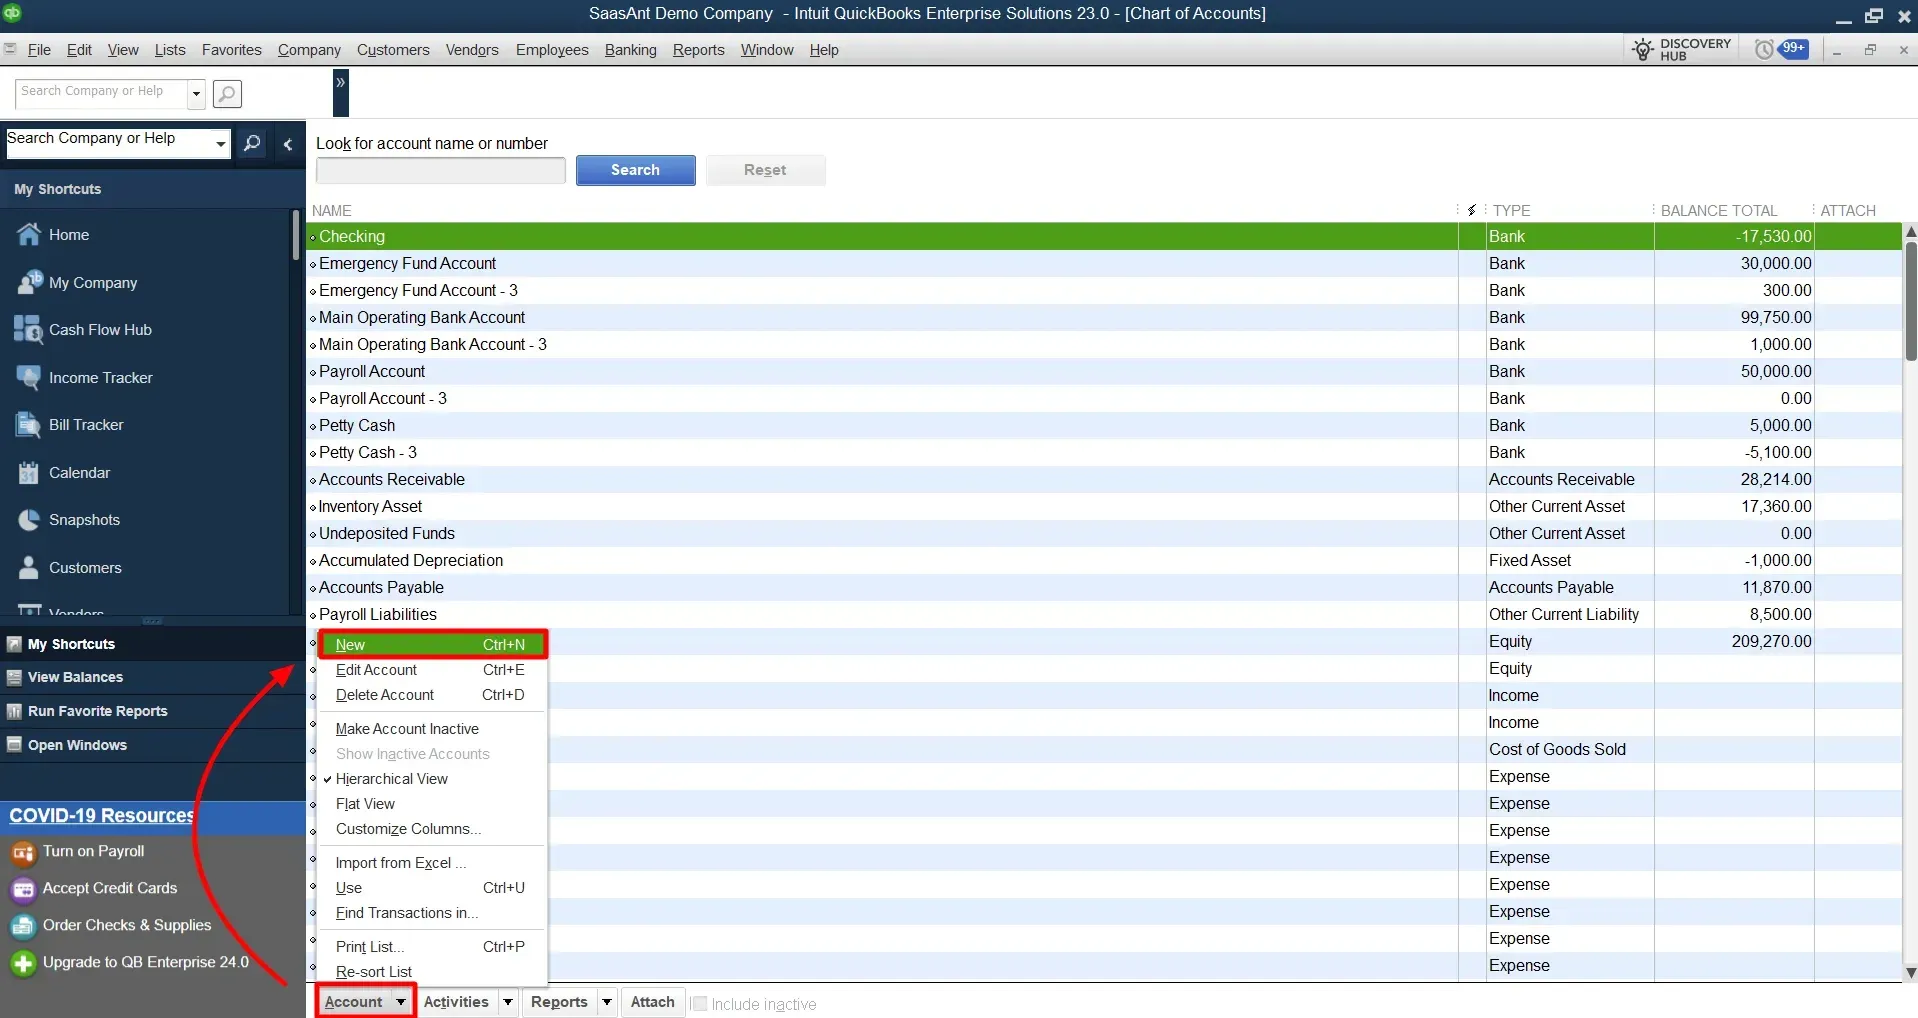
Step 4: Choose the type of account you want to create (e.g., expense, asset, liability, income, etc.).

chartaccount27.webp

Step 5: Enter a name for the account and a description (optional).

Add Description Create Chart of Accounts QuickBooks Desktop

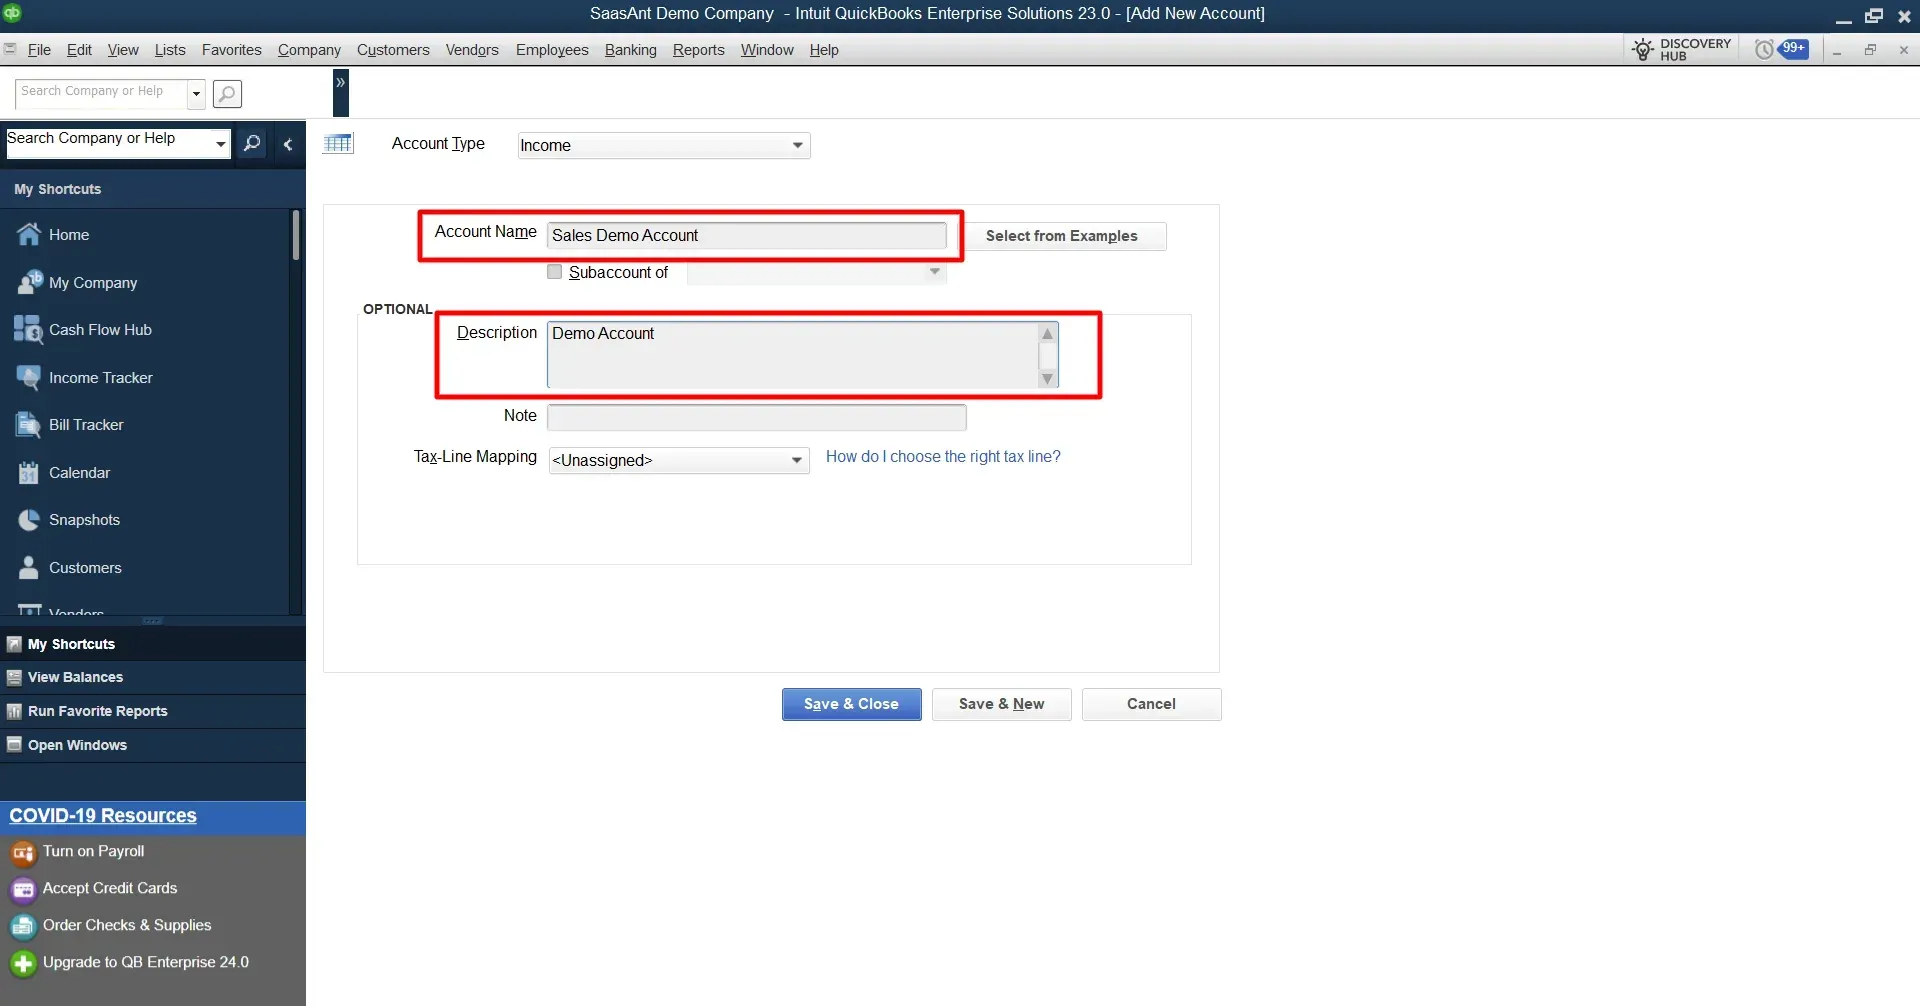
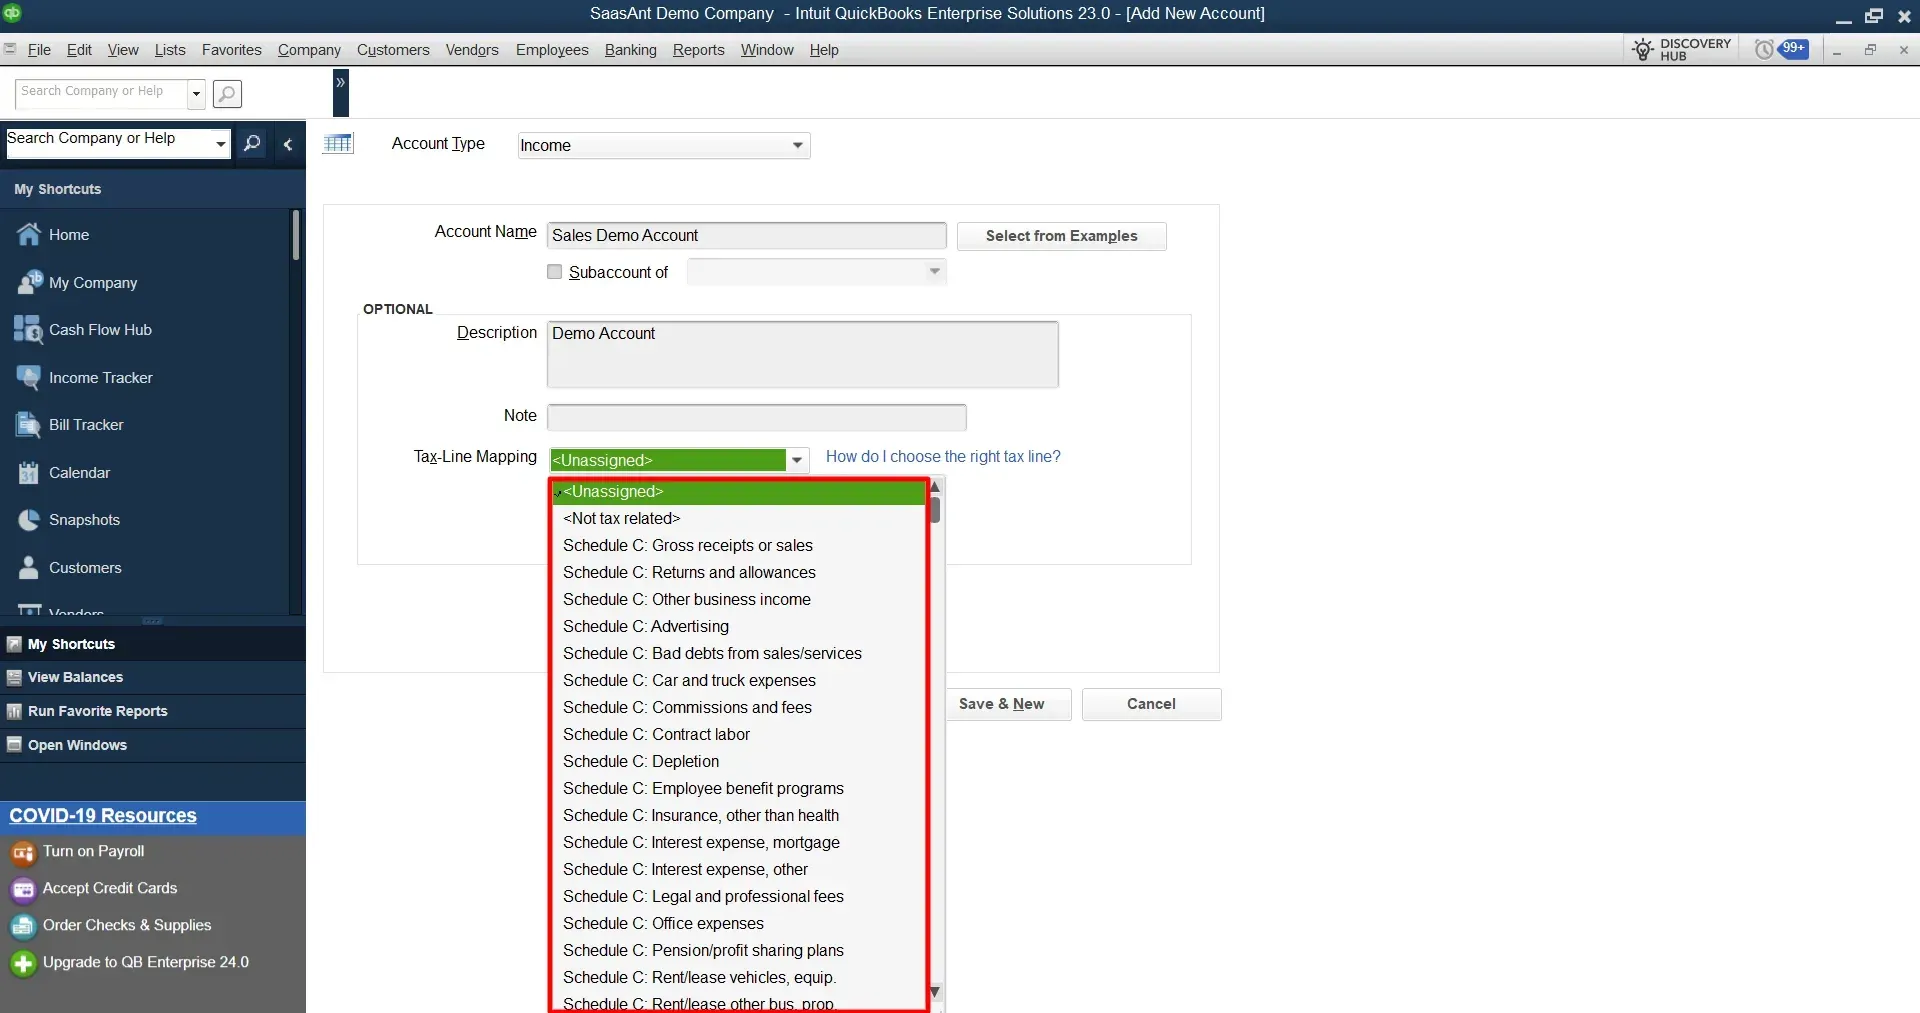
Step 6: Choose a tax line mapping if applicable.
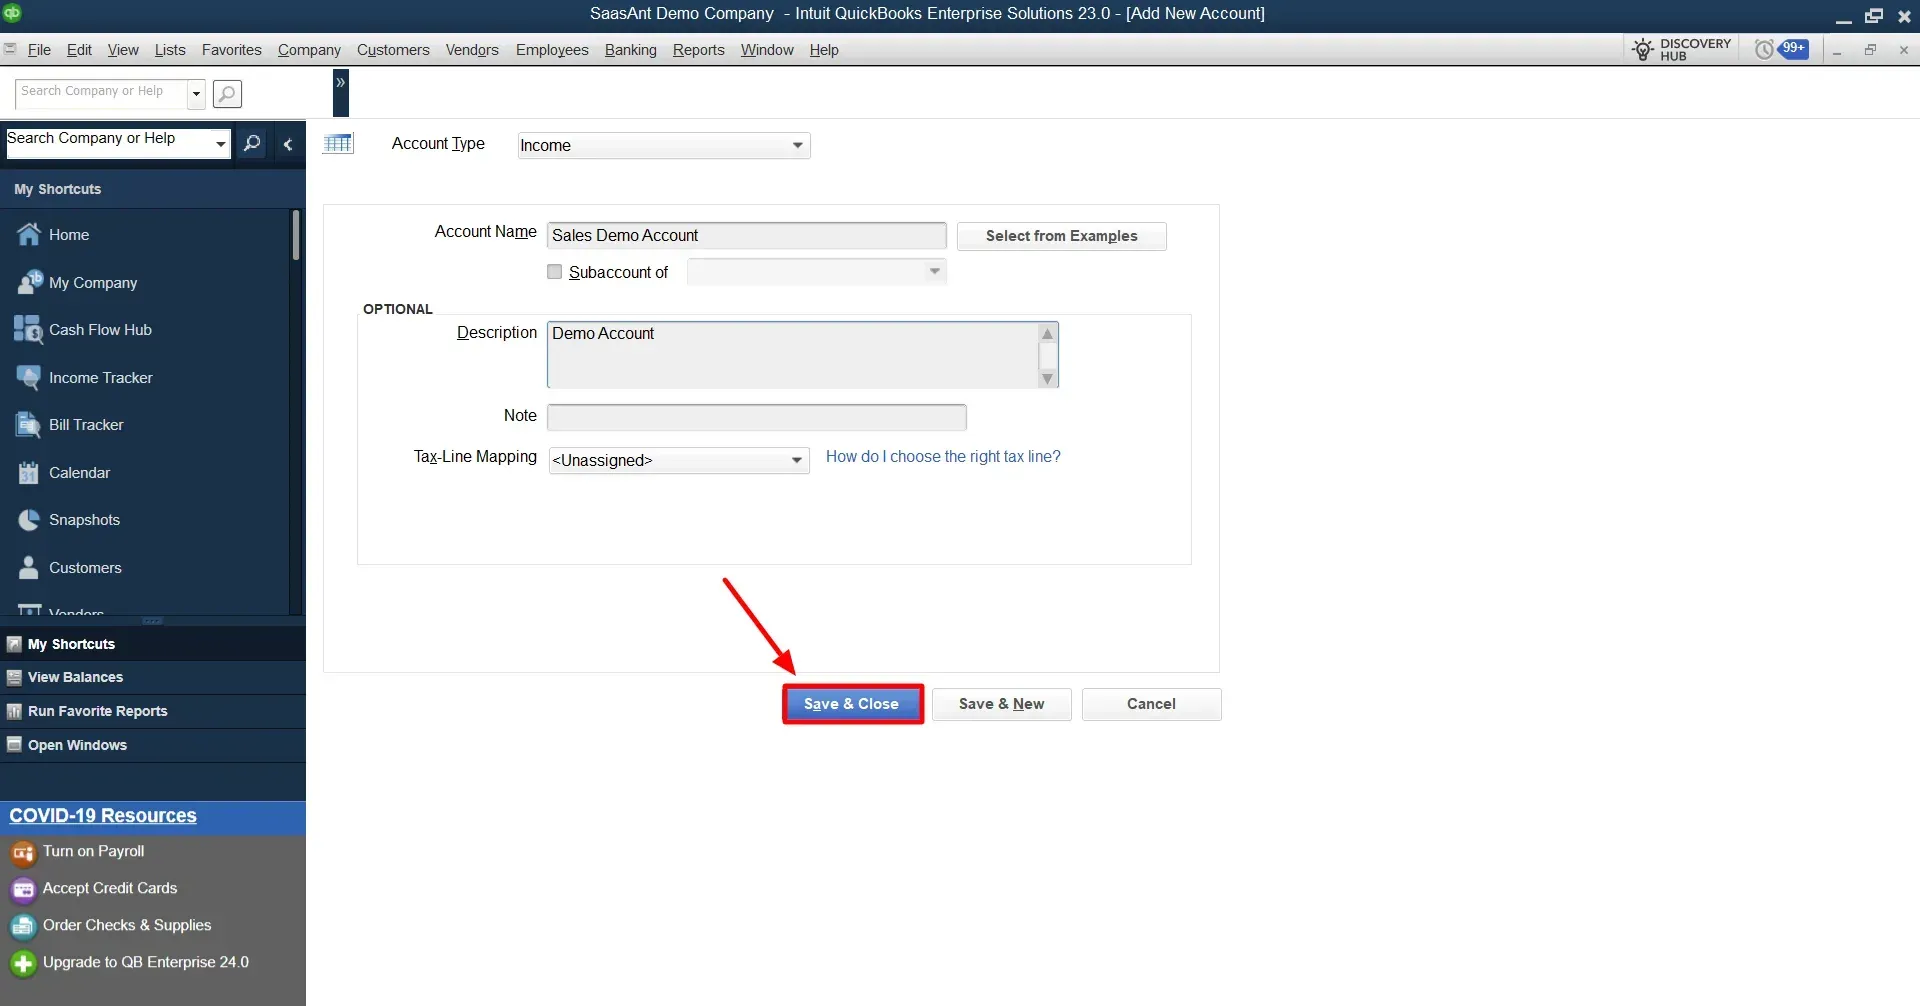
Choose the appropriate tax-line mapping for the account - Chart of Accounts QuickBooks Desktop

Step 7: Once done, click “Save and Close.”

chartaccount30.webp

Once you have created your accounts, you can customize them by adding sub-accounts, merging accounts, or changing the account type or detail type.

Note: QuickBooks Desktop offers more advanced features and customization options than QuickBooks Online but requires higher technical expertise.

How to Create a Custom Chart of Accounts in QuickBooks Desktop

Creating a custom Chart of Accounts in QuickBooks Desktop allows you to tailor your financial tracking to the specific needs of your business. Follow the steps below to create a custom Chart of Accounts in QuickBooks Desktop:

Step 1: Click the "Lists" menu and select "Chart of Accounts."

chartaccount31.webp

Step 2: In the Chart of Accounts window, click on the "Account" menu and select "New."

chartaccount32.webp

Step 3: In the "Add New Account" window, select the account type you want to create from the drop-down menu.

chartaccount33.webp

Step 4: If you want to add a sub-account to an existing account, select the account to which you want to add the sub-account and click on the "Account" menu. Select "Add New" and then choose the type of account you wish to create for the sub-account.

Step 5: In the "Add New Account" window, enter a name for the account in the "Account Name" field.

chartaccount34.webp

Step 6: Choose the appropriate tax-line mapping for the account.

chartaccount35.webp

Step 7: If you want to add a note to the account, enter it in the "Notes" field.

chartaccount36.webp

Step 8: Click "Save & Close" to create the new account.

chartaccount37.webp

After creating your custom Chart of Accounts, you can also rearrange the order of accounts by dragging and dropping them into place.

Note: Creating a custom Chart of Accounts in QuickBooks Desktop can be more complex than in QuickBooks Online due to the additional features and functionalities available in the desktop version. If you need clarification on the process or need assistance, it is recommended that you consult with a certified QuickBooks ProAdvisor or accountant.

How to Organize Chart of Accounts in QuickBooks Desktop

Organizing the Chart of Accounts in QuickBooks Desktop is crucial for efficient bookkeeping. Here are the steps to organize your Chart of Accounts:

Step 1: Click the "Lists" menu and select "Chart of Accounts."

Step 2: Locate the account you want to move or organize and click on it to select it.

Step 3: Click on the "Account" menu at the top of the screen and select "Edit Account" or right-click on the account and select "Edit Account."

chartaccount38.webp

Step 4: Go to the "Account Information" section in the Edit Account window.

Step 5: In the "Detail Type" drop-down menu, select the account type to which you want to move the account.

Step 6: Click on the "Save & Close" button to save your changes.

Step 7: To move the account, simply click and drag the account to its new location in the Chart of Accounts.

Understanding Chart of Accounts in QuickBooks

How does QuickBooks Chart of Accounts work?

The QuickBooks Chart of Accounts lists a business's accounts to record financial transactions. It serves as the foundation for recording all financial activity and helps provide a clear and organized structure for the business's financial information.

Each account in the Chart of Accounts is assigned a unique account number and name and is categorized based on its type and function. There are five main types of accounts: assets, liabilities, equity, income, and expenses. Within each type, there can be subcategories to further classify accounts based on their specific function.

For example, cash, accounts receivable, and inventory subcategories may be under the assets category. Under the expenses category, there may be subcategories for rent, utilities, and office supplies. By organizing accounts in this way, businesses can easily track their financial activity and generate reports that provide insights into their financial health.

QuickBooks allows users to easily add, edit, and delete accounts in the Chart of Accounts. It also offers customization options, such as adding account descriptions, subaccounts, and account numbers.

Users can select the appropriate account from the Chart of Accounts when recording financial transactions to ensure the transaction is correctly categorized. It helps to ensure that financial statements are accurate and provide a clear picture of the business's financial performance.

How Many Chart of Accounts Are There in QuickBooks Online?

QuickBooks Online has no limit on how many Chart of Accounts users can create. It depends on the needs of the business and how detailed they want their financial reporting to be. 

QuickBooks Online allows for creating multiple custom Chart of Accounts, each with its unique account numbering system and detail types. However, experts recommend keeping the number of accounts manageable for ease of use and organization.

It is important to remember that the Chart of Accounts should accurately reflect the business's financial transactions and provide valuable financial information for decision-making.

How to Create General Journal Entry in Chart of Accounts QuickBooks

A general journal entry in QuickBooks serves as a method for documenting transactions that don't fit into the standard forms. It could include adjusting an account balance, transferring funds between accounts, or recording depreciation expenses. It offers flexibility for handling various financial activities beyond QuickBooks' usual data entry points.

A general journal entry contains multiple lines containing an account and an associated amount. The total debits must equal the total credits to maintain balance across the accounts. Additionally, you can include a memo explaining the purpose of the entry and, if applicable, assign a class or location using these features.

Here's a step-by-step guide on how to create a general journal entry in the Chart of Accounts in QuickBooks:

Step 1: Access the General Journal Entry screen

  • Click on the Plus (+) icon on the top center of the screen.

  • Choose "Journal Entry" under the "Other" column.

Step 2: Fill out the general journal entry form

  • Enter the date of the transaction in the "Date" field.

  • Enter the account names and numbers you want to adjust in the "Account" column. Make sure that you choose the correct account type.

  • Enter the amounts of the debits and credits in the corresponding columns.

  • Add a memo in the "Memo" field to explain the transaction.

  • If necessary, add a class or location to the transaction.

Step 3: Review and Save the General Journal Entry

  • Review the journal entry form entries to ensure they are correct.

  • Click "Save" at the bottom of the screen to save the entry.

Here are a few additional tips to remember when creating a general journal entry in QuickBooks:

  • When entering a transaction affecting more than two accounts, ensure that the total debits equal the total credits.

  • If you are adjusting to an account with a balance, be sure to adjust the balance in the correct direction (i.e., debit or credit).

  • Double-check the account number and name to ensure you adjust the correct account.

Having a solid understanding of accounting principles before creating general journal entries is fundamental in QuickBooks. If you are still determining the transaction, consult your accountant or bookkeeper.

Summing it Up

Understanding how to create and manage a Chart of Accounts is essential for any business owner or accountant using QuickBooks. A well-organized Chart of Accounts allows financial data to be easily analyzed, tracked and reported.

SaasAnt Transactions offers a versatile solution for managing QuickBooks data by facilitating transaction import, export, and deletion transactions. Consider a scenario where your business undergoes a significant restructuring, leading to changes in your account structure. Instead of manually updating each account in QuickBooks, SaasAnt Transactions comes to the rescue. It allows you to import, export, modify, or delete bulk transactions in QuickBooks from various file formats such as Excel, CSV, TXT, PDF, and IIF files. This streamlined process saves substantial manual time and effort.

What sets SaasAnt Transactions apart is its automatic mapping feature, enabling you to seamlessly align the columns in your file with corresponding fields in QuickBooks. It includes essential details like name, type, number, description, balance, etc. Before importing the data into QuickBooks, the platform empowers users to preview and review the information, ensuring accuracy and preventing potential errors. In essence, SaasAnt Transactions simplifies and expedites the management of your Chart of Accounts, offering a practical solution for businesses undergoing changes or seeking efficiency in their accounting and financial data handling.

FAQs

Do I need a Chart of Accounts in QuickBooks?

Yes, having a Chart of Accounts in QuickBooks is essential for proper accounting and bookkeeping. It helps organize financial transactions, track income and expenses, and generate accurate financial statements. 

A Chart of Accounts also allows you to categorize transactions by account type, making it easier to analyze your business's financial performance and make informed decisions. QuickBooks provides a default Chart of Accounts, but customizing it to fit your business needs is highly recommended.

How do you arrange a Chart of Accounts?

A Chart of Accounts can be arranged by grouping accounts by type, such as assets, liabilities, equity, revenue, and expenses. Within each group, accounts can be further sub-categorized based on specific business needs. It is vital to have a consistent and logical arrangement to ensure accurate financial reporting.

How to Organize Chart of Accounts in QuickBooks Online

In QuickBooks Online, you can organize your Chart of Accounts by rearranging accounts to fit your business needs. To organize your Chart of Accounts, follow these steps:

1. Navigate to the “Transactions” tab and click the “Chart of Accounts.”

2. Click the "Action" column and select "Edit" for the account you want to move.

3. In the "Edit Account" window, change the "Detail Type" if necessary.

4. To move the account, click and drag it to the desired location in the list.

5. Click "Save" to save your changes.

What Are the 5 Main Account Types in the Chart of Accounts QuickBooks?

The five main account types in the Chart of Accounts in QuickBooks are:

1. Assets: These are resources a business owns or controls, such as cash, accounts receivable, inventory, and equipment.

2. Liabilities: These are debts that a business owes, such as loans, accounts payable, and taxes owed.

3. Equity: This represents the net worth of a business and includes items such as owner's equity and retained earnings.

4. Income: This includes revenue earned from sales of products or services.

5. Expenses: These are the costs incurred by a business to generate revenue, such as rent, salaries, utilities, and supplies.

Tags

Chart of Accounts

quickbooks

small businesses