Post-Migration Setup - Moving from QuickBooks Desktop to QuickBooks Online

Migrating to QuickBooks Online is a significant step toward streamlining your accounting processes. This guide is tailored for business owners, accountants, and bookkeepers who have recently switched from QuickBooks Desktop to QuickBooks Online. By following these steps, you can ensure a seamless transition and make the most of your new QuickBooks Online account.
Contents
Initial Steps After Migrating from QuickBooks Desktop
Managing User Permissions in QuickBooks Online
Integrating Third-Party Apps with QuickBooks Online
Customizing Invoices and Sales Forms
Setting Up Recurring Transactions
Utilizing QuickBooks Online Reports
Handling Multi-Currency Transactions
Setting Up Projects in QuickBooks Online
Additional Tips and Best Practices
FAQs
Initial Steps After Migrating from QuickBooks Desktop
Verifying your data and configuring your QuickBooks Online settings before entering new transactions is essential. This will help you avoid potential issues and ensure everything runs smoothly.
1. Verify Data Integrity
Compare Key Reports
After migration, checking that your data is transferred correctly is crucial. Run these reports in both QuickBooks Online and QuickBooks Desktop:
Balance Sheet Report
Trial Balance – All Dates
Customer Balance Summary – All Dates
Supplier Balance Summary – All Dates
Sales Tax Summary Report for the most recent period
To verify your reports:
Set the date range to "All Dates."
Use the Accrual accounting method.
Potential Issues:
Discrepancies in Balances: If balances don’t match, recheck your data mapping and re-run the migration process if necessary.
Missing Transactions: Ensure all transactions are present. Missing data might indicate a need for manual entry.
2. Update Company Information
Your company details like name, address, and email do not migrate automatically. Update these manually:
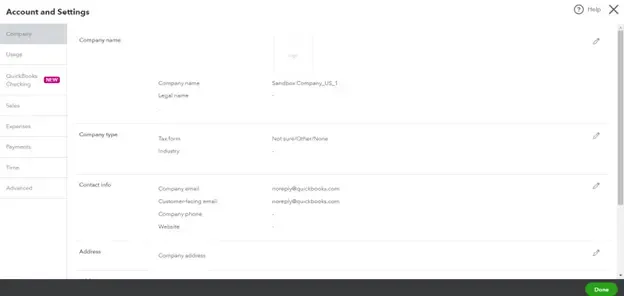
Go to Settings (gear icon) > Account and Settings.
On the Company tab, enter your company and contact information.
Set the email address for receiving monthly invoices from Intuit in the Company email box.
If different, specify an email address for customer contact in the Customer-facing email box.
Click Save.
Potential Issues:
Incorrect Information: Ensure the details entered are accurate to avoid communication issues and inaccurate billing.
3. Configure Sales Tax Settings
Set up your sales tax information if your business is registered for it:
Go to Taxes and select Sales Tax.
Click Set up sales tax.
Choose your province or territory and select Save.
Fill in the required information and click Next, then OK.
Potential Issues:
Incorrect Tax Rates: Double-check the tax rates and registration details to ensure compliance with tax regulations.
4. Connect Bank and Credit Card Accounts
For security reasons, bank and credit card details are not transferred. Connect these accounts manually:

Go to Bookkeeping > Transactions > Bank transactions.
Click Connect Account or Add Account.
Search for your bank and follow the prompts to link your accounts.
Select the appropriate account type from the dropdown menu and set the date range for the download.
Click Connect.
Potential Issues:
Connection Failures: Ensure you have the correct login credentials for your bank accounts.
Missing Transactions: Verify that all transactions are imported and none are missing.
5. Reconcile Bank Transactions
Mark all pre-migration transactions as reconciled:
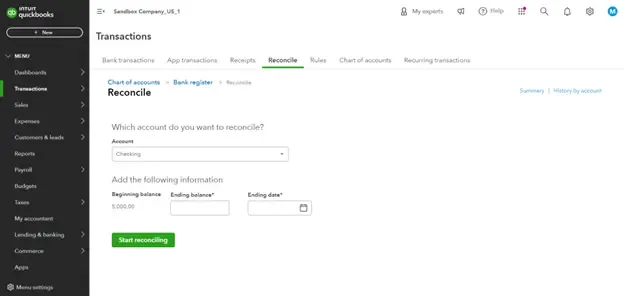
Go to Settings (gear icon) > Reconcile.
Select the relevant bank account, enter the Ending balance and Ending date, and click Reconcile Now.
Select all transactions up to the migration date. Ensure the Difference is zero before finishing.
Repeat for each connected account.
Potential Issues:
Discrepancies in Reconciliation: Double-check the ending balances and dates to ensure accurate reconciliation.
6. Link Payments and Credits to Open Invoices
Enable the automatic application of credits:
Go to Settings (gear icon) > Account and Settings.
On the Advanced tab, enable Automatically Apply Credits and click Save.
Potential Issues:
Unlinked Transactions: Manually link payments and credits if automatic linking does not resolve all discrepancies.
7. Review and Update Account Detail Types
QuickBooks Online uses an additional level of account typing called Detail Types. Review and update these as needed:
Go to Business Overview> Reports.
Run the Account Listing Report.
Review the accounts and edit their detail types if necessary.
Save any changes.
Potential Issues:
Incorrect Account Types: Ensure each account has the correct detail type to maintain accurate reporting.
8. Complete Payroll Setup
Ensure your payroll data is correctly set up:
Go to Payroll > Employees.
Verify year-to-date payroll totals and employee details.
Map pay types from QuickBooks Desktop to QuickBooks Online if prompted.
Complete the payroll setup by following the on-screen instructions.
Potential Issues:
Incorrect Payroll Data: Double-check payroll information to avoid employee payments and tax filing errors.
9. Set Up Payments
Create a new Payments account in QuickBooks Online:
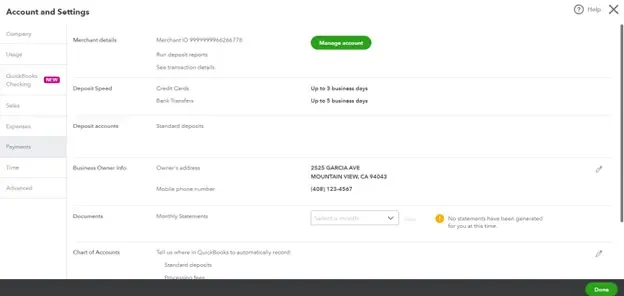
Go to Settings (gear icon) > Account and settings > Payments.
Click Learn More and then Set up Payments.
Complete the Business, Owner/Proprietor, and Bank sections.
Click Activate Payments.
Potential Issues:
Payment Setup Delays: Ensure all business and bank information is accurate for a smooth setup process.
10. Add Users
Add users and assign appropriate access levels:
Go to Settings (gear icon) > Manage users.
Click Add User and follow the prompts to enter user details.
Save the changes. New users will receive an invitation via email.
Potential Issues:
Access Issues: Ensure users have the appropriate permissions to avoid access problems.
11. Invite an Accountant
Invite your accountant to access your QuickBooks Online company:
Go to Bookkeeping > My accountant and enter their email address.
Alternatively, send an invitation to Settings (gear icon) > Manage users > Accounting firms>.
Potential Issues:
Invitation Errors: Confirm your accountant receives the invitation and can access your QuickBooks Online account.
Managing User Permissions in QuickBooks Online
After adding users, managing their permissions is essential to ensure they have the appropriate access levels.
Setting Up User Roles
Go to Settings (gear icon) > Manage users.
Select the user you want to manage and click Edit.
Assign a role (e.g., Standard User, Company Admin, etc.).
Customize permissions as needed and click Save.
Potential Issues:
Unauthorized Access: Ensure users have the correct permissions to prevent unauthorized access to sensitive information.
Integrating Third-Party Apps with QuickBooks Online
Enhance the functionality of QuickBooks Online by integrating it with third-party apps.
Popular Integrations
Payment Processors: Integrate with PayPal, Square, or Stripe.
E-commerce Platforms: Connect with Shopify, WooCommerce, or Amazon.
CRM Systems: Integrate with Salesforce or HubSpot.
How to Integrate
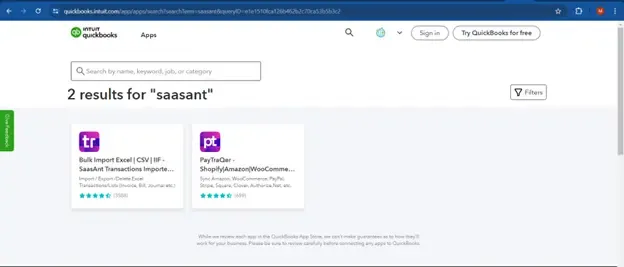
Go to Apps in QuickBooks Online.
Search for the app you want to integrate.
Follow the on-screen instructions to connect to the app.
Potential Issues:
Integration Errors: Ensure the third-party app is compatible with QuickBooks Online to avoid integration issues.
Customizing Invoices and Sales Forms
Customizing your invoices and sales forms helps maintain your brand identity.
Customizing Forms
Go to Settings (gear icon) > Custom form styles.
Select New style and choose Invoice.
Customize the template, including logo, colors, and fields.
Click Save and close.
Potential Issues:
Brand Consistency: Ensure your forms are consistent with your brand guidelines.
Setting Up Recurring Transactions
Automate regular transactions by setting them up as recurring transactions.
Creating Recurring Transactions
Go to Settings (gear icon) > Recurring transactions.
Click New and select the type of transaction (e.g., Invoice, Expense, etc.).
Enter the transaction details and set the recurrence schedule.
Click Save template.
Potential Issues:
Incorrect Scheduling: Double-check the recurrence schedule to ensure transactions occur at the correct intervals.
Utilizing QuickBooks Online Reports
Leverage the reporting capabilities of QuickBooks Online to gain insights into your business.
Running Reports
Go to Reports in QuickBooks Online.
Select the report you want to run (e.g., Profit and Loss, Balance Sheet, etc.).
Customize the report date range and filters.
Click Run report.
Potential Issues:
Data Accuracy: Ensure all transactions are entered correctly to maintain accurate reporting.
Handling Multi-Currency Transactions
If your business deals with multiple currencies, set up multi-currency support in QuickBooks Online.
Enabling Multi-Currency
Go to Settings (gear icon) > Account and settings > Advanced.
In the Currency section, click Edit.
Turn on multi-currency and click Save.
Potential Issues:
Exchange Rate Fluctuations: Regularly update exchange rates to ensure accurate transaction records.
Setting Up Projects in QuickBooks Online
Manage projects and track profitability by setting up the Projects feature.
Creating a Project
Go to Projects in QuickBooks Online.
Click New Project and enter the project name and details.
Assign transactions and time to the project to track expenses and revenue.
Potential Issues:
Tracking Accuracy: Ensure all related transactions are correctly assigned to the project for accurate tracking.
Additional Tips and Best Practices
Backup Your Data Regularly
Although QuickBooks Online automatically backs up your data, it’s a good practice to export your reports periodically for added security.
Customize Your Dashboard
QuickBooks Online offers a customizable dashboard. Tailor it to display the information most relevant to your business operations.
Explore QuickBooks Online Features
To streamline your workflow, use QuickBooks Online’s features, such as automation rules, integration with third-party apps, and advanced reporting capabilities.
Utilize QuickBooks Support
If you encounter any issues or have questions, QuickBooks Online offers comprehensive support resources, including live chat, tutorials, and a user community.
Keep Your Software Updated
Ensure you use the latest version of QuickBooks Online to benefit from new features and security updates.
FAQs
What Should I Do If My Data Didn’t Transfer Correctly?
If you notice any discrepancies in your data after migration, you may need to enter missing transactions or manually re-run the migration process. QuickBooks Online support can assist you if needed. SaasAnt offers migration assistance to help you through the migration process. You can learn more about our service on QuickBooks Migration—SaasAnt.
How Do I Import My Data to QuickBooks Online?
Use the import feature in Saasant Transactions to import data to QuickBooks Online. You can import almost all data types, such as Lists and Transactions.
How Do I Set Up a Payments Account in QuickBooks Online?
Setting up a payments account in QuickBooks Online involves connecting your bank account and completing the business, owner/proprietor, and bank sections. Follow the steps outlined in the "Set Up Payments" section above.
Can I Move My QuickBooks Desktop Company File to QuickBooks Online?
Yes, you can move your QuickBooks Desktop company file to QuickBooks Online. Follow the steps in the migration process to ensure a smooth transition.
How Do I Start Using QuickBooks Online After Migration?
After migration, follow the initial steps in this guide to verify data integrity, update company information, and set up your QuickBooks Online account. This will prepare you for entering new transactions and managing your business data efficiently.