How to Record Customer Prepayments in QuickBooks Online: Step-by-Step Guide
Recording customer prepayments is crucial for maintaining financial records and improving cash flow management. While QuickBooks Online offers a structured approach to handling prepayments, applications like SaasAnt Transactions can take this further by automating the entire process, making it seamless for businesses managing high transaction volumes.
This blog will further explain customer prepayments and how to record them in QuickBooks Online. Let’s get started!
Contents
What Are Customer Prepayments in QuickBooks Online?
How to Record Customer Prepayments in Quickbooks Online?
Managing Multi-Person Job Prepayments in QuickBooks Online
Conclusion
FAQ’s
What Are Customer Prepayments in QuickBooks Online?
Customer prepayments are the amount clients or customers pay to a business before the delivery of goods or services. Customers make these advance payments to secure their orders or as part of contractual agreements. For businesses, prepayments help manage cash flow, reduce credit risk, and provide working capital before incurring the costs of fulfilling an order.
In accounting, these payments are recorded as liabilities because they represent an obligation for the company to deliver products or services in the future. Only after providing the goods or services do these liabilities convert into revenue.
How to Record Customer Prepayments in Quickbooks Online?
Recording customer prepayments in QuickBooks Online is crucial for precise accounts receivable management for businesses. Follow the steps below to learn how to record customer prepayments in QuickBooks Online.
Step 1: Set Up a Liability Account:
Go to the 'Settings' gear icon, then select 'Chart of Accounts.'
Click 'New' to create a new account.
Name the account 'Customer Prepayments' or similar.
Choose 'Other Current Liabilities' from the Account Type dropdown.
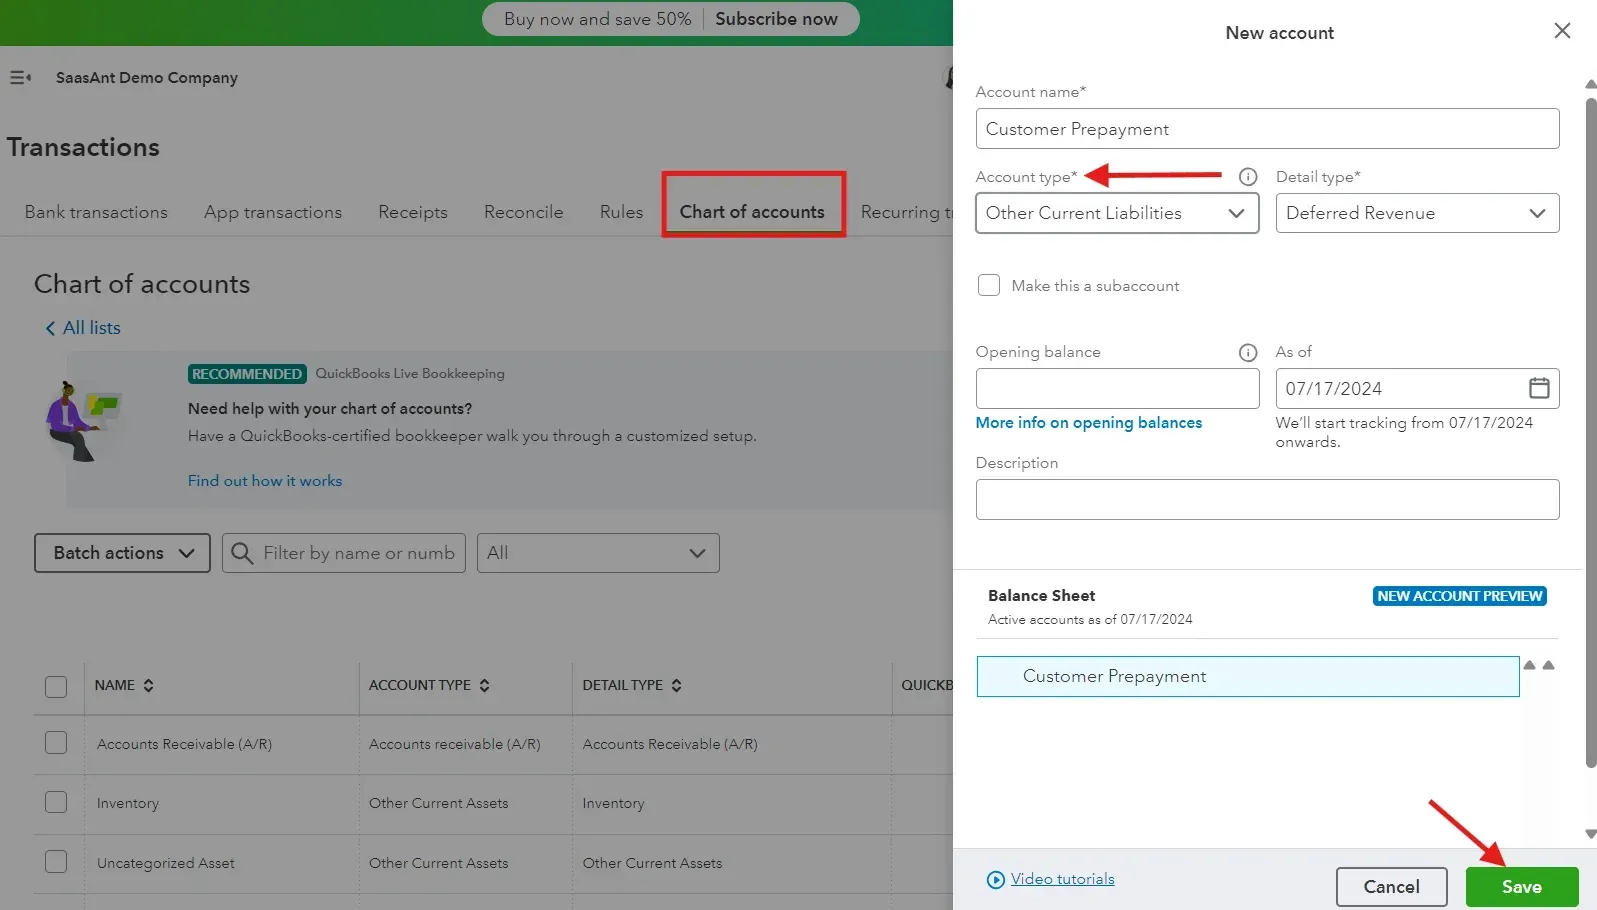
Save and Close.
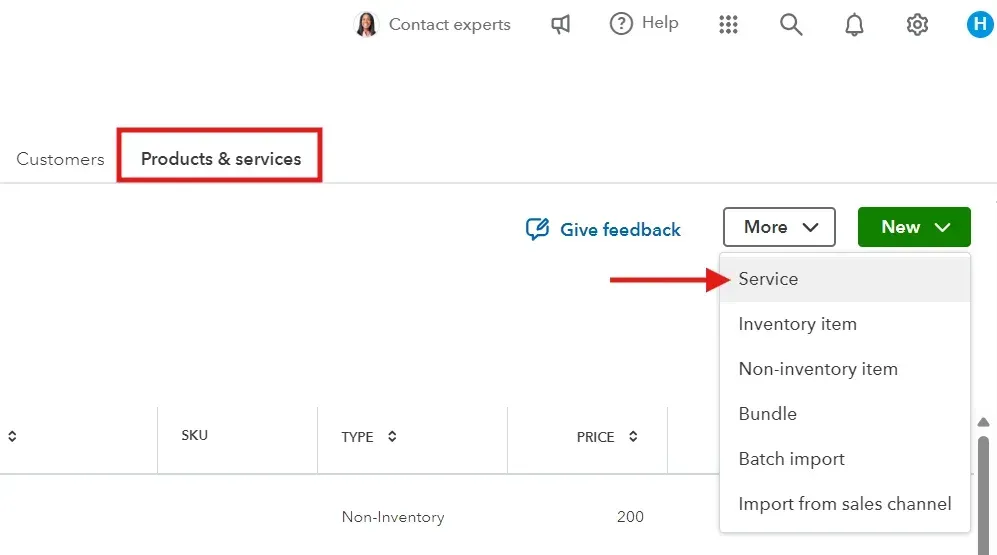
Step 2: Create a Product or Service Item for Prepayments:
Navigate to the 'Sales' menu and select 'Products and Services.'
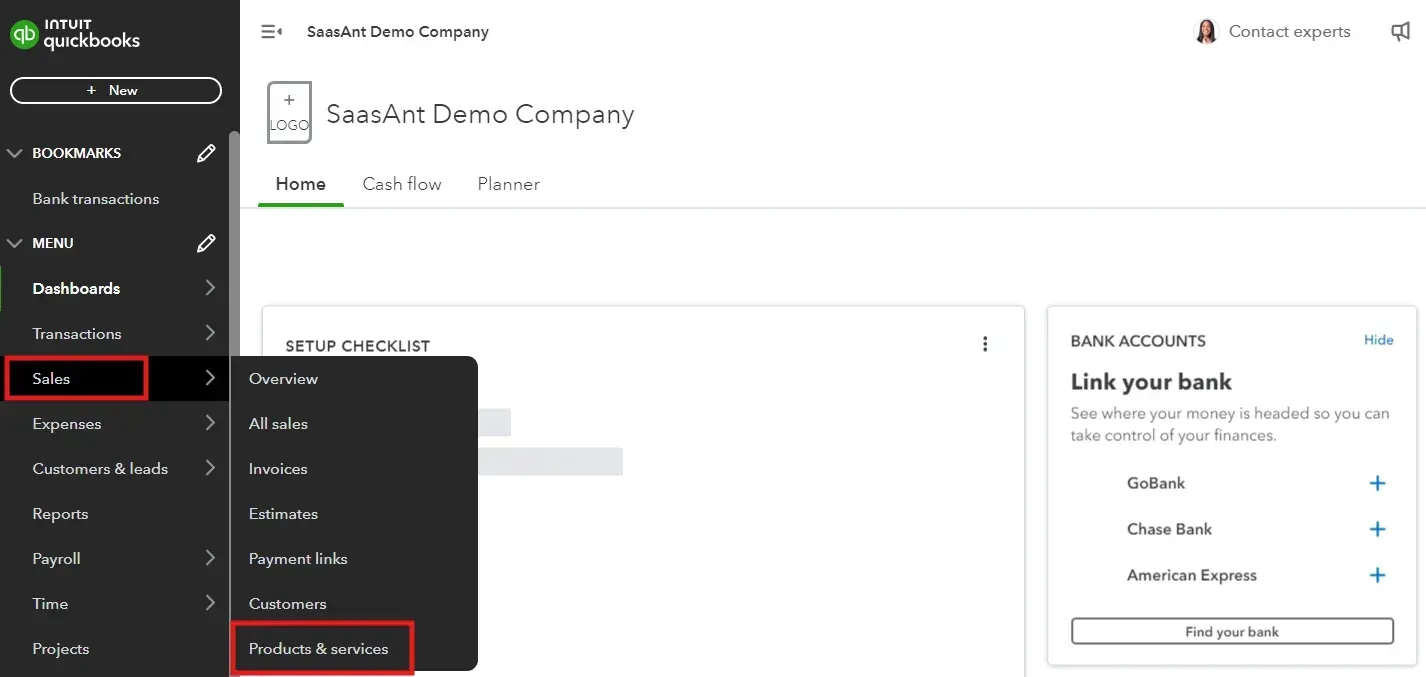
Click 'New' and choose 'Service' as the type.
Name the service 'Customer Prepayment' or similar.
In the 'Income account' option, link this service to the liability account you created earlier (e.g., Customer Prepayments).
Save and Close.
Step 3: Record the Customer Prepayment:
Click on the '+ New' button.
Select 'Sales Receipt' to enter the prepayment.
Choose the customer from the customer dropdown menu.
Select the 'Customer Prepayment' item you created under the Product/Service column.
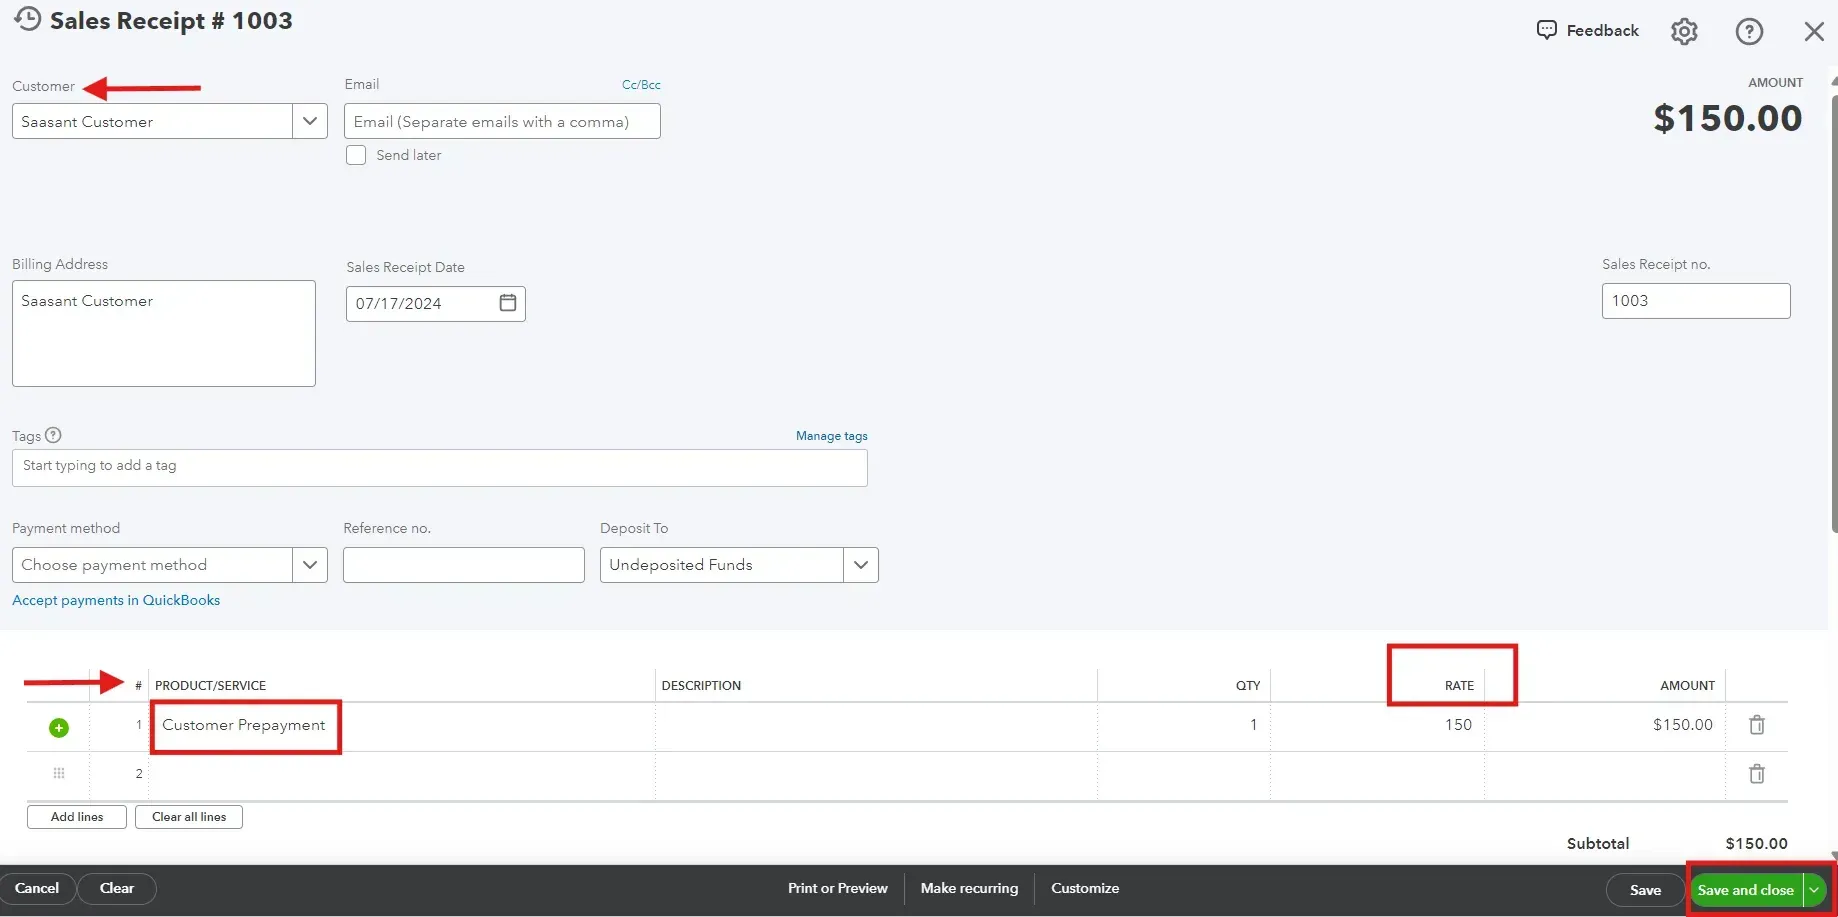
Enter the amount of the prepayment.
Verify that the payment method and the deposit to the account are correct.
Save and Close the sales receipt.
Note: Using SaasAnt Transactions, you can bulk import sales receipts, ensuring that prepayments are recorded accurately without manual data entry. Read the blog on creating and uploading sales receipts in QuickBooks Online to understand better.
Step 4: Apply the Prepayment to an Invoice:
When it’s time to invoice the customer for the sale, create an invoice as usual.
On the invoice, add the 'Customer Prepayment' item with a negative amount to apply the prepayment against the total owed.
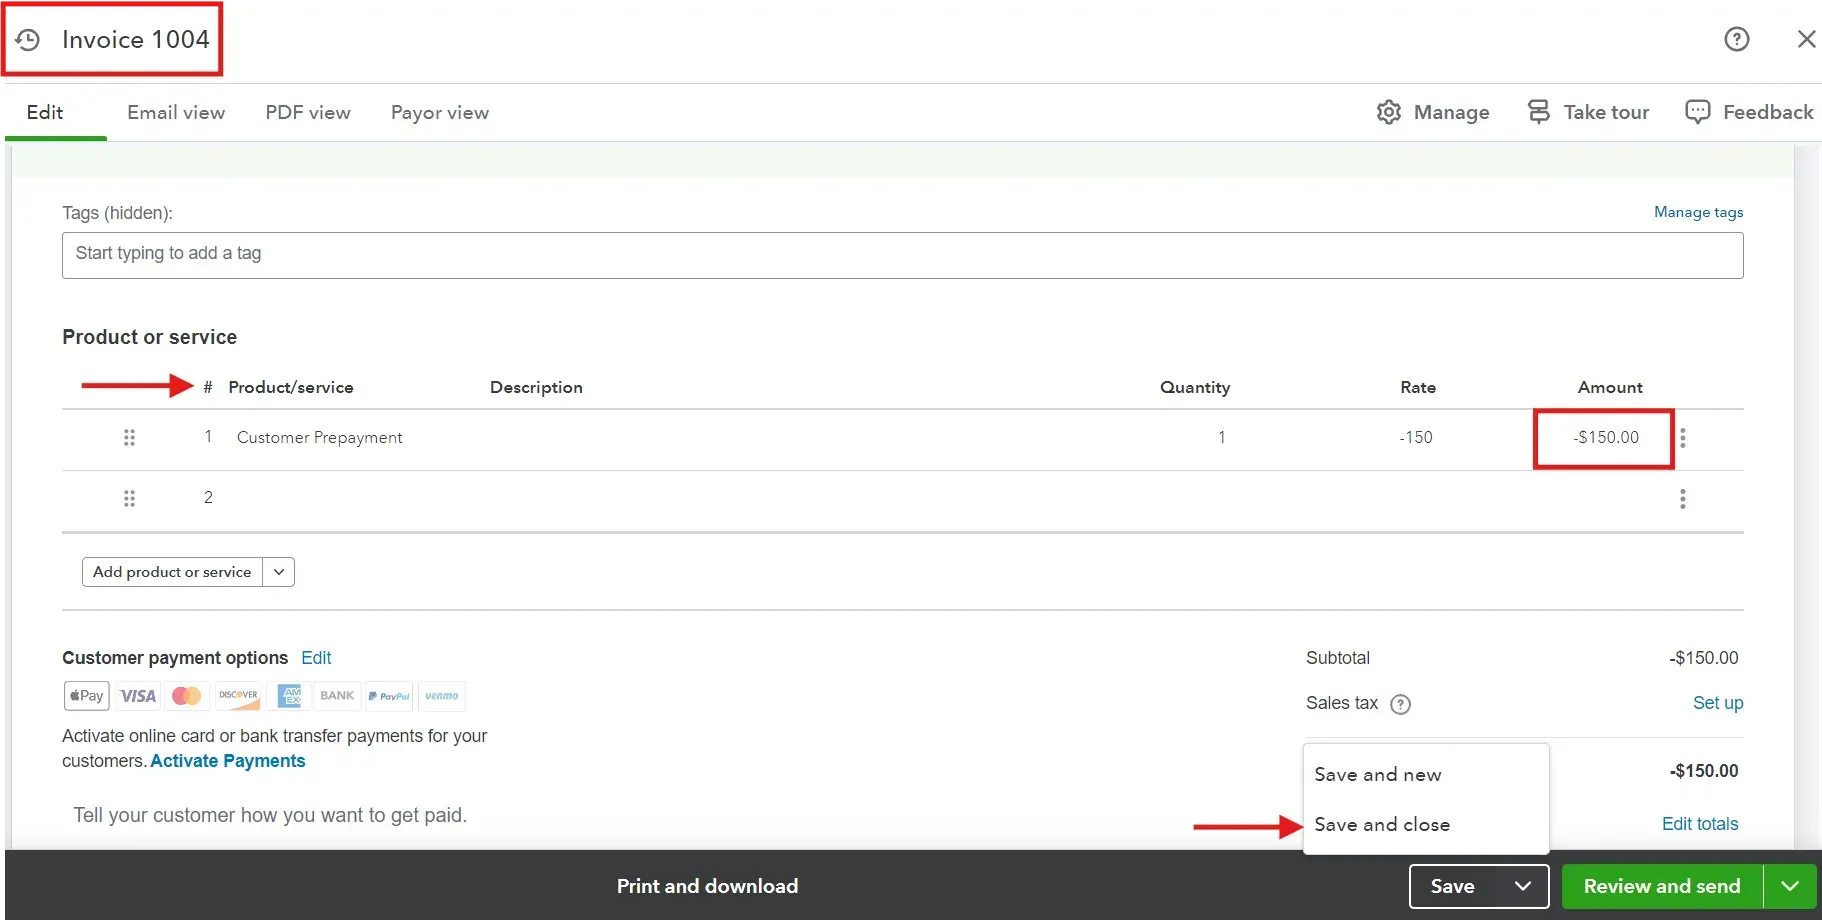
The remainder (if any) reflects what the customer still owes after applying the prepayment.
Step 5: Review and Adjust Accounts:
Review the liability account regularly to ensure prepayments are applied correctly against invoices.
Adjust any discrepancies to keep your financials accurate.
Managing Multi-Person Job Prepayments in QuickBooks Online
Recording customer prepayments in QuickBooks Online when multiple people are working on a single job involves a few additional considerations to ensure the prepayment is appropriately allocated and managed. Follow the below given steps:
Step 1: Set Up for Prepayments
First, ensure you have set up a liability account for customer prepayments as described in previous steps:
Click the Settings gear icon, select 'Chart of Accounts,' and click 'New' to create a new account. Choose 'Other Current Liabilities' as the Account Type and 'Customer Deposits' as the Detail Type.
Name the account something like 'Customer Prepayments.'
Navigate to 'Products and Services' and create a new service item named 'Customer Prepayment' that links to the liability account you created.
Step 2: Record the Prepayment
When you receive the prepayment from the customer:
Click the '+ New' button, choose 'Sales Receipt,' and enter the customer details.
Under the Product/Service section, select the 'Customer Prepayment' item you created.
Enter the prepayment amount received from the customer.
Make sure all details are correct, then save the transaction.
Step 3: Allocate Prepayment to Specific Job and Team Members
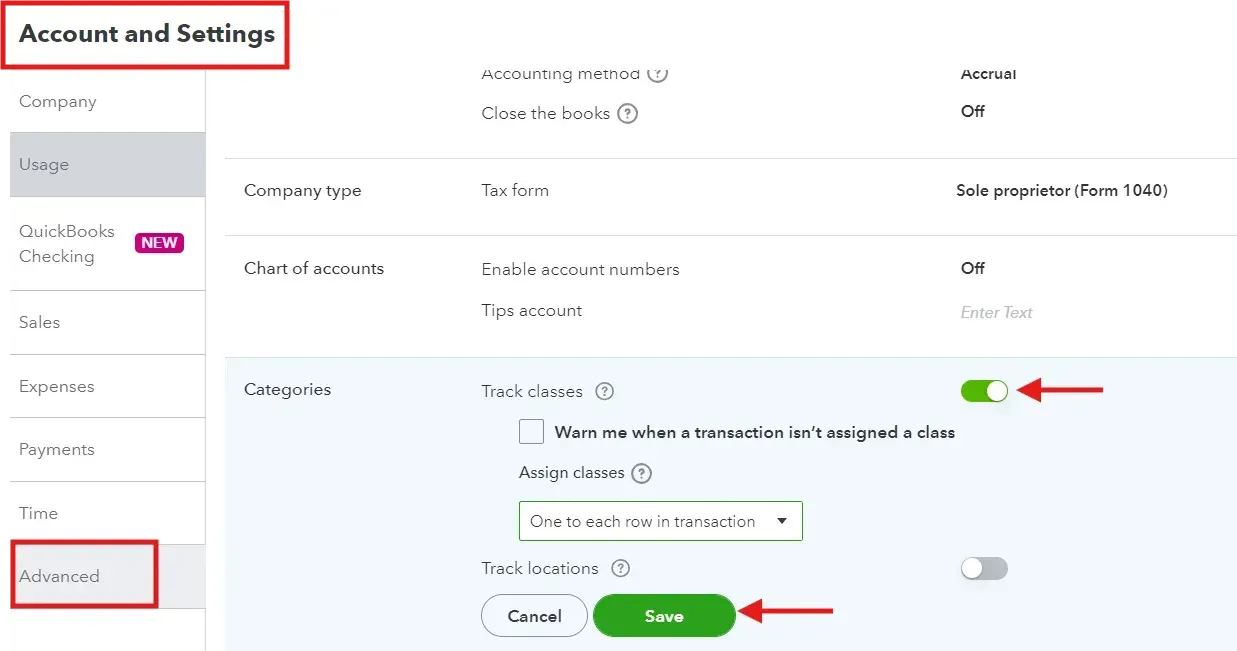
If the prepayment needs to be allocated across multiple team members working on the job, create Sub-Jobs or Use Class Tracking:
You can set up class tracking under 'Settings' by enabling Track 'Classes' and assigning classes when you apply the prepayment to invoices.
Apply a part of the prepayment to each invoice based on the work completed by the respective team member or as agreed in the job's financial planning.
Monitor the prepayment balance and apply it accurately as the job progresses. Adjust any allocations as necessary based on additional work or changes in the project scope.
Note: SaasAnt Transactions can help allocate and track these amounts efficiently using its advanced import features if you frequently manage prepayments across multiple jobs.
Step 4: Reporting and Reconciliation
Finally, regularly review the liability account and each job’s invoicing to ensure that all prepayments are accounted for correctly and that the liability is reduced as work is billed.
Conclusion
Recording customer prepayments in QuickBooks Online is crucial for maintaining financial records and enhancing cash flow management. Your business can ensure transparency and precision by setting up liability accounts for prepayments, creating specific service items, and applying these prepayments to future invoices.
Consider using SaasAnt Transactions to further simplify and automate your accounting processes. Bulk importing prepayment data to automate invoice applications ensures your records are accurate and your workflow remains efficient.
FAQ’s
How Can I Automate the Process of Recording Customer Prepayments?
SaasAnt Transactions allows you to import sales receipts and invoices into QuickBooks Online in bulk, automating the recording of customer prepayments and reducing manual data entry efforts.
How Do I Account for Customer Prepayments?
Account for customer prepayments as a liability on your balance sheet until the service or product is delivered. Once delivered, transfer the prepayment from the liability account to revenue, reflecting the fulfillment of the obligation.
How to Enter Prepaid Expenses in QuickBooks Online?
To enter prepaid expenses, create an asset account named 'Prepaid Expenses.' Record payments to this account when expenses are paid in advance. Adjust the account monthly by transferring the used portion to the appropriate expense account.
What is the Best Way to Record Prepayment Inventory in QuickBooks?
Record inventory prepayments by creating an asset account called 'Prepaid Inventory.' When inventory is received, adjust the entry by transferring the amount from 'Prepaid Inventory' to your regular 'Inventory' account, reflecting the actual inventory acquisition.
How to Record Advance Payments from Customers in QuickBooks Online?
Record an advance payment using a sales receipt. Choose the customer, select the prepayment service item linked to a liability account, and enter the amount paid. This records the payment as a liability, adjusted when services or products are delivered.
Read also
How to Categorize Cash Back Rewards in QuickBooks
How to Print Checks in QuickBooks: A Step-by-Step Guide
Importing Customers into QuickBooks Online: How to
How to Edit Bill Payments in QuickBooks