Best Practices for Optimizing Amazon Seller Finance Management Using QuickBooks
As an Amazon seller, it is essential to effectively manage your finances to ensure profitability and business growth. In 2021, astonishingly, 6.2 million Amazon sellers were identified globally by Marketplacepulse – and a whopping 1.5 million of these vendors are active participants in the world's largest online marketplace! The e-commerce giant's vast customer base and infrastructure offer excellent opportunities for sellers, but effective financial management is key to success.
Statista reports that in 2022, Amazon accounted for 37.8% of all online retail sales in the United States, and its net revenue amounted to $514 billion, making it one of the largest e-commerce companies worldwide. Therefore, understanding how to manage finances as an Amazon seller is crucial to maximize profitability and stay competitive.
Using QuickBooks can help sellers streamline their financial management and make informed decisions about their business. There are various best practices for optimizing Amazon seller finance management using QuickBooks. These include recording Amazon cash deposits as sales income, tracking Amazon sales data in QuickBooks, downloading settlement reports from Amazon, and using the Amazon Business Purchases app to track expenses.
It is also recommended to regularly check expenses, vendors, and marketplace fees in QuickBooks, as well as issuing refunds and reimbursements if necessary. Effective financial management is crucial for Amazon sellers' success, and using QuickBooks can help streamline the process. By implementing best practices such as those mentioned above, sellers can maximize profitability and stay competitive in the e-commerce marketplace.
Contents
Setting Up QuickBooks for Amazon Sellers: Best Practices and Essential Tips
Optimizing Profit with Profit First Methodology for Amazon Sellers
Recording Payments in QuickBooks: A Step-by-Step Guide for Amazon Sellers to Ensure Accurate Financial Tracking
Simple Sales Tax Management in QuickBooks for Amazon FBA Sellers: Ensuring Compliance and Minimizing Errors
Tracking Amazon Expenses in QuickBooks for Buyers: Best Practices for Managing Business Expenses and Maximizing Profits
Importing Amazon Orders into QuickBooks: Streamlining Financial Management for Amazon Sellers
Final Thoughts
FAQs
Setting Up QuickBooks for Amazon Sellers: Best Practices and Essential Tips
Setting up QuickBooks for Amazon sellers can be a challenging task, but it is essential for managing your business finances effectively. Here are some best practices and essential tips to help you set up QuickBooks for your Amazon business:
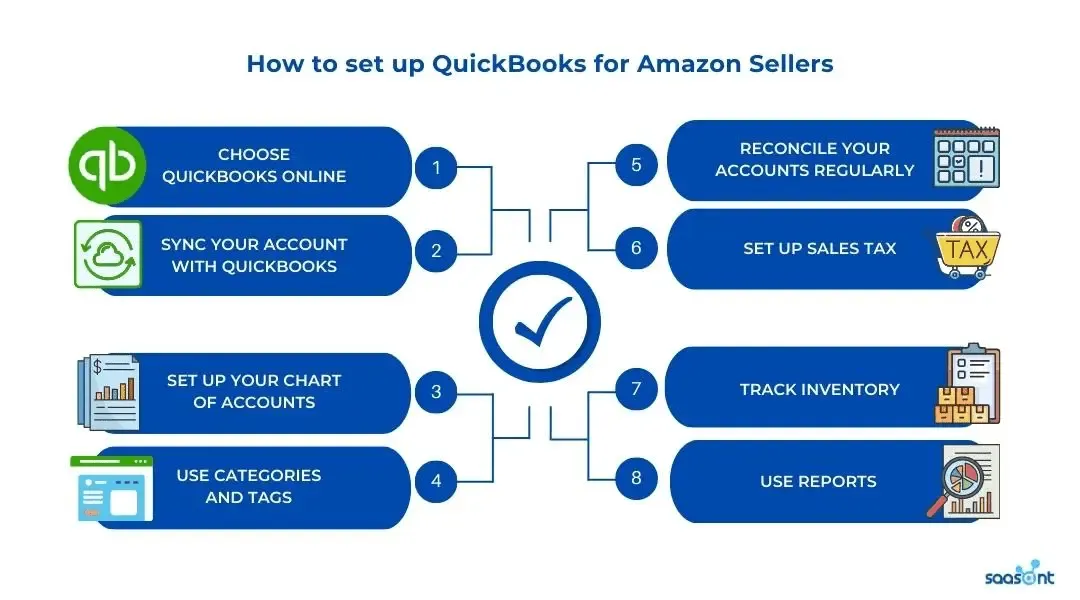
Choose QuickBooks Online
QuickBooks Online is the most recommended version for Amazon sellers due to its easy integration with Amazon. QuickBooks Online offers features such as automatic bank feeds, recurring transactions, and unlimited invoicing. You can also customize it to suit your business needs.
Sync your Amazon account with QuickBooks
You can use third-party apps like PayTraQer to automatically import your Amazon transactions into QuickBooks. These apps use APIs (Application Programming Interfaces) to connect Amazon and QuickBooks.
Set up your chart of accounts
Your chart of accounts should have separate accounts for each income source, expense category, and payment method. For example, you can create an income account for "Amazon Sales," an expense account for "Amazon Fees," and a payment method account for "Amazon Deposits." This will help you track your cash flow and understand your profitability.
Use categories and tags
You can use categories and tags to track your expenses and sales by product, location, or any other category you choose. For example, if you sell clothing on Amazon, you can create a category for "Clothing" and a tag for "Winter Collection." This will help you identify which products are selling well and which ones are not.
Reconcile your accounts regularly
You should reconcile your bank and credit card accounts with QuickBooks on a regular basis, ideally every month. This involves comparing your QuickBooks records with your bank or credit card statements to ensure that they match. If there are any discrepancies, you can identify and correct them.
Set up sales tax
As an Amazon seller, you may need to collect sales tax. QuickBooks Online can help you manage your sales tax by setting up the appropriate tax rates and tracking your sales tax liability. You can set up sales tax for each state or location where you sell on Amazon.
Track inventory
If you sell products on Amazon, it's important to track your inventory levels. QuickBooks Online offers a built-in inventory management system that can help you track your inventory levels and value. You can also set up alerts to notify you when your inventory levels are running low.
Use reports
QuickBooks offers a variety of reports that can help you understand your business performance. For example, you can use the Profit and Loss report to track your income and expenses, the Balance Sheet report to track your assets and liabilities, and the Sales by Item report to track your sales by product. You can also customize these reports to suit your needs.
Optimizing Profit with Profit First Methodology for Amazon Sellers
The Profit First methodology is a cash management system designed to help businesses optimize their profits. By subtracting a certain percentage as profit for every sale made, you can allocate the remaining funds to different accounts. The Profit First Methodology is applicable to Amazon sellers and can be integrated with QuickBooks.
For example, the Profit First formula for your Amazon Seller central could be:
15% of revenue is allocated to the "Owner's Pay" account.
30% of revenue is allocated to the "Operating Expenses" account.
55% of revenue is allocated to the "Profit" account.
This means that for every dollar of revenue, 15 cents go towards the owner's pay, 30 cents go towards operating expenses, and 55 cents go towards profit.
To implement this system in QuickBooks, you would create three new bank accounts: Owner's Pay, Operating Expenses, and Profit. You would then set up automatic transfers from your main revenue account to these three accounts based on the Profit First formula.
For example, if your business earns $100,000 in revenue, the Profit First formula would allocate $15,000 to Owner's Pay, $30,000 to Operating Expenses, and $55,000 to Profit. You would then transfer these amounts to their respective accounts.
By following the Profit First methodology, Amazon sellers can ensure that they are always making a profit and that their expenses are under control. It also encourages business owners to pay themselves a reasonable salary and prioritize profit over expenses.
Using QuickBooks to implement the Profit First methodology makes it easy to track your revenue, expenses, and profits in real-time. You can also generate reports to analyze your financial performance and make informed business decisions.
Recording Payments in QuickBooks: A Step-by-Step Guide for Amazon Sellers to Ensure Accurate Financial Tracking
As an Amazon seller, it's important to maintain accurate financial records for your business. QuickBooks is a popular accounting software that can help you keep track of your financial transactions, including payments received from Amazon.
Here's a step-by-step guide on how to record payments in QuickBooks:
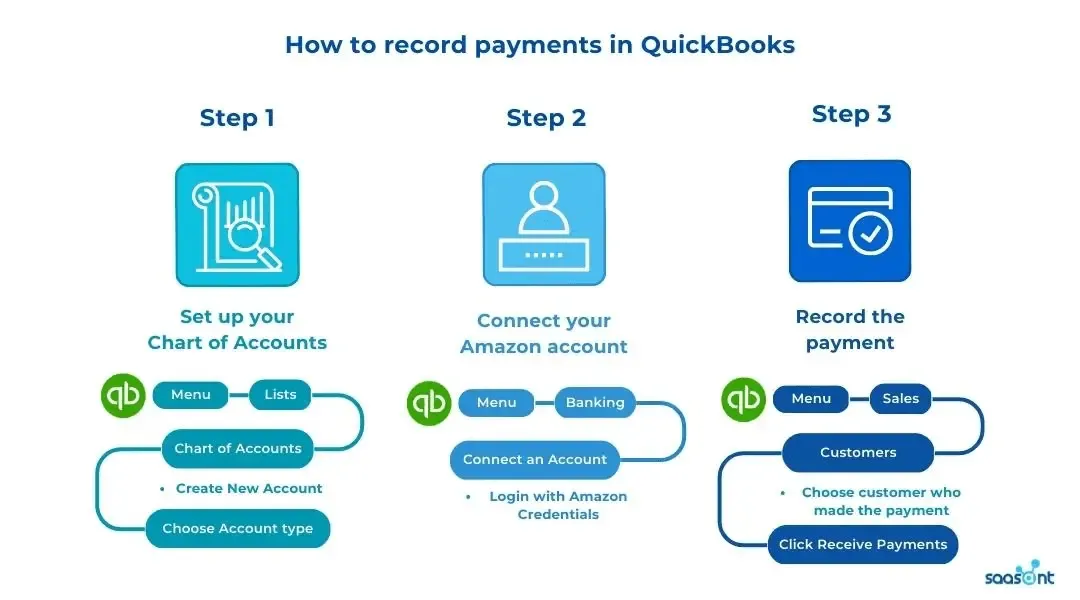
Step 1: Set up your Chart of Accounts
The Chart of Accounts is a vital feature in QuickBooks that enables users to classify their financial transactions. As an Amazon seller, you'll want to set up accounts for all your income streams, expenses, and assets. You can create a new account by navigating to the "Lists" menu and selecting "Chart of Accounts" and then clicking "New Account." From there, you can choose the account type (bank account, income account, expense account, etc.) and give it a name, number, and description.
Step 2: Connect your Amazon account
To record payments accurately in QuickBooks, you'll want to connect your Amazon account. To do this, navigate to the "Banking" menu and select "Connect an Account." From there, search for Amazon and enter your login credentials. Once your account is connected, QuickBooks will automatically download and categorize your Amazon transactions, making it easier to track your sales and fees.
Step 3: Record the payment
Recording payments in QuickBooks is straightforward. To get started, navigate to the "Sales" menu and select "Customers." From there, choose the customer who made the payment and click "Receive Payment." You can enter the payment amount, select the payment method, and choose the account that should be associated with the payment. If you have multiple payments to record at once, you can select them all and record them in bulk by clicking "Batch Actions" and choosing "Receive Payments."
By following these three steps, Amazon sellers can ensure accurate financial tracking in QuickBooks. With a properly set-up Chart of Accounts and connected Amazon account, recording payments is easy and efficient, allowing you to focus on growing your business.
Simple Sales Tax Management in QuickBooks for Amazon FBA Sellers: Ensuring Compliance and Minimizing Errors
As an Amazon FBA seller using QuickBooks, it's important to understand the mechanics of how sales tax is calculated and managed within the software. When a sale is made through Amazon, the order details are transmitted to QuickBooks through the Amazon Sales Channel integration. QuickBooks then uses the tax code assigned to the product to calculate the sales tax amount.
Tax codes in QuickBooks are used to identify which products are taxable and which are exempt. Tax codes can be set up to apply to specific products or product categories, and they can be set to include or exclude shipping charges. For example, a seller might set up a tax code for "clothing" that applies to all clothing products sold on Amazon, but excludes shipping charges.
To ensure compliance with sales tax regulations, it's important for Amazon FBA sellers to understand the sales tax rules in each state where they have sales tax nexus. This includes understanding which products are taxable and which are exempt, as well as the applicable tax rates. Amazon FBA sellers should also keep track of any changes to sales tax laws and update their tax codes and rates accordingly.
One way to minimize errors in sales tax management is to use Intuit’s sales tax automation tool that integrates with QuickBooks. These tools can automatically calculate the correct sales tax amount based on the seller's tax codes and rates, and apply it to the sale in QuickBooks. This can reduce the risk of errors that can occur with manual data entry.
Managing sales tax in QuickBooks for Amazon FBA sellers requires an understanding of how tax codes are set up and used, as well as knowledge of the sales tax rules in each state where the seller has nexus. By ensuring compliance and minimizing errors, sellers can avoid costly penalties and focus on growing their business.
Tracking Amazon Expenses in QuickBooks for Buyers: Best Practices for Managing Business Expenses and Maximizing Profits
In tracking Amazon expenses in QuickBooks for buyers, it's important to understand the best practices for managing business expenses and maximizing profits. QuickBooks provides a robust platform for tracking expenses, but it's essential to set it up correctly and follow best practices to ensure accurate financial reporting.
First, it's important to understand the different types of expenses that can be incurred when buying products on Amazon. These can include the cost of goods sold (COGS), shipping fees, storage fees, Amazon fees, and other expenses such as advertising and promotions. Each type of expense should be tracked separately in QuickBooks to provide a clear picture of the overall financial health of the business.
To track COGS, buyers should use the inventory tracking feature in QuickBooks. This allows buyers to track the cost of the products they purchase on Amazon and the quantity of each item they have on hand. QuickBooks can also be set up to automatically adjust inventory levels when items are sold, making it easy to track COGS in real-time.
Shipping fees and other expenses such as advertising and promotions can be tracked using expense accounts in QuickBooks. Each expense account should be set up with a clear description of the type of expense it represents. For example, a buyer might set up an expense account for "Amazon Shipping Fees" and another for "Advertising and Promotions."
Amazon fees, such as referral fees and FBA fees, can be tracked using the "other current liability" account in QuickBooks. This account represents money owed to Amazon and can be reconciled against the seller's Amazon account to ensure accuracy.
To maximize profits, buyers should regularly review their expenses in QuickBooks and look for ways to reduce costs. For example, a buyer might analyze their shipping fees and identify ways to negotiate better rates with their shipping provider or switch to a more cost-effective option.
You need to have a thorough understanding of the different types of expenses that can be incurred and how to track them in QuickBooks, else you forfeit optimizing your finances.
Importing Amazon Orders into QuickBooks: Streamlining Financial Management for Amazon Sellers
QuickBooks provides a seamless integration with the Amazon Marketplace, allowing sellers to import their orders directly into the software. This can save time and reduce errors associated with manual data entry.
To set up the Amazon Sales Channel integration in QuickBooks, sellers must first have an Amazon Professional Seller account. Once the account is set up, sellers can connect their Amazon account to QuickBooks by following the step-by-step instructions provided in the software.
Once the Amazon account is connected to QuickBooks, sellers can set up the integration to automatically import orders at regular intervals. The orders will be imported into QuickBooks as sales receipts, which can be easily reviewed and reconciled against the seller's Amazon account.
It's important for sellers to understand the different types of transactions that can be imported from Amazon into QuickBooks. These include sales receipts, refunds, and returns. Sales receipts represent the income received from Amazon sales, while refunds and returns represent money owed to customers.
To properly track refunds and returns in QuickBooks, sellers should set up a "refund" or "return" item in their product or service list. This item should be set up as a negative amount to represent the money owed to the customer. When a refund or return is processed through Amazon, the seller can create a credit memo in QuickBooks using the "refund" or "return" item to accurately track the transaction.
It's also important for sellers to properly track Amazon fees and expenses in QuickBooks. This can be done by setting up expense accounts for each type of fee, such as referral fees or FBA fees. Sellers can also track expenses related to Amazon sales, such as shipping costs, by setting up an expense account for each type of expense.
Final Thoughts
Amazon sellers who use QuickBooks for ecommerce accounting can greatly benefit from implementing best practices to optimize their financial operations. By setting up the software correctly, accurately tracking expenses and income, and regularly reviewing financial reports, sellers can gain valuable insights into the financial health of their business.
One best practice is to track expenses accurately, including all Amazon fees, shipping costs, and other expenses related to sales. This can be done by setting up expense accounts in QuickBooks for each type of expense, making it easy to see where money is being spent and identify areas where costs can be reduced.
Also, it is important to regularly review financial reports to gain insights into the profitability of the business. QuickBooks provides a range of reports, including profit and loss statements, cash flow statements, and balance sheets. By regularly reviewing these reports, sellers can identify trends and make informed decisions about their business operations.
Finally, it's important for sellers to stay up-to-date with changes to Amazon's policies and fees. This can have a significant impact on the financial health of the business, so it's essential to stay informed and adjust financial operations accordingly.
Optimizing finance management using QuickBooks can help Amazon sellers make informed decisions, reduce costs, and maximize profits. By implementing best practices, sellers can ensure accuracy in financial reporting and gain valuable insights into the financial health of their business.
FAQs
Amazon Quickbooks Integration
The integration between Amazon and QuickBooks allows Amazon sellers to import their orders directly into QuickBooks, which can save time and reduce errors associated with manual data entry. The integration is set up by connecting the Amazon account to QuickBooks and importing orders as sales receipts.
Sellers must properly track Amazon fees and expenses in QuickBooks by setting up expense accounts for each type of fee. Using QuickBooks to manage Amazon finances provides a more efficient and accurate way of managing financial data, which can save time and provide valuable insights into the financial health of the business.
Quickbooks for Amazon FBA
QuickBooks is a comprehensive accounting software that can be utilized by Amazon FBA sellers to efficiently manage their finances. By setting up accounts to track FBA fees, shipping costs, and other expenses related to FBA sales, sellers can ensure compliance with tax regulations and gain valuable insights into the profitability of their business.
QuickBooks can also be integrated with Amazon to import orders and track sales, providing an accurate view of income and expenses. Regularly reviewing financial reports can help sellers make informed decisions to maximize profits and streamline their operations.
Xero vs Quickbooks for Amazon FBA
Xero and QuickBooks are both powerful accounting software options for Amazon FBA sellers. Both provide features that can help sellers manage income and expenses, track inventory, and generate financial reports.
Xero is a cloud-based accounting software that is known for its user-friendly interface and robust inventory management capabilities. It integrates with a wide range of apps and services, making it easy for sellers to automate tasks and streamline their operations.
QuickBooks, on the other hand, is a more established software with a long track record of reliability and customer support. It provides a range of features that can help sellers manage finances, including customizable templates for invoicing and financial reports.
When deciding between Xero and QuickBooks for Amazon FBA, it's important to consider factors such as cost, ease of use, and features. Xero may be a better option for sellers who prioritize inventory management and automation, while QuickBooks may be a better fit for those who prioritize reliability and customer support.
Ultimately, both Xero and QuickBooks are excellent options for Amazon FBA sellers, and the decision will depend on the individual needs and preferences of the seller.
How to create a Quickbooks invoice for Amazon sale?
To create a QuickBooks invoice for an Amazon sale, follow these steps:
Log in to your QuickBooks account and navigate to the "Customers" tab.
Click on "Create Invoice" to create a new invoice.
Select the Amazon customer who made the purchase from the "Customer" drop-down menu.
In the "Product/Service" section, enter a description of the product or service sold, along with the quantity and price.
Add any applicable taxes or fees to the invoice.
If applicable, add any discounts or promotional codes in the "Discount" field.
Enter any shipping and handling charges in the "Shipping" field.
Save the invoice and send it to the customer via email or mail.
It's important to note that Amazon sales should be entered as sales receipts in QuickBooks, rather than invoices. To do this, navigate to the "Customers" tab and click on "Create Sales Receipt." From there, follow the same steps as above to enter the sale details. By properly tracking Amazon sales in QuickBooks, sellers can stay on top of their finances and ensure compliance with tax regulations.
Amazon receipts to Quickbooks
Amazon receipts can be imported into QuickBooks by using a third-party app or by manually entering the receipt details. Many third-party apps are available that can automate the receipt import process and minimize errors. These apps can be easily integrated with QuickBooks, and allow sellers to import Amazon receipts directly into their accounting software.
Manually entering receipt details is also an option, but can be time-consuming and prone to errors. By importing Amazon receipts into QuickBooks, sellers can track their expenses accurately, and ensure that all expenses are accounted for, which is crucial for tax compliance and financial planning.
Amazon business purchases app
The Amazon Business Purchases app is an intelligent and straightforward way to get your purchases from Amazon Business into QuickBooks. With a direct connection, the app will automatically retrieve your orders during overnight refreshes, displaying them in QuickBooks for further review and itemization.
You'll be able to see every detail regarding each transaction; such as fee breakdowns of items you purchased along with the ability to categorize expenses individually. This application reduces manual data entry, giving you more control over how business expenses are categorized - all while eliminating time spent hovering between both applications!
With the app, all Amazon Business purchases can be easily and quickly imported into QuickBooks for reviews and reconciliations. You can gain comprehensive insights and understand your expenses with precise product descriptions, item costs, and transaction fees in detail. In addition, it enables you to streamline categorization & reconciliation processes. You can categorize each purchase accurately while matching them to bank transactions effortlessly!