How To Undo a Reconciliation In QuickBooks: A Step-by-Step Guide
Reconciliation verifies that your QuickBooks records match your bank and credit card statements exactly. When transactions are modified, deleted, or cleared incorrectly, your balances will mismatch, requiring you to undo a reconciliation or adjust specific entries.
This guide provides step-by-step instructions for unreconciling transactions in QuickBooks Online, QuickBooks Online Accountant, and QuickBooks Desktop, along with troubleshooting methods for balance discrepancies.
table-of-contents
Undoing Reconciliations in QuickBooks Online
Standard QuickBooks Online subscriptions do not have a automated tool to undo an entire reconciliation period. You must either revert transactions individually or have a QuickBooks Online Accountant user undo the period for you.
Reversing Individual Transactions (Standard Users)
Click the Gear icon (⚙️) and select Chart of Accounts.
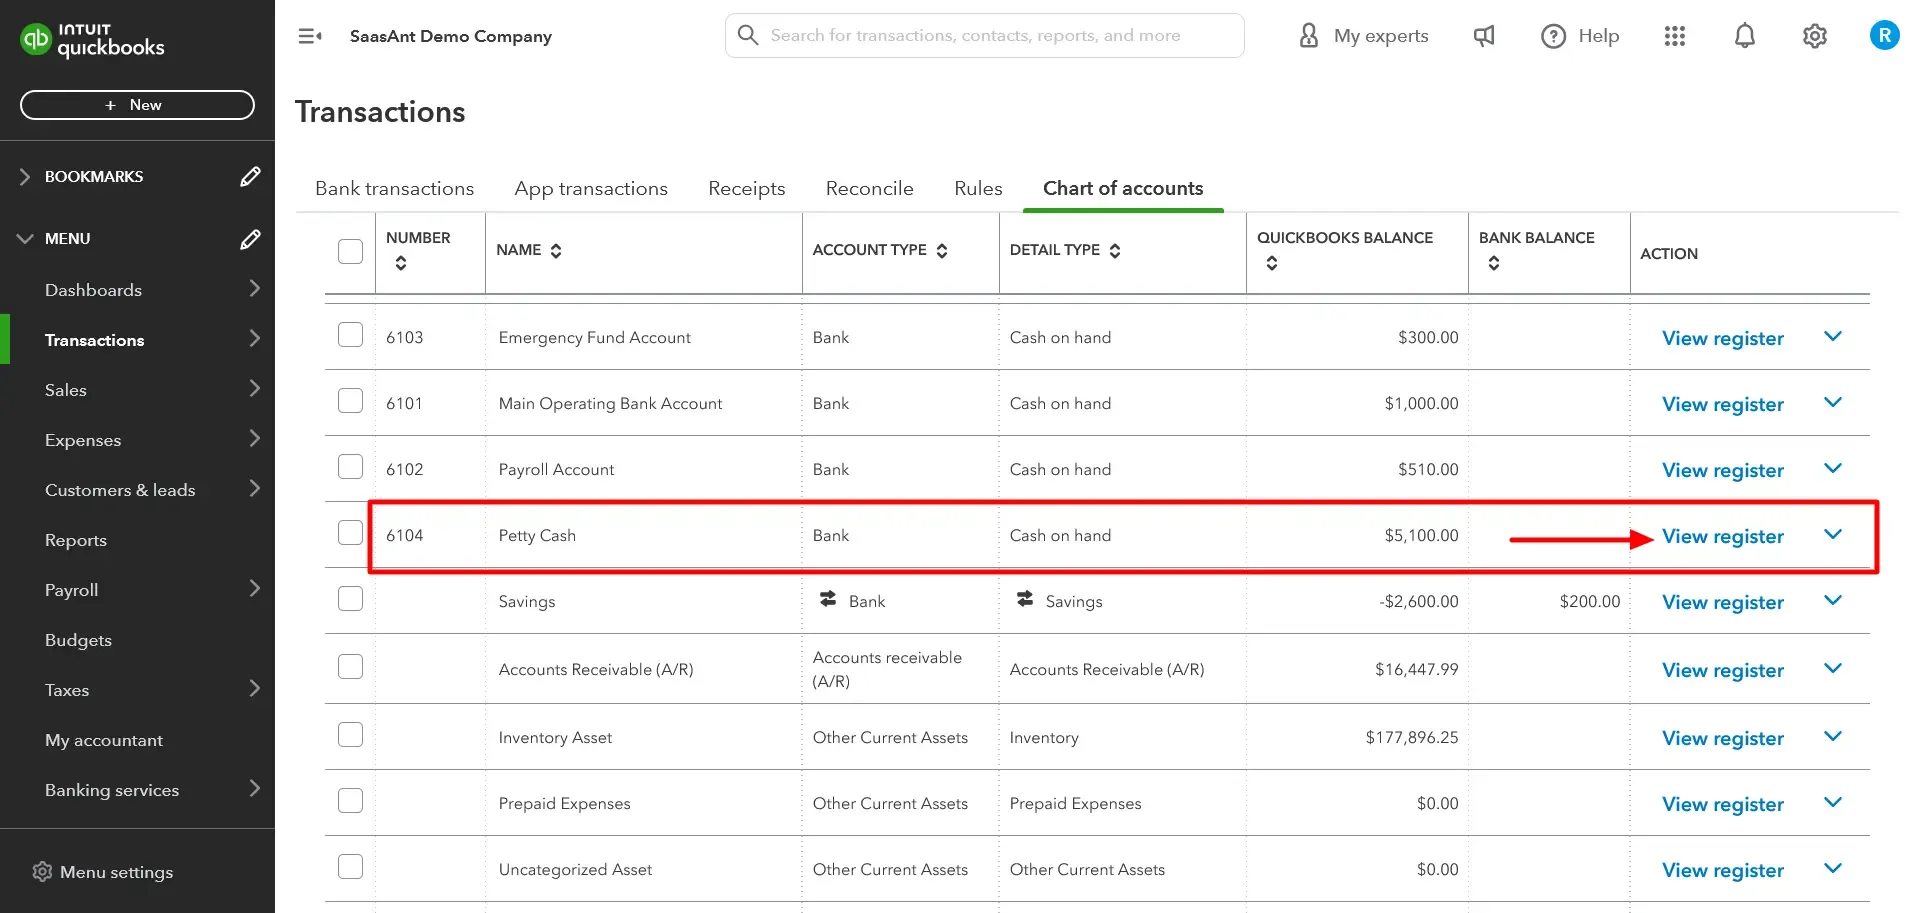
Locate the bank or credit card account and click View Register in the Action column.
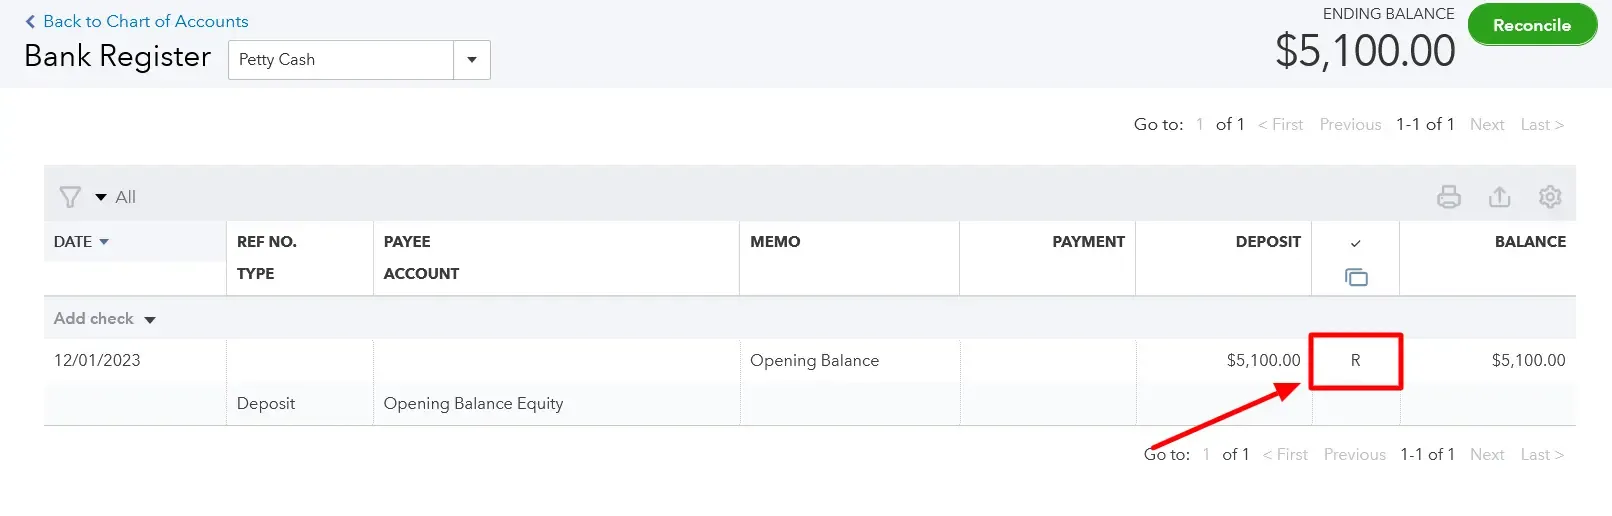
Find the transaction you need to change and look at the Reconciliation Status column (indicated by a checkmark icon header).
Click the status field repeatedly to cycle through the options:
Blank: Unreconciled
C: Cleared
R: Reconciled
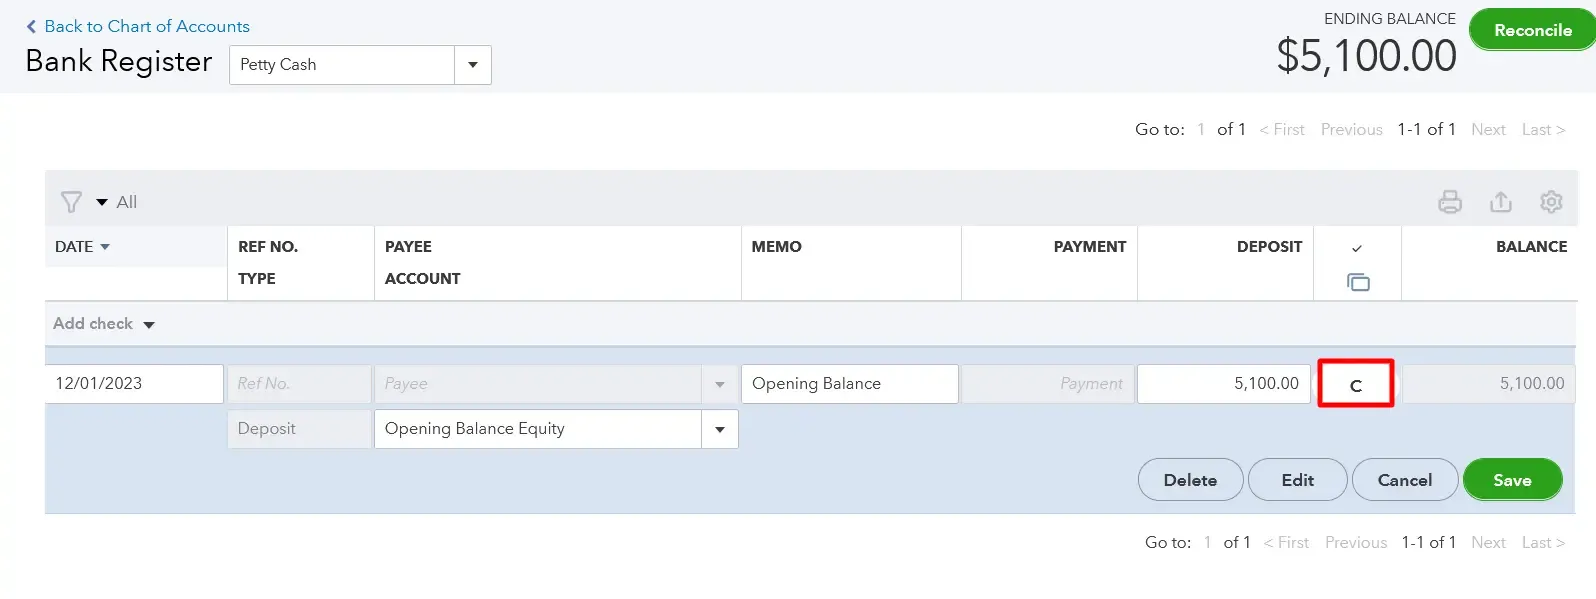
Set the status to Blank or C, then click Save.
Confirm the change if a warning prompt appears.
Undoing an Entire Period (Accountant View Only)
If you use QuickBooks Online Accountant, you can undo a full monthly reconciliation at once:
Open the client’s company file from your Accountant dashboard.
Go to Transactions (or Accounting) and select Reconcile.
Click History by Account in the top-right corner.
Select the target account and date range to locate the reconciliation period.
In the Action column, click the dropdown arrow next to View Report and select Undo.
Click Yes to confirm the deletion of that reconciliation period.
Undoing Reconciliations in QuickBooks Desktop
QuickBooks Desktop (Pro, Premier, or Enterprise) allows you to undo the most recent reconciliation period in a single step.
Open the Banking menu and select Reconcile.
In the Reconcile window, select the appropriate bank or credit card account.
Click Undo Last Reconciliation.
Review the backup prompt, then click Continue to reverse the period.
Note: Ensure you've opened your client's company file from QuickBooks Online Accountant to see the Undo option.
Resolving Reconciliation Discrepancies in QuickBooks Online
If your beginning or ending balances do not match your bank statement, use these troubleshooting checklists to locate the errors.
Troubleshooting in QuickBooks Online
Verify the Beginning Balance: If the opening balance changed, someone likely edited a previously reconciled transaction in the register. Run a Reconciliation Discrepancy Report to view modified entries.
Check the Ending Balance Entry: Ensure you typed the correct statement ending balance in the initial setup window. You can edit this amount by clicking Edit Info in the top right of the reconciliation screen.
Match Combined Transactions: If your bank statement lists a single deposit that reflects multiple combined customer payments, ensure those payments are processed through the Undeposited Funds account and deposited as a single batch in QuickBooks.
Identify Missing or Unmatched Entries:
Add missing bank transactions manually or add them from your live bank feeds.
Delete or exclude duplicate or unmatched QuickBooks entries that do not appear on your physical bank statement.
Troubleshooting in QuickBooks Desktop
When an account fails to balance in QuickBooks Desktop, use the platform's automated discrepancy tools:
Go to the Reports menu, select Banking, and choose Reconciliation Discrepancy. Select your account to see transactions that changed since the last reconciliation.
Go to Reports > Banking > Missing Checks to scan for gaps in check numbers or missing entry sequences.
Check for manual adjustments by opening the Chart of Accounts and reviewing the Reconciliation Discrepancies expense account to see if past errors were forced to balance using journal entries.
Step-by-Step Guide to Fixing Reconciliation Issues in QuickBooks Online
Step 1: Review Opening and Beginning Balances
Ensure accuracy before proceeding.
Step 2: Verify Entered Ending Balance
Check and edit the ending balance in the ‘Reconciliation Window.’
Step 3: Combine Multiple Transactions
Consolidate transactions in QuickBooks if your bank treated them as a single record.
Step 4: Eliminate Known Correct Transactions
Mark transactions on your bank statement that match QuickBooks entries.
Step 5: Add Missing Transactions
Enter missing transactions in QuickBooks based on your bank statement.
Step 6: Review and investigate unmatched transactions
Review and delete transactions in QuickBooks that are not present on your bank statement.
Step 7: Address Slightly Off Transactions
Consult your accountant for transactions with minor discrepancies.
Step 8: Check for Financial Institution Mistakes
Investigate potential errors from the bank or credit card company.
Step 9: Finish Reconciling
After resolving discrepancies and balancing your accounts, you can confidently complete the reconciliation process in QuickBooks Online.
Step-by-Step Guide to Fixing Reconciliation Issues in QuickBooks Desktop
Step 1: Review Opening and Beginning Balances
Ensure accuracy in your opening and beginning balances before proceeding.
Step 2: Examine Changed, Deleted, or Added Transactions
Run a Reconciliation Discrepancy Report:
Locate it in the ‘Reports’ menu under Banking, then ‘Reconciliation Discrepancy.’
Identify and address any discrepancies, consulting with the individual who made changes.
Run a Missing Checks Report:
Access it through the Reports menu under Banking, then Missing Checks.
Review the report for any transactions, not on your bank statement.
Run a Transaction Detail Report:
In ‘Custom Reports’ under the ‘Reports’ menu, select ‘Transaction Detail.’
Filter by the account and review transactions between the earliest and last reconciliation dates.
Step 3: Check for Reconciliation Adjustments
Navigate to the ‘Lists’ menu, open ‘Chart of Accounts,’ and examine the ‘Reconciliation Discrepancies’ account.
Ensure accurate adjustments.
If adjustments conflict with corrections, resolve the conflict.
Finalizing the Reconciliation:
After addressing the issues, proceed to finish reconciling your accounts.
Accelerating Cleanup with Bulk Tools
Correcting reconciliation errors manually can be time-consuming when dozens of transactions are affected. If you need to fix data entry errors across multiple dates, you can use automated data management tools like SaasAnt Transactions.
Instead of editing transactions one by one in the register, these tools allow you to:
Bulk-delete duplicate imports that are causing balance inflation.
Export, clean, and re-import transactions with corrected dates, amounts, or account categories.
Re-upload large sets of cleared data directly into QuickBooks to align your register quickly with historical bank statements.
Wrap Up
In conclusion, QuickBooks provides a user-friendly solution for reconciling and unreconciling transactions, ensuring the accuracy and consistency of your business accounts. The ability to undo reconciliations is crucial for correcting errors, adjusting balances, and maintaining precise financial records.
Whether using QuickBooks Online or Desktop versions like Pro or Premier, the step-by-step guides ensure a smooth unreconciliation process. From adjusting individual transactions to utilizing the 'Undo Last Reconciliation' button, QuickBooks empowers businesses to navigate financial intricacies easily.
Proactively identifying discrepancies before undoing reconciliations is a key takeaway, ensuring a thorough understanding of errors and preventing future hiccups. QuickBooks continues to be a beacon of efficiency in the accounting landscape, allowing businesses to operate confidently in their financial accuracy.
FAQs
1. Can I undo a full reconciliation period in QuickBooks Online without an accountant account?
No. Standard QuickBooks Online user accounts must manually change the status of each individual transaction from "R" to blank in the register. Only a user logged in through QuickBooks Online Accountant has the batch "Undo" tool.
2. What happens to my financial statements when I undo a reconciliation?
Undoing a reconciliation does not delete your transactions; it simply unlocks them from that specific historical period. However, if you delete or modify the amounts of those transactions afterward, it will alter your past profit and loss statements and balance sheets.
3. Why is my beginning balance wrong when starting a new reconciliation?
This occurs when a transaction that was successfully reconciled in a prior month is edited, deleted, or changed to a different account. QuickBooks updates the beginning balance dynamically based on all transactions marked with an "R" status in your ledger.
Tags
Read also
Recurring Transactions in QuickBooks Online - Detailed Guide
How to Edit Multiple Transactions in QuickBooks Online
How to Delete Multiple Transactions in QuickBooks Online