How to Categorize Transactions in QuickBooks
You could be looking for how to categorize transactions in QuickBooks Online to organize your financial data, improve your financial reporting and tax preparation, or maybe for budgeting purposes. This is a critical task because you have to assign a specific expense or income category to each transaction, and it could be time-consuming. You can always use an application like SaasAnt Transactions to import transactions into QuickBooks. On that note, SaasAnt is CPA-recommended and has a 5-star rating in the QuickBooks App Store.
This article will walk you through how to categorize transactions in QuickBooks to maintain accurate financial records and generate meaningful reports. This article will also show you how to import data into QuickBooks as well.
Simplify Transaction Management with SaasAnt Transactions
SaasAnt Transactions simplifies importing transactions into QuickBooks from various file formats, including XLS, XLSX, CSV, and IIF. It also allows you to convert PDF files to one of the supported formats. With features like automated imports via Email, FTP/SFTP, and Zapier, you can schedule imports according to your preferences. Additionally, SaasAnt Transactions offers advanced filtering for exporting, as well as bulk editing and bulk deleting capabilities. If needed, you can easily use the rollback feature to undo any changes.
Contents
How to Categorize the Transactions in QuickBooks Online:Step-By-Step Guide
How to Categorize Transactions in QuickBooks Desktop:Step-By-Step Guide
How to import transactions into QuickBooks Online
Understand Account Types and Categories
Before you start categorizing transactions, it's essential to have a clear understanding of the different account types and categories in QuickBooks. Account types typically include assets, liabilities, equity, income, and expenses. Each account type has specific subcategories that further classify transactions. For example, expense categories include office supplies, rent, utilities, and travel expenses.
Review Transactions
The first step in categorizing transactions is to review and analyze them. This step involves going through your bank statements, receipts, and other financial documents to identify the purpose and nature of each transaction. Note essential details such as dates, payees, amounts, and relevant memos or descriptions.
How to Categorize the Transactions in QuickBooks Online:Step-By-Step Guide
Step 1: Accessing the Transaction List
Log in to your QuickBooks Online account. Once you’ve logged in, select the ‘Booking’ option from the left-hand panel of the home screen.
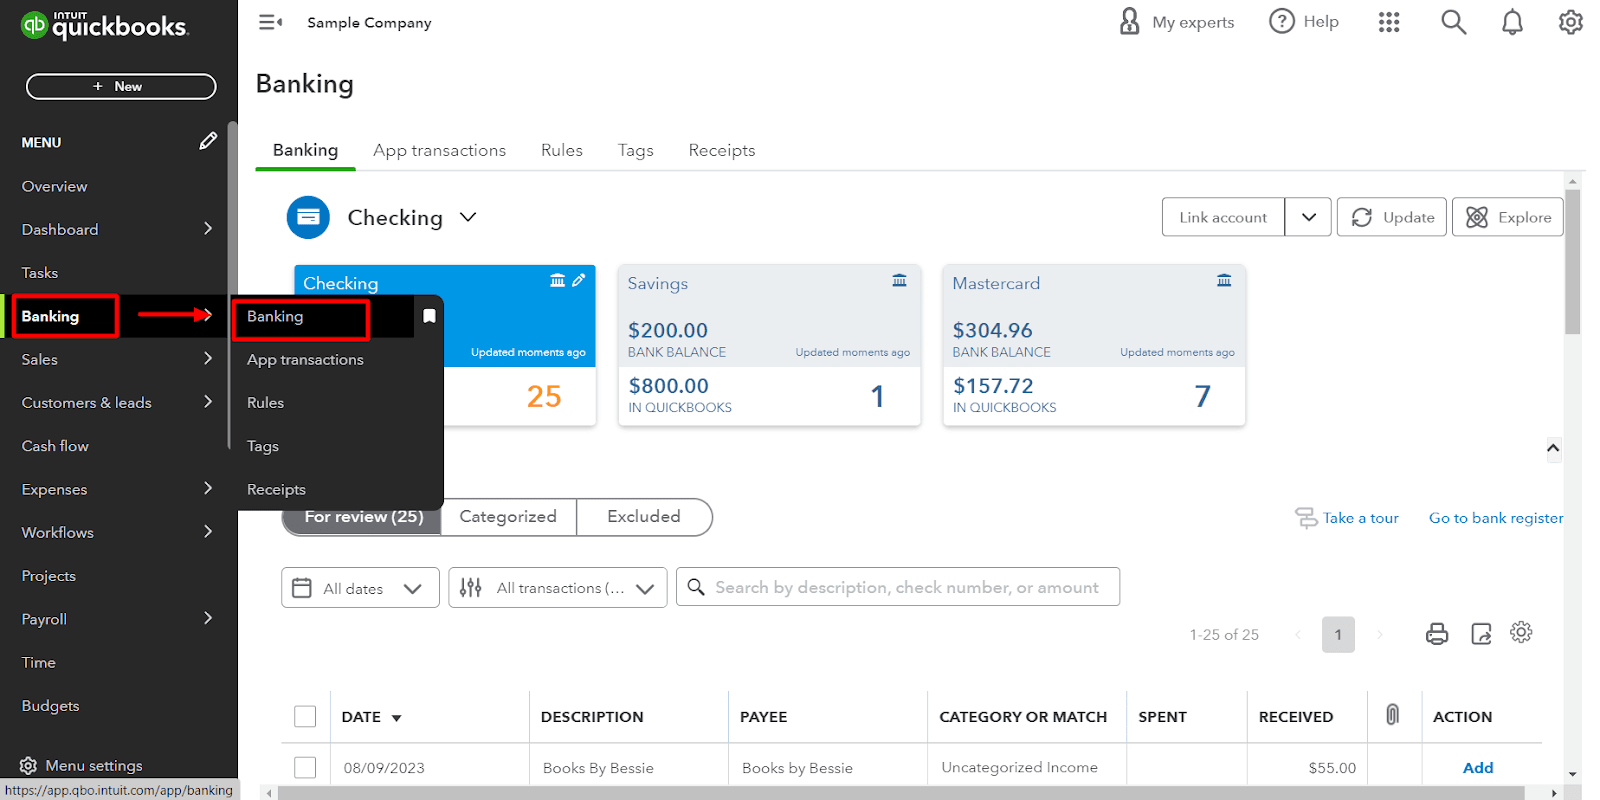
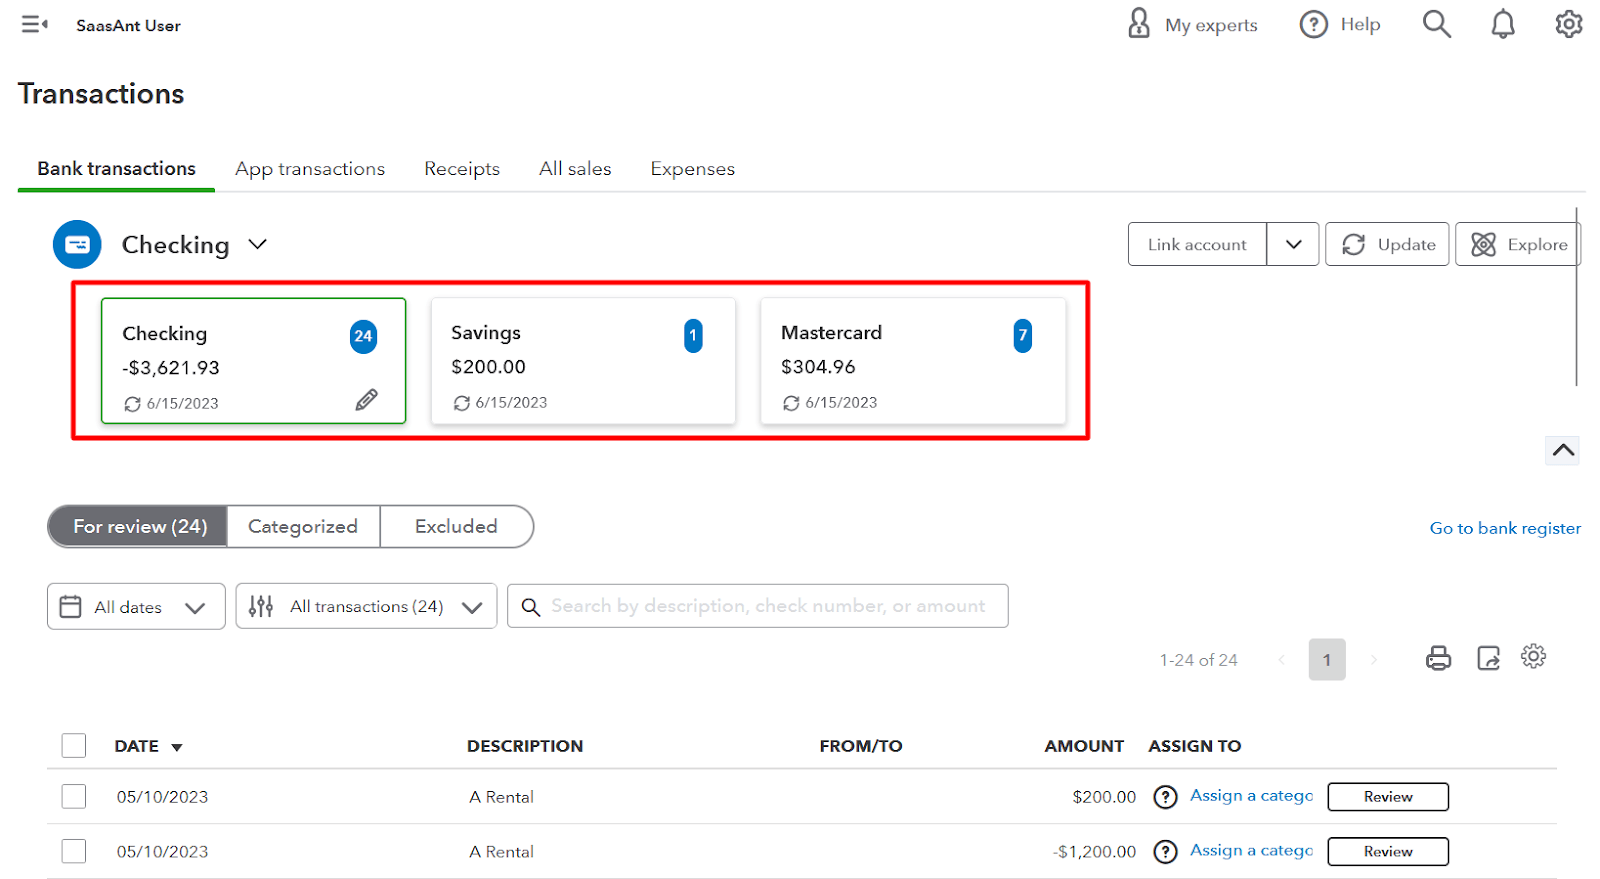
Step 2: Reviewing Downloaded Transactions
Within the transaction window, click on the box corresponding to the bank or credit card account you want to categorize transactions for. Each transaction has either a 'Confirm' or 'Review' label.
Step 3: Modifying Transaction Details
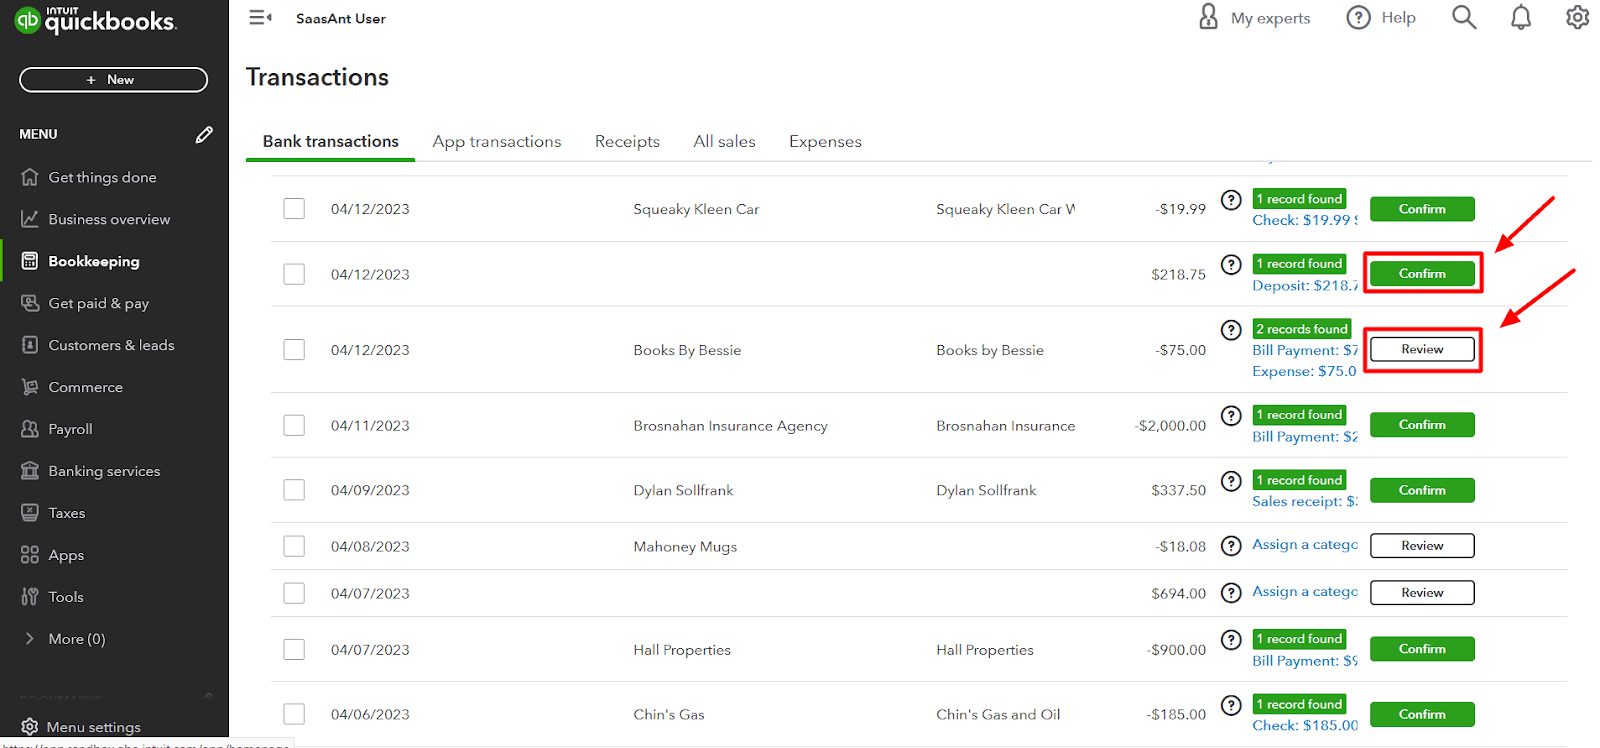
If a transaction is labeled as 'Confirm,' QuickBooks suggests a category based on its analysis. You can proceed to the next step without making any changes if the suggested category is suitable.
If QuickBooks can't determine a category for a transaction, it labels the transaction as 'Review.' You will need to assign a category to these transactions manually.
Step 4: Categorizing the Transaction
Click on a transaction to view details and make adjustments or additions. QuickBooks may suggest a category for the transaction. If you agree with the suggestion, you can leave it as is. Select a different category that represents the purpose of the transaction.
Step 5: Income or Expense Categorization
Categorize the transaction as either ‘Income’ if it represents a sale or ‘Expense’ if it's a purchase. For long-term assets like vehicles or computers, consider categorizing them as ‘Fixed Assets’ instead of expenses.
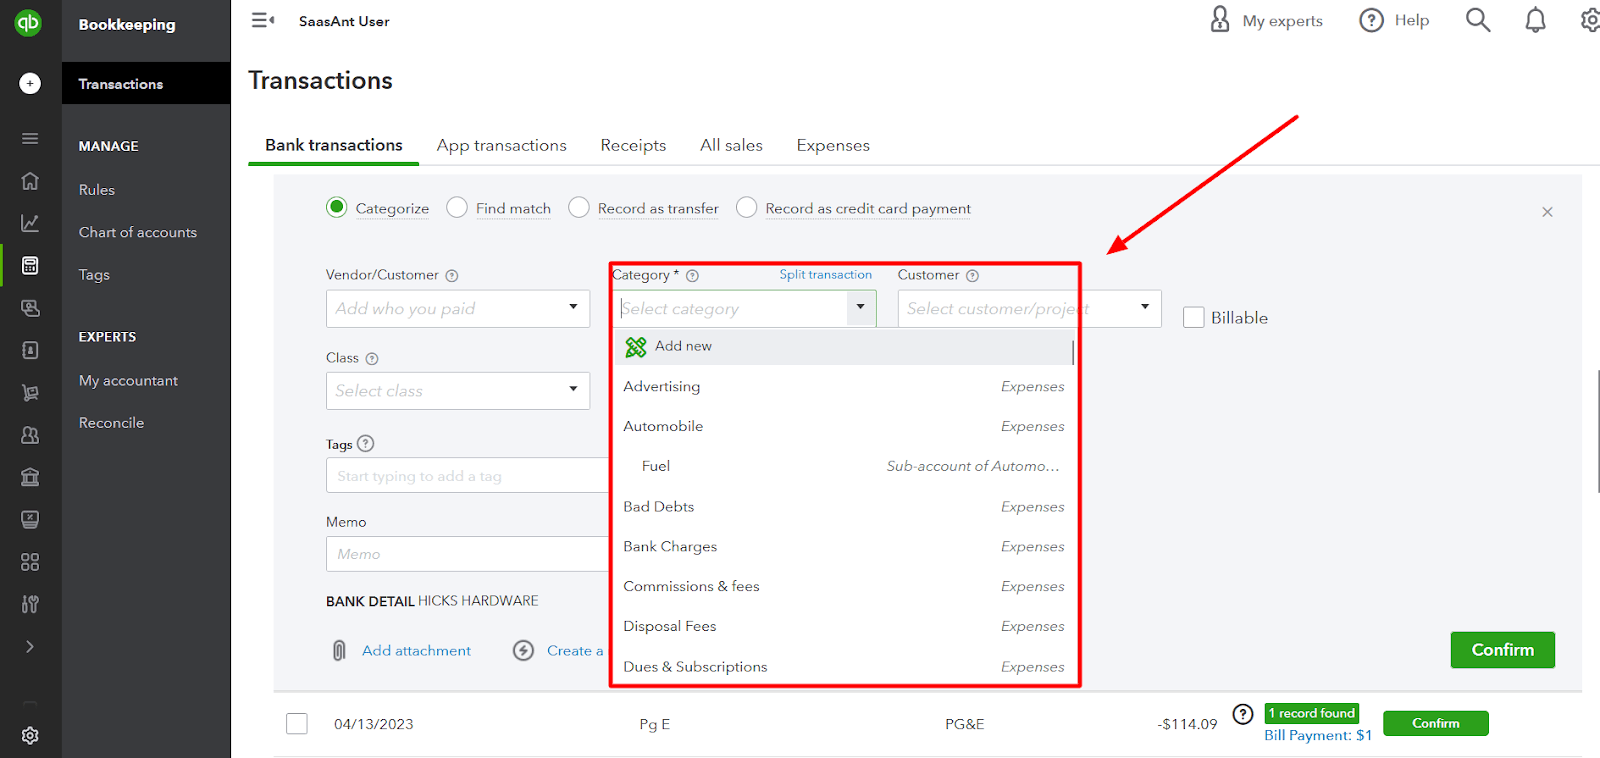
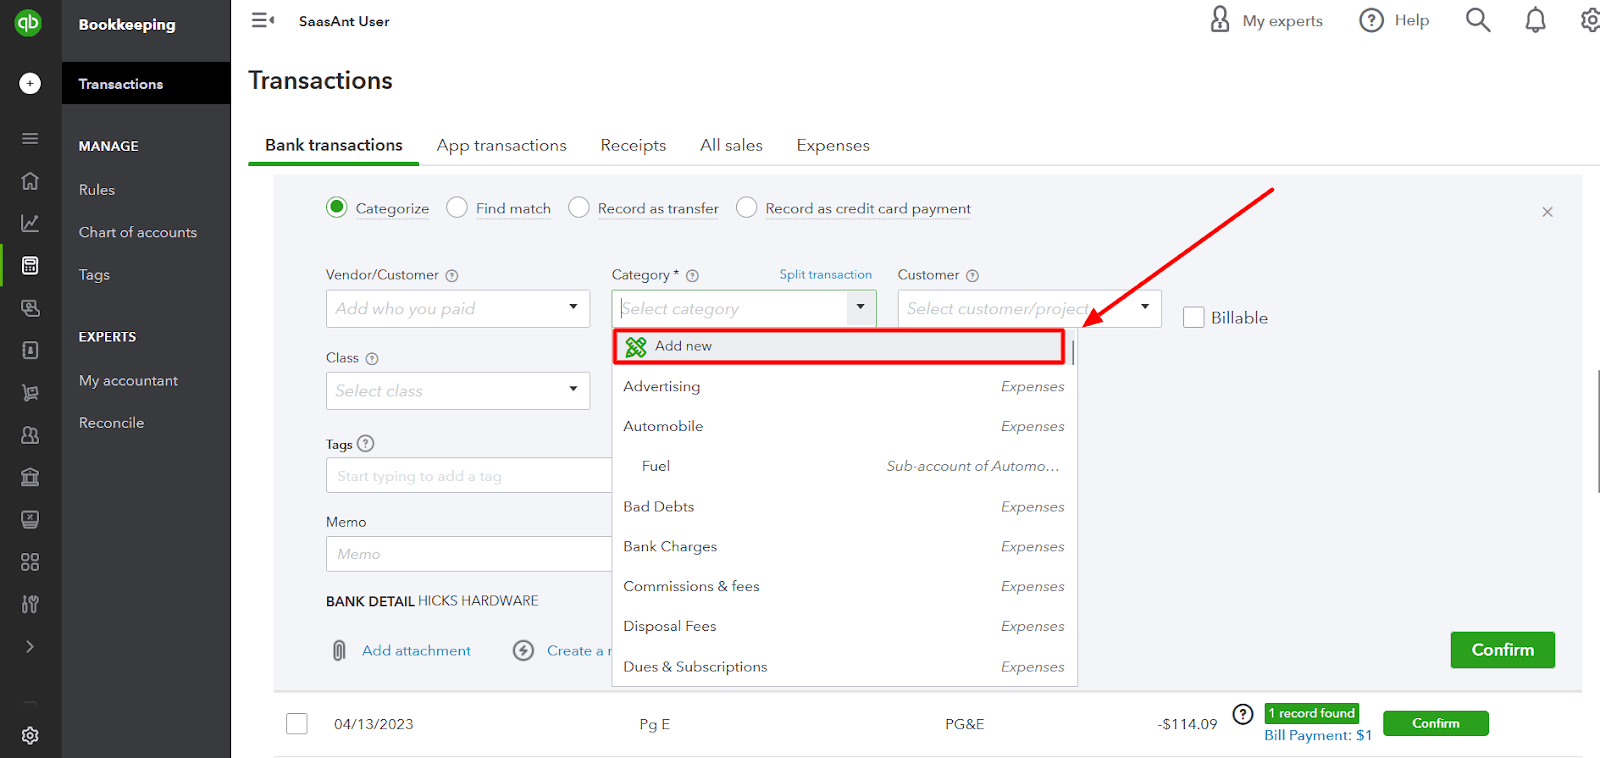
Step 6: Adding a New Category
If you can't find a suitable category, you can create a new one by clicking the '+Add new' button.
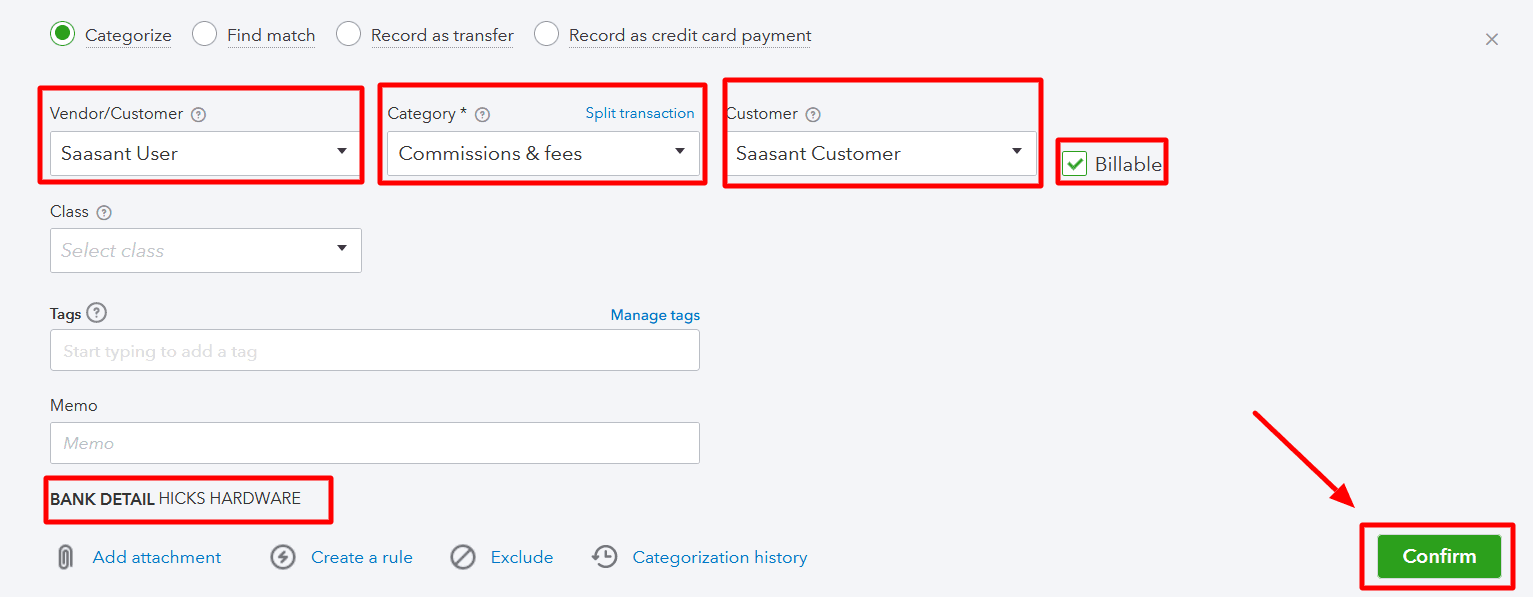
Step 7: Splitting Transactions
If you want to allocate a transaction to multiple categories, you can split the transaction amounts by clicking the 'Split transaction' option adjacent to the category. Select the relevant categories and input the corresponding amounts.
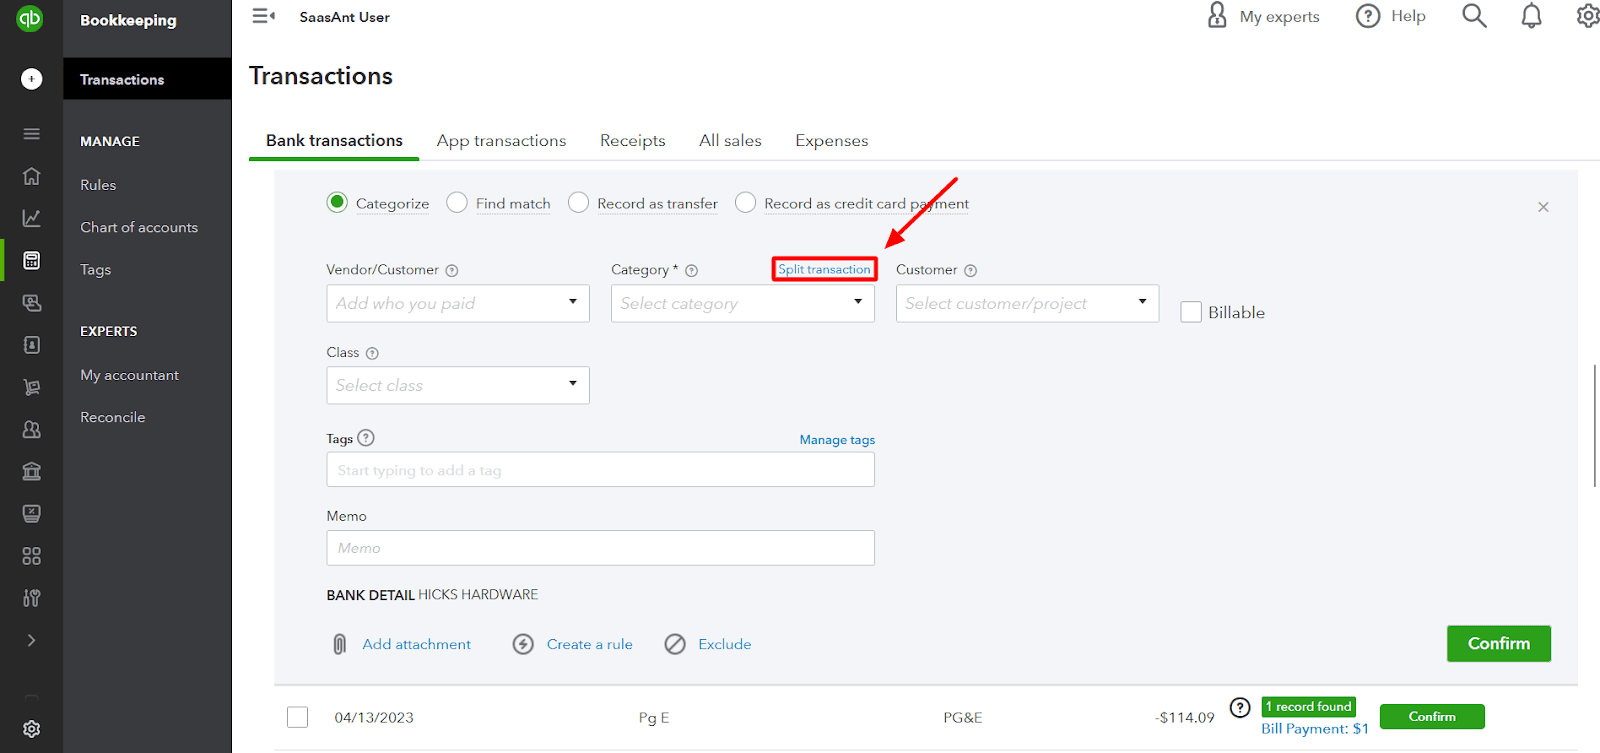
Note: Ensure that the sum of the split amounts matches the transaction amount.
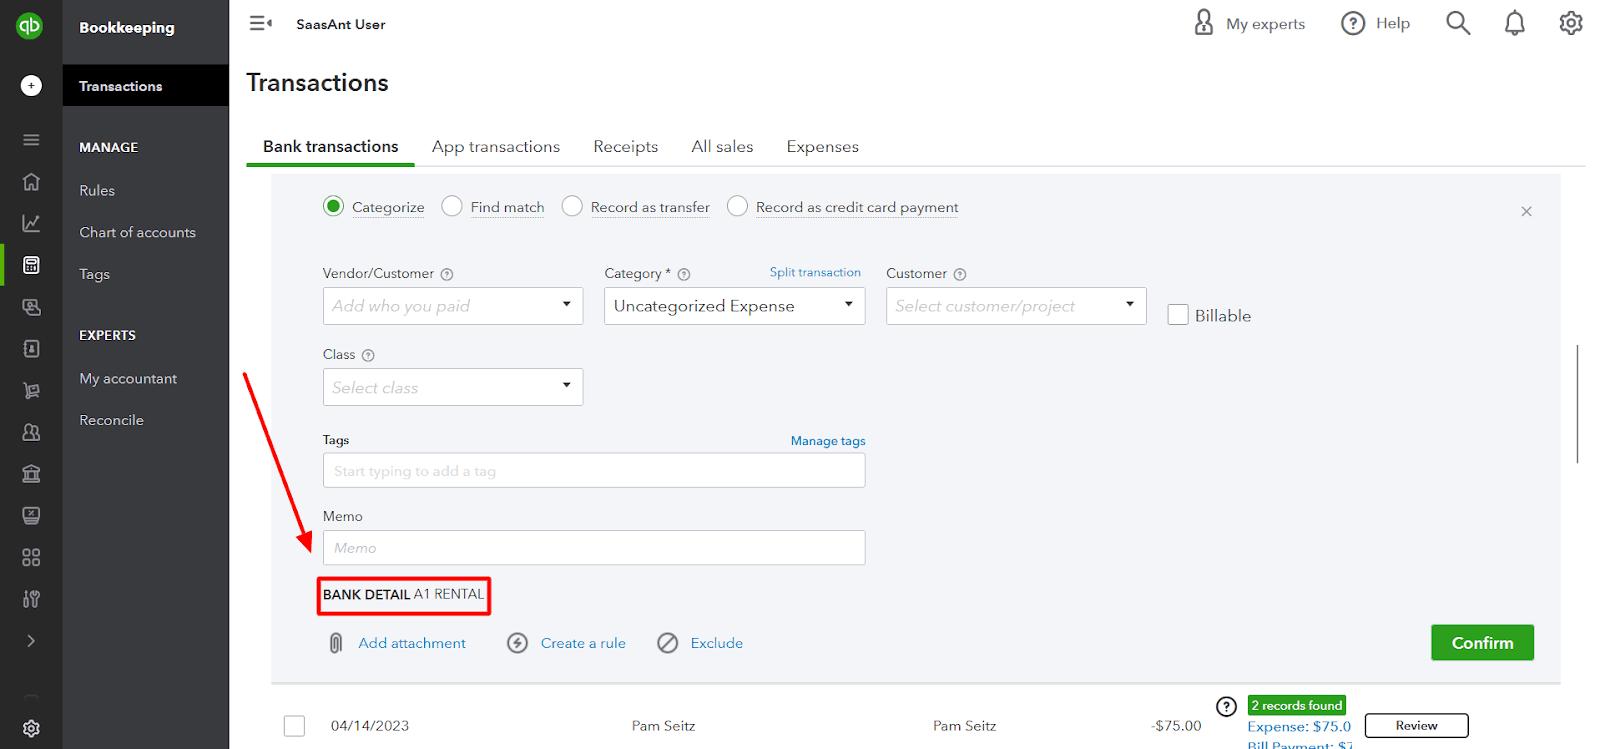
Step 8: Entering Specific Details
Assigning a 'vendor or customer' to the transaction is optional but can help generate reports and track payments.
If applicable, associate the transaction with a ‘specific project or customer’ to monitor profitability.
Check the' Billable' box if the expense should be billed to a customer and included on a future invoice.
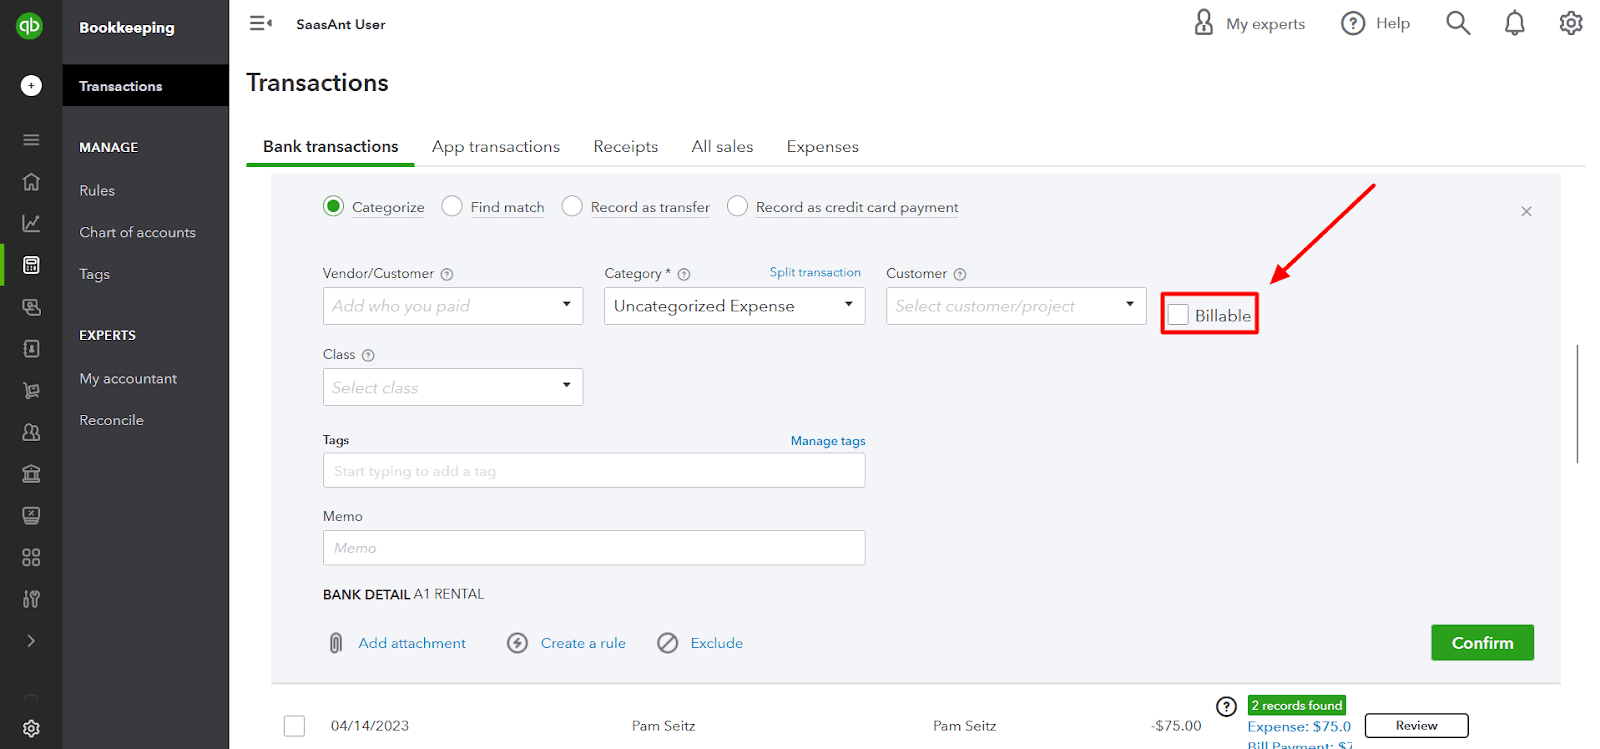
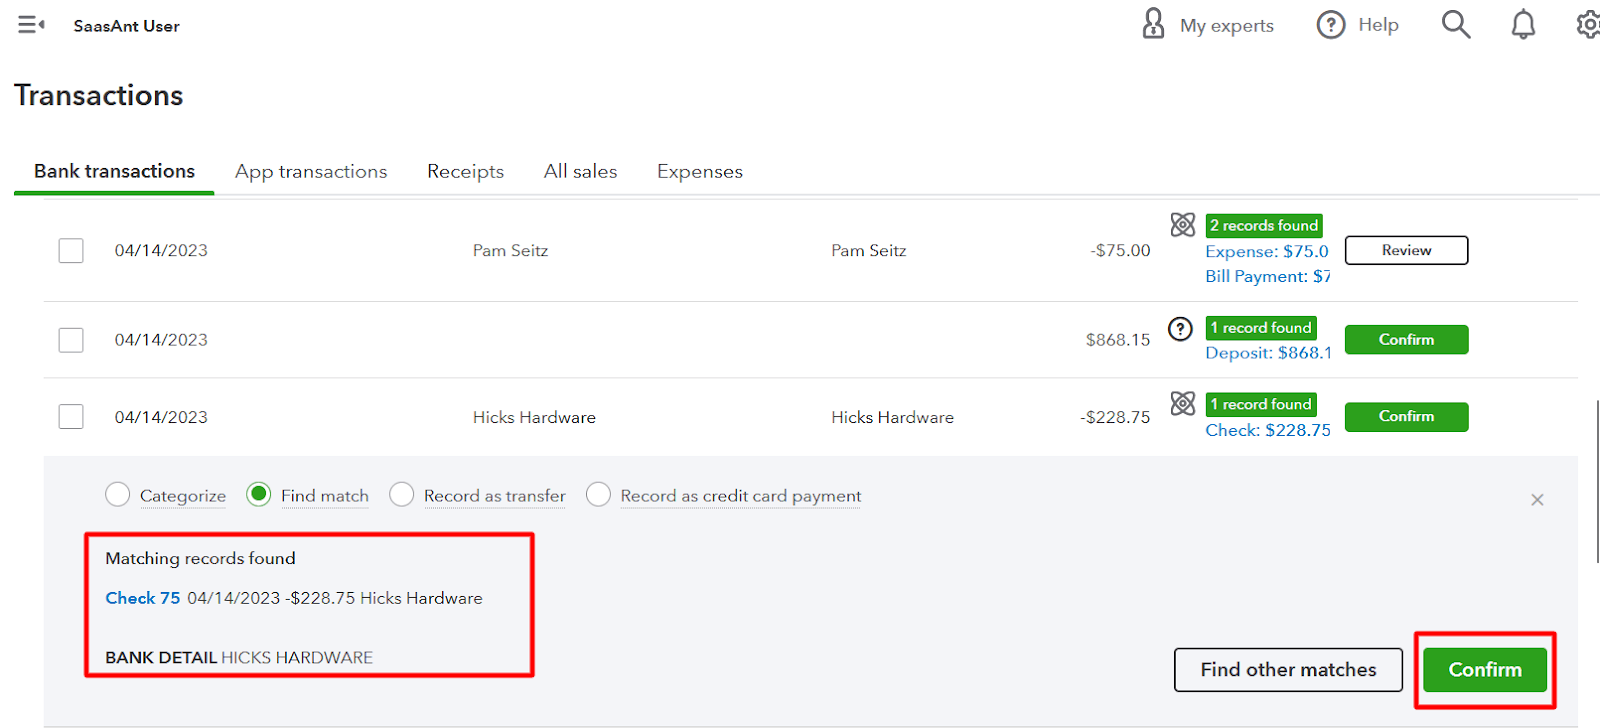
If you need clarification on the transaction's recipient, check the 'Bank Detail' section at the bottom. Your bank sends this information and often contains the payee's name.
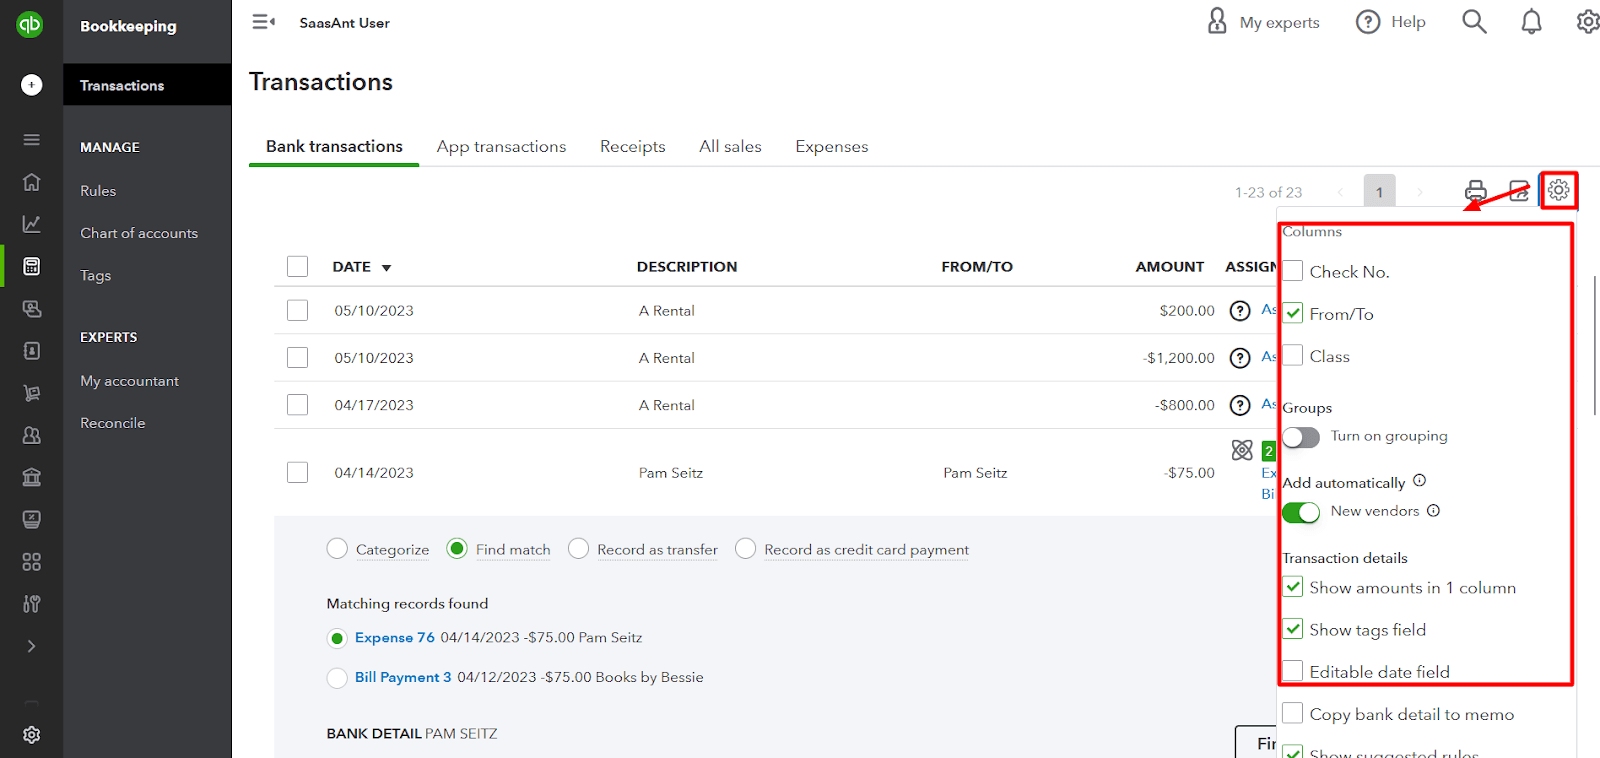
Step 9: Customizing Display
To adjust the level of information shown, click the ‘Gear’ icon and toggle on/off the fields as desired.
Step 10: Confirming the Transaction
Once you have reviewed and made any necessary changes, select the ‘Confirm’ button to finalize the categorization.
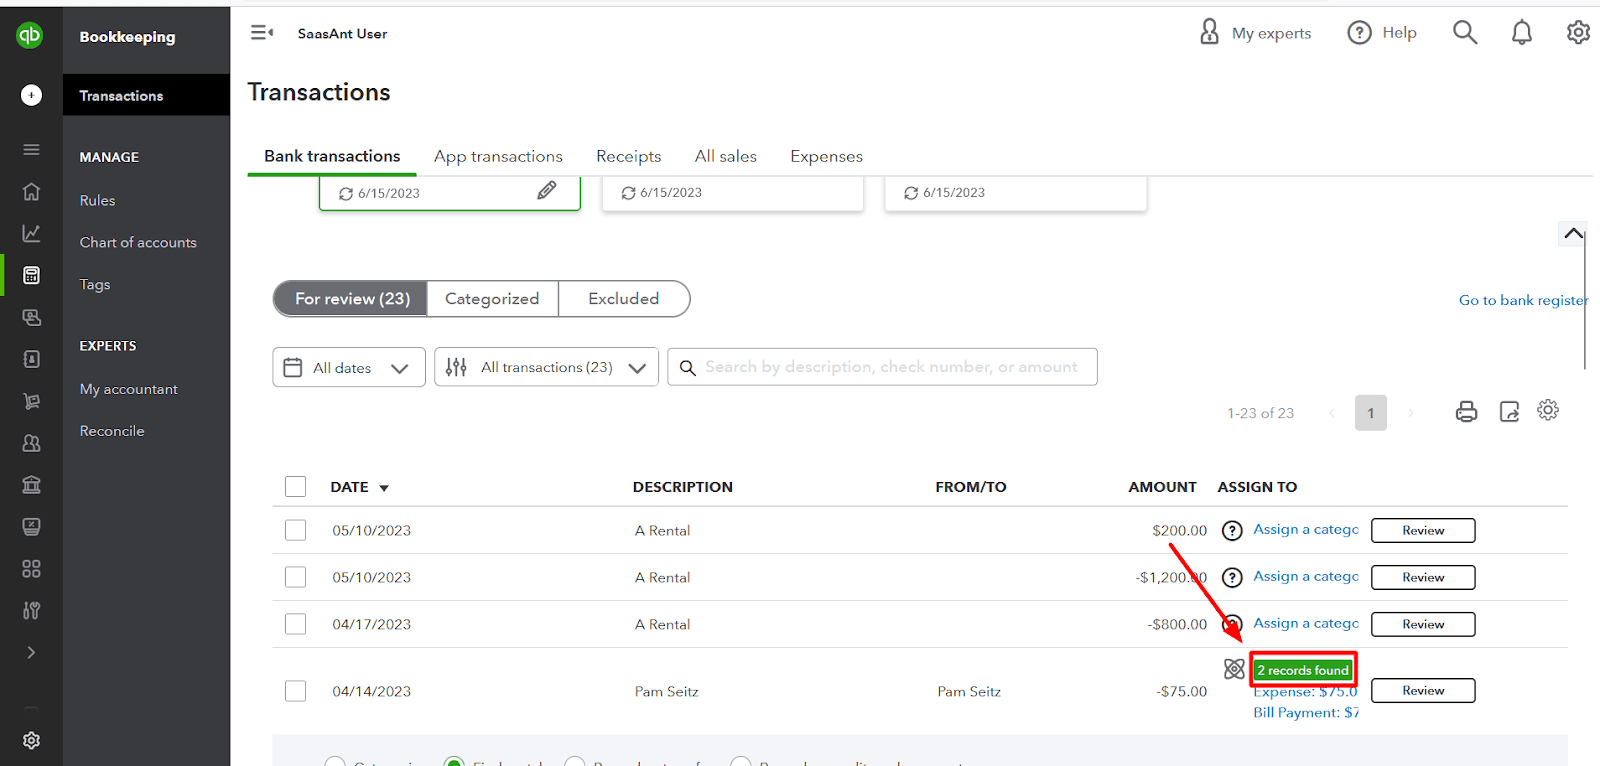
Step 11: Handling Duplicates or Matches
When QuickBooks matches previously recorded transactions or unapplied payments to outstanding invoices/bills, it displays a 'Records Found' option.
How to Categorize Transactions in QuickBooks Desktop:Step-By-Step Guide
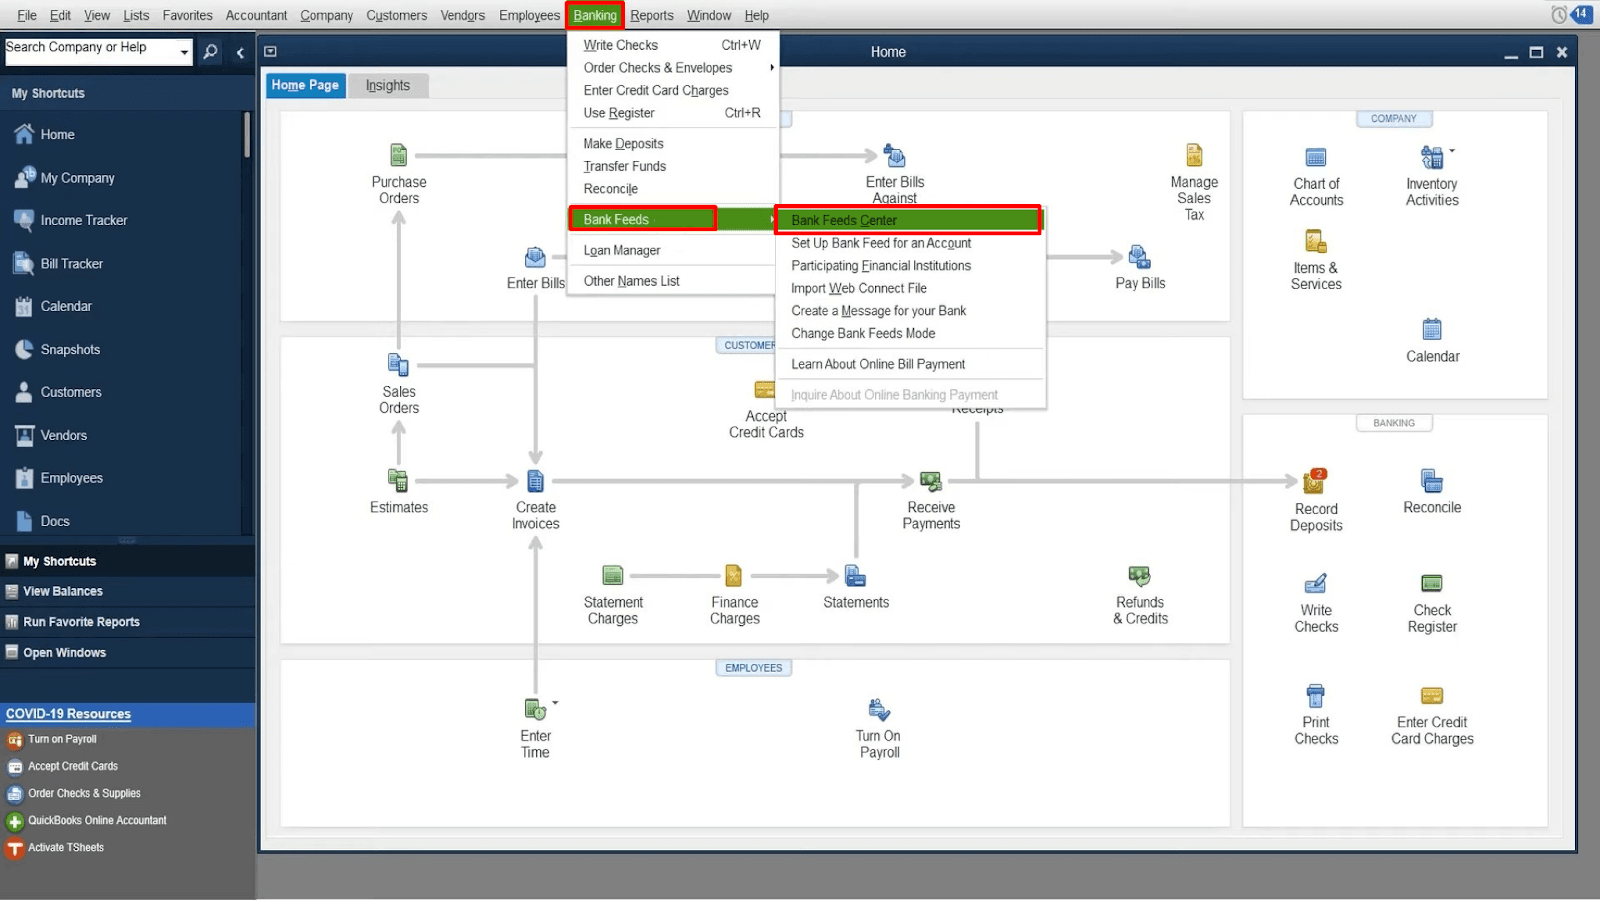
Step 1: Accessing the Bank Feeds Center
Navigate to the ‘Banking’ menu on the home screen.
Select ‘Bank Feeds’ from the dropdown menu and then choose ‘Bank Feeds Center.’
Step 2: Reviewing Downloaded Transactions
Each line represents a separate financial transaction from your bank or credit card.
Step 3: Understanding Transaction Status
Transactions are categorized as follows:
Recognized
Partially-recognized
Unrecognized
Step 4: Reviewing Recognized Transactions
QuickBooks may apply rules or find matches for recognized transactions. Review each transaction individually.
Step 5: Adding Recognized Transactions
If a transaction follows a rule, click 'Add' to enter it into QuickBooks. You can also include additional information by clicking the dropdown arrow and selecting 'Add more details.'
You can include various additional information, such as payee or class. Once you’ve entered the details, click ‘Save and add to register.’
Step 6: Managing Rules
You can view the rules by clicking the ‘Rules’ option at the top left corner of the window. Once you click the rules option, you can see a new window called 'Rules list. Here, you'll find the rules that apply to the transaction. You can edit the existing rules by clicking 'Edit.'
When you click the 'Edit' option, QuickBooks redirects you to a new 'Edit rule details' window. Here, you can modify various criteria like the description, account, and amount to categorize your transactions.
To create new rules, click ‘+Add rule’ and define the criteria for categorizing transactions.
Step 7: Categorizing Auto-Matched Transactions
QuickBooks auto-matches transactions that have a match in your records, including open bills. If the match is appropriate, select ‘Confirm’ to match the transaction to what you have in QuickBooks. You can also review the details by clicking the ‘View details’ option.
If the match is incorrect, click the ‘Down arrow’ adjacent to ‘Confirm’ and click ‘Not a match.’
Step 8: Categorizing Partially-Recognized Transactions
Select the 'Partially-recognized' list to view the transactions in which QuickBooks has found multiple matches. Select which transaction matches the downloaded transaction under the 'Transactions found in your books.' Once done, click 'Confirm match.'
Step 9: Categorizing Unrecognized Transactions
Select the 'Unrecognized' list to view other transactions that QuickBooks requires additional information. You can fill in the basic information, such as payee or account, directly in the list.
If you identify a transaction that should match, use the 'Action' dropdown and select 'Match to Existing Transactions.' Choose the relevant transaction from the list. QuickBooks lists all the possible open or unmatched transactions from the last 30 days. To see more transactions, select 'Show all' or a 'specific type' to filter the list. Then select 'Save and add to register' or 'cancel' to discard your changes.
Select the appropriate 'payee name' or 'account' to add more details, click 'Add' and then 'Add more details' if you want to associate the transaction with a specific customer or job or add a class. This action moves the transaction to the 'Added to register list.'
Provide missing information for unrecognized transactions, such as payee, account, or class. Select ‘Add’ to move the transaction to the ‘Added to Register’ list.
Step 10: Reviewing Added Transactions
Verify transactions that affect your QuickBooks balance and reports in the 'Added to Register' list. Double-click on a line to see how the transaction appears in QuickBooks.
How to import transactions into QuickBooks Online
Find SaasAnt Transactions in the QuickBooks App Store and connect it to your account with a 30-day free trial.
Step 1: Connect SaasAnt Transactions to your QuickBooks account. This certified app ensures your data is secure.
Step 2: Go to the SaasAnt Transactions Dashboard, click “New Import,” and select the entity to import. Download the sample file template to format your data.
Step 3: Upload files in formats such as XLS, XLSX, CSV, or IIF. You can also convert PDF files to Excel or enter a Google Sheet link. Additionally, you can include the account category directly in this file, saving you time on categorization later.
Step 4: Map the fields in your uploaded file to those in QuickBooks.
Step 5: Review the mapped data for accuracy. SaasAnt Transactions helps identify errors. Once confirmed, click ‘Upload’ to import your file into QuickBooks Online.
Step 6: After a successful import, the transactions will display with a reference number. Click the number to verify the upload, and you can roll back the imported data if needed.
FAQs
What Does Categorizing Transactions Mean in QuickBooks Online?
Categorizing transactions refers to assigning specific categories (such as income, expense, or fixed asset) to each financial transaction in QuickBooks Online for accurate tracking and reporting.
How Do I Access the Transaction Window in QuickBooks Online?
To access the transaction window in QuickBooks Online, select ‘Banking’ from the menu on the left-hand panel and choose ‘Transactions.’ from the options available.
What Is the Difference between ‘Confirm’ and ‘Review’ Labeled Transactions?
'Confirm' labeled transactions in QuickBooks Online are suggestions the software provides for categorization. 'Review' labeled transactions require manual assignment of appropriate categories.
Can I Create New Categories for Transactions in QuickBooks Online?
You can create new categories in QuickBooks Online by clicking the '+Add new' option when categorizing a transaction.
Can I Split a Transaction into Multiple Categories in QuickBooks Online?
Yes, QuickBooks Online allows you to split a transaction into multiple categories. You can assign different amounts to each category, ensuring the sum of the split amounts matches the total transaction amount.
How Do I Handle Duplicate Transactions or Matches in QuickBooks Online?
QuickBooks Online detects duplicate transactions or matches. You can confirm matches, categorize them as new transactions, or find other matches for incorrect ones.
How Do I Access the Bank Feeds Center in QuickBooks Desktop?
To access the Bank Feeds Center in QuickBooks Desktop:
Navigate to the ‘Banking’ menu
Select ‘Bank Feeds’
And then select ‘Bank Feeds Center’ from the dropdown menu
What Are the Different Transaction Statuses in QuickBooks Desktop?
QuickBooks Desktop categorizes transactions as recognized, partially recognized, or unrecognized based on their matching and rule application.
Can I Create New Rules for Categorizing Transactions in QuickBooks Desktop?
Yes, QuickBooks Desktop allows you to create new rules for categorizing transactions. Select ‘+Add rule’ to define the criteria and categorization rules.
How Do I Match Transactions to Existing Records in QuickBooks Desktop?
If you identify a transaction that should match an existing record, use the ‘Action’ dropdown and select ‘Match to Existing Transactions.’ Choose the relevant transaction from the list.